How Does A Grease Trap Work
Imagine this: you're doing the dishes after a delicious meal, and the water in your kitchen sink is draining slower than molasses. Soon enough, it's barely draining at all. This is a common household plumbing problem, often stemming from a culprit lurking beneath the sink: a clogged grease trap.
Understanding the Enemy: What is a Grease Trap?
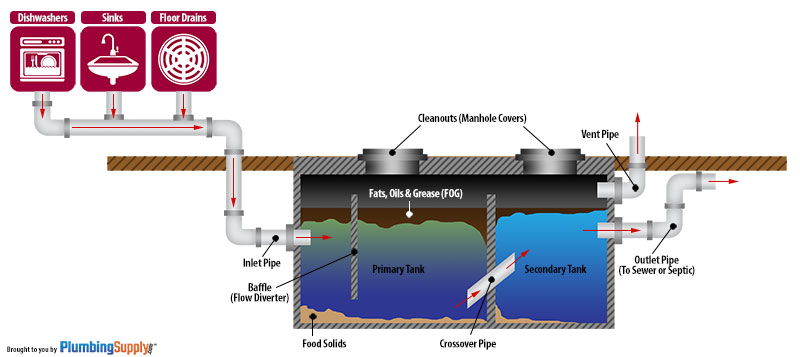
Many homeowners aren't even aware they have a grease trap, or what its purpose is. So, what *is* a grease trap and how does it contribute to keeping your plumbing flowing freely? A grease trap, also sometimes called a grease interceptor, is a plumbing device designed to prevent fats, oils, and grease (FOG) from entering the main sewer system. These substances solidify as they cool, creating blockages that can lead to sewage backups, environmental damage, and costly repairs. In essence, it's a small-scale sewage treatment plant right under your sink!
Where Are Grease Traps Typically Found?
While mandatory for commercial kitchens like restaurants, grease traps are less common in residential settings. However, homes with septic systems or those particularly prone to grease disposal in the sink might have one installed. If your home is older, it's also worth investigating whether a grease trap exists as they were more frequently used in the past. They are typically installed under the kitchen sink or, in some cases, outside near the drain line.
How Does a Grease Trap Work? The Step-by-Step Process
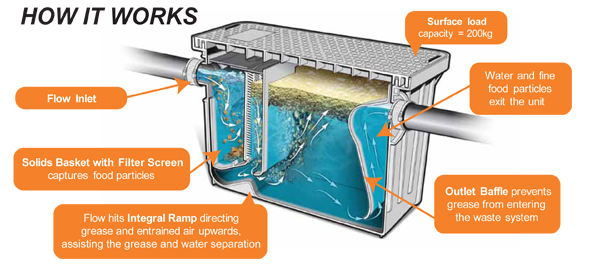
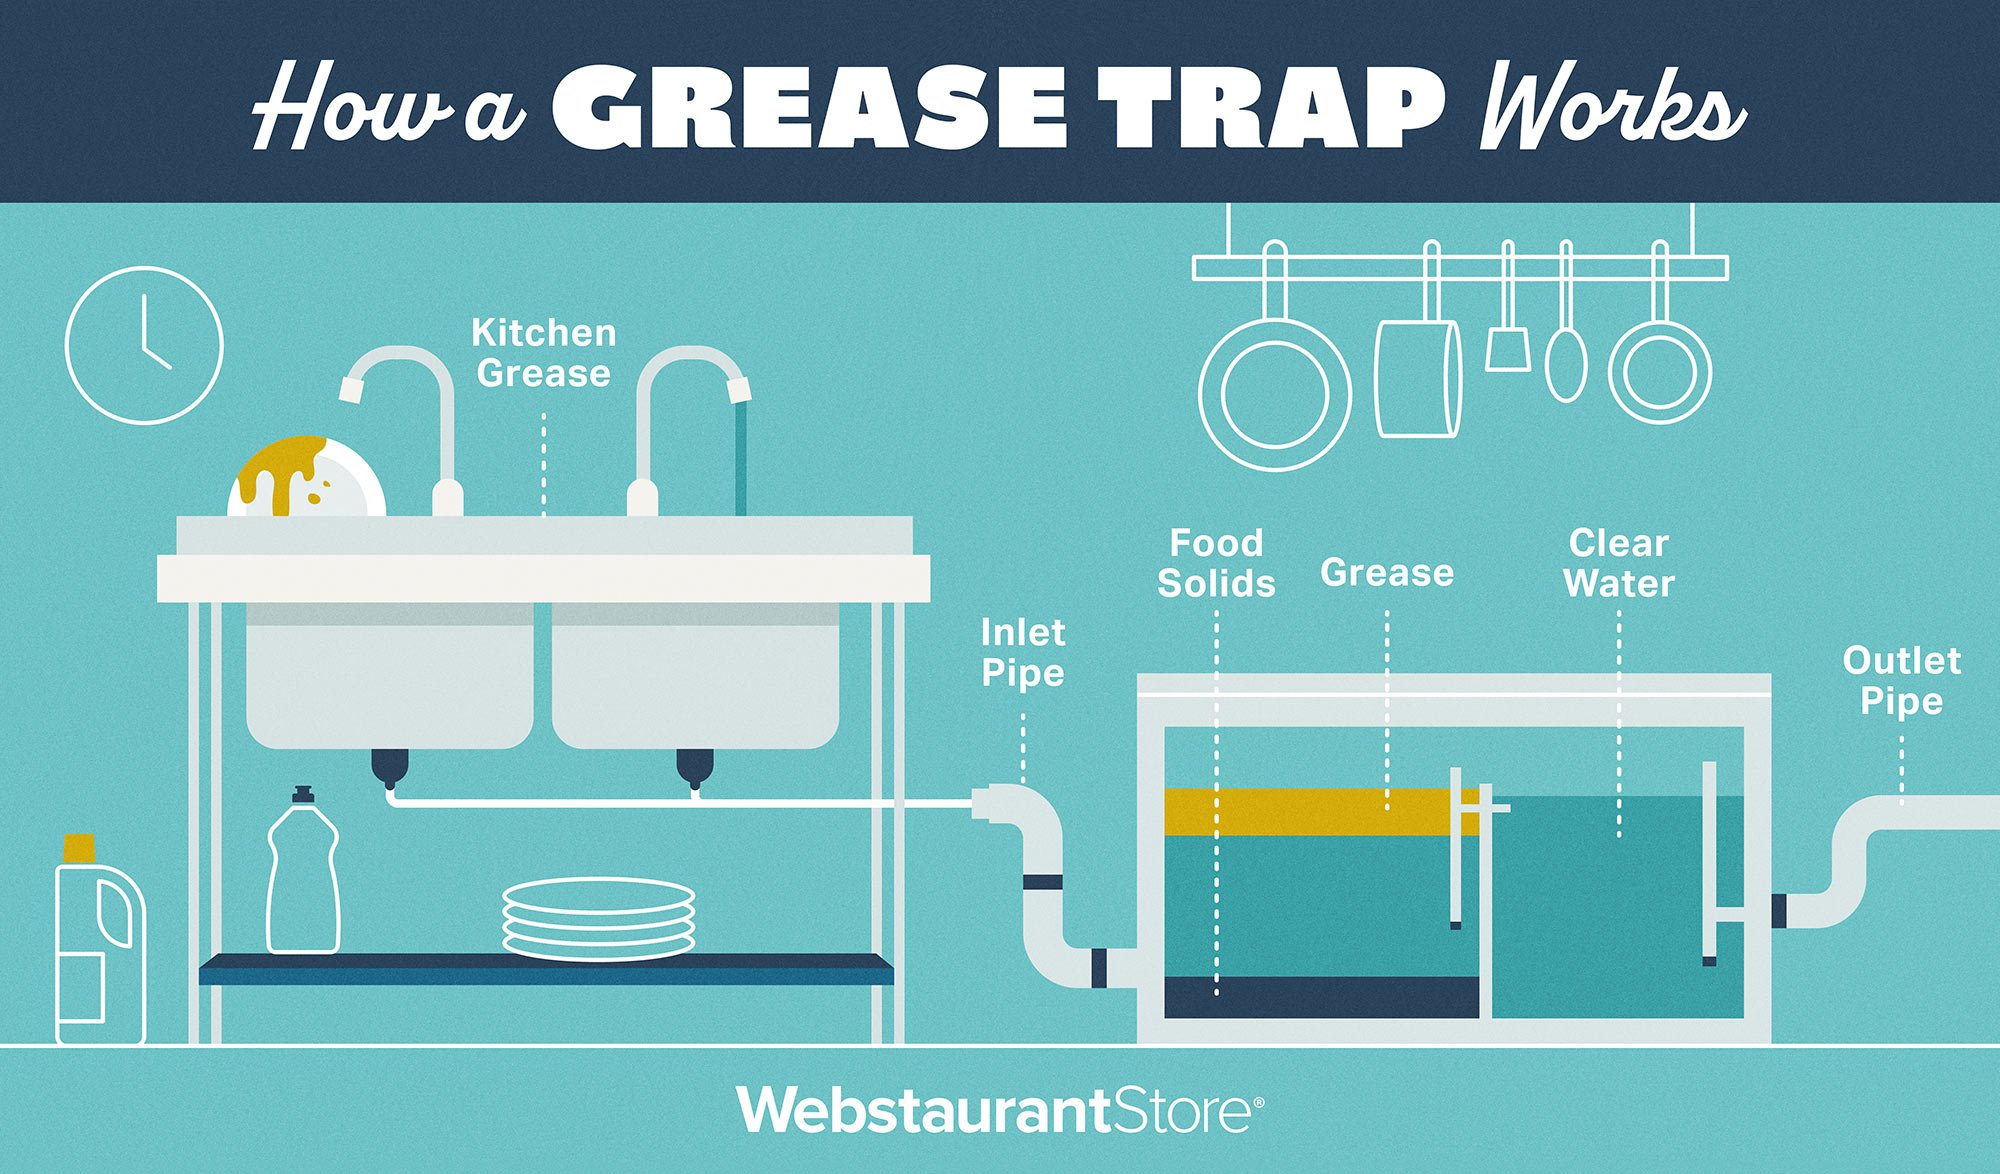
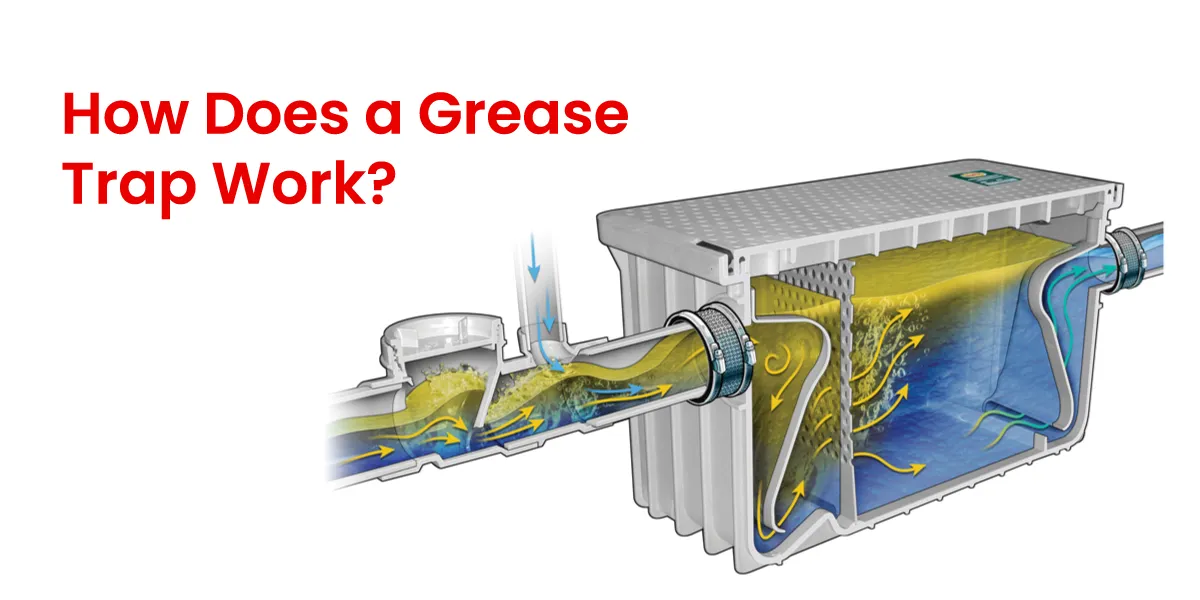
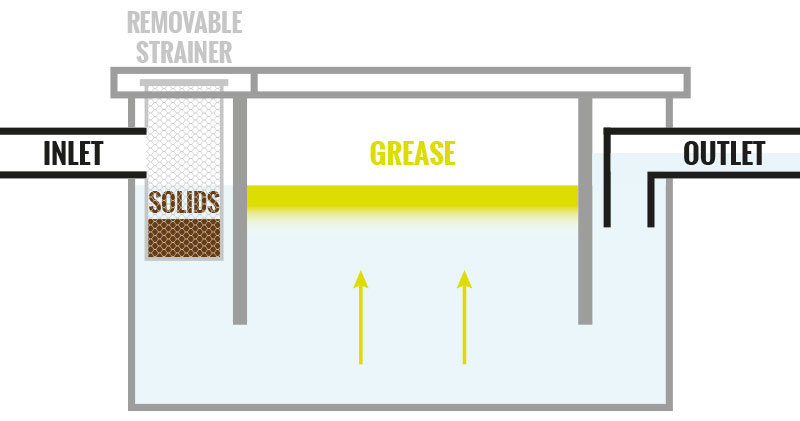
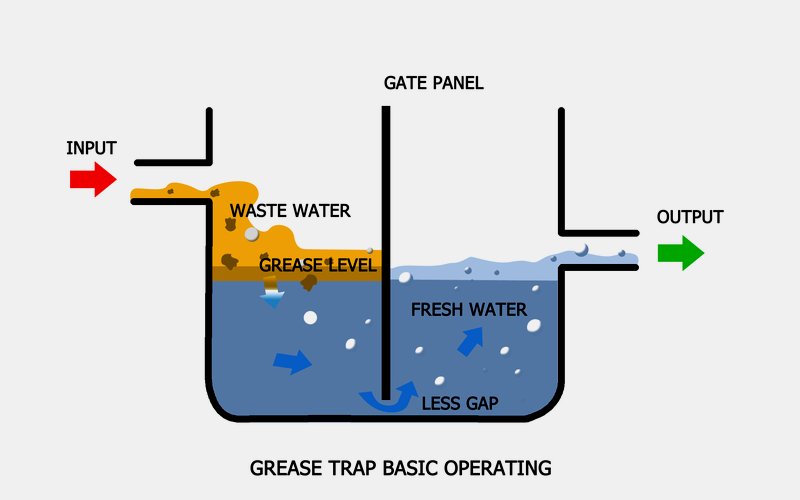
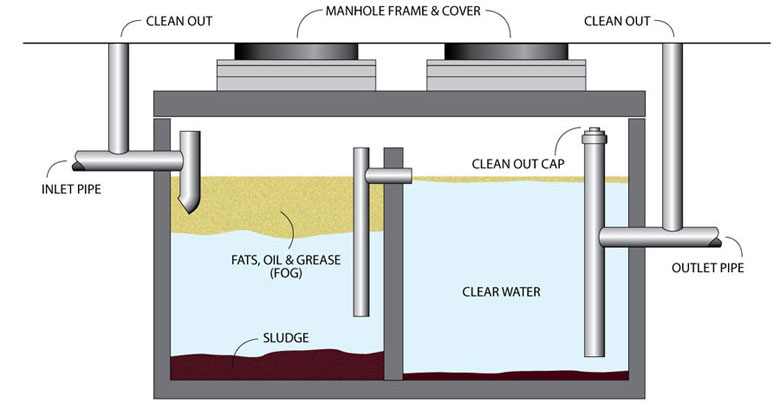
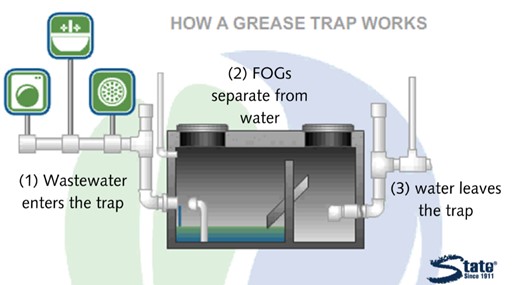
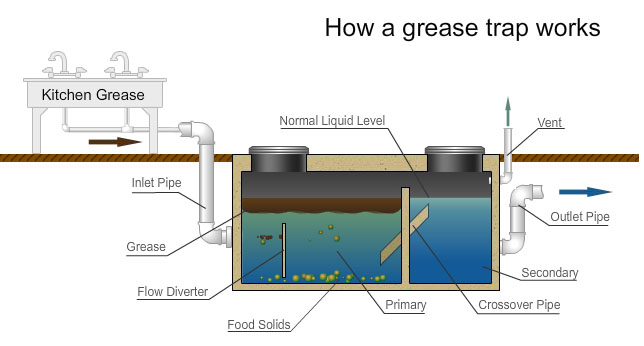
The core principle behind a grease trap's function is simple: separation. It leverages the fact that FOG is lighter than water. Here's a breakdown of the process:
- Wastewater Entry: Wastewater from your sink, containing food scraps, grease, and other debris, enters the grease trap.
- Slowing Down: Inside the trap, the flow of wastewater slows significantly. This allows the water to sit and separate.
- Grease Separation: Due to its lower density, the FOG rises to the surface of the water inside the trap, forming a layer of grease on top. This layer hardens over time.
- Water Flow: The (relatively) clean water, now mostly free of grease, exits the trap through an outlet pipe located near the bottom.
- Grease Retention: The separated grease and solid food particles are retained within the trap. This prevents them from flowing into the drainage system.
Think of it like a miniature oil rig, but instead of extracting oil, it's *trapping* it!
Troubleshooting a Sluggish Drain: Is the Grease Trap the Culprit?
Before diving into the grease trap, rule out simpler issues. Is your sink strainer clogged? Try cleaning that first. Have you recently dumped a large amount of grease down the drain, even accidentally? That might be the primary culprit.
Step-by-Step Grease Trap Troubleshooting Guide
If you suspect the grease trap is the source of your drain issues, follow these steps. Safety first! Wear gloves to protect your hands from bacteria and unpleasant odors. Have some old rags or towels handy to clean up any spills.
- Locate the Grease Trap: Look under your kitchen sink. It's usually a rectangular or cylindrical container connected to the drain pipes. If you can't find it there, check outside near the main drain line.
- Inspect for Obvious Damage: Check the trap for any cracks, leaks, or obvious signs of damage. If you find any, do not attempt to repair it yourself. Contact a professional plumber immediately.
- Prepare for Opening: Place a bucket or container underneath the grease trap to catch any spills when you open it.
- Open the Grease Trap: Grease traps usually have a lid secured with screws or clamps. Carefully remove the lid. Be prepared for an unpleasant odor.
- Assess the Grease Level: Observe the amount of grease accumulated inside the trap. If it's nearly full, that's likely your problem. A properly functioning grease trap should have a significant layer of grease on top, but not overflowing.
- Manual Cleaning (DIY): This is where the elbow grease comes in!
- Skim the Grease: Use a scoop, spoon, or small container to carefully skim off the layer of hardened grease from the top of the water. Dispose of the grease properly – never pour it down the drain or toilet. Consider composting it (if allowed by your local regulations) or disposing of it in a sealed container in your trash.
- Remove Solid Debris: Remove any solid food particles or debris that may have settled at the bottom of the trap.
- Clean the Trap Interior: Use a brush and warm, soapy water to clean the inside walls of the trap. Avoid using harsh chemicals, as they can damage the trap and the environment.
- Inspect Inlet and Outlet Pipes: Check the inlet and outlet pipes for any clogs or obstructions. You can use a small brush or plumber's snake to clear any blockages. Be gentle to avoid damaging the pipes.
- Reassemble the Trap: Carefully replace the lid and secure it tightly. Ensure the seal is properly aligned to prevent leaks.
- Flush the Drain: Run hot water down the drain for several minutes to flush out any remaining debris and ensure the trap is functioning correctly.
- Monitor Drain Performance: Observe how quickly the water drains from your sink. If the drain is still slow, repeat the cleaning process or consider calling a professional.
Preventative Maintenance: Keeping Your Grease Trap Happy
The best way to avoid grease trap problems is to prevent them in the first place. Here are some preventative measures you can take:
- Avoid Pouring Grease Down the Drain: This is the most important step. Instead, pour cooled grease into a container (like an old jar or can) and dispose of it properly in the trash.
- Scrape Plates Thoroughly: Before washing dishes, scrape off as much food waste as possible into the trash or compost.
- Use Sink Strainers: Install strainers in your sink drains to catch food scraps and other debris. Clean the strainers regularly.
- Avoid Disposing of Large Quantities of Food Down the Drain: Even with a garbage disposal, avoid putting large amounts of food down the drain. This can overwhelm the system and contribute to clogs.
- Flush with Hot Water Periodically: Regularly flushing your drain with hot water can help to melt away any small accumulations of grease.
- Regular Cleaning: Clean your grease trap on a regular schedule, depending on the amount of grease you typically generate. For most households, cleaning the trap every 3-6 months should be sufficient.
When to Call a Professional: Knowing Your Limits
While cleaning a grease trap can be a DIY project, there are situations where you should absolutely call a professional plumber:
- Extensive Damage: If you find cracks, leaks, or significant damage to the grease trap or its surrounding pipes, do not attempt to repair it yourself. This could lead to further damage and potential water leaks.
- Persistent Clogs: If you've cleaned the grease trap and the drain is still slow or clogged, there may be a more serious blockage further down the drain line. A plumber has the tools and expertise to clear these stubborn clogs.
- Septic System Issues: If your home has a septic system and you suspect the grease trap is contributing to septic system problems, consult with a septic system specialist.
- Unfamiliarity: If you're uncomfortable working with plumbing or unsure about any aspect of the cleaning process, it's always best to err on the side of caution and call a professional.
- Large or Complex Systems: If you have a particularly large or complex grease trap system, especially if it's located outside, professional cleaning and maintenance are recommended.
- Foul Odors Persist: If, after cleaning, extremely foul and lingering odors persist, it may indicate a problem beyond a simple grease buildup, such as a sewer line issue.
Trying to fix a complex plumbing issue yourself can sometimes make the problem worse and more expensive to repair in the long run. Know your limits and don't hesitate to call a professional when needed. Remember, proper maintenance and timely repairs can save you money and headaches in the long run.
Tools and Materials Checklist
Before you begin, gather these essential tools and materials:
- Gloves: Heavy-duty rubber gloves to protect your hands.
- Bucket or Container: To catch spills and waste.
- Scoop, Spoon, or Small Container: For skimming grease.
- Brush: For cleaning the trap interior.
- Warm, Soapy Water: For cleaning. Use a mild dish soap.
- Old Rags or Towels: For cleaning up spills.
- Screwdriver or Wrench: Depending on the type of lid on your grease trap.
- Plumber's Snake (optional): For clearing stubborn clogs in pipes.
- Trash Bags: For proper disposal of grease and debris.
- Safety Glasses (optional): To protect your eyes from splashes.
A Final Word of Caution
Remember, working with plumbing involves potential risks. Always exercise caution and take necessary safety precautions. If you're unsure about any step, don't hesitate to seek professional help. A little preventative maintenance and careful cleaning can go a long way in keeping your drains flowing smoothly and preventing costly plumbing problems down the road. Enjoy your unclogged sink!