How Does A Multi Zone Mini Split Work
A multi-zone mini-split system offers fantastic, individualized climate control for different rooms in your home. But, like any complex piece of equipment, they can sometimes encounter problems. One of the most common complaints we hear is: "One or more of my indoor units isn't blowing cold (or hot) air, while the others seem to be working fine!" This article will walk you through diagnosing this issue and tackling some simple fixes before calling in a professional.
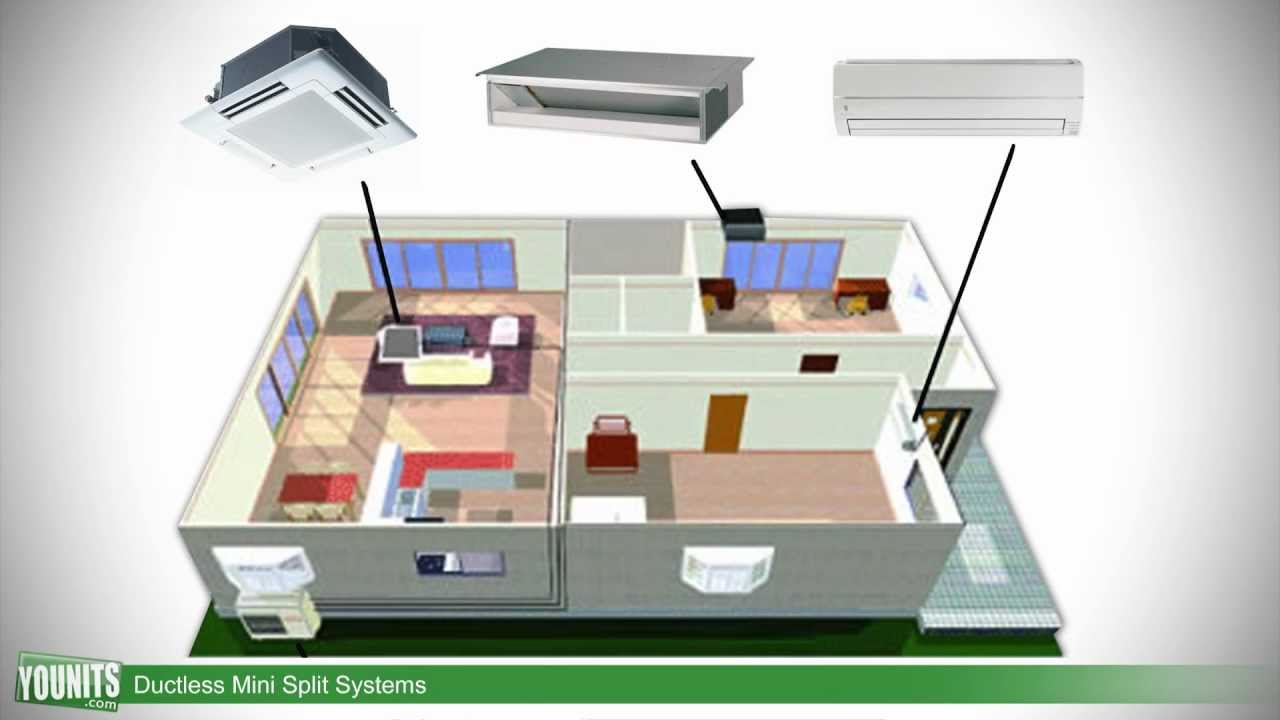
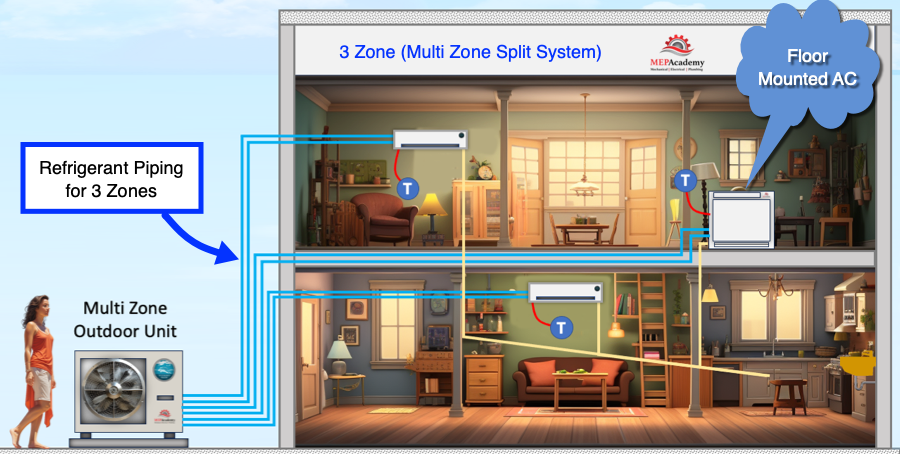
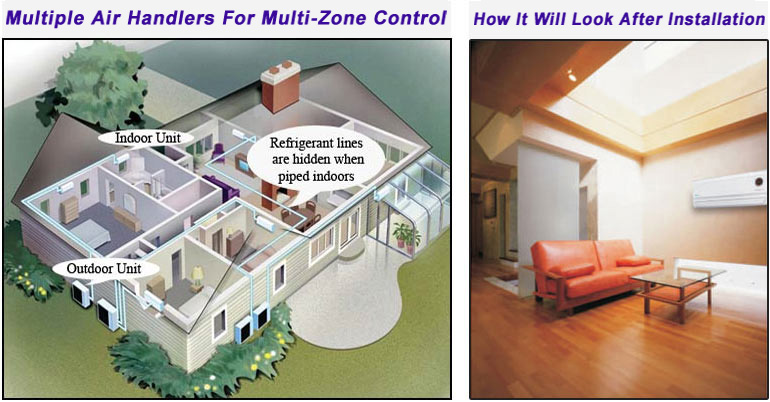
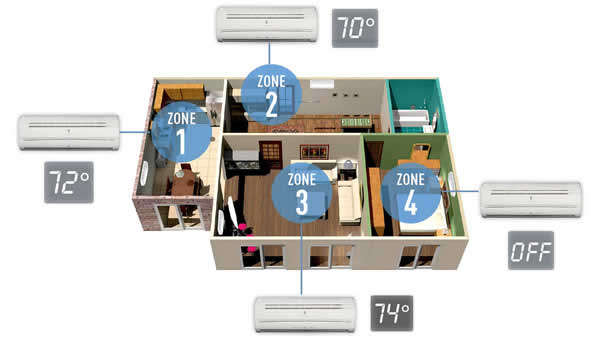
Understanding the Basics: How a Multi-Zone Mini-Split Works
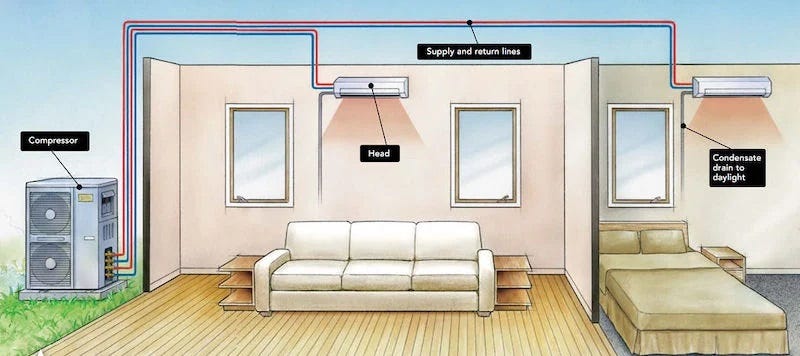
Before we dive into troubleshooting, let’s quickly recap how a multi-zone mini-split operates. A single outdoor unit (the condenser) is connected to multiple indoor units (the air handlers) via refrigerant lines. Each indoor unit independently controls the temperature of its respective zone. The outdoor unit contains the compressor, which circulates refrigerant, and a reversing valve that allows the system to switch between heating and cooling. The refrigerant absorbs heat from the indoor air (in cooling mode) or releases heat into the indoor air (in heating mode). Electronic expansion valves (EEVs) inside each indoor unit and sometimes within the outdoor unit precisely control the flow of refrigerant to each zone, allowing for independent temperature control. A central control board, usually located within the outdoor unit, manages the entire system.
Step-by-Step Troubleshooting: One Zone Not Cooling/Heating
Step 1: Check the Obvious - Power and Settings
This might seem basic, but it's the first thing to verify. Ensure all indoor units are powered on. Check the circuit breaker for the outdoor unit and any associated indoor unit circuits. Make sure they haven't tripped. Replace tripped breakers if necessary.
Next, verify the settings on each individual remote control. Is the unit set to "Cool" or "Heat" (depending on your desired outcome)? Is the temperature set correctly? A common mistake is accidentally setting the unit to "Fan Only" or setting the temperature higher than the room temperature (in cooling mode) or lower than the room temperature (in heating mode).
Examine the remote's batteries. Weak batteries can cause erratic behavior or prevent the remote from communicating with the indoor unit.
Step 2: Inspect the Air Filter
A clogged air filter is a very common culprit behind poor performance. A dirty filter restricts airflow, reducing the unit's ability to cool or heat effectively. It can also lead to the evaporator coil freezing up.
Locate the air filter on the problematic indoor unit. This is usually behind a removable panel. Remove the filter and inspect it. If it's visibly dirty, clean it (if it's a washable filter) or replace it with a new one. Washable filters can be cleaned with mild soap and water, ensuring they are completely dry before re-installing. Disposable filters should be replaced regularly, usually every 1-3 months, depending on usage and air quality.
Step 3: Look for Obstructions
Check for any obstructions blocking the airflow around the indoor and outdoor units. Make sure furniture, curtains, or other objects aren't blocking the air intake or outlet of the indoor unit. Ensure the outdoor unit isn't surrounded by overgrown plants or debris that could restrict airflow.
Inspect the outdoor unit's fan. Make sure it's free of debris and can spin freely. Remove any leaves, twigs, or other obstructions that may be hindering its operation.
Step 4: Examine the Indoor Unit's Evaporator Coil
If the air filter was dirty, the evaporator coil inside the indoor unit might be frozen. This happens when the airflow is restricted, and the refrigerant gets too cold, causing condensation to freeze on the coil.
Carefully inspect the evaporator coil. You might need a flashlight to see it properly. If you see ice or frost buildup, turn off the unit and set it to "Fan Only" mode. This will circulate air over the coil and help it thaw. It may take several hours for the coil to completely defrost. *Do not attempt to scrape or melt the ice with a heat gun or other device, as this could damage the coil*.
Once the coil has completely thawed, clean or replace the air filter (as described in Step 2) and try running the unit in cooling or heating mode again. Monitor it closely to ensure the coil doesn't freeze up again. If it does, there's likely a more serious underlying issue, such as a refrigerant leak or a malfunctioning compressor.
Step 5: Check the Condensate Drain Line
A clogged condensate drain line can cause water to back up into the indoor unit, potentially triggering a safety switch that shuts down the unit or prevents it from cooling/heating. This is more common in humid climates.
Locate the condensate drain line. This is usually a PVC pipe that runs from the indoor unit to the outside or to a drain. Check for any visible clogs or obstructions at the drain opening. You can try using a wet/dry vacuum to suck out any debris. *Be careful not to damage the drain line*.
You can also try pouring a cup of white vinegar down the drain line to help dissolve any algae or mold buildup. Allow it to sit for 30 minutes, then flush with water. If the drain line is severely clogged, you may need to use a plumber's snake to clear it.
Step 6: Listen for Unusual Noises
Pay attention to any unusual noises coming from the indoor or outdoor units. A hissing sound could indicate a refrigerant leak. A grinding or rattling sound could indicate a problem with the compressor or fan motor. A clicking sound could indicate a relay issue. Note the sounds, if any.
Make note of where the noises occur: only a specific indoor unit or emanating from the outdoor unit. These sounds often require immediate professional attention.
When to Call a Professional
If you've tried the troubleshooting steps above and the problem persists, it's time to call a qualified HVAC technician. Here are some situations that definitely require professional intervention:
- Refrigerant Leak: If you suspect a refrigerant leak (e.g., hissing sound, visible oily residue on the refrigerant lines, consistently frozen evaporator coil), do not attempt to fix it yourself. Refrigerant is a controlled substance, and handling it requires specialized equipment and training.
- Compressor Problems: If the compressor is making unusual noises or not running at all, it likely needs to be repaired or replaced. This is a complex repair that requires specialized tools and knowledge.
- Electrical Problems: If you suspect an electrical problem (e.g., tripped circuit breakers that won't reset, burning smell), do not attempt to diagnose or repair it yourself. Electrical work can be dangerous, and it's best left to a qualified electrician or HVAC technician.
- Control Board Malfunction: If the control board is malfunctioning, it can cause a variety of problems, including incorrect temperature settings, communication errors, and system shutdowns. Replacing or repairing the control board requires specialized knowledge and equipment.
- Expansion Valve Problems:If the expansion valve is not functioning correctly. It can restrict flow. This can also be a faulty temperature sensor.
- You're Unsure: If you're not comfortable working on your mini-split system or you're not sure what the problem is, it's always best to err on the side of caution and call a professional.
In particular, issues with the outdoor unit almost always require a professional. This is where the most complex components reside, and any tampering could void your warranty or cause further damage.
Preventative Maintenance Tips
Regular maintenance can help prevent problems and extend the life of your multi-zone mini-split system. Here are some tips:
- Clean or replace the air filters regularly (every 1-3 months).
- Keep the outdoor unit free of debris.
- Periodically inspect the condensate drain line and clear any clogs.
- Schedule annual maintenance with a qualified HVAC technician. This should include inspecting the refrigerant levels, cleaning the coils, and checking the electrical connections.
Finding a Qualified Technician
When choosing an HVAC technician, look for someone who is licensed, insured, and experienced with mini-split systems. Ask for references and read online reviews. It's also a good idea to get multiple quotes before making a decision. Don't necessarily go with the lowest price, as this could indicate substandard work. Consider reviews and expertise.
By following these steps, you can often diagnose and fix common problems with your multi-zone mini-split system yourself. However, remember that safety is always the top priority. If you're not comfortable working on your system, or if you suspect a more serious problem, don't hesitate to call a professional.