How Does A Plate Heat Exchanger Work
Is your radiant floor heating feeling lukewarm, or your domestic hot water taking forever to heat up? Many homes now use plate heat exchangers for efficient heating and cooling. When they malfunction, you'll notice a significant drop in performance. Before calling a professional, let's walk through some simple troubleshooting steps you can take yourself.
Understanding Plate Heat Exchangers
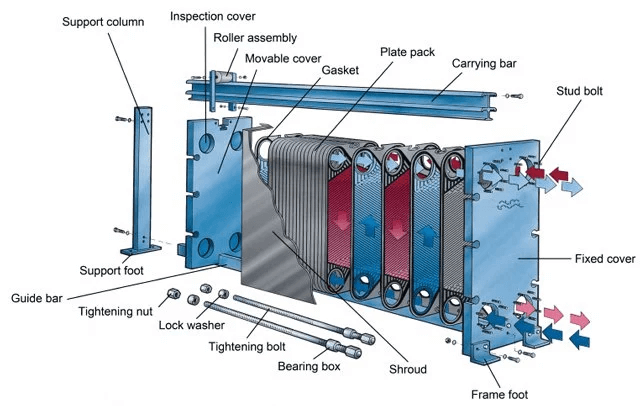
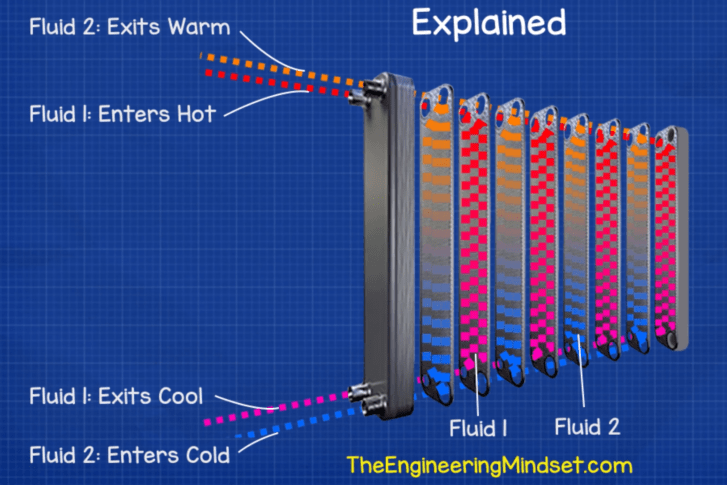
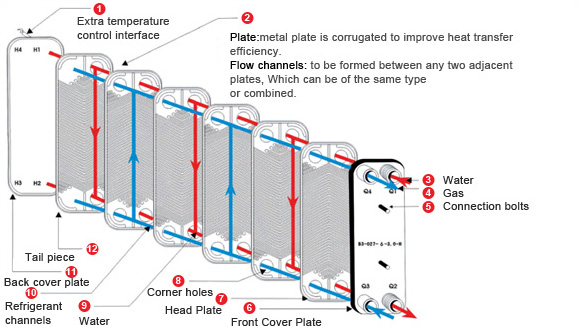
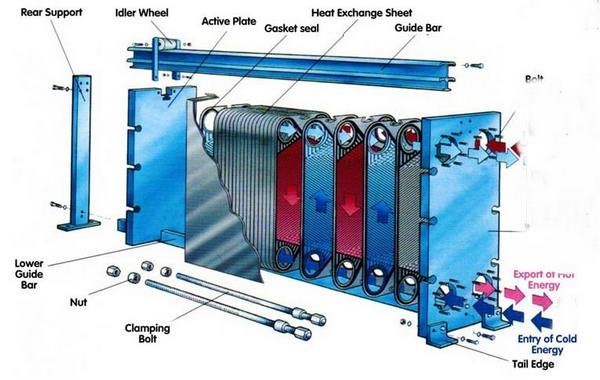
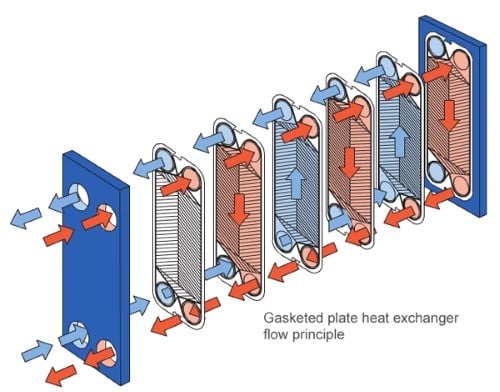
First, let's quickly review how a plate heat exchanger works. Imagine two fluids, say hot water from your boiler and cold water coming into your house. These fluids need to exchange heat but without mixing. A plate heat exchanger achieves this using a series of thin, corrugated metal plates stacked together.
Hot fluid flows through channels between some of the plates, while cold fluid flows through alternating channels. The metal plates act as conductors, allowing heat to transfer from the hot fluid to the cold fluid. The corrugated design maximizes the surface area for heat transfer, making the process highly efficient.
Common Symptoms of a Plate Heat Exchanger Problem
Here are some telltale signs indicating a potential issue:
* Insufficient Heating: Your radiant floors aren't as warm as they should be. * Slow Hot Water Production: It takes a long time to get hot water from your taps. * Inconsistent Water Temperature: Hot water fluctuates between hot and lukewarm. * Unusual Noises: Gurgling or banging sounds coming from the heat exchanger. * System Overheating: The boiler or heat pump is running excessively, trying to compensate. * High Energy Bills: Unexpected increase in your gas or electricity consumption.Troubleshooting Steps: A Methodical Approach
Now, let's get down to troubleshooting. We'll start with simple checks and progress to more involved diagnostics. Always turn off the power and fuel supply to your heating system before attempting any repairs beyond visual inspections.
Step 1: Visual Inspection (No Tools Required)
This is the first and easiest step. Walk around the heat exchanger and look for:
* Leaks: Check for any signs of water dripping or staining around the unit, fittings, or plates. Even a small leak can indicate a significant problem. * Corrosion: Examine the plates, connections, and surrounding pipes for rust or corrosion. Excessive corrosion can compromise the integrity of the heat exchanger. * Physical Damage: Look for dents, bends, or cracks in the plates or housing. Any physical damage can affect performance. * Proper Connections: Ensure all pipes and fittings are securely connected and tightened. Loose connections can lead to leaks or reduced flow. * Clearance: Make sure there's adequate clearance around the heat exchanger for proper ventilation and maintenance. Obstructions can cause overheating.Action: If you find a small leak at a fitting, carefully tighten it with a wrench (go easy, don't overtighten!). If you spot significant corrosion or physical damage, do not attempt any further repairs. Contact a qualified HVAC technician immediately.
Step 2: Checking System Pressure (No Tools Required)
Low system pressure can affect the efficiency of the heat exchanger. Look at the pressure gauge on your boiler or heating system. The ideal pressure will vary depending on your system but is usually between 12 and 15 PSI.
Action: If the pressure is below the recommended level, consult your system's manual for instructions on how to add water. Important: Adding too much water can damage your system. If you're unsure, call a professional.
Step 3: Verifying Pump Operation (No Tools Required Initially)
The circulation pump is crucial for moving fluids through the heat exchanger. A malfunctioning pump will significantly reduce heat transfer.
* Listen to the Pump: Carefully listen to the pump while the system is running. You should hear a gentle hum. Loud buzzing, grinding, or no sound at all could indicate a problem. * Check for Vibration: Place your hand on the pump (carefully!) and feel for vibration. A working pump should vibrate slightly.If you suspect pump failure and are comfortable doing so (and after turning off the power!), you can try the following with a screwdriver:
* Check the Pump Shaft: Many pumps have a slotted screw on the front. After turning off the power, carefully remove the screw and use a screwdriver to gently turn the pump shaft. If it's seized, you might be able to free it. However, do not force it. If it's still stuck or feels rough, the pump likely needs replacement.Action: If the pump is making unusual noises, not vibrating, or seized, it likely needs professional attention. Replacing a pump requires disconnecting plumbing and electrical connections, which is best left to a qualified technician.
Step 4: Checking for Air in the System (No Tools Required)
Air trapped in the system can prevent proper circulation and reduce heat transfer. Air tends to collect at high points in the system, including near the heat exchanger.
* Listen for Gurgling: Listen for gurgling sounds coming from the heat exchanger or pipes. * Check for Air Vents: Locate the air vents (usually small valves) near the heat exchanger or on the system's piping.Action: Carefully open the air vents to release any trapped air. You might hear a hissing sound. Close the vent as soon as water starts to come out. Be prepared with a towel to catch any drips.
Step 5: Inspecting Flow Rate and Temperature Differential (Requires Basic Equipment)
This step requires a bit more technical knowledge and some basic tools, namely a thermometer.
* Measure Inlet and Outlet Temperatures: Use a thermometer to measure the temperature of the fluid entering and exiting the heat exchanger on both the hot and cold sides. * Compare Temperature Differentials: Compare the temperature difference (the difference between the inlet and outlet temperatures) on each side. A significant difference between the expected and actual temperature differentials can indicate a problem.For example: If the hot water entering the heat exchanger is 180°F and the hot water exiting is 160°F, the temperature differential is 20°F. If the cold water entering is 50°F and the cold water exiting is only 55°F, the temperature differential is only 5°F. This suggests that the heat transfer is not efficient, potentially due to fouling or scaling.
Action: If you find a significantly reduced temperature differential, especially on the cold water side, it could indicate fouling or scaling within the heat exchanger. This usually requires professional cleaning or, in severe cases, replacement.
Step 6: Checking for Fouling and Scaling (Requires Disassembly – Proceed with Caution!)
Over time, minerals in the water can deposit on the plates inside the heat exchanger, reducing its efficiency. This is called fouling or scaling.
Important: Disassembling a plate heat exchanger can be complex and potentially dangerous if not done correctly. This step should only be attempted if you are comfortable working with plumbing and have a good understanding of the system. Otherwise, consult a professional.
If you choose to proceed:
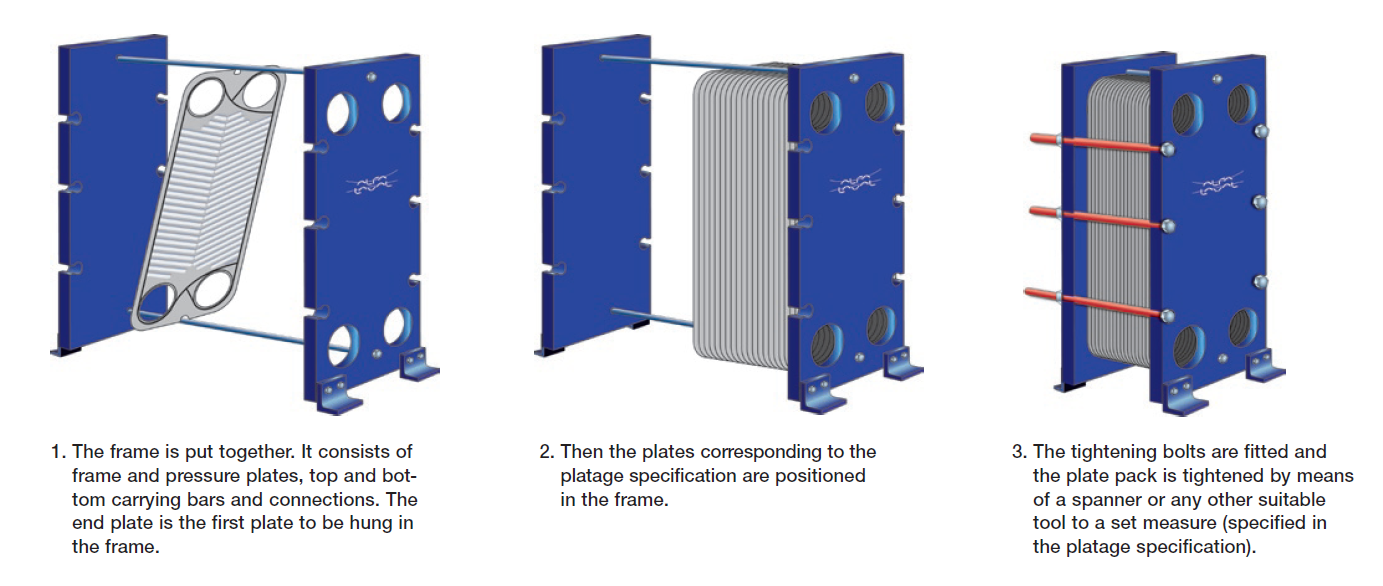
1. Turn off the power and fuel supply to the heating system. 2. Isolate the heat exchanger by closing the valves on both the hot and cold water sides. 3. Relieve any pressure in the system by opening a drain valve. 4. Carefully disconnect the piping from the heat exchanger. 5. Disassemble the heat exchanger according to the manufacturer's instructions. 6. Inspect the plates for mineral deposits, scale, or other debris.Action: If you find significant fouling or scaling, you can try to clean the plates. However, do not use abrasive cleaners or metal tools, as these can damage the plates. Use a mild descaling solution specifically designed for heat exchangers. If the scaling is severe or the plates are damaged, replacement is likely necessary. Reassemble the heat exchanger carefully, ensuring all gaskets are properly seated and tightened.
When to Call a Professional
While many of these troubleshooting steps can be performed by homeowners, some situations require professional expertise. Call a qualified HVAC technician if:
* You are uncomfortable working with plumbing or electrical components. * You suspect a leak that you cannot easily fix. * You find significant corrosion or physical damage to the heat exchanger. * The pump is malfunctioning or needs replacement. * You are unable to identify the cause of the problem. * You have disassembled the heat exchanger and are unsure how to reassemble it correctly. * You are dealing with refrigerant lines (if applicable). * The system involves complex controls or settings.Prevention Tips
To prevent future problems with your plate heat exchanger:
* Regular Maintenance: Schedule regular maintenance with a qualified HVAC technician. * Water Treatment: Consider installing a water softener or filter to reduce mineral buildup. * Flush the System: Periodically flush the system to remove sediment and debris. * Monitor System Pressure: Regularly check the system pressure and add water as needed. * Inspect for Leaks: Periodically inspect the heat exchanger and surrounding pipes for leaks.By following these troubleshooting steps and preventive measures, you can keep your plate heat exchanger running efficiently and extend its lifespan. Remember to prioritize safety and call a professional when needed. Good luck!