How Does A Pressure Independent Characterized Control Valve Work
Is your home experiencing inconsistent heating or cooling? Maybe some rooms are always too hot while others remain stubbornly cold, even when your thermostat is set comfortably. This uneven temperature distribution is a common frustration for homeowners, and while many factors can contribute, a malfunctioning Pressure Independent Characterized Control Valve (PICCV) could be the culprit. Let's explore how these valves work and how you can troubleshoot them.
Understanding PICCVs: The Basics
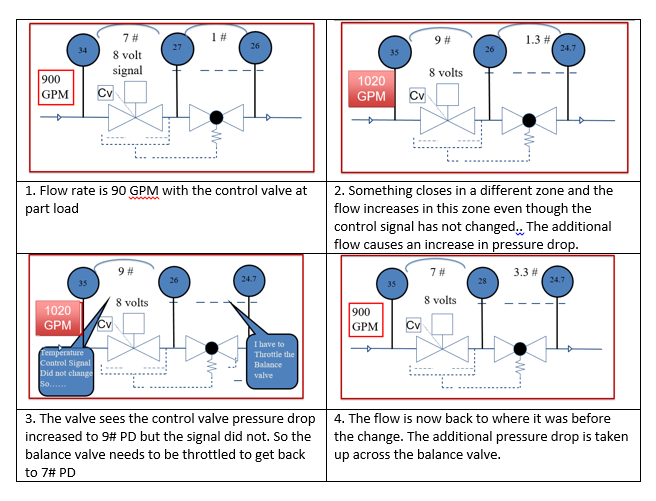
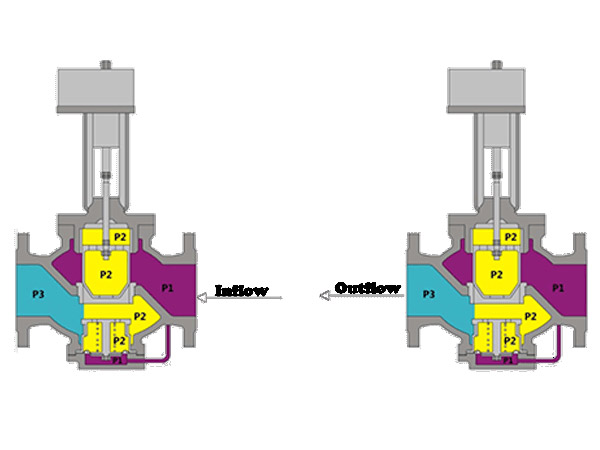
A PICCV is a sophisticated valve designed to precisely control the flow of hot or chilled water to a heating or cooling coil, such as those found in fan coil units or radiant heating systems. Unlike traditional control valves, PICCVs automatically compensate for pressure fluctuations in the system, ensuring a consistent and accurate flow rate regardless of changes in the system's overall pressure.
Think of it this way: imagine watering your garden with a hose. If someone turns on another tap in the house, the water pressure at your hose drops, and your plants get less water. A PICCV is like a special nozzle on your hose that maintains a constant water flow, even if the pressure in the house changes.
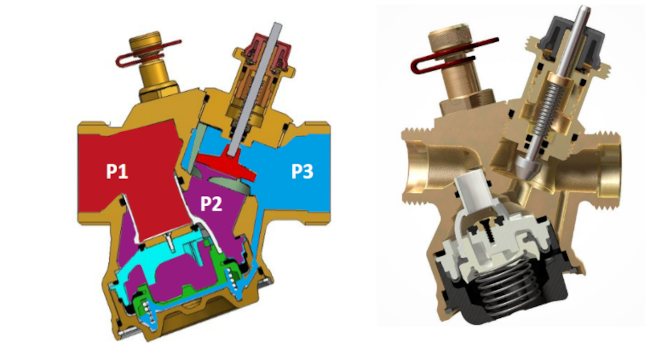
Key Components:
- Control Valve: This is the part that actually opens and closes to regulate the flow of water. It's usually controlled by an actuator.
- Actuator: The actuator is the motor that opens and closes the control valve. It receives a signal from the building's control system or thermostat.
- Pressure Regulator: This crucial component maintains a constant pressure differential across the control valve, ensuring consistent flow.
- Characterized Ball or Plug: This specially shaped component allows for precise control of flow rate as the valve opens and closes.
Diagnosing PICCV Problems: A Step-by-Step Guide
Before diving in, remember that working with HVAC systems involves water and electricity. Always turn off the power to the affected unit at the breaker box before attempting any troubleshooting steps. If you're uncomfortable working with electricity or plumbing, call a qualified HVAC technician.
Step 1: Identify the Affected Zone
Pinpoint which rooms or zones are experiencing temperature issues. Is it just one room, a whole floor, or the entire house? Knowing the affected area will help you narrow down the problem.
Step 2: Check the Thermostat (No Tools Required)
This might seem obvious, but it's an important first step. Verify that the thermostat is set to the correct mode (heating or cooling) and temperature. Make sure the thermostat batteries are good, as a low battery can cause erratic behavior. Also, check for any error codes on the thermostat display. Note down any codes; they might provide valuable clues.
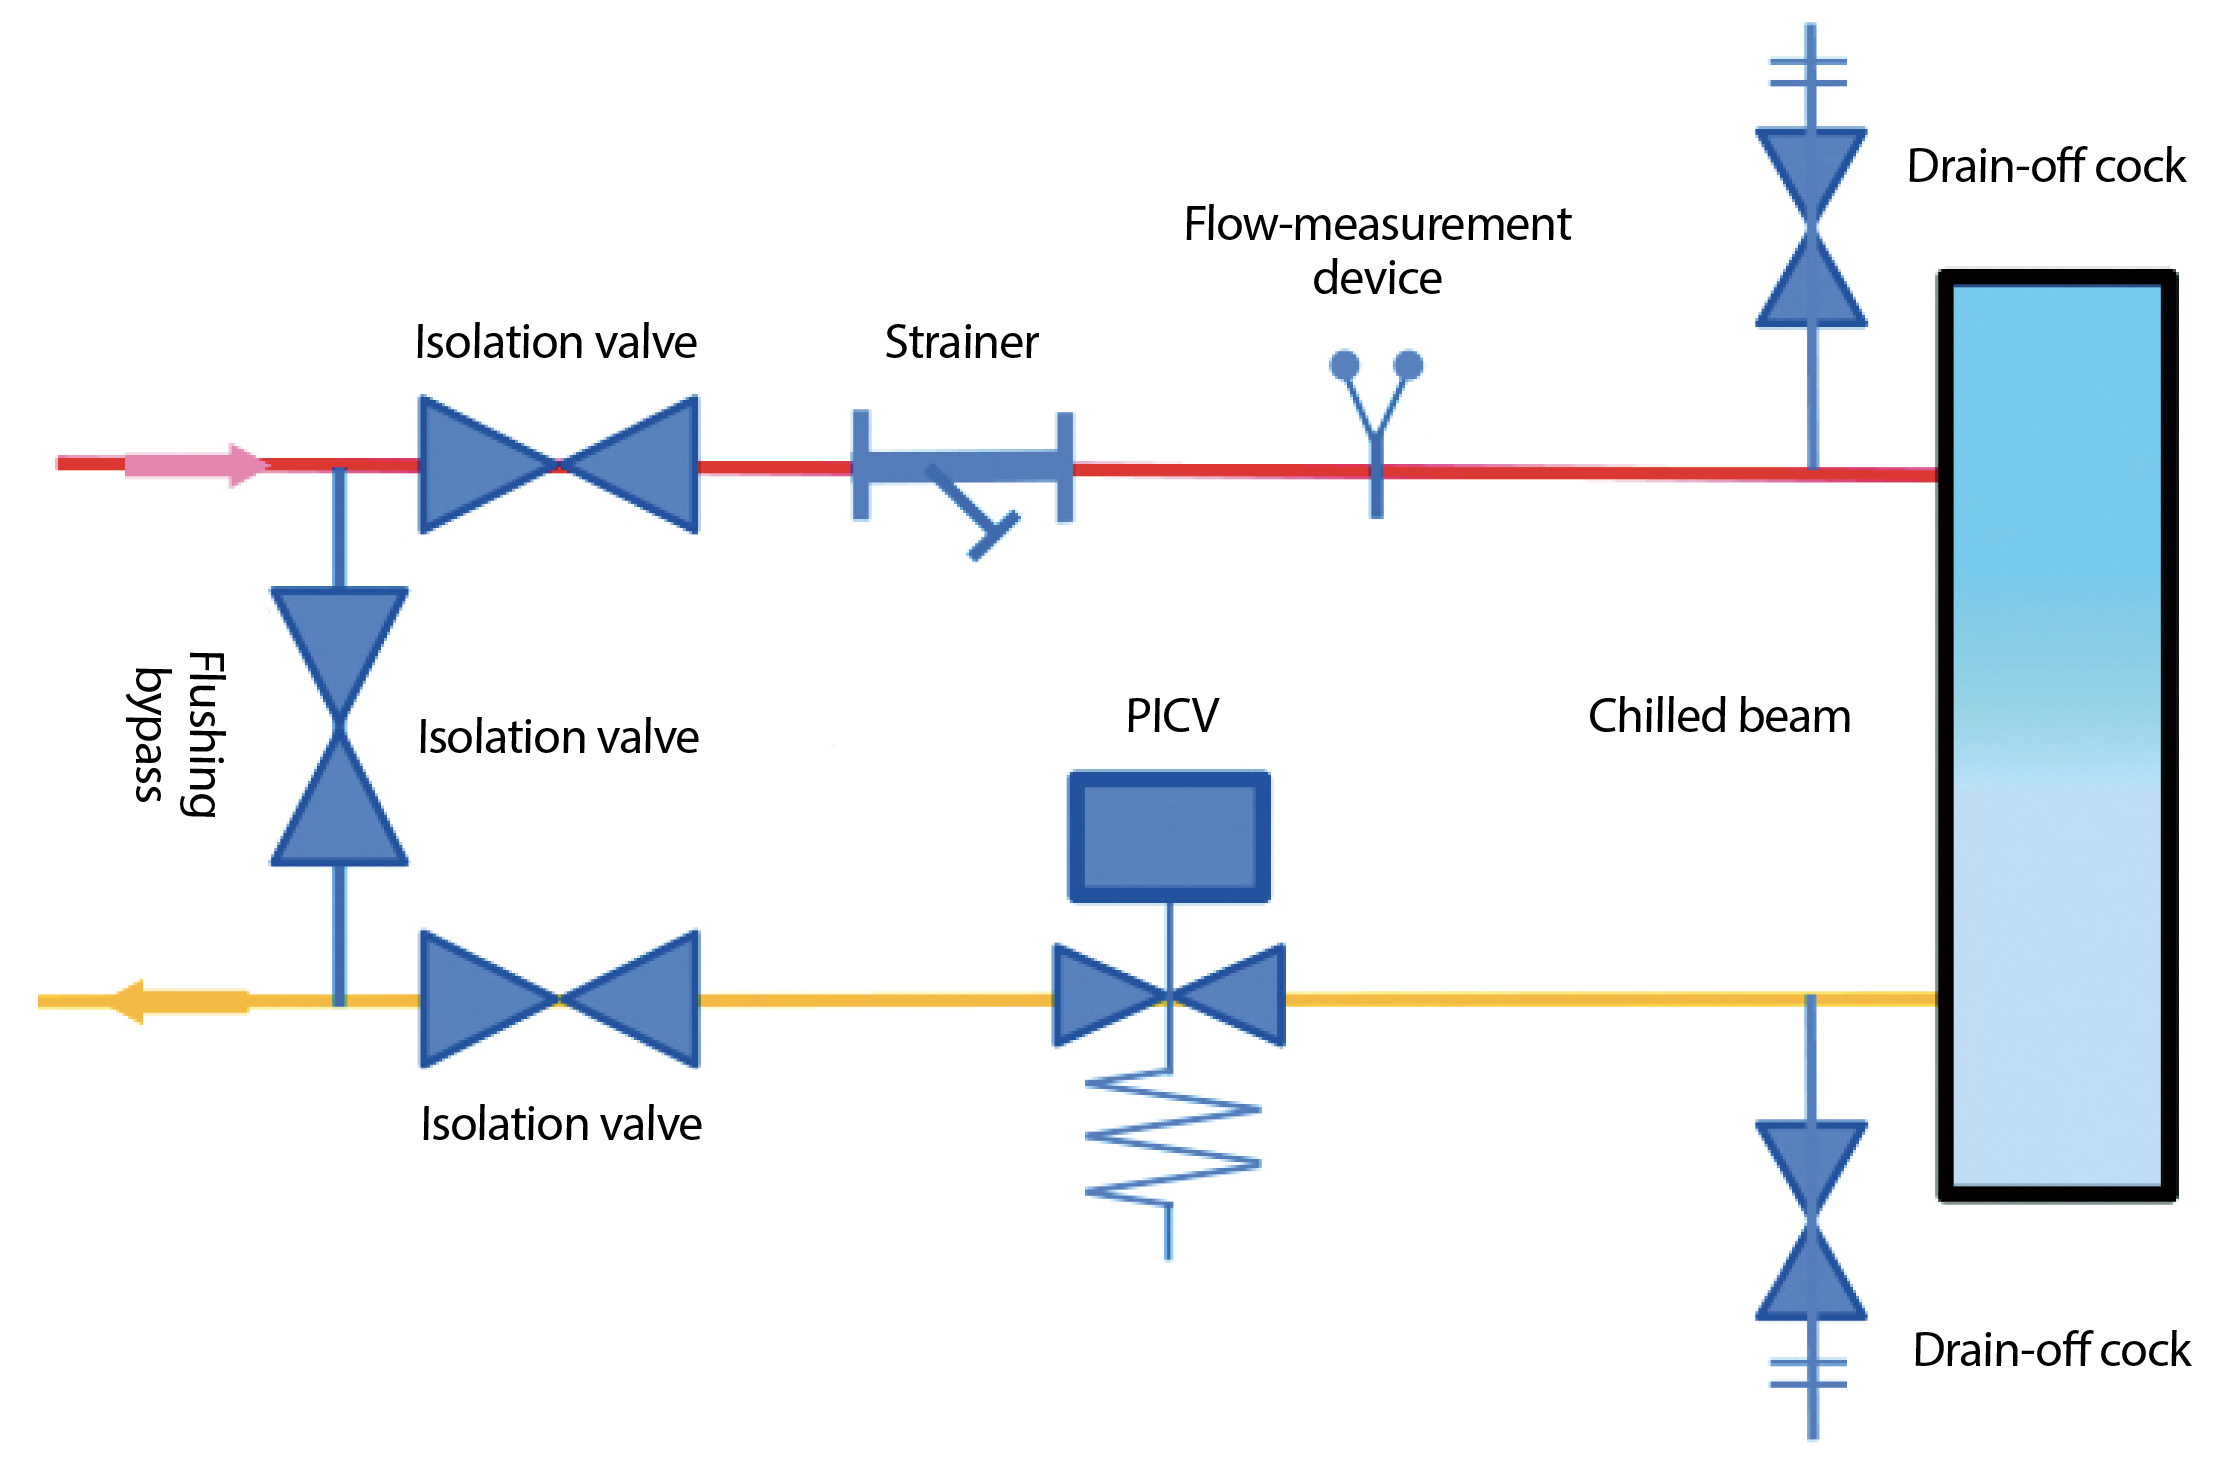
Step 3: Inspect the PICCV (Visual Inspection - No Tools Required)
Locate the PICCV serving the affected zone. It's usually located near the heating or cooling coil of a fan coil unit or radiant heating manifold. Look for the following:
- Leaks: Check for any signs of water leakage around the valve body, connections, or actuator. Even small drips can indicate a problem.
- Physical Damage: Inspect for any cracks, dents, or other physical damage to the valve or actuator.
- Actuator Position: Observe the position of the actuator. Is it fully open, fully closed, or somewhere in between? Does it appear to be moving smoothly?
- Wiring: Check the wiring connections to the actuator. Are any wires loose, disconnected, or corroded?
Step 4: Check the Actuator Power Supply (Requires a Multimeter)
PICCV actuators typically operate on 24V AC or DC. Using a multimeter, carefully check the voltage at the actuator terminals. Ensure the power is turned on *after* you have safely set up your multimeter. If there's no voltage, the actuator isn't receiving power, which could indicate a wiring problem, a faulty transformer, or an issue with the control system.
Safety First: If you are not comfortable working with electricity, skip this step and call a professional.
Step 5: Check the Actuator Signal (Requires a Multimeter)
The actuator receives a control signal from the building automation system (BAS) or thermostat. This signal tells the actuator how far to open or close the valve. Using a multimeter, check the signal voltage or current at the actuator terminals. The expected signal range depends on the type of actuator (e.g., 0-10V DC or 4-20mA). A missing or incorrect signal indicates a problem with the BAS or thermostat.
Important Note: You'll need the specifications of your specific actuator to interpret the signal readings. Consult the manufacturer's documentation.
Step 6: Manually Override the Actuator (Requires Caution)
Some actuators have a manual override feature that allows you to temporarily open or close the valve manually. This can help you determine if the valve itself is functioning properly. Consult the actuator's documentation for instructions on how to use the manual override. Be careful not to force anything. If you encounter resistance, stop immediately.
If manually overriding the actuator improves the temperature in the affected zone, it suggests that the actuator is the problem. If it doesn't, the valve itself may be malfunctioning.
Step 7: Check for Blockages (Requires Tools and Skill)
Over time, debris can accumulate in the valve, causing it to malfunction. If you suspect a blockage, you can try flushing the valve. This step requires shutting off the water supply to the valve and disconnecting it from the piping. Use a bucket to catch any water that spills out. Then, carefully flush the valve with clean water to remove any debris. Reassemble the valve and piping, and turn the water supply back on.
Caution: This step can be messy and requires some plumbing skills. If you're not comfortable working with plumbing, call a professional.
Step 8: Monitor System Pressure (Requires a Pressure Gauge)
While a PICCV is designed to compensate for pressure fluctuations, extreme pressure variations can still impact its performance. Use a pressure gauge to measure the pressure at the inlet and outlet of the valve. Compare these readings to the valve's specified operating pressure range. If the pressure is outside the specified range, it could indicate a problem with the system's pump, expansion tank, or other components.
DIY Actions You Can Take
Based on your troubleshooting, here are some simple DIY actions you can take:- Tighten Loose Connections: If you find any loose wiring connections, carefully tighten them.
- Replace Thermostat Batteries: If the thermostat batteries are low, replace them with fresh batteries.
- Clean the Valve Body (Exterior): Wipe down the exterior of the valve body and actuator with a clean, damp cloth to remove any dust or debris.
- Verify Thermostat Settings: Double-check the thermostat settings to ensure they are correct for your desired heating or cooling mode and temperature.
When to Call a Professional
Certain problems are best left to the professionals. Call a qualified HVAC technician if you encounter any of the following:- Extensive Leaks: If you find significant water leaks around the valve or piping.
- Electrical Issues: If you are uncomfortable working with electricity or suspect a major electrical problem.
- Valve Blockages: If you suspect a severe blockage that you cannot clear yourself.
- Complex Control System Problems: If you suspect a problem with the building automation system or thermostat.
- Actuator Malfunctions: If the actuator is visibly damaged, making unusual noises, or not responding to control signals.
- Pressure Issues: If the system pressure is consistently outside the specified range, indicating a problem with the pump or other components.
- You're Unsure: If you've tried the troubleshooting steps and are still unsure what the problem is.
Preventative Maintenance
To keep your PICCVs working properly and prevent future problems, consider the following preventative maintenance measures:- Regular Inspections: Periodically inspect the valves for leaks, damage, and proper operation.
- Water Treatment: Ensure that the water circulating through the system is properly treated to prevent corrosion and scale buildup.
- Filter Changes: Regularly change the filters in the HVAC system to prevent debris from clogging the valves.
- Professional Servicing: Schedule regular professional servicing of your HVAC system, including the PICCVs.
By following these troubleshooting steps and taking preventative maintenance measures, you can keep your PICCVs working efficiently and ensure a comfortable and consistent temperature throughout your home. Remember, when in doubt, consult a qualified HVAC technician for assistance.