How Does A Scroll Compressor Work

Is your home sweltering in summer or freezing in winter despite your HVAC system running seemingly non-stop? One common culprit behind inadequate heating or cooling is a malfunctioning scroll compressor. This unsung hero of your system is responsible for pumping refrigerant, the lifeblood of your air conditioner or heat pump. Let’s dive into how these compressors work and how you can troubleshoot common issues.
Understanding the Scroll Compressor
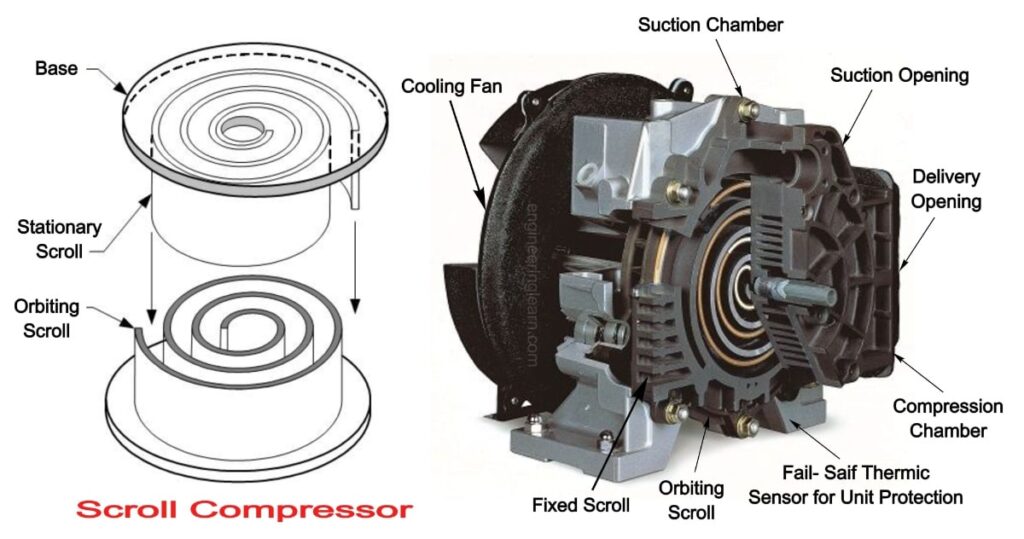
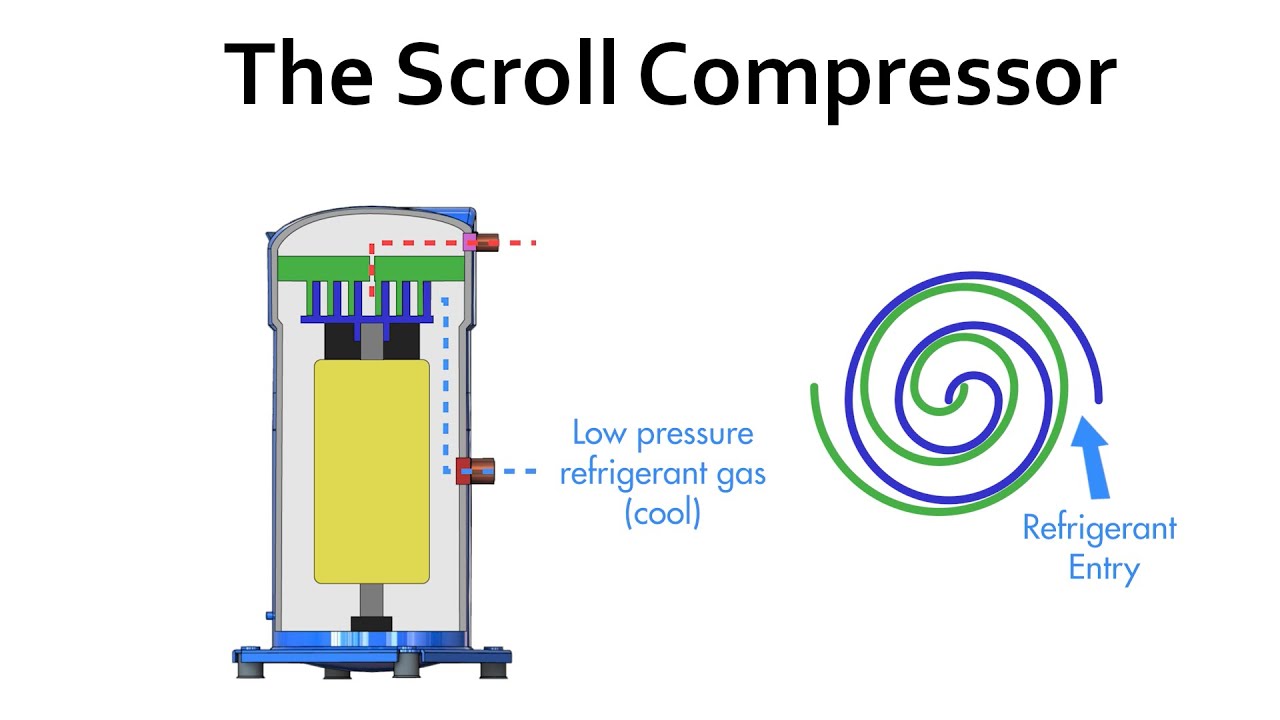
The scroll compressor, unlike its piston-driven counterpart, uses a clever rotating mechanism to compress refrigerant. Imagine two interleaved scrolls, one fixed and the other orbiting. As the orbiting scroll moves, it traps pockets of refrigerant and gradually shrinks their volume, increasing the pressure. This high-pressure refrigerant is then discharged to the rest of the system.
Here’s a breakdown of the key components and their roles:
- Fixed Scroll: This scroll remains stationary, acting as the housing and one side of the compression chamber.
- Orbiting Scroll: This scroll moves in a circular path, creating the compression action.
- Motor: The electric motor provides the power to drive the orbiting scroll.
- Refrigerant Inlet: Where low-pressure refrigerant enters the compressor.
- Refrigerant Outlet: Where high-pressure refrigerant exits the compressor.
- Oil Sump: A reservoir of oil used to lubricate the moving parts and cool the motor.
- Discharge Valve: Prevents backflow of high-pressure refrigerant.
Diagnosing Compressor Problems: A Step-by-Step Guide
Before you call an HVAC technician, let's walk through a methodical troubleshooting process. Remember, safety first! Always turn off the power to your outdoor unit at the breaker box before attempting any inspection. If you are uncomfortable working with electrical components, immediately contact a qualified HVAC professional.
Step 1: Initial Assessment (No Tools Required)
Start with a basic overview. This can tell you a lot before you even touch the system.
- Check the Thermostat: Is it set correctly? Are the batteries fresh? A seemingly obvious step, but often overlooked. Ensure it's calling for heating or cooling as desired.
- Inspect the Outdoor Unit: Look for obvious signs of damage: bent fins, debris accumulation, or oil leaks. Note any unusual smells or sounds.
- Listen to the Compressor: When the system is running (after you've checked the thermostat!), listen closely to the compressor. Is it making a loud grinding, buzzing, or clicking noise? A healthy compressor should produce a relatively smooth humming sound.
- Check the Airflow: Feel the air coming out of your vents inside the house. Is it weak or non-existent? This could indicate a compressor issue affecting the entire system.
Step 2: Basic Visual Inspection (No Tools Required)
Now, let's take a closer look. Remember to turn off the power!
- Clean the Outdoor Unit: Remove any debris (leaves, grass, twigs) from around the unit, especially around the fins. Clogged fins restrict airflow and can cause the compressor to overheat. You can use a garden hose with a gentle spray to clean the fins. Avoid using a pressure washer, as it can damage them.
- Inspect the Electrical Disconnect: Locate the electrical disconnect box near the outdoor unit. Ensure the switch is in the "ON" position (after you turned off the breaker!). Sometimes this switch can be accidentally turned off.
- Look for Leaks: Carefully inspect the refrigerant lines and connections for signs of oil residue. Oil leaks often indicate a refrigerant leak, which can damage the compressor.
Step 3: Checking the Contactor (Basic Equipment Required - Multimeter & Voltage Tester)
The contactor is an electrical relay that sends power to the compressor. A faulty contactor can prevent the compressor from starting. This step involves working with electricity and requires extreme caution! If you're not comfortable, call a professional.
- Safety First: Turn off the power at the breaker box AND the outdoor disconnect switch. Double-check with a non-contact voltage tester to ensure the power is off before touching any components.
- Locate the Contactor: Inside the electrical panel of the outdoor unit, you'll find the contactor. It's typically a rectangular device with several terminals and a small plunger.
- Visual Inspection: Look for signs of burning, corrosion, or pitting on the contactor terminals. A damaged contactor needs replacement.
- Testing the Contactor:
- Turn the power back on (temporarily): Restore power to the unit at the breaker and disconnect.
- Check Voltage: Use a multimeter to check for voltage on both sides of the contactor. You should have voltage on both sides when the thermostat is calling for cooling (or heating).
- Turn the power off again: Immediately turn off the power at the breaker box AND the disconnect switch after testing.
Step 4: Checking the Capacitor (Basic Equipment Required - Multimeter & Voltage Tester)
The capacitor provides the initial surge of power needed to start the compressor. A weak or failed capacitor is a common cause of compressor failure. This step also involves working with electricity and requires extreme caution! If you're not comfortable, call a professional. Capacitors can store a dangerous electrical charge even after the power is off.
- Safety First: Turn off the power at the breaker box AND the outdoor disconnect switch. Double-check with a non-contact voltage tester to ensure the power is off before touching any components.
- Discharge the Capacitor: This is crucial! Use a screwdriver with an insulated handle to carefully short across the capacitor terminals. This will discharge any stored energy. Some multimeters have a capacitor discharge function, which is safer.
- Locate the Capacitor: Inside the electrical panel of the outdoor unit, you'll find the capacitor. It's typically a cylindrical component. There is usually a start capacitor and a run capacitor. The start capacitor is generally cylindrical and smaller than the run capacitor. The run capacitor has three terminals.
- Visual Inspection: Look for signs of bulging, leaking, or cracking on the capacitor. A damaged capacitor needs replacement.
- Testing the Capacitor:
- Use a multimeter with capacitance measurement capabilities.
- Disconnect the wires from the capacitor (after discharging!).
- Measure the capacitance value of the capacitor. Compare it to the value printed on the capacitor label.
- If the measured value is significantly lower (e.g., more than 10% lower) than the rated value, the capacitor is likely bad and needs to be replaced.
Step 5: Checking for Overload Protection (Basic Equipment Required - Multimeter)
The compressor has built-in overload protection to prevent it from overheating. If the compressor has tripped its overload, it will shut down. You can check for continuity to see if the overload is open.
- Safety First: Turn off the power at the breaker box AND the outdoor disconnect switch. Double-check with a non-contact voltage tester to ensure the power is off before touching any components.
- Locate the Overload: It can be internal or external on the compressor. Use the wire diagram to trace it.
- Continuity Test:
- Disconnect the wires from the overload (after discharging capacitors).
- Use a multimeter in continuity mode to test across the terminals of the overload.
- If there is no continuity, the overload is open, which means it tripped. It may reset after the compressor cools down, but if it continues to trip, there is a problem.
DIY Actions: What You Can Do
Based on your diagnosis, here are some simple DIY actions you can take:
- Clean the Outdoor Unit: As mentioned earlier, remove debris to improve airflow.
- Replace a Contactor: If the contactor is visibly damaged and you're comfortable working with electricity (after taking all safety precautions!), you can replace it with an exact replacement part. Make sure to label the wires before disconnecting them.
- Replace a Capacitor: Similarly, if the capacitor is bad and you're comfortable, you can replace it with an exact replacement. Again, make sure to discharge the capacitor before handling it and label the wires.
- Reset the Breaker: If the breaker has tripped, reset it. However, if it trips repeatedly, there's an underlying problem that needs professional attention.
When to Call a Professional HVAC Technician
The following situations require the expertise of a qualified HVAC professional:
- Refrigerant Leaks: Handling refrigerant requires specialized equipment and certification. Do not attempt to repair refrigerant leaks yourself.
- Compressor Replacement: Replacing a compressor is a complex and expensive job that requires specialized tools and knowledge.
- Electrical Issues: If you're not comfortable working with electricity or you suspect a serious electrical problem, call a professional.
- Unusual Noises: Loud grinding, buzzing, or clicking noises from the compressor usually indicate internal damage that requires professional repair or replacement.
- Overload Tripping Repeatedly: If the overload keeps tripping.
- You are unsure of what to do! It is always better to call a professional than make the situation worse.
Attempting repairs beyond your skill level can be dangerous and may void your system's warranty.
Preventive Maintenance: Keeping Your Compressor Healthy
Regular maintenance can help prevent compressor problems and extend the life of your HVAC system:
- Schedule Annual HVAC Tune-Ups: A professional technician can inspect and clean your system, check refrigerant levels, and identify potential problems before they become major issues.
- Change Air Filters Regularly: Dirty air filters restrict airflow and can cause the compressor to overheat. Change your air filters every 1-3 months, depending on usage and air quality.
- Keep the Outdoor Unit Clean: Regularly remove debris from around the outdoor unit to ensure proper airflow.
By understanding how a scroll compressor works and following these troubleshooting steps, you can diagnose common problems and potentially save yourself a costly service call. However, remember to prioritize safety and don't hesitate to call a professional when needed. A well-maintained HVAC system will keep your home comfortable for years to come.