How Does A Thermal Expansion Valve Work

Understanding the Thermal Expansion Valve (TXV): Your Guide to HVAC Efficiency
The Thermal Expansion Valve (TXV), also known as a thermostatic expansion valve, is a critical component in your air conditioning or heat pump system. It's the unsung hero that regulates the flow of refrigerant into the evaporator coil, ensuring optimal cooling performance and efficiency. Understanding how it works can empower you to diagnose potential HVAC issues and potentially save on costly repairs. However, remember that refrigerant handling requires specialized knowledge and equipment; when in doubt, always call a licensed HVAC professional.
What Does the TXV Do?
The TXV's primary job is to maintain a constant superheat at the evaporator outlet. Superheat is the temperature of the refrigerant vapor above its boiling point at a given pressure. Maintaining the correct superheat ensures that only vapor enters the compressor, preventing liquid refrigerant from damaging it. Liquid entering the compressor can lead to catastrophic failure.
In simpler terms, the TXV acts like a smart valve, adjusting the refrigerant flow based on the cooling demand and the temperature of the refrigerant leaving the evaporator. This precise control maximizes cooling efficiency and prevents compressor damage.
How Does a Thermal Expansion Valve Actually Work?
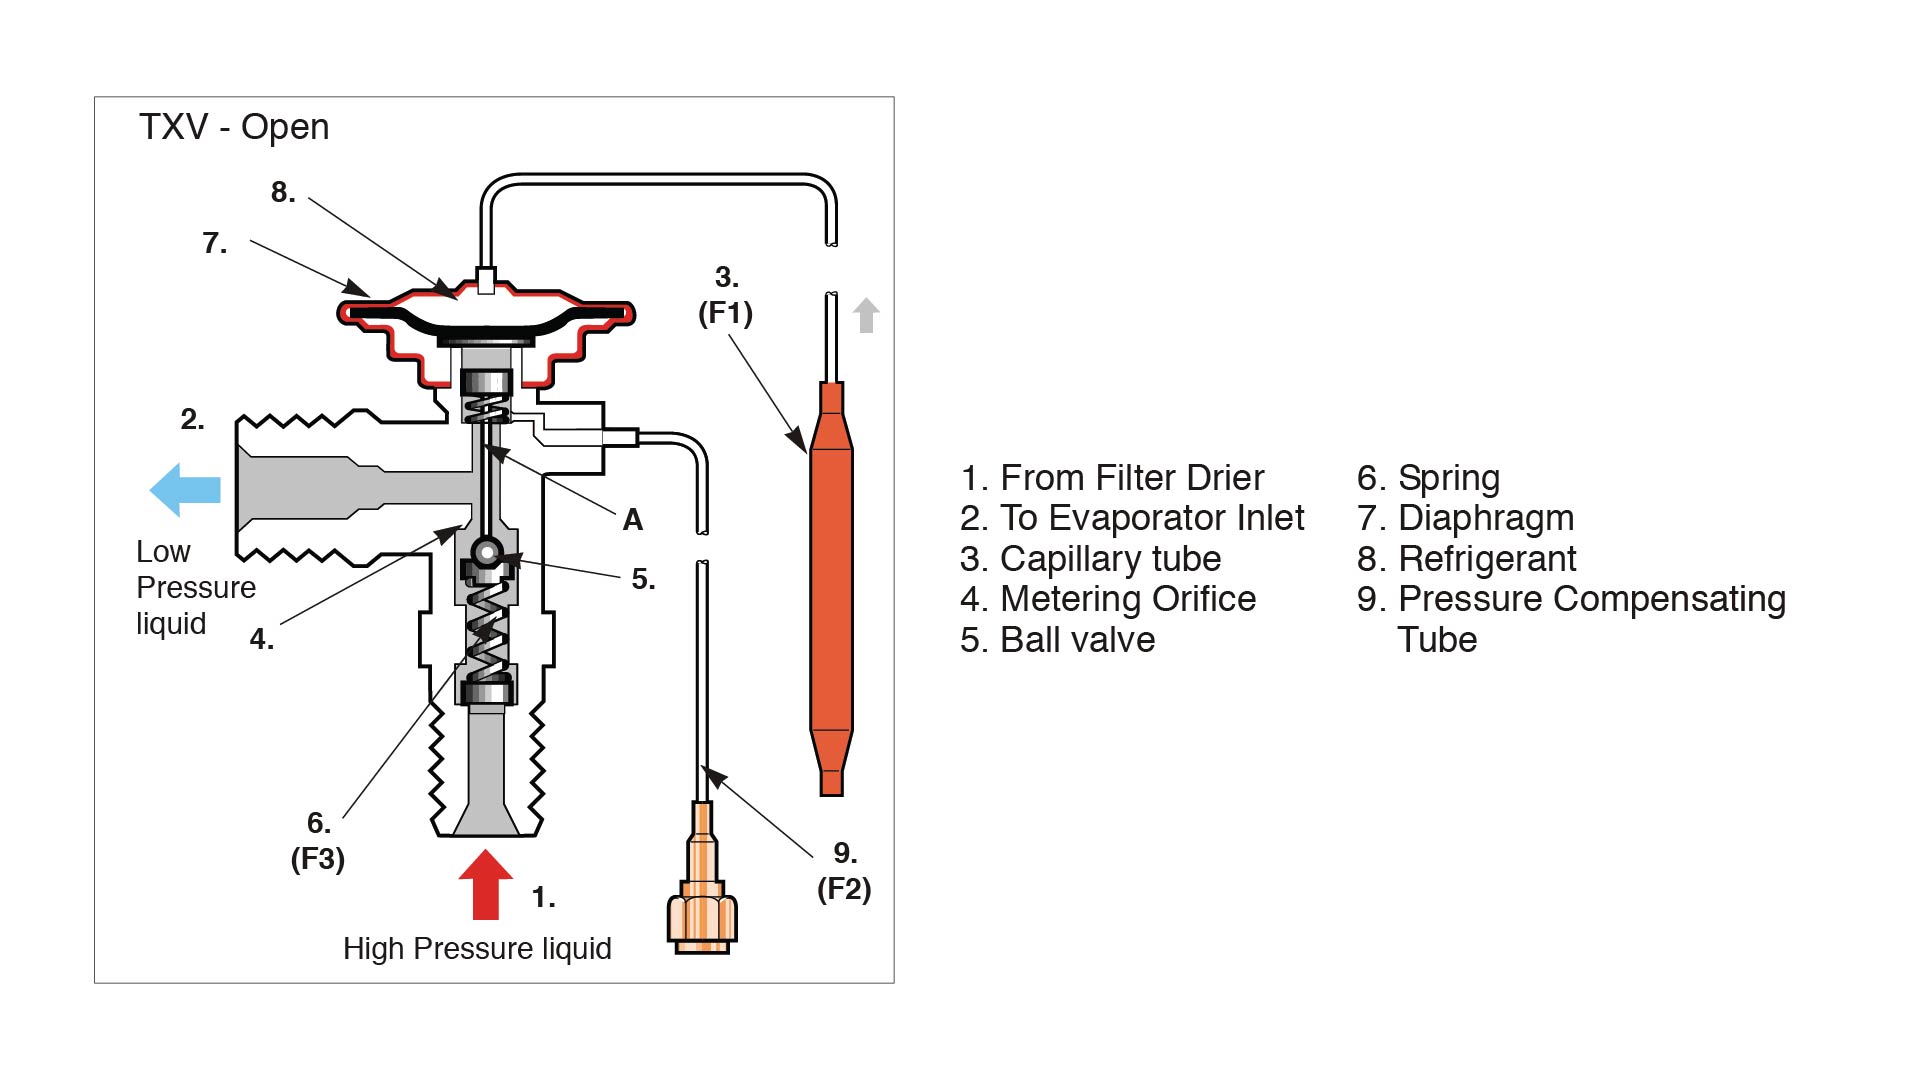
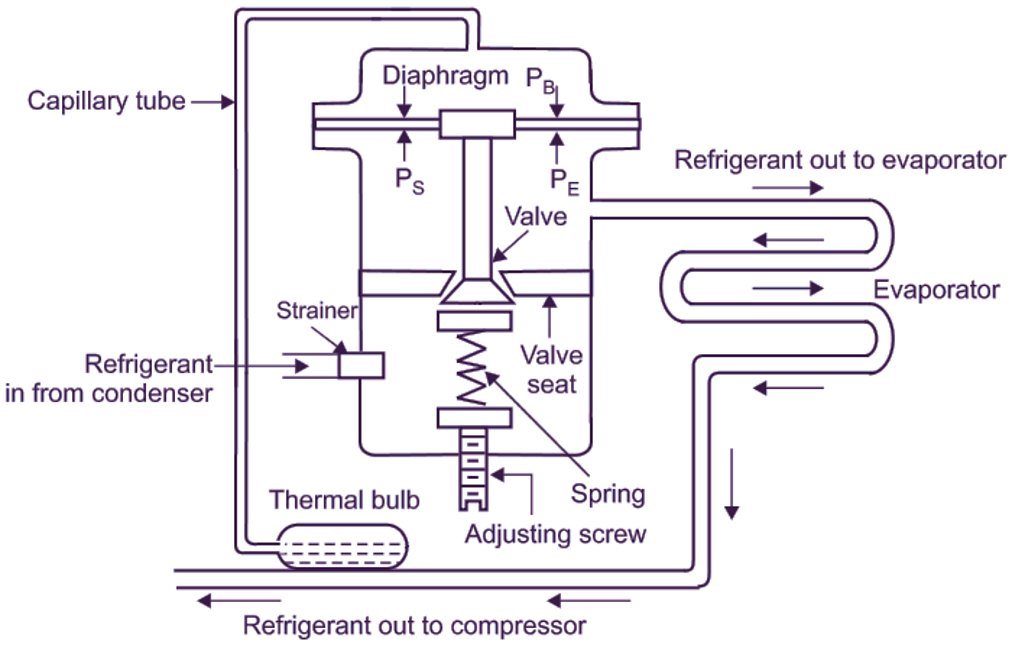
The TXV operates based on a delicate balance of three forces:
- Bulb Pressure (P1): A sensing bulb, typically filled with a similar refrigerant as the system, is attached to the evaporator outlet. As the temperature of the refrigerant vapor leaving the evaporator increases (superheat increases), the pressure inside the bulb (P1) increases. This pressure exerts a force that tends to open the TXV.
- Evaporator Pressure (P2): The pressure inside the evaporator coil (P2) acts against the opening force of the bulb. This pressure is directly related to the refrigerant temperature in the evaporator.
- Spring Pressure (P3): An adjustable spring inside the TXV provides a closing force (P3). This spring pressure is typically set to achieve the desired superheat level.
The TXV modulates its opening based on the equilibrium of these three pressures: P1 = P2 + P3.
Here's a step-by-step breakdown of how it works:
- Cooling Demand Increases: As the demand for cooling increases, the refrigerant in the evaporator absorbs more heat, causing the superheat to rise.
- Bulb Warms Up: The increased superheat causes the sensing bulb to warm up, increasing the bulb pressure (P1).
- Valve Opens: The higher bulb pressure overcomes the evaporator pressure (P2) and spring pressure (P3), causing the valve to open wider.
- More Refrigerant Flows: The wider opening allows more refrigerant to flow into the evaporator, increasing the cooling capacity.
- Superheat Stabilizes: As more refrigerant flows, the superheat decreases and stabilizes at the desired level.
The reverse happens when the cooling demand decreases. The superheat drops, the bulb cools down, the valve closes slightly, and less refrigerant flows.
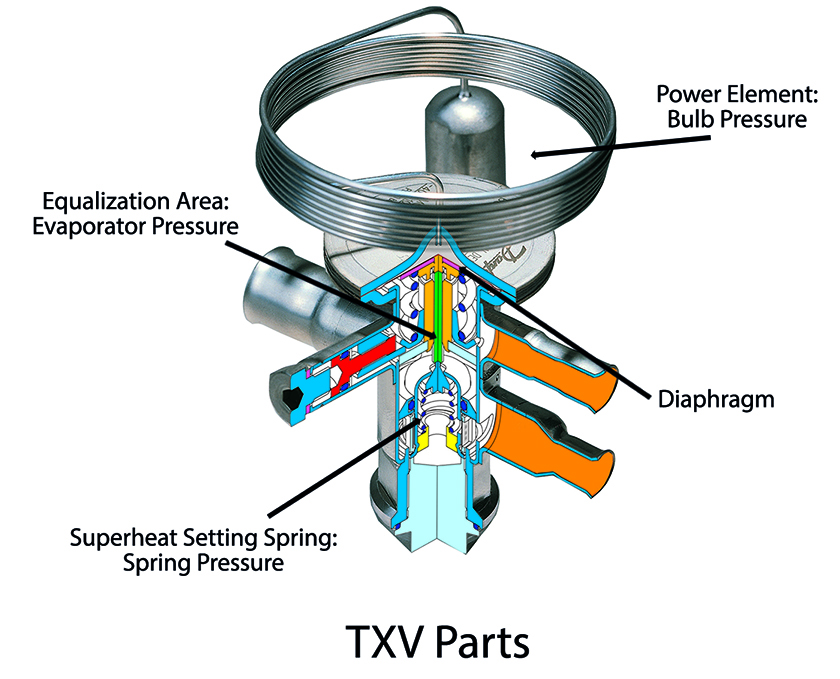
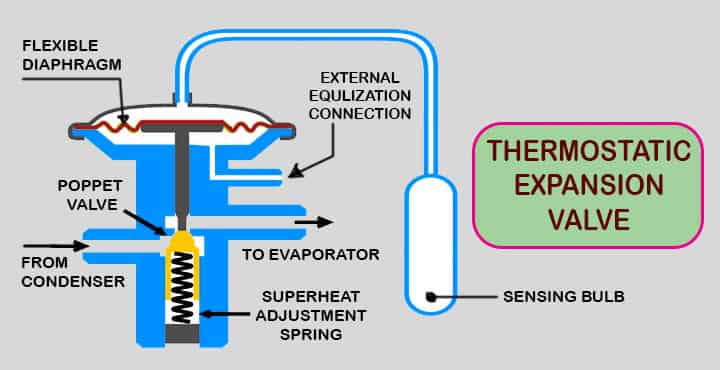
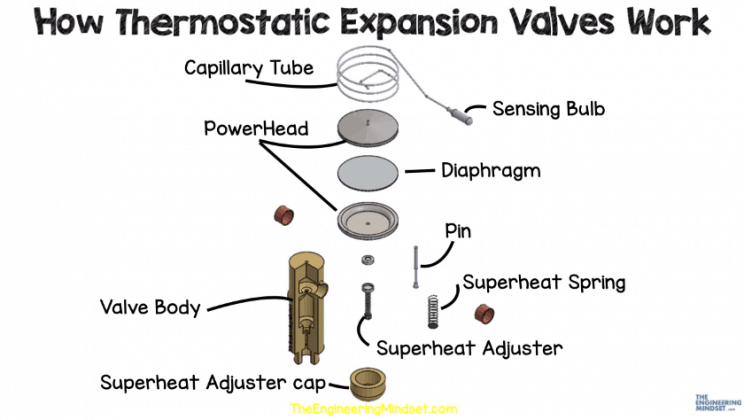
Components of a TXV
- Sensing Bulb: The bulb, filled with refrigerant, measures the superheat at the evaporator outlet.
- Capillary Tube: Connects the sensing bulb to the valve body, transmitting the pressure signal.
- Diaphragm or Piston: Responds to the pressure changes from the bulb and regulates the valve opening.
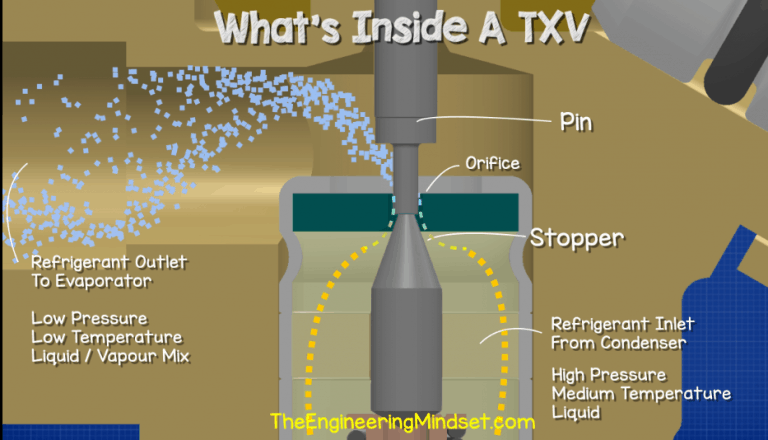
- Valve Body: Contains the internal components and the valve orifice.
- Valve Orifice: The opening through which the refrigerant flows. Its size determines the refrigerant flow rate.
- Adjusting Stem: Allows for fine-tuning of the superheat setting (on some models).
- Spring: Provides the closing force and helps maintain the desired superheat.
Common Issues with TXVs
A malfunctioning TXV can lead to a variety of HVAC problems. Here are some common symptoms and potential causes:
- System Not Cooling Properly: This can be due to a TXV stuck closed or partially closed, restricting refrigerant flow.
- Frozen Evaporator Coil: A TXV stuck open or overfeeding can flood the evaporator coil with liquid refrigerant, causing it to freeze.
- High Superheat: Indicates a lack of refrigerant or a TXV undereeding.
- Low Superheat: Suggests the TXV is overfeeding refrigerant.
- High Head Pressure: Can be caused by a TXV malfunction leading to excessive refrigerant flow and overloading the compressor.
- Compressor Failure: Liquid refrigerant entering the compressor due to a faulty TXV can cause serious damage.
Troubleshooting a TXV: A DIY Approach (with Caution!)
Before attempting any troubleshooting, remember that working with refrigerant requires specialized tools and knowledge. Improper handling can be dangerous and illegal. Always disconnect power to the unit before starting any work.
Here are some basic steps you can take:
- Visual Inspection: Check for any signs of physical damage to the TXV, sensing bulb, or capillary tube. Look for leaks or corrosion.
- Check Superheat and Subcooling: Use a manifold gauge set to measure the superheat and subcooling. These readings can provide valuable clues about the TXV's performance. A high superheat reading may indicate a starved evaporator due to a restricted TXV, while a low superheat reading can suggest overfeeding. (Important: Understanding these readings requires experience. Consult with an HVAC professional if you're unsure.)
- Sensing Bulb Contact: Ensure the sensing bulb is securely attached to the evaporator outlet and properly insulated. Poor contact can lead to inaccurate temperature readings and TXV malfunction.
- Adjusting Stem (If Applicable): Some TXVs have an adjusting stem. Very carefully make small adjustments following manufacturer instructions. Note the original position before making any changes. Overtightening or loosening the stem can damage the valve.
- "Tap Test": (Use with extreme caution and only if you're comfortable) Gently tapping the TXV body with a screwdriver handle *might* dislodge debris stuck inside the valve. However, excessive force can damage the valve. This is generally not recommended for DIYers.
Tools You Might Need:
- Screwdrivers (various sizes)
- Manifold gauge set
- Adjustable wrench
- Insulation tape
- Multimeter (for checking electrical components)
Parts That Might Need Replacement:
- TXV
- Sensing bulb
- Capillary tube
- Refrigerant (if the system needs recharging)
When to Call a Professional
While some basic troubleshooting steps are within the realm of a skilled DIYer, many TXV-related issues require professional intervention. Here are some situations where you should definitely call a licensed HVAC technician:
- Refrigerant Leaks: Refrigerant leaks require specialized equipment to locate and repair.
- Refrigerant Charging: Adding or removing refrigerant requires proper knowledge and equipment to ensure the correct charge level. Overcharging or undercharging can damage the system.
- Suspect Compressor Damage: If you suspect liquid refrigerant has entered the compressor, stop immediately and call a professional. Running the compressor with liquid refrigerant can cause irreversible damage.
- Complex Diagnoses: If you've tried the basic troubleshooting steps and are still unable to identify the problem, it's best to consult a professional.
- You're Uncomfortable: If you're not comfortable working with electrical or mechanical components, don't hesitate to call a professional.
Estimating Repair Costs
The cost of repairing or replacing a TXV can vary depending on the complexity of the job, the type of refrigerant used, and your location. Here's a general estimate:
- Diagnosis: $75 - $150 (This covers the cost of a technician to diagnose the problem.)
- TXV Replacement (including labor): $250 - $700+ (This includes the cost of the new TXV, refrigerant, and labor. More complex systems or TXVs in difficult-to-access locations will cost more.)
- Refrigerant Recharge: $150 - $400+ (The cost of refrigerant varies depending on the type and amount needed.)
Note: These are just estimates. Get a quote from a qualified HVAC technician for an accurate assessment of your specific situation.
Preventive Maintenance for Your TXV
While you can't directly maintain the TXV itself, regular HVAC system maintenance can help prevent problems that could lead to TXV failure. These include:
- Regular Filter Changes: A dirty air filter restricts airflow, putting a strain on the entire system and potentially leading to TXV issues.
- Coil Cleaning: Clean evaporator and condenser coils ensure proper heat transfer and prevent the system from overworking.
- Professional Tune-Ups: Annual tune-ups by a qualified HVAC technician can identify potential problems early and ensure the system is running efficiently.
By understanding how your TXV works and taking steps to maintain your HVAC system, you can help ensure optimal cooling performance, reduce energy costs, and avoid costly repairs. Remember, safety first! When in doubt, always consult with a qualified HVAC professional.