How Does A Water Pressure Vessel Work
Experiencing inconsistent water temperature in your shower? Notice your water pressure fluctuating wildly when multiple appliances are running? These are common homeowner headaches, and often the culprit isn't the water heater itself, but rather a silent workhorse called the water pressure vessel (also sometimes referred to as an expansion tank or pressure tank). This seemingly simple component plays a critical role in maintaining consistent water pressure and protecting your plumbing system. Understanding how it works, and how to troubleshoot it, can save you money and prevent potentially damaging leaks.
Understanding the Water Pressure Vessel
Think of your plumbing system as a closed network. When water heats up, it expands. Without a place to accommodate this expansion, pressure builds rapidly, potentially stressing pipes, fixtures, and your water heater itself. This is where the pressure vessel comes in.
How it Works:
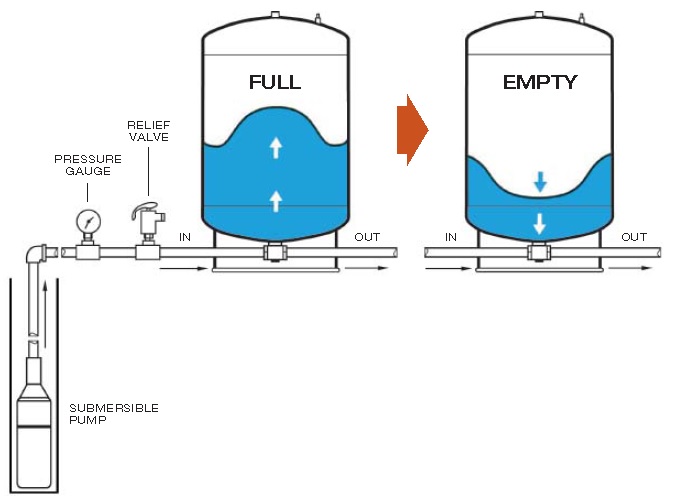
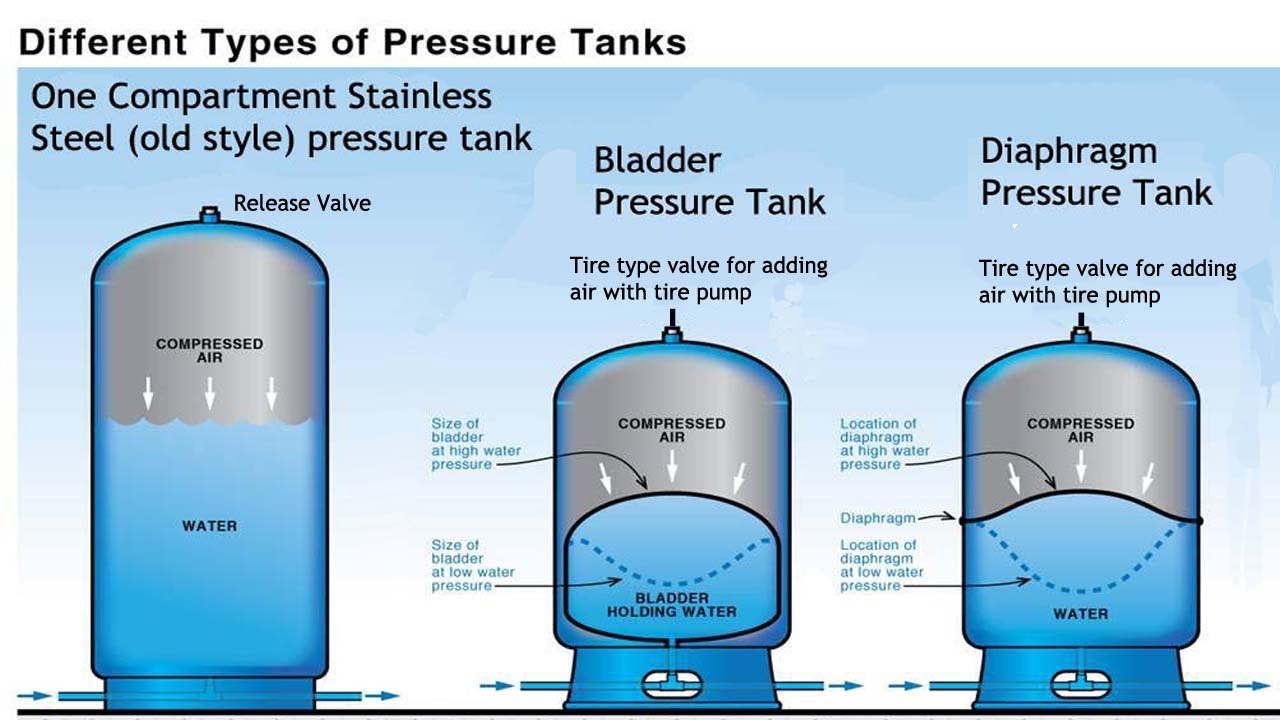
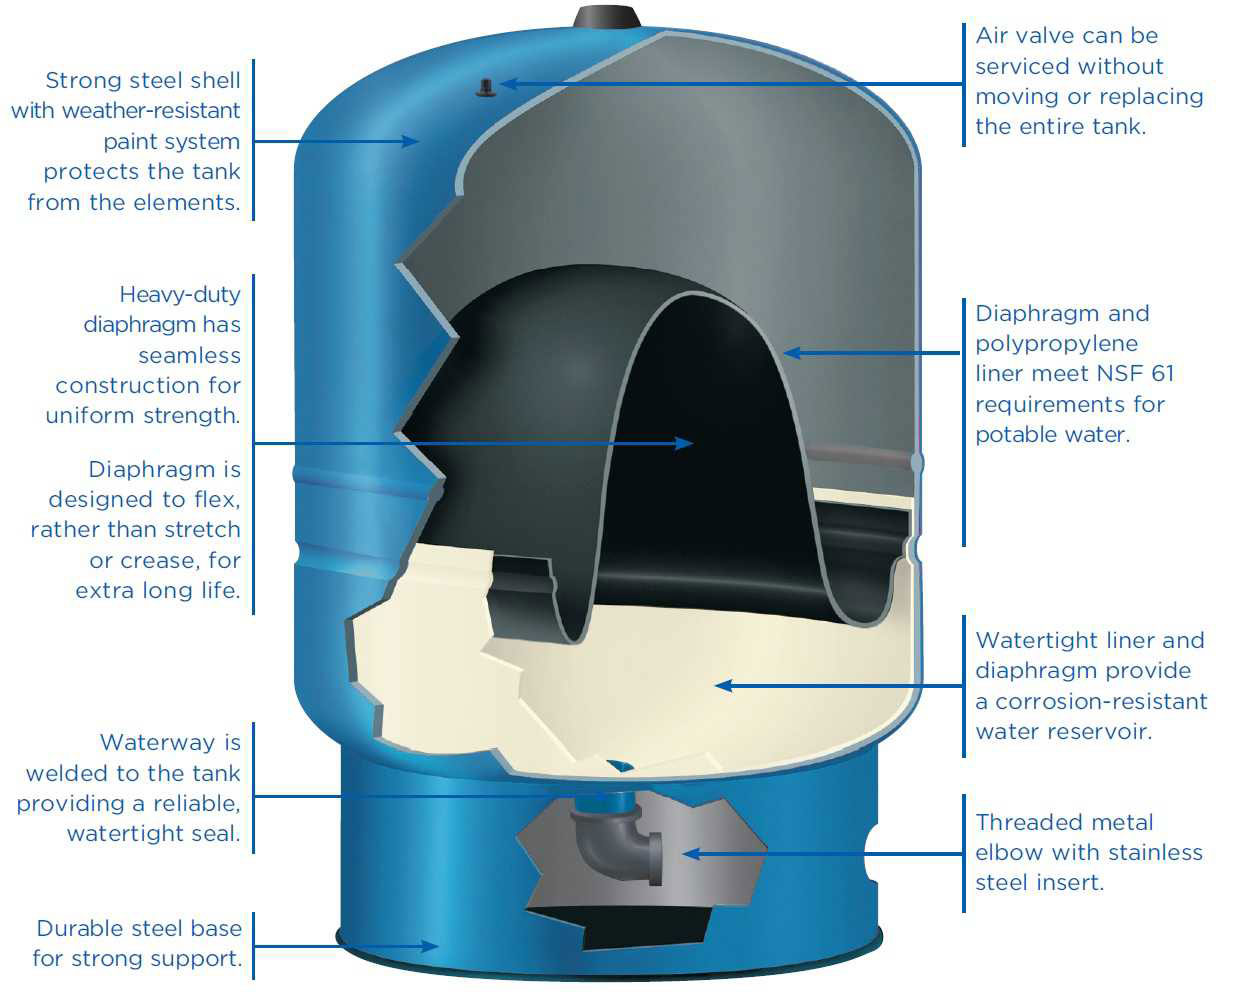
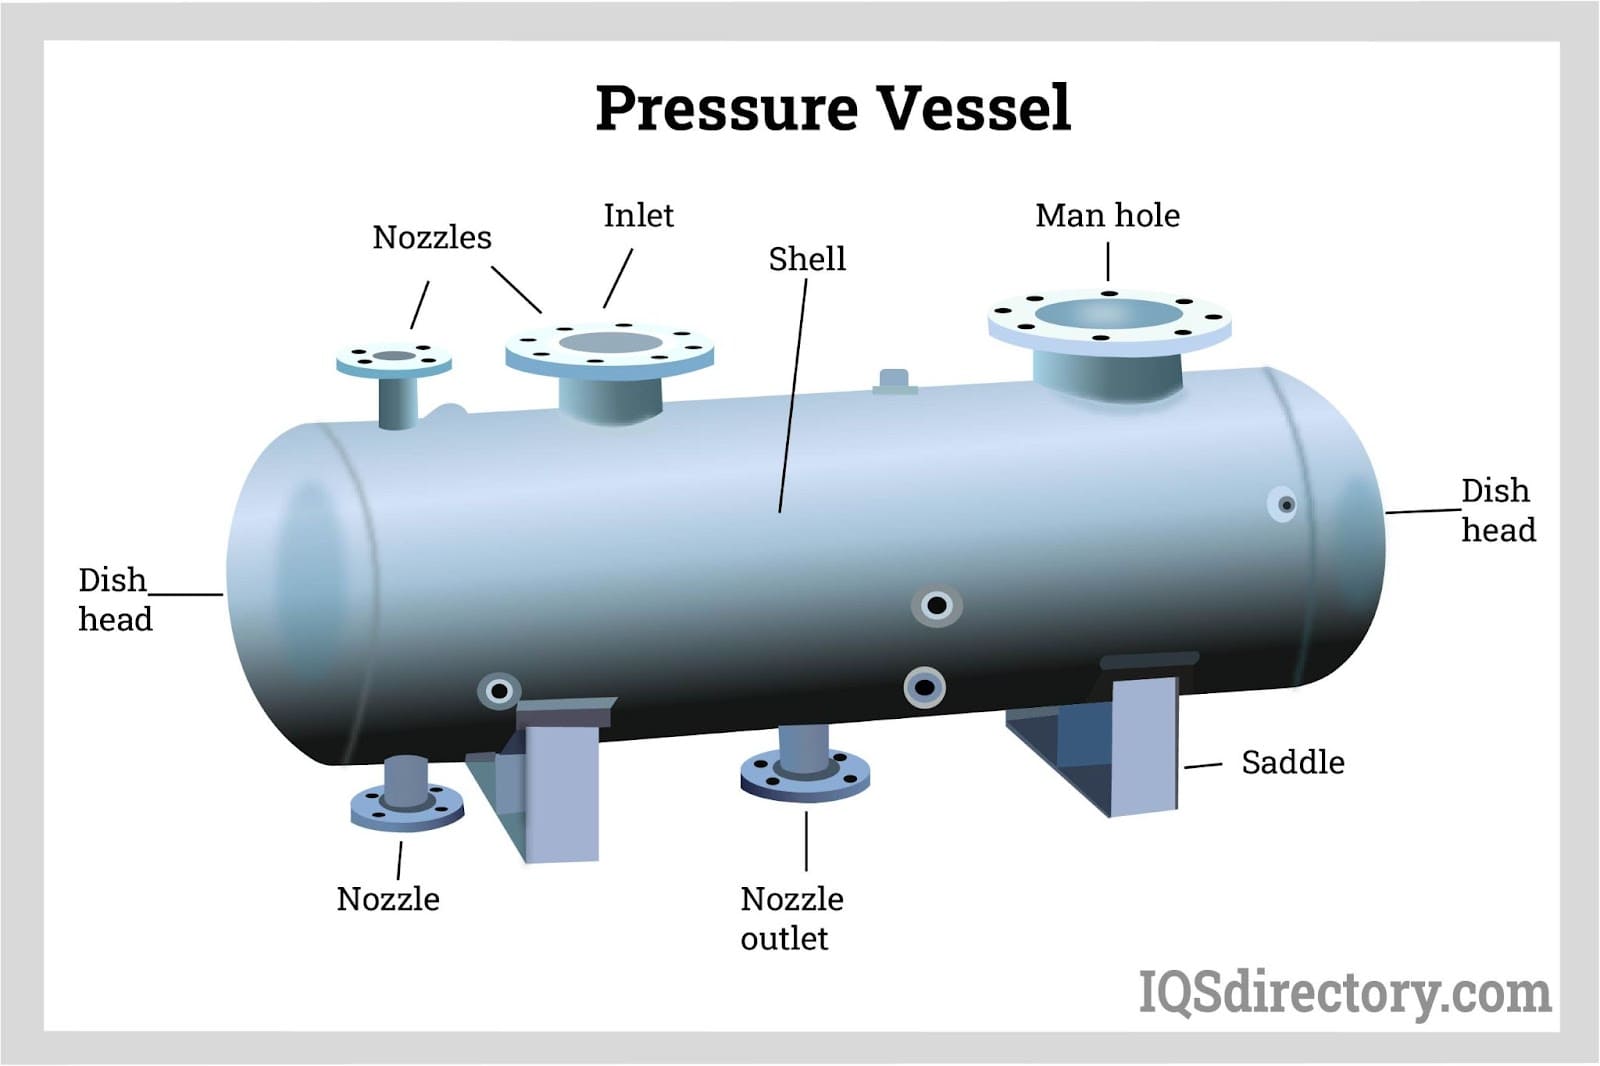
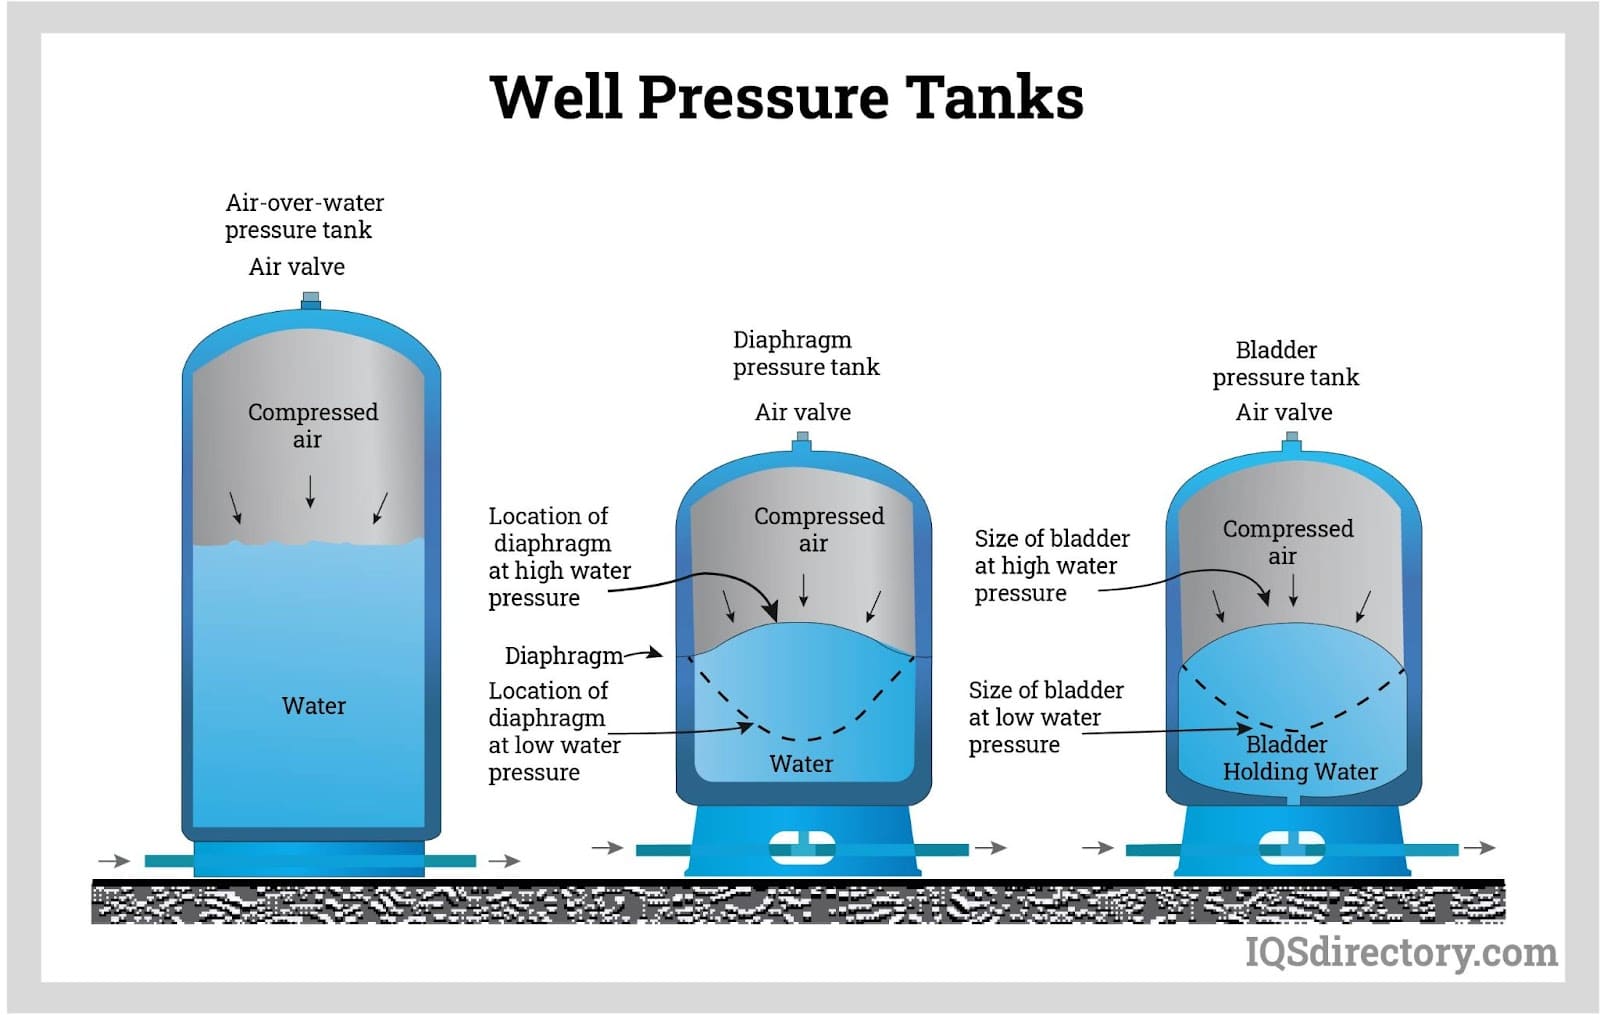
A water pressure vessel typically consists of a steel tank divided into two sections by a flexible diaphragm or bladder. One side is filled with compressed air, pre-charged to a specific pressure (usually around 40 PSI, but check your tank's specifications). The other side connects to your plumbing system and fills with water.
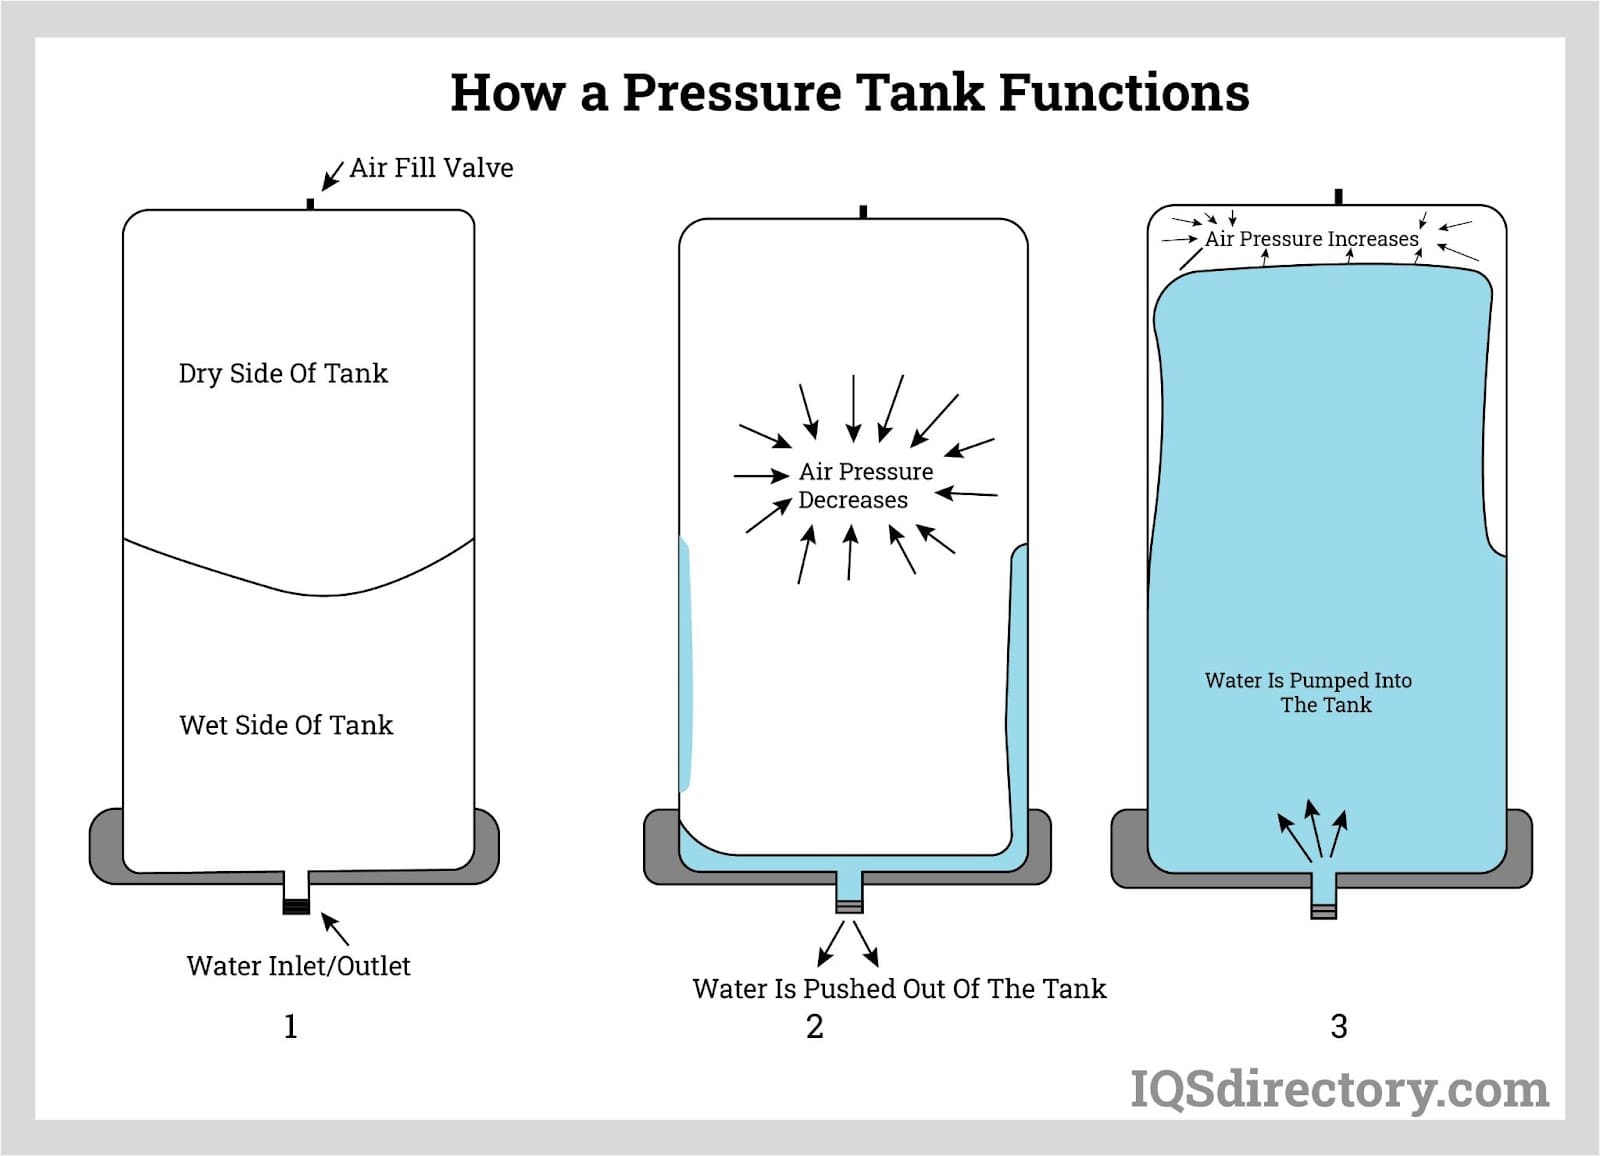
When water heats and expands, it flows into the tank, compressing the air bladder. The compressed air acts as a cushion, absorbing the expansion and preventing excessive pressure buildup. Conversely, when water cools or is drawn from the system, the air pressure pushes the water back into the pipes, maintaining a steady supply.
Troubleshooting Inconsistent Water Temperature & Pressure
Let's get practical. Here's a step-by-step approach to diagnosing common pressure vessel issues. Remember safety first. If you're uncomfortable with any of these steps, call a qualified plumber or HVAC technician.
Step 1: Initial Observation - What Can You Tell Without Tools?
Before grabbing any tools, take a few minutes to observe the symptoms. This can provide valuable clues.
- Water Pressure Fluctuations: Does the water pressure surge or drop dramatically when you turn on a faucet or flush a toilet? This is a key indicator of a potential problem.
- Short Cycling Water Heater: Is your water heater turning on and off frequently, even when you're not using hot water? This "short cycling" can be caused by a faulty pressure vessel unable to absorb expansion.
- Noisy Pipes: Do you hear banging or hammering sounds in your pipes when water is turned on or off? This is known as "water hammer" and can be exacerbated by pressure vessel issues.
- Water Leaks: Visually inspect the area around the pressure vessel for any signs of leaks. Even a small drip can indicate a serious problem.
- Rust or Corrosion: Check the exterior of the tank for rust or corrosion. This can weaken the tank and eventually lead to failure.
Note: If you notice any signs of water leaks near electrical components (e.g., water heater wiring), immediately shut off the power to the water heater at the breaker box and call a qualified electrician or plumber.
Step 2: The "Tap Test" - Identifying a Waterlogged Tank (No Tools Required)
This is a simple, yet often effective, way to determine if your pressure vessel is waterlogged (completely filled with water and lacking an air cushion). A waterlogged tank is essentially useless.
Procedure:
- Gently tap on the sides and top of the tank with your knuckle or a small wrench.
- Listen carefully to the sound. A healthy tank should sound hollow towards the top (where the air bladder is located) and solid towards the bottom (where the water resides).
- If the tank sounds solid and full all the way up, it's likely waterlogged.
Interpretation: A completely solid sound indicates that the air bladder has likely failed or lost its pre-charge, and the tank is filled with water.
Step 3: Checking the Air Charge - Tools Required: Tire Pressure Gauge
If the "Tap Test" suggests a waterlogged tank, the next step is to check the air charge in the bladder. You'll need a simple tire pressure gauge, the same kind you use to check your car tires.
Safety First: Before proceeding, turn off the water supply to the pressure vessel. This prevents water from flowing out when you release the pressure.
Procedure:
- Locate the Schrader valve (the same type of valve you find on a car tire) on the top or side of the pressure vessel, usually covered by a small cap.
- Remove the cap and press the tire pressure gauge onto the valve.
- Read the pressure on the gauge.
Interpretation:
- Low or No Pressure: If the pressure is significantly lower than the manufacturer's recommended pre-charge (usually around 40 PSI – check the sticker on the tank), the bladder may have leaked or lost its charge. This often results in a waterlogged tank.
- Water Sprays Out: If water sprays out when you press the gauge onto the valve, the bladder has definitely ruptured and the tank needs to be replaced.
- Correct Pressure (Initially): If the initial pressure is correct, but the tank still sounds waterlogged, the bladder might be sticking or malfunctioning internally. This is less common, but possible.
Step 4: Recharging the Air Pressure (DIY Action - Proceed with Caution)
If the air pressure is low, you can attempt to recharge it. However, this is a temporary fix if the bladder is leaking. It's crucial to understand that recharging a leaking bladder is like putting air in a tire with a puncture – it will eventually lose pressure again.
Tools Required: Tire pressure gauge, air compressor (or bicycle pump with a pressure gauge).
Safety First: Ensure the water supply to the pressure vessel is shut off.
Procedure:
- Connect your air compressor (or bicycle pump) to the Schrader valve.
- Slowly add air until the pressure reaches the manufacturer's recommended pre-charge (again, usually around 40 PSI). Check the sticker on the tank.
- Important: Before turning the water supply back on, it's generally recommended to lower the pressure in the tank to about 2 PSI below the water supply pressure. To determine your water supply pressure, you can purchase an inexpensive water pressure gauge that screws onto an outdoor faucet. This is a good investment for any homeowner. If you don't have a water pressure gauge, err on the side of caution and reduce the pressure slightly.
- Turn the water supply back on slowly.
- Monitor the water pressure in your plumbing system. It should stabilize and remain relatively constant.
Important Considerations:
- Over-Pressurizing: Avoid over-pressurizing the tank, as this can damage the bladder.
- Bladder Condition: If the bladder is significantly damaged, recharging it will only provide temporary relief. The tank will eventually need to be replaced.
- Repeated Loss of Pressure: If you find yourself needing to recharge the tank frequently (e.g., every few weeks), the bladder is almost certainly leaking, and replacement is the only permanent solution.
Step 5: Checking for Leaks After Recharging
After recharging the tank and turning the water supply back on, carefully inspect the area around the pressure vessel for any signs of new leaks. Use a flashlight to get a good view of all connections and the tank's surface.
What to Look For:
- Drips: Even small, infrequent drips can indicate a problem.
- Moisture: Dampness or condensation on the tank's surface.
- Puddling: Standing water near the base of the tank.
If you find any leaks, shut off the water supply immediately and contact a plumber.
When to Call a Professional
While some pressure vessel troubleshooting and maintenance can be done DIY, there are situations where calling a qualified plumber or HVAC technician is essential.
Call a Professional If:
- You are uncomfortable working with plumbing or electrical components. Safety should always be your top priority.
- You suspect a major leak or structural damage to the tank. Don't risk injury or further damage to your home.
- You are unable to identify the source of the problem. Professional diagnosis can save you time and money in the long run.
- The tank requires replacement. Replacing a pressure vessel involves disconnecting and reconnecting plumbing, which can be complex and requires specific knowledge and tools. Improper installation can lead to leaks and other problems.
- Your water heater is also malfunctioning. A professional can assess the entire system and ensure that all components are working correctly.
- You notice water spraying out of the Schrader valve. This indicates a ruptured bladder, and the tank needs replacement.
Preventative Maintenance
Taking a few simple steps can help prolong the life of your pressure vessel and prevent future problems.
- Regularly Check the Air Charge: Check the air pressure in the bladder at least once a year, or more frequently if you suspect a problem.
- Inspect for Leaks: Visually inspect the tank and connections for leaks on a regular basis.
- Maintain Proper Water Heater Temperature: Setting your water heater to a reasonable temperature (around 120°F) can reduce the amount of expansion and contraction the pressure vessel needs to handle.
- Flush Your Water Heater: Regularly flushing your water heater helps remove sediment buildup, which can improve efficiency and reduce stress on the pressure vessel.
By understanding how your water pressure vessel works and following these troubleshooting steps, you can take control of your home's plumbing system and prevent potentially costly repairs. Remember, when in doubt, always consult a qualified professional.