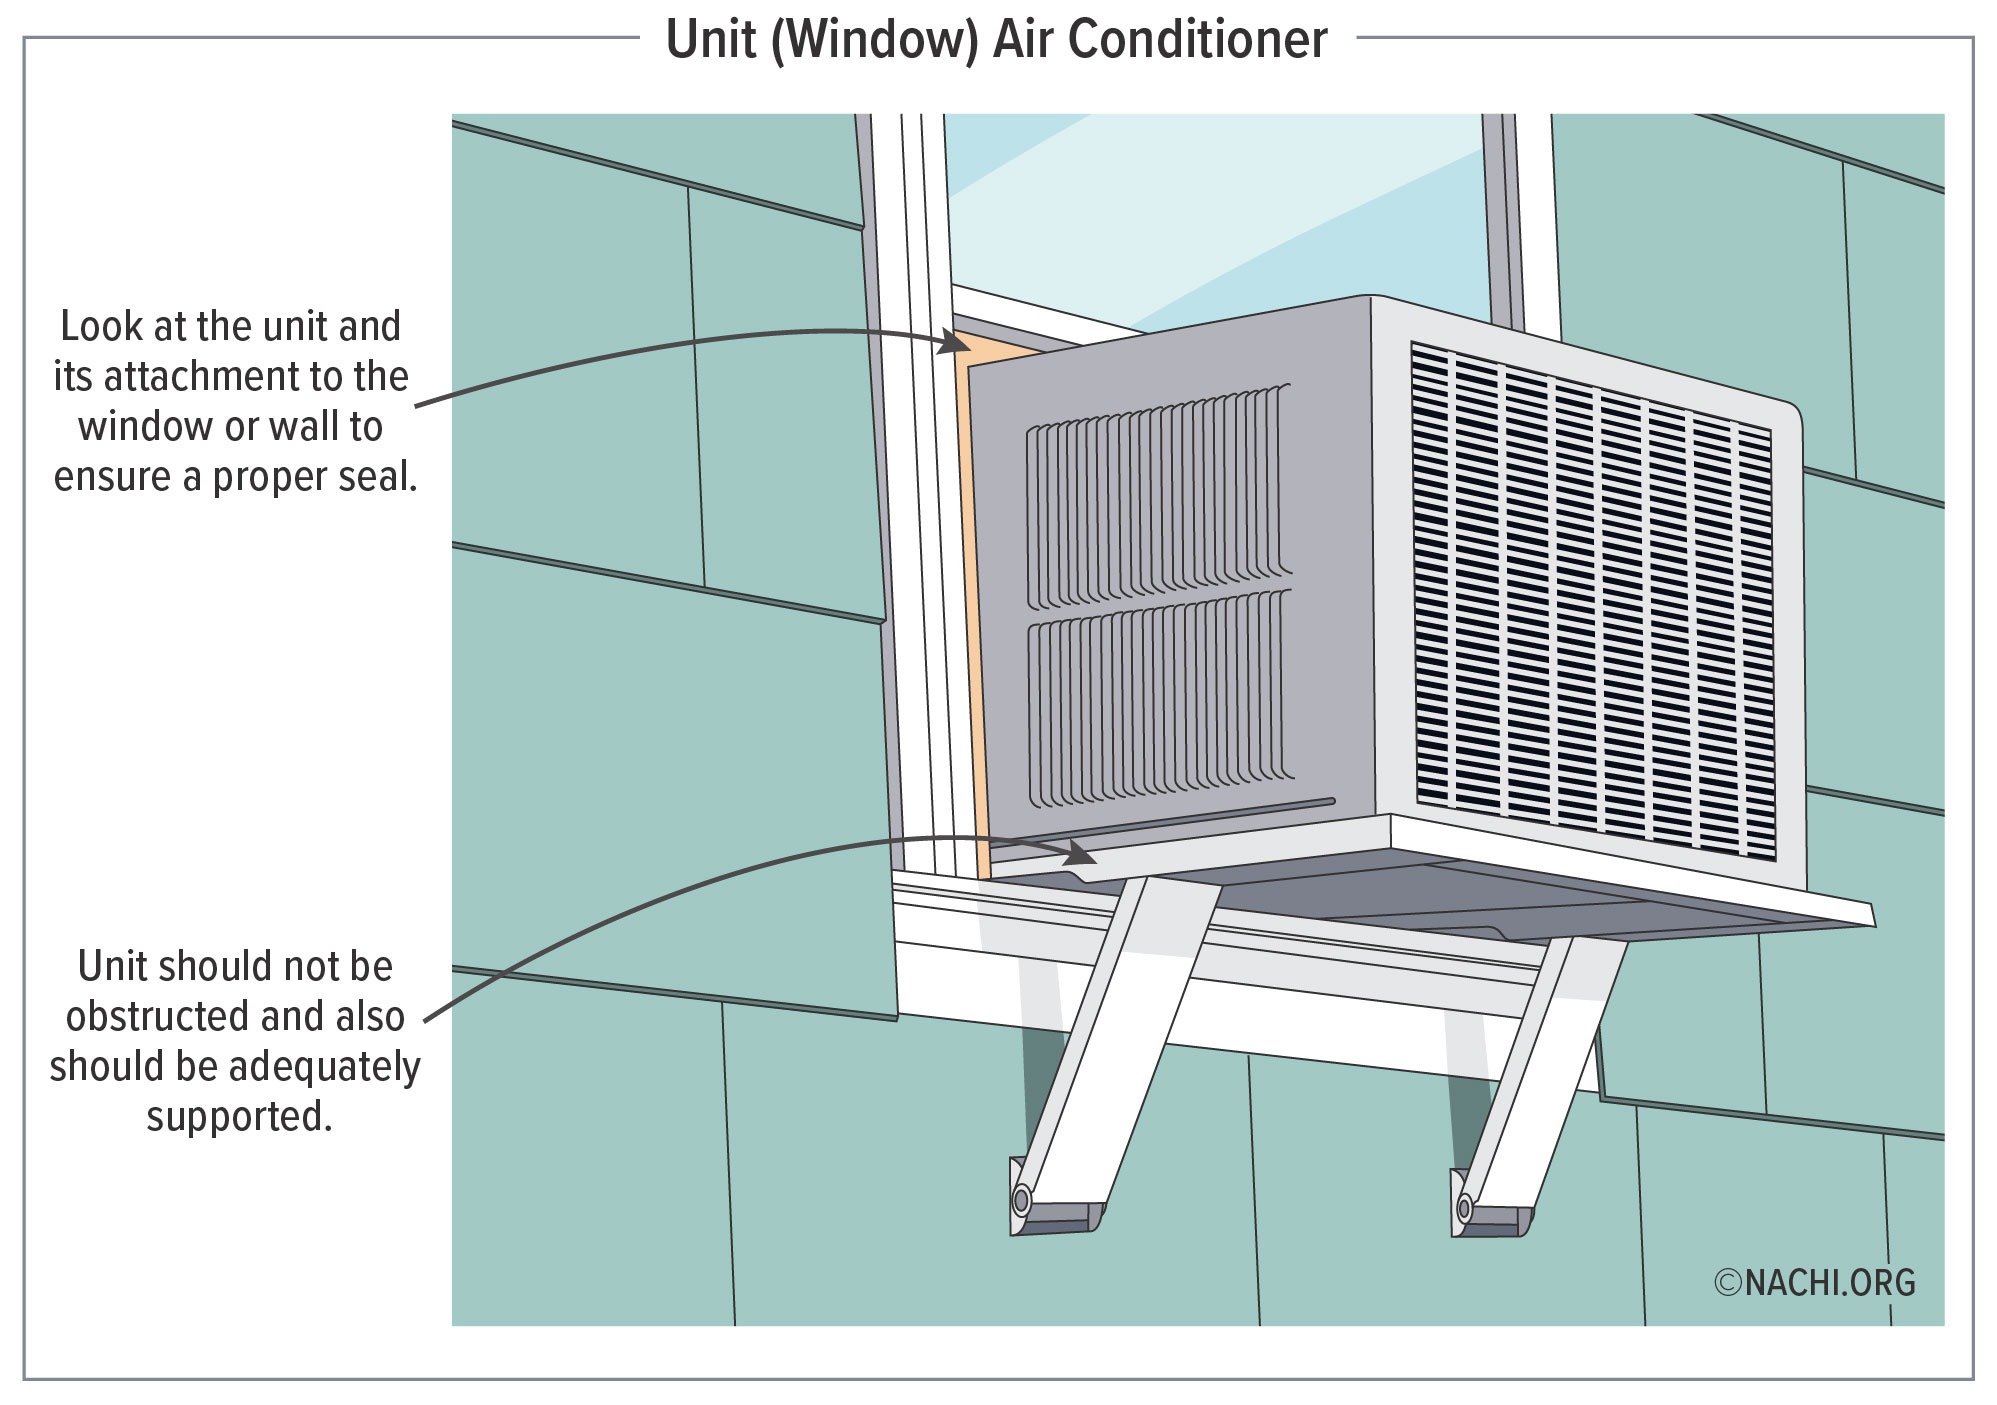
How Does A Window Unit Work
Imagine this: It's a sweltering summer day, and your window air conditioner, your trusty oasis of cool, suddenly decides to quit. The hum stops, the cool air vanishes, and you're left sweating and frustrated. Before you call a repair technician, let's explore some troubleshooting steps you can take yourself to potentially diagnose and fix the problem. This guide will break down how a window unit works and what you can do to get it back up and running safely.
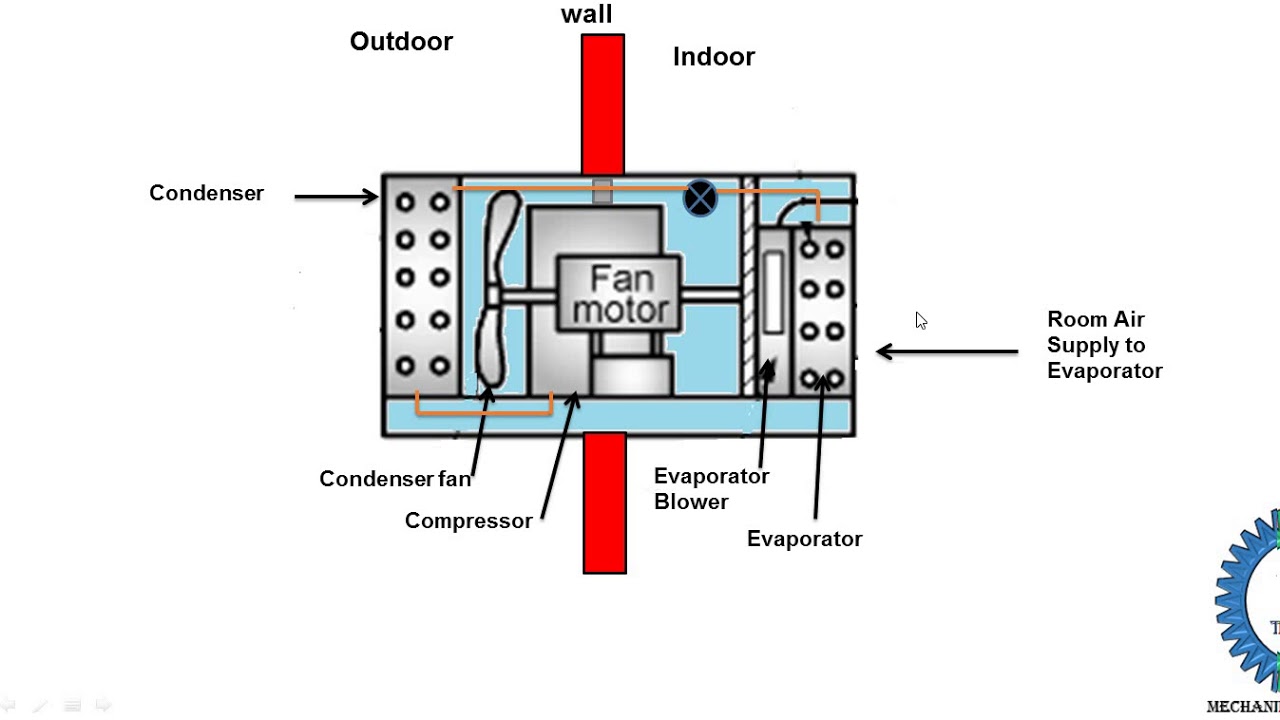
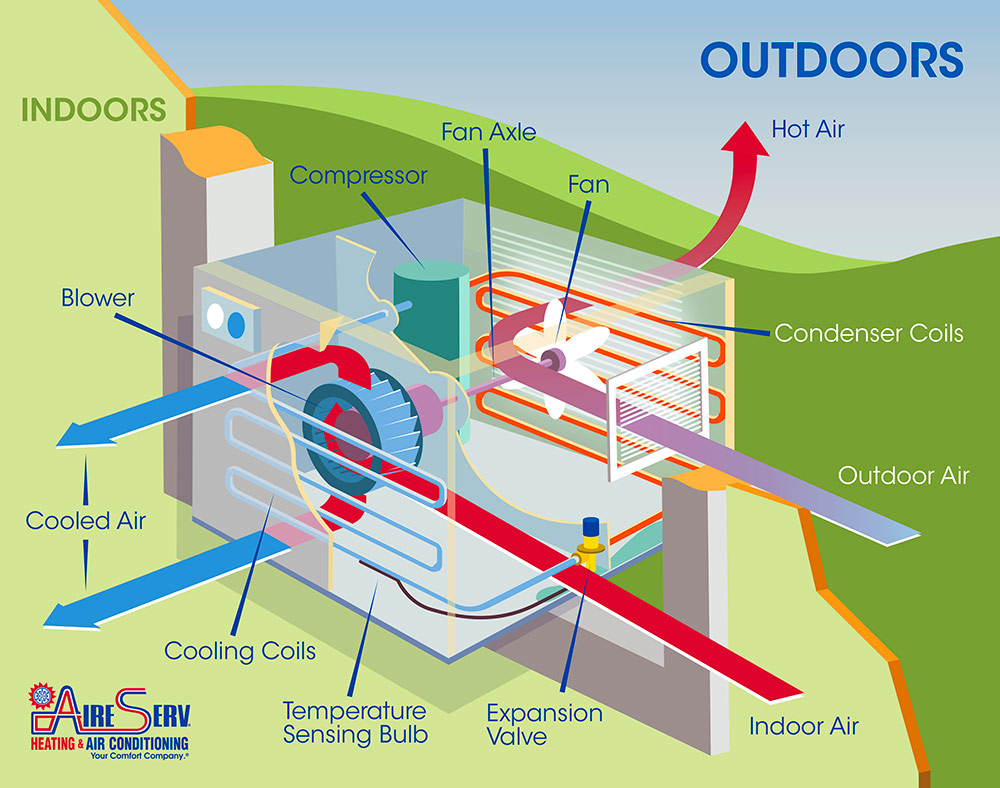
Understanding How Your Window Unit Works
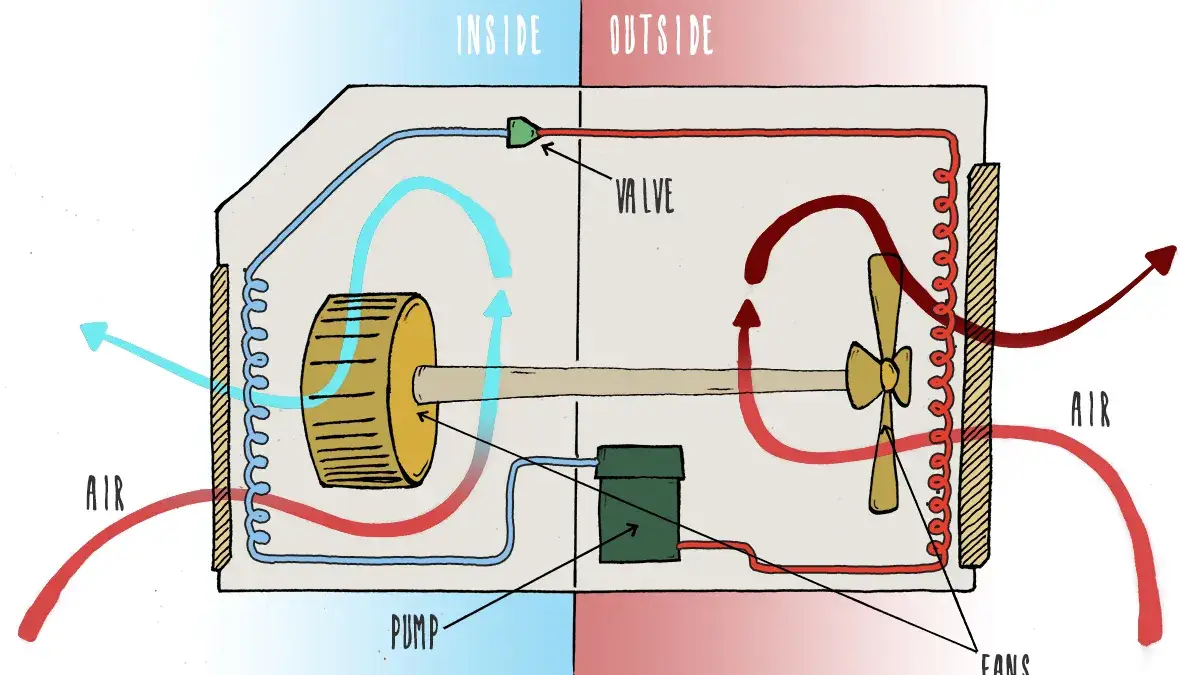
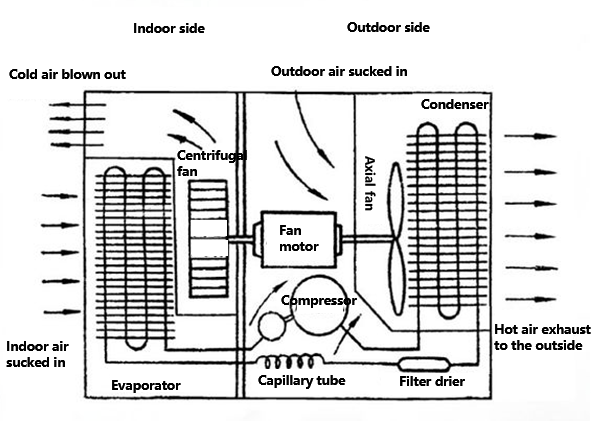
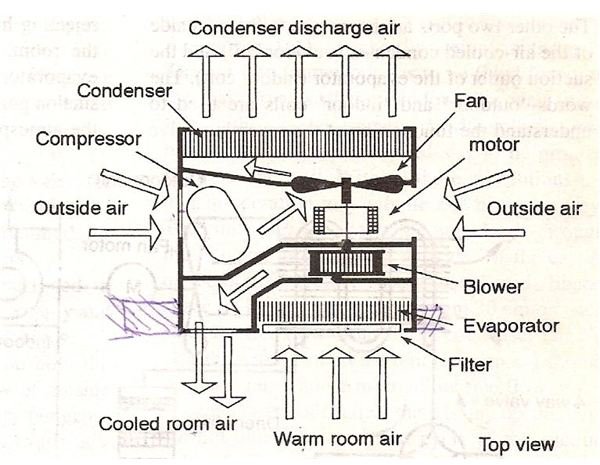
First, let's understand the basics. A window air conditioner is essentially a closed-loop refrigeration system. It works by:
- Compressing a refrigerant gas.
- Condensing the hot, high-pressure gas into a liquid, releasing heat outside.
- Expanding the liquid refrigerant, causing it to evaporate and absorb heat from inside your room.
- Circulating the now-cooled air back into the room.
The main components involved in this process are:
- Compressor: The heart of the system, responsible for compressing the refrigerant.
- Condenser Coils: Located on the outside of the unit, these coils release heat.
- Evaporator Coils: Located on the inside of the unit, these coils absorb heat.
- Refrigerant: The fluid that cycles through the system, absorbing and releasing heat.
- Fan: Circulates air over the coils, both inside and outside.
- Thermostat: Controls the cooling cycle based on the desired temperature.
- Capacitor: Provides the initial jolt of electricity needed to start the compressor and fan motor.
Troubleshooting Your Window Unit: A Step-by-Step Guide
Now, let's get to the troubleshooting. Remember, safety first. Always disconnect the unit from the power outlet before attempting any repairs.
1. Check the Power Supply
This might seem obvious, but it's the most common culprit. Start with the basics:
- Is it plugged in? Double-check the power cord is securely plugged into both the air conditioner and the wall outlet.
- Is the outlet working? Test the outlet with another appliance, like a lamp. If the lamp doesn't work, the outlet itself might be the problem. Try a different outlet.
- Check the circuit breaker: Locate the circuit breaker for the outlet the air conditioner is plugged into. If the breaker has tripped (switched to the "off" position), flip it back to the "on" position. If it trips again immediately, there's a larger electrical issue and you should call an electrician.
- Examine the power cord: Look for any signs of damage to the power cord, such as cuts, fraying, or exposed wires. A damaged power cord is a serious electrical hazard and must be replaced by a qualified electrician.
2. Review the Settings
Sometimes the solution is as simple as adjusting the settings.
- Is the unit turned on? Ensure the power switch is in the "on" position.
- Is the thermostat set correctly? Make sure the thermostat is set to a temperature lower than the current room temperature. If the thermostat is set too high, the unit won't turn on.
- Is it in the correct mode? Most units have different modes, such as "cool," "fan only," or "auto." Ensure it's set to the "cool" mode if you want it to cool the air.
- Check the fan speed: Try increasing the fan speed to see if that helps with airflow.
3. Clean the Air Filter
A dirty air filter is a common cause of reduced airflow and cooling efficiency. It restricts airflow, forcing the unit to work harder and potentially overheat.
- Locate the air filter: The air filter is usually located behind a removable panel on the front of the unit. Refer to your owner's manual for the exact location.
- Remove the filter: Gently remove the filter.
- Clean the filter: You can clean most air filters by washing them with mild soap and water. Rinse thoroughly and allow the filter to dry completely before replacing it. You can also vacuum the filter to remove dust and debris.
- Replace the filter: If the filter is heavily soiled or damaged, replace it with a new one. You can find replacement filters at most hardware stores.
4. Inspect the Coils
Both the condenser coils (outside) and the evaporator coils (inside) need to be clean for efficient operation. Dust and debris can insulate the coils, preventing them from releasing or absorbing heat effectively. Disconnect the unit from the power outlet before proceeding.
- Condenser Coils (Outside): Carefully remove any leaves, grass, or other debris that may be blocking the coils. You can use a brush attachment on a vacuum cleaner to gently remove dust. If the coils are heavily soiled, you can use a coil cleaner specifically designed for air conditioners. Follow the instructions on the cleaner carefully.
- Evaporator Coils (Inside): The evaporator coils are more delicate. Use a soft brush or vacuum cleaner with a brush attachment to gently remove dust. Be careful not to bend or damage the fins. If you are uncomfortable cleaning the coils yourself, consider calling a professional.
5. Check the Drain
Window air conditioners produce condensation, which needs to be drained properly. A clogged drain can lead to water leaks and reduced cooling efficiency.
- Locate the drain hole: The drain hole is usually located on the bottom or back of the unit.
- Clear the drain hole: Use a straightened paperclip or small wire to gently clear any blockage in the drain hole. Be careful not to push the debris further in.
- Tilt the unit slightly: Tilting the unit slightly downwards towards the outside can help facilitate drainage.
6. Listen for Unusual Noises
Unusual noises can indicate a problem with the compressor, fan motor, or other components.
- Grinding or rattling: Could indicate a problem with the fan motor or compressor. This often requires professional attention.
- Hissing: Could indicate a refrigerant leak. Refrigerant leaks should be addressed by a qualified HVAC technician.
- Humming but not starting: Could indicate a problem with the capacitor.
7. Capacitor Replacement (Proceed with Caution!)
The capacitor provides the initial electrical surge needed to start the compressor and fan motor. If the capacitor is failing, the unit might hum but not start. This repair involves working with electricity and should only be attempted if you are comfortable and experienced with electrical repairs. If not, call a qualified HVAC technician.
- Disconnect the unit from the power outlet and WAIT at least 10 minutes. Capacitors can hold a charge even after the unit is unplugged, posing a serious electrical shock hazard.
- Locate the capacitor: The capacitor is usually a cylindrical component located near the compressor or fan motor.
- Discharge the capacitor: Before touching the capacitor, discharge it using a screwdriver with an insulated handle. Short the terminals of the capacitor with the screwdriver. This will discharge any remaining electrical charge.
- Remove the old capacitor: Note the wiring configuration and carefully disconnect the wires from the old capacitor.
- Install the new capacitor: Connect the wires to the new capacitor in the same configuration as the old one.
- Replace the cover: Replace the cover over the capacitor.
- Plug the unit back in and test: Plug the unit back into the power outlet and test to see if it starts.
When to Call a Professional
While many problems can be resolved with simple troubleshooting, some issues require the expertise of a qualified HVAC technician. Never attempt repairs you are uncomfortable with or that involve working with refrigerant, gas, or complex electrical components. Call a professional if:
- You suspect a refrigerant leak.
- The compressor is not working.
- You are experiencing electrical problems, such as repeated circuit breaker tripping.
- You are not comfortable working with electricity.
- You have tried all the troubleshooting steps and the unit still is not working.
- The unit is still under warranty.
Preventative Maintenance
Regular maintenance can help prevent problems and extend the life of your window air conditioner.
- Clean the air filter regularly: At least once a month, or more often if you live in a dusty environment.
- Clean the coils: At least once a year, or more often if you notice a decrease in cooling efficiency.
- Inspect the drain: Regularly check the drain hole to ensure it is clear.
- Cover the unit during the off-season: When you are not using the unit, cover it with a waterproof cover to protect it from the elements.
By following these troubleshooting steps and preventative maintenance tips, you can keep your window air conditioner running smoothly and efficiently, ensuring a cool and comfortable summer.