How Does Air Conditioner Condenser Work
It's a sweltering summer day, and you're counting on your air conditioner to keep you cool and comfortable. But then, disaster strikes: the AC struggles to cool, blows warm air, or worse, doesn't turn on at all. While the entire AC system is complex, understanding how the condenser unit works, and performing some basic troubleshooting, can help you identify the problem and potentially save you a service call.
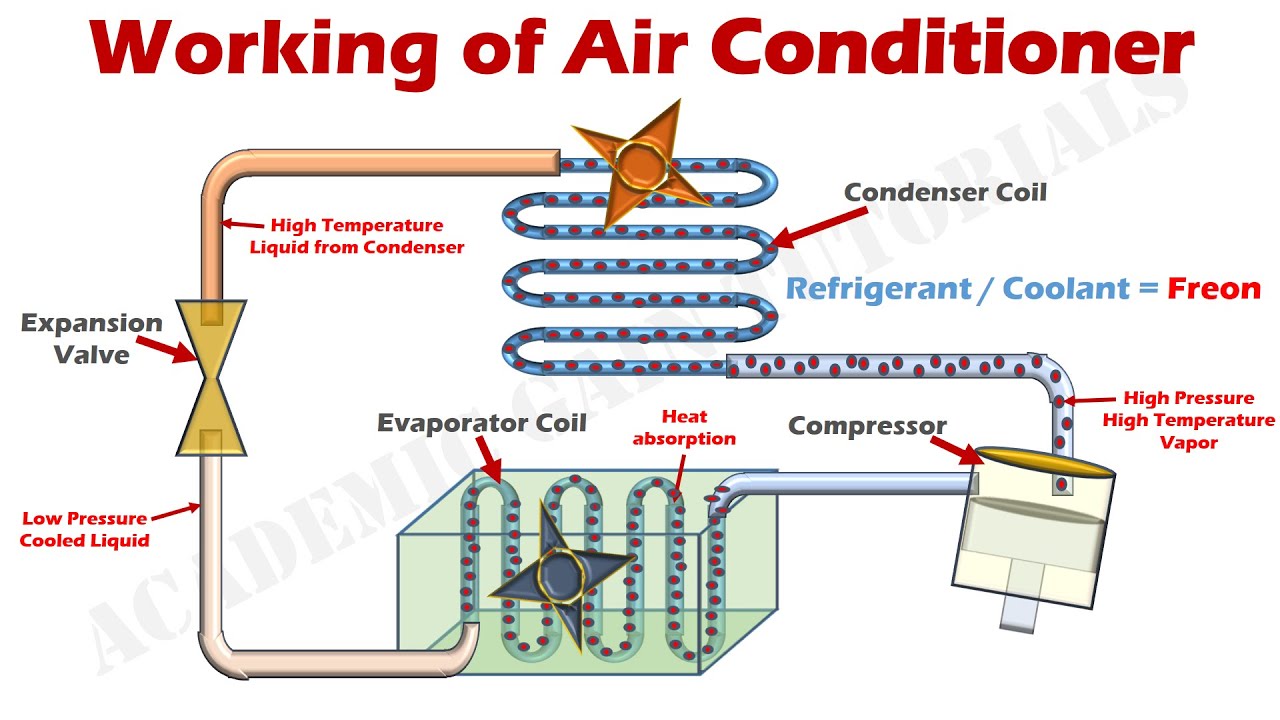
Understanding the Air Conditioner Condenser
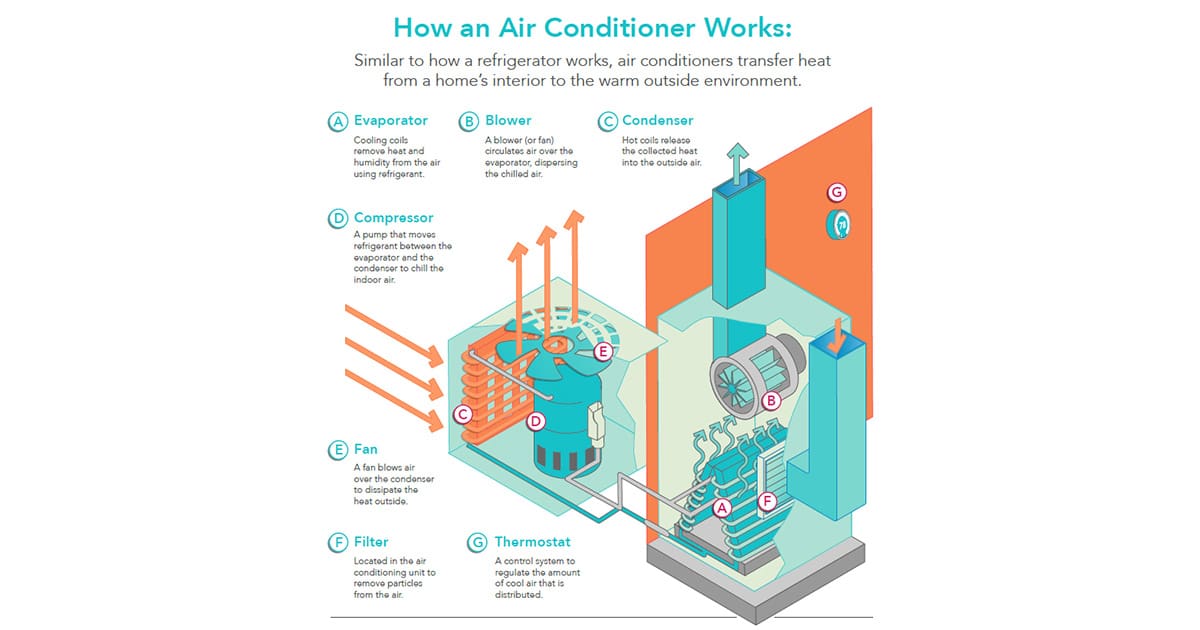
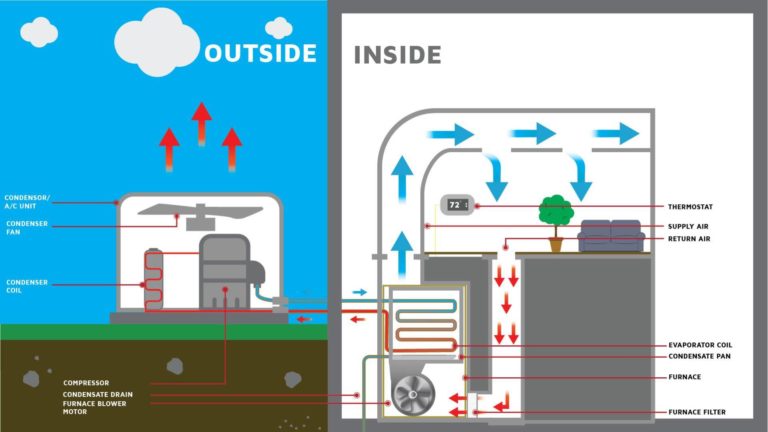
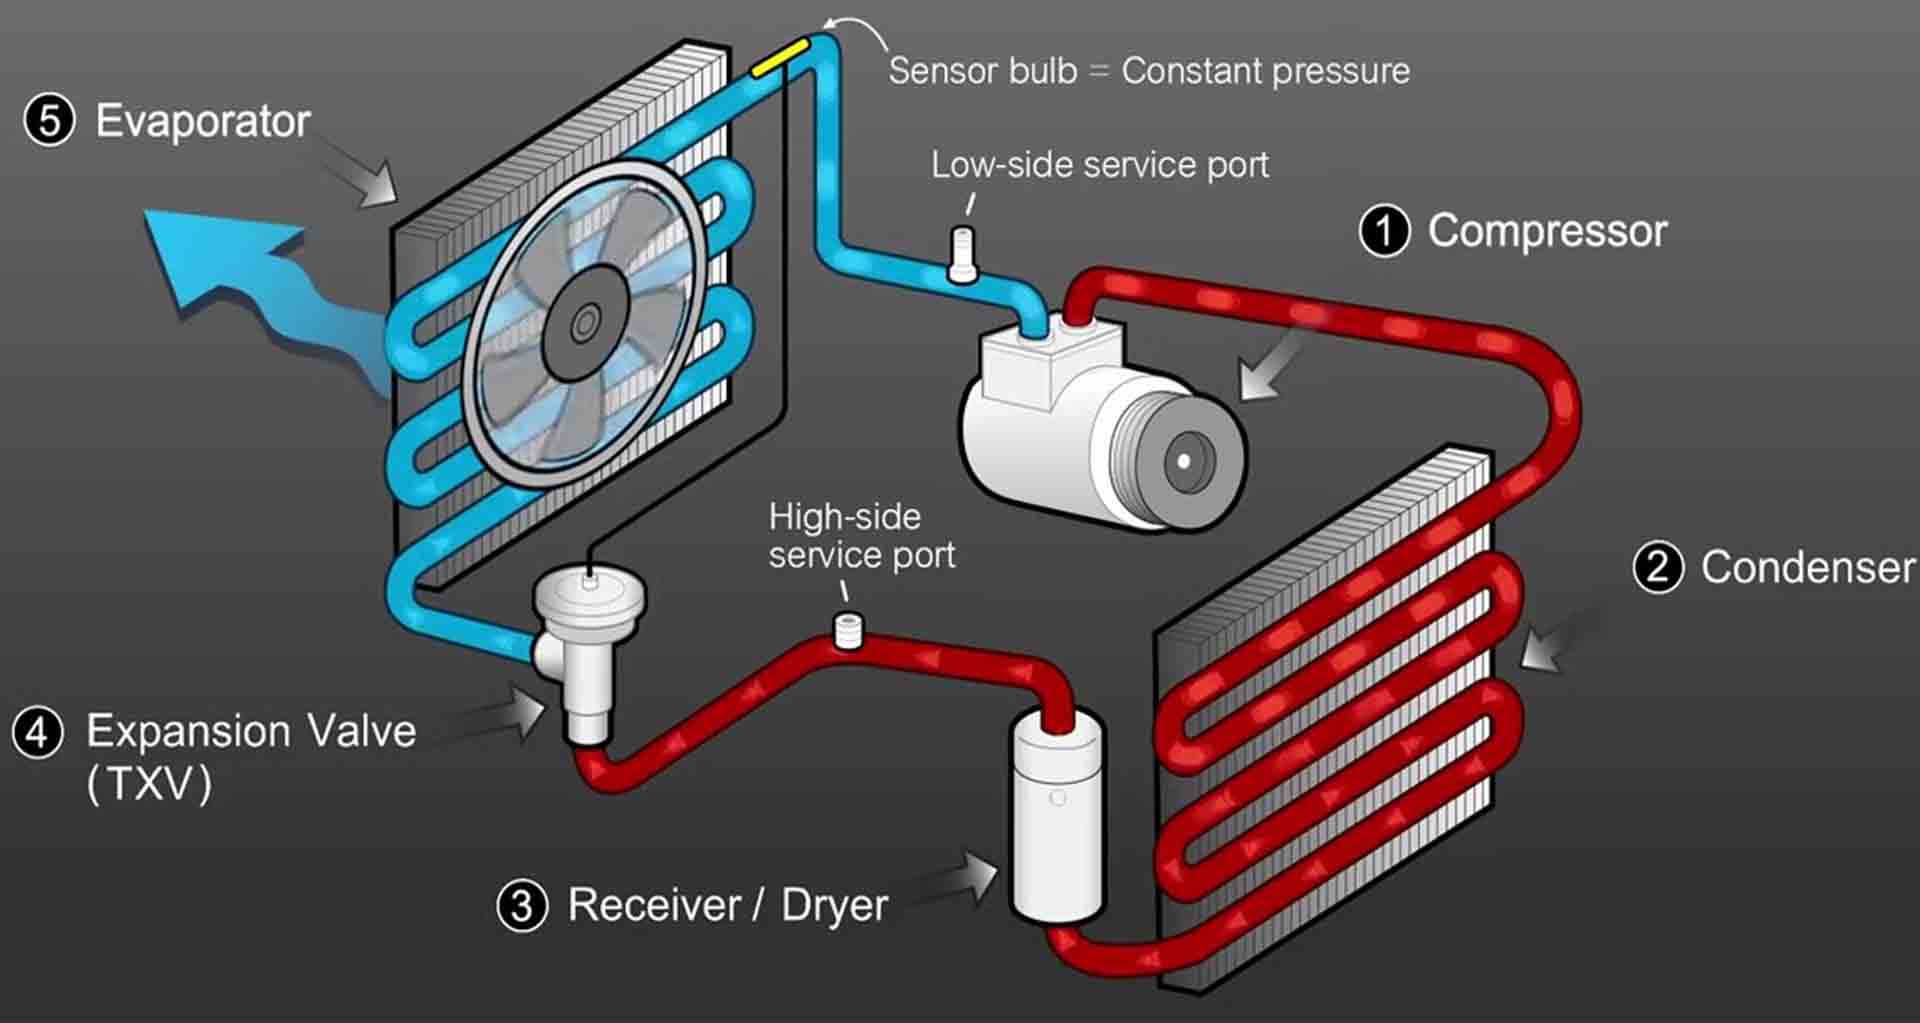
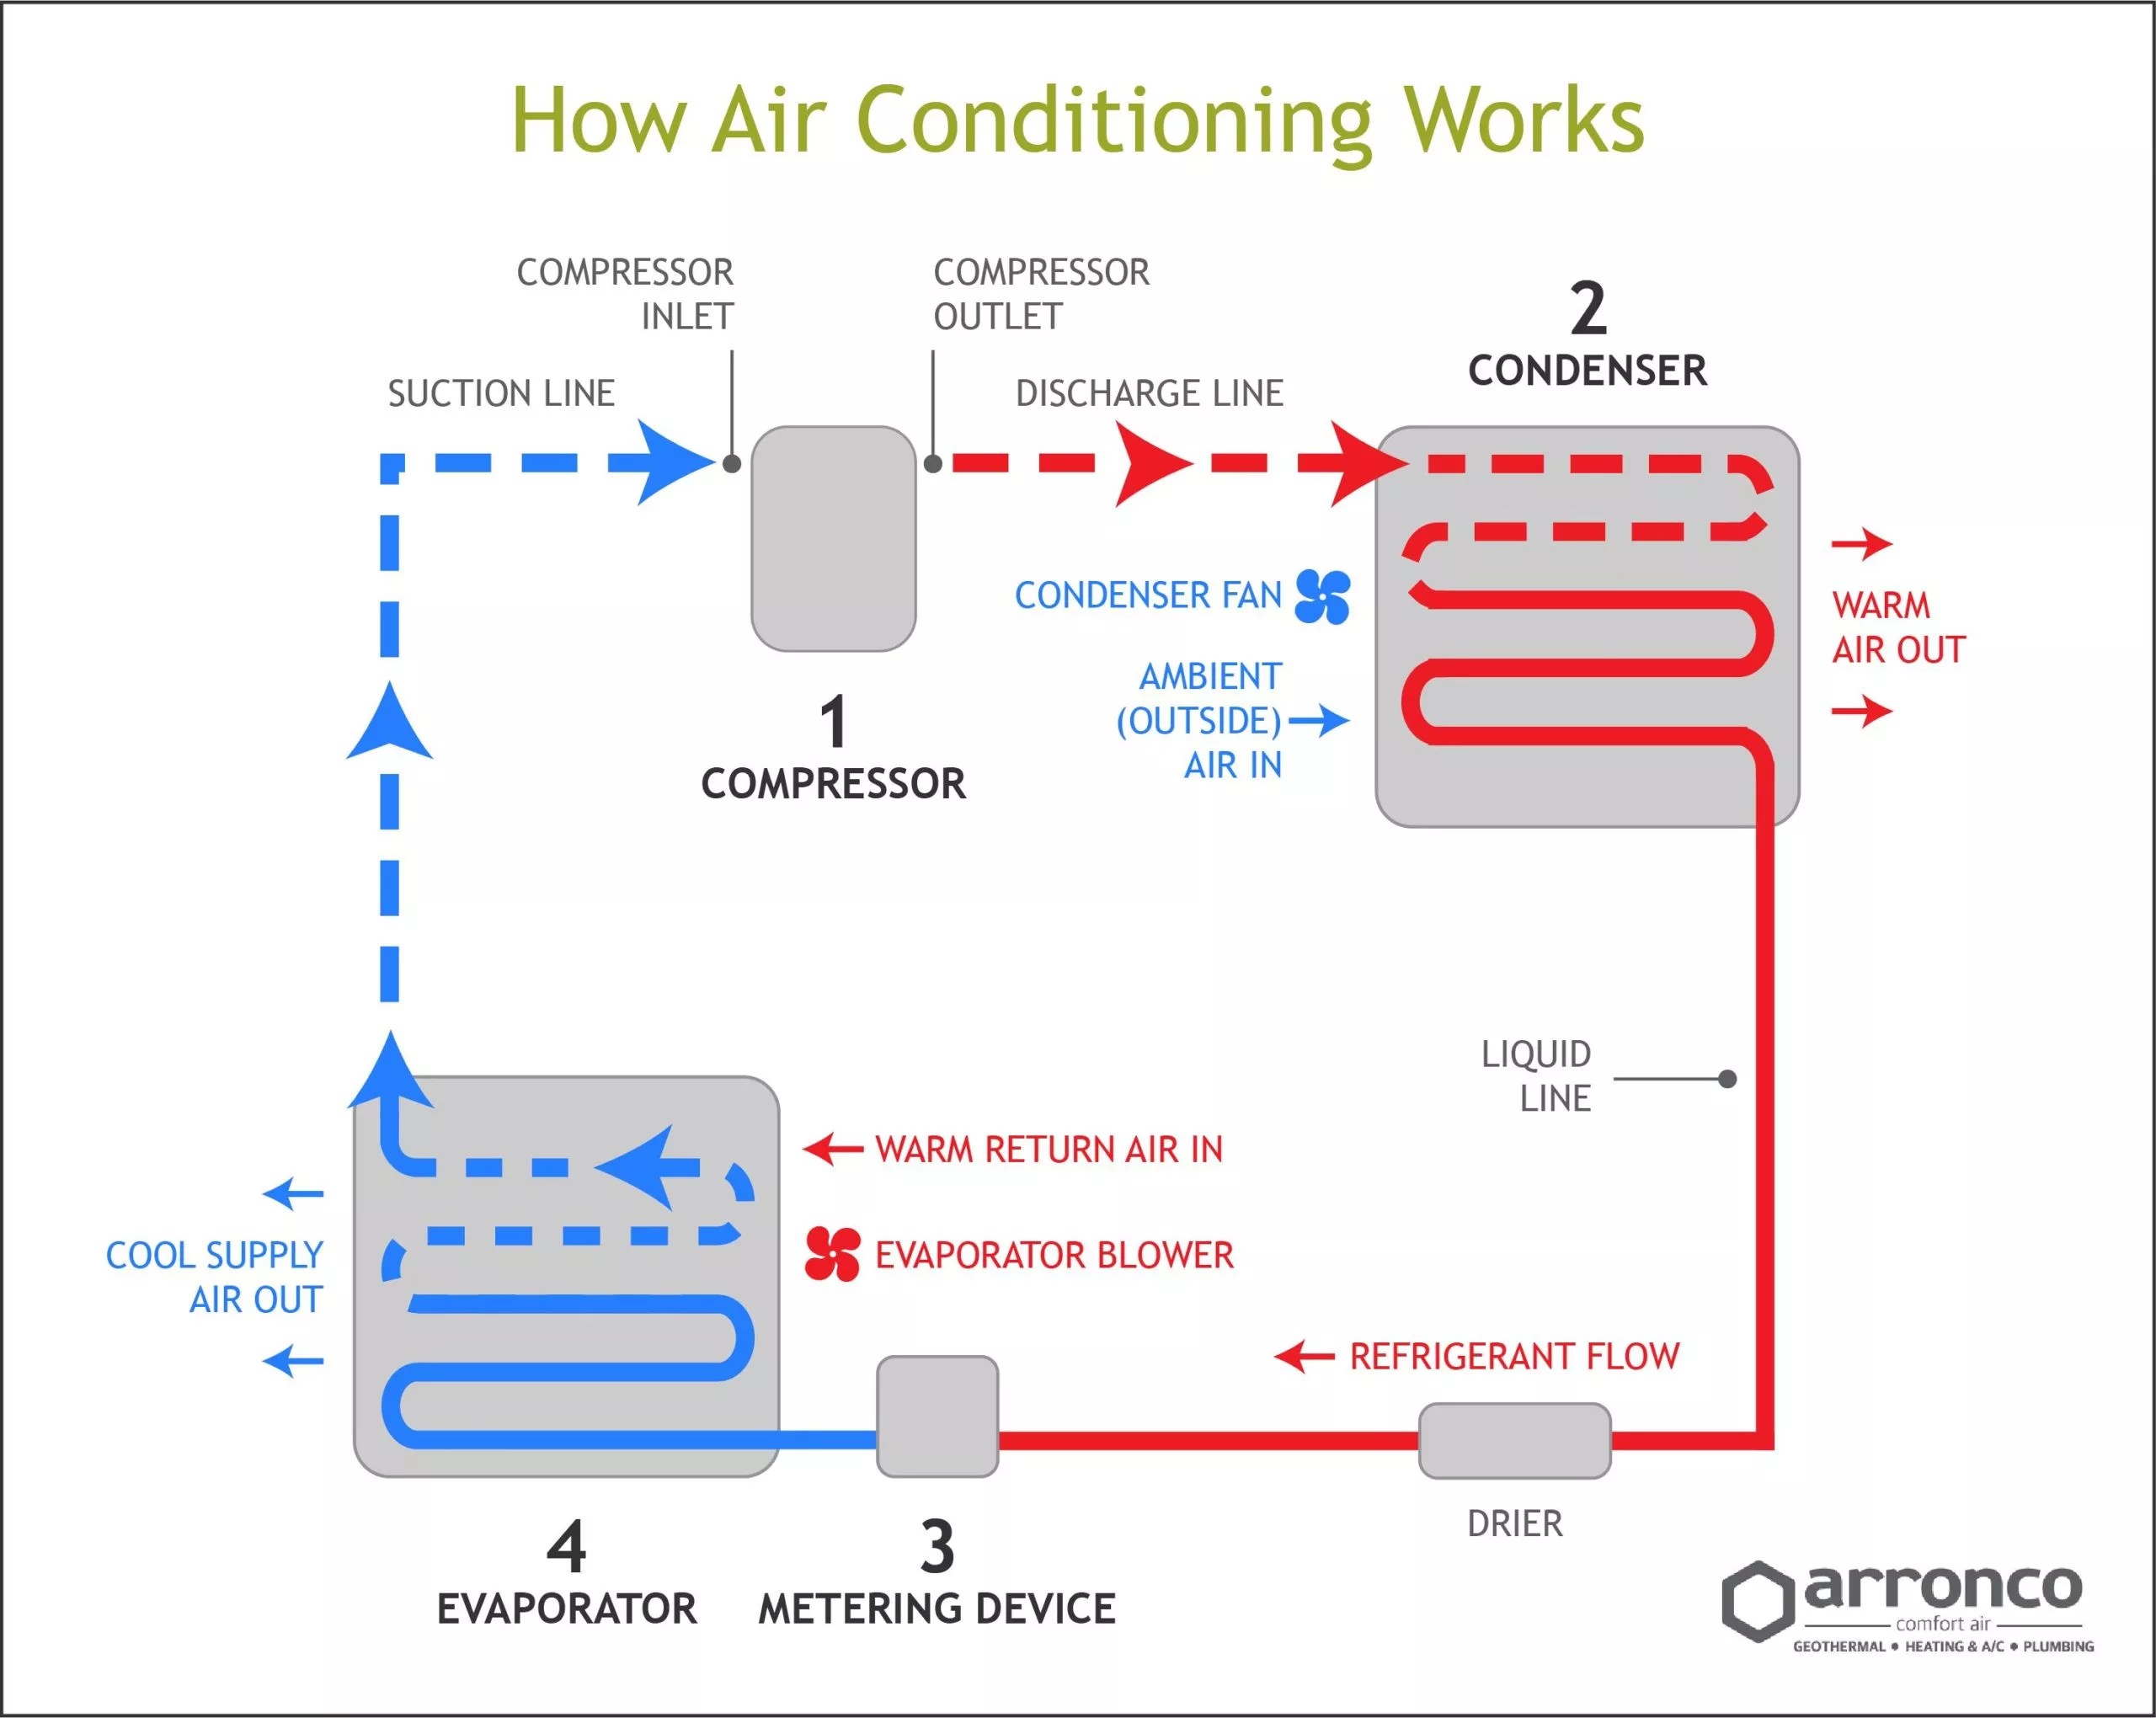
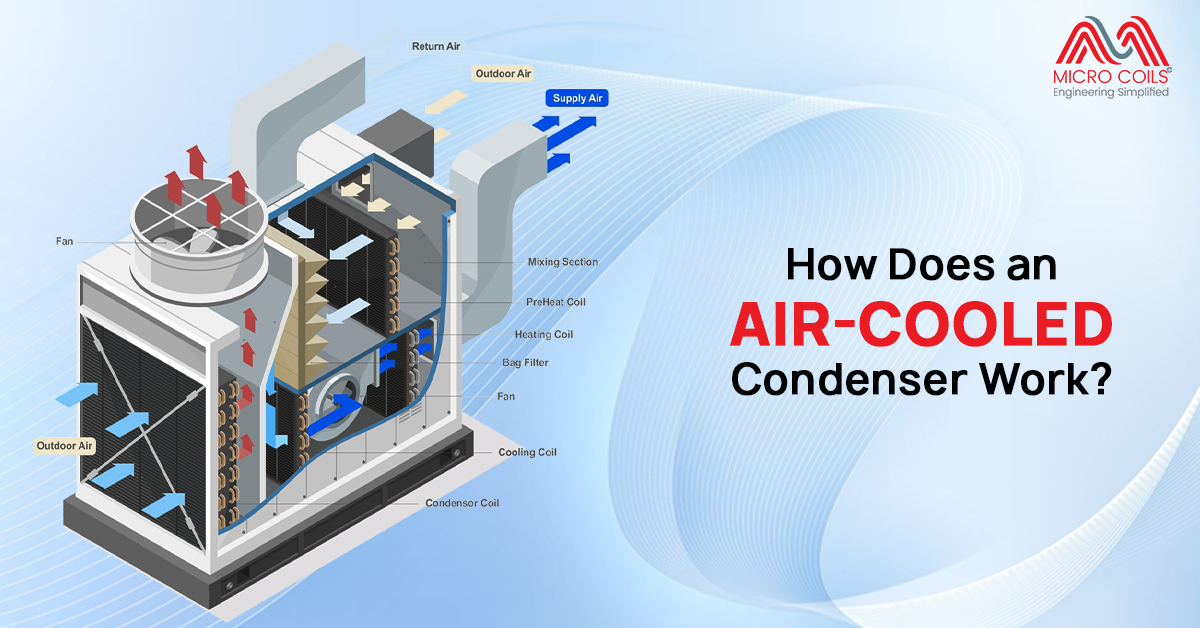
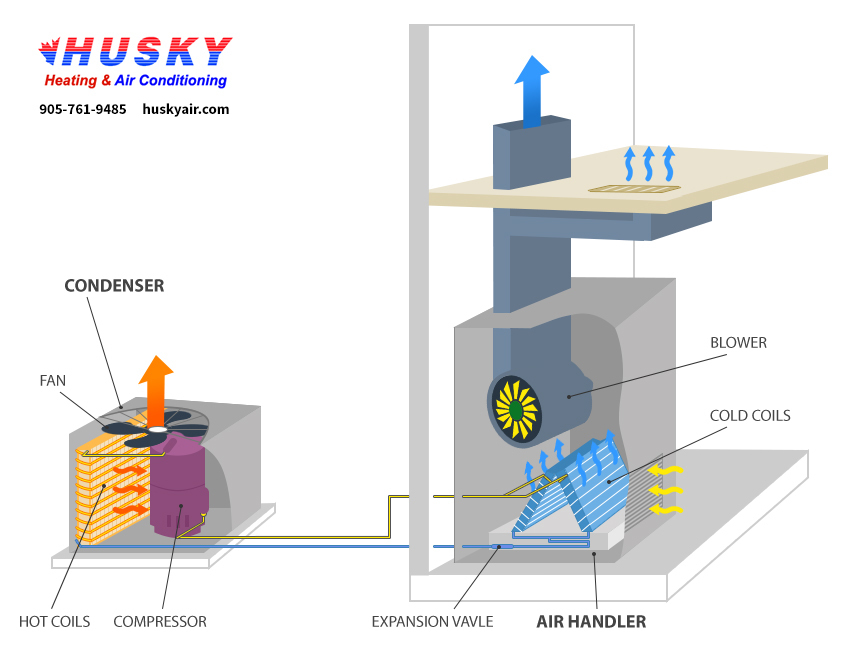
The condenser is the outdoor unit of your central air conditioning system. It plays a crucial role in the cooling process. Its primary function is to release the heat that has been absorbed from inside your home.
Here's a simplified explanation of the condenser's operation:
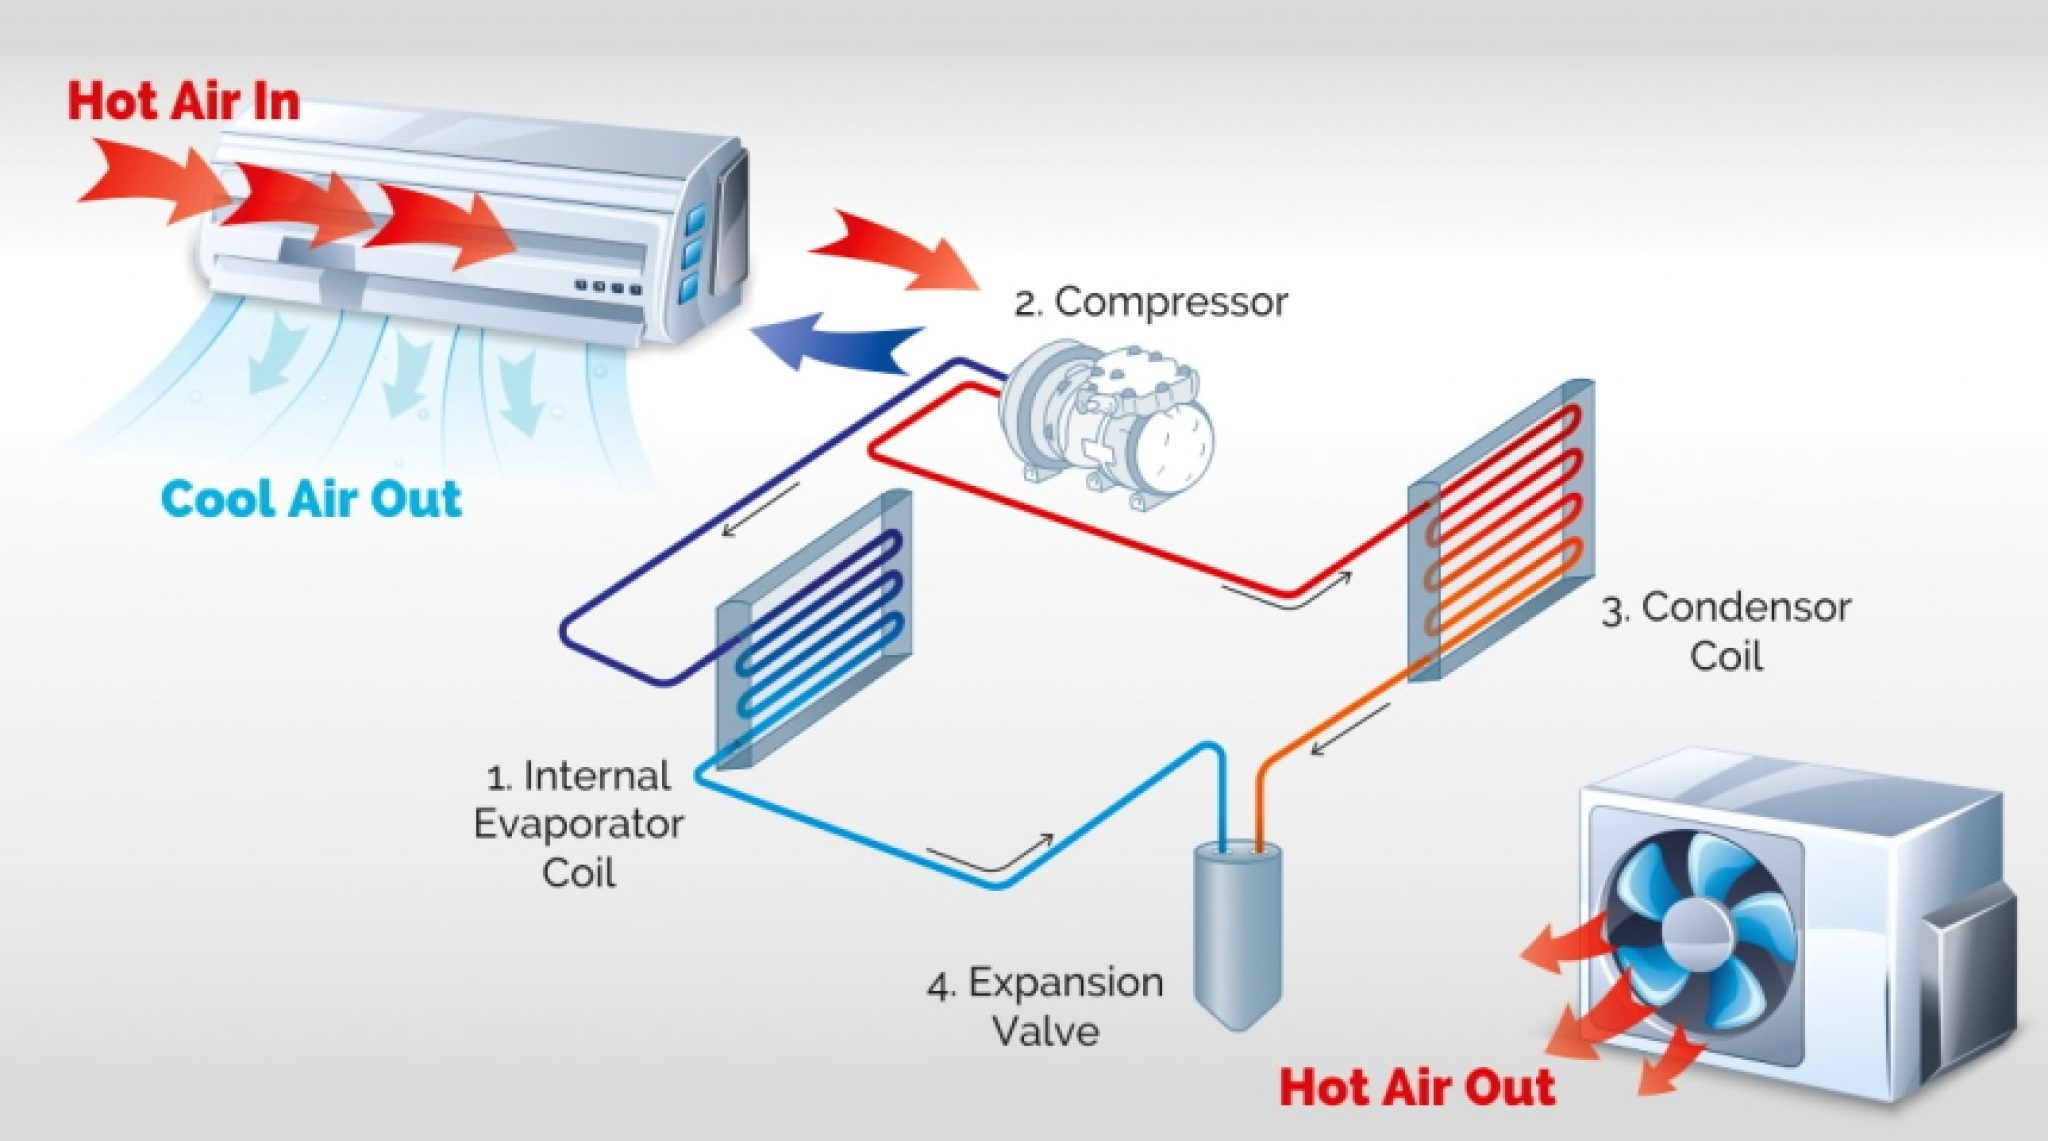
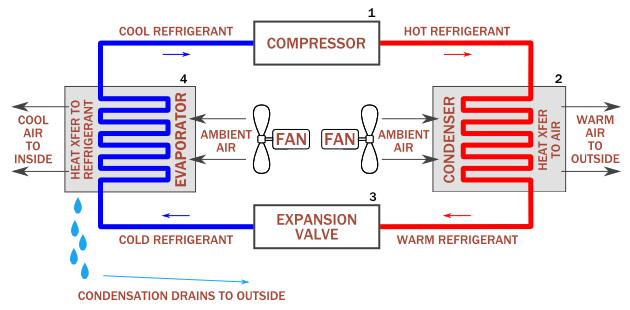
- Refrigerant Receives Heat Indoors: The process begins with refrigerant circulating through the indoor unit (evaporator coil). As it passes through the coil, it absorbs heat from the air inside your house, cooling the air in the process.
- Refrigerant Travels Outdoors: The now heated refrigerant, in a gaseous state, is pumped to the outdoor condenser unit.
- Compression: A compressor within the condenser unit compresses the refrigerant gas, further increasing its temperature and pressure.
- Heat Exchange: The hot, high-pressure refrigerant flows through the condenser coil. This coil is designed to release heat to the outside air. A fan blows air across the coil, facilitating this heat transfer.
- Condensation: As the refrigerant loses heat, it condenses back into a liquid state.
- Return to Indoor Unit: The now cooled, high-pressure liquid refrigerant returns to the indoor unit, ready to repeat the cooling cycle.
In essence, the condenser acts as a heat radiator, expelling the heat from inside your home to the outside environment.
Troubleshooting Your AC Condenser: A Step-by-Step Guide
Before diving into any troubleshooting, always prioritize safety. Disconnect power to the condenser unit at the breaker box before performing any internal checks. If you're uncomfortable working with electrical components, call a qualified HVAC technician.
Step 1: Basic Checks
- Power Supply:
- Check the Breaker: The most common cause of an AC failure is a tripped breaker. Locate the breaker labeled "AC," "Condenser," or similar in your electrical panel. If it's tripped (in the OFF or middle position), flip it fully to the OFF position and then back ON.
- Check the Disconnect Switch: Many condenser units have a dedicated disconnect switch located near the unit itself. This switch can be a pull-out type or a simple on/off switch. Ensure it's in the ON position.
- Test the Outlet (If Applicable): If the condenser is plugged into an outlet (rare, but possible), test the outlet with another device to ensure it's providing power.
- Thermostat Settings:
- Mode: Ensure your thermostat is set to "Cool" or "AC" mode.
- Temperature: Verify that the set temperature is significantly lower than the current room temperature. A setting too close to the current temperature may prevent the AC from turning on.
- Fan Setting: Ensure the fan is set to "Auto." A setting of "On" might only circulate air without activating the cooling cycle.
- Batteries: If your thermostat is battery-powered, replace the batteries to rule out a dead battery as the issue.
- Inspect the Area Around the Condenser:
- Obstructions: Ensure the condenser unit is free from obstructions like plants, debris, or furniture that could block airflow. Maintain at least 2-3 feet of clearance around the unit.
- Grass and Weeds: Trim any grass or weeds growing close to the unit, as they can restrict airflow and harbor pests.
Step 2: Inspecting the Condenser Unit
Remember to disconnect the power before proceeding with the following checks.
- Visually Inspect the Coil:
- Dirt and Debris: The condenser coil can accumulate dirt, dust, leaves, and other debris over time, hindering its ability to release heat. Carefully inspect the coil for buildup.
- Clean the Condenser Coil (DIY):
- Turn off Power: Ensure the power to the unit is OFF at the breaker box and the disconnect switch.
- Remove Debris: Use a soft brush or a vacuum cleaner with a brush attachment to remove loose debris from the coil.
- Use a Fin Comb: If the coil fins are bent, use a fin comb (available at most hardware stores) to gently straighten them. Bent fins restrict airflow.
- Hose Down the Coil (Gently): Use a garden hose with a gentle spray nozzle to wash the coil from the inside out. Avoid using high pressure, as it can damage the fins. Do not spray electrical components.
- Allow to Dry: Let the coil dry completely before restoring power to the unit.
- Check the Fan:
- Obstructions: Make sure the fan blades are free from obstructions and can spin freely.
- Damage: Inspect the fan blades for any signs of damage, such as cracks or bends. A damaged fan blade can cause the fan to vibrate or make excessive noise. If the fan blade is damaged, it needs professional replacement.
- Listen for Unusual Noises:
- Grinding or Squealing: These noises can indicate a problem with the fan motor or the compressor. These issues typically require professional attention.
- Clicking: A clicking sound might indicate a relay problem or a starting capacitor issue. These repairs are best left to a professional.
Step 3: Simple Part Replacements (Proceed with Caution)
The following replacements are only recommended if you are comfortable working with basic tools and have a clear understanding of the process. Always disconnect power before attempting any part replacement. When in doubt, call a professional.
- Condenser Fan Motor Capacitor Replacement (Handle with Extreme Caution!):
- Warning: Capacitors store electrical charge even after the power is disconnected. Mishandling a capacitor can result in a dangerous electrical shock.
- Identify the Capacitor: The capacitor is a cylindrical component usually located inside the control panel of the condenser unit. It's often silver or gray in color.
- Discharge the Capacitor (Essential!): Before touching the capacitor, you MUST discharge it. Use a screwdriver with an insulated handle to short the terminals of the capacitor. This is done by touching both terminals simultaneously with the screwdriver blade. Do this carefully and only if you understand the risk.
- Take a Picture: Before disconnecting any wires, take a picture of the capacitor and the wiring connections. This will help you reconnect the wires correctly.
- Disconnect the Wires: Disconnect the wires from the old capacitor, one at a time.
- Install the New Capacitor: Connect the wires to the new capacitor, matching the wiring configuration from the picture you took.
- Reassemble and Test: Reassemble the control panel and restore power to the unit. Test the AC to see if the fan motor is working properly.
- When to Call a Pro: If you are not comfortable discharging the capacitor or if the wiring is complex, call a qualified HVAC technician.
- Contactor Replacement (For Experienced DIYers Only):
- The contactor is an electrical switch that controls power to the compressor and fan motor.
- Identify the Contactor: Typically located in the control panel, it's a small relay with several wires connected to it.
- Safety First: Ensure power is OFF and verify with a non-contact voltage tester.
- Document Wiring: Take clear photos of the wiring before disconnecting anything.
- Disconnect and Replace: Disconnect the wires one at a time, noting their positions, and connect them to the new contactor in the same configuration.
- Test: Restore power and test the AC.
- Professional Help: If unsure about wiring or safety, consult an electrician or HVAC technician. Improper wiring can damage your system.
When to Call a Professional
While these DIY troubleshooting steps can resolve many common AC condenser problems, some issues require the expertise of a qualified HVAC technician. Call a professional if you encounter any of the following:
- Refrigerant Leaks: If you suspect a refrigerant leak (e.g., hissing sound, oily residue on the coil), do not attempt to fix it yourself. Refrigerant handling requires specialized equipment and training.
- Compressor Problems: The compressor is the heart of the AC system, and repairs are complex and require specialized tools and knowledge.
- Electrical Issues: If you are uncomfortable working with electrical components or suspect a major electrical problem, call a qualified electrician.
- Complex Wiring: If the wiring inside the condenser unit is complex or unfamiliar, do not attempt to repair it yourself. Incorrect wiring can damage the system and pose a safety hazard.
- Persistent Problems: If you've tried the troubleshooting steps above and the AC still isn't working correctly, it's time to call a professional.
- Warranty: If your AC unit is still under warranty, attempting repairs yourself might void the warranty. Check the warranty terms before proceeding.
Preventative Maintenance
Regular preventative maintenance can help keep your AC condenser running efficiently and prevent costly repairs. Consider these tips:
- Clean the Condenser Coil Annually: At the beginning of each cooling season, clean the condenser coil to remove dirt and debris.
- Change Air Filters Regularly: Replace your air filters every 1-3 months, depending on usage and air quality. A dirty air filter restricts airflow and can strain the AC system.
- Schedule Professional Maintenance: Have your AC system professionally inspected and serviced annually by a qualified HVAC technician. They can identify potential problems early and ensure that the system is running efficiently.
- Keep the Area Around the Unit Clear: Maintain at least 2-3 feet of clearance around the condenser unit to ensure proper airflow.
By understanding how your AC condenser works and following these troubleshooting tips, you can keep your home cool and comfortable all summer long. Remember to prioritize safety and call a professional when needed.