How Does An Absorption Chiller Work
Feeling the heat even though your cooling system is running? If you have an absorption chiller, you might be facing a frustrating situation. Unlike traditional vapor-compression chillers that use electricity to power a compressor, absorption chillers use heat as their energy source. This makes them attractive for applications where waste heat is abundant. However, when they malfunction, diagnosing the problem can seem complex. This guide breaks down how an absorption chiller works and provides a step-by-step troubleshooting process you can follow before calling a professional.
Understanding the Absorption Chiller Cycle
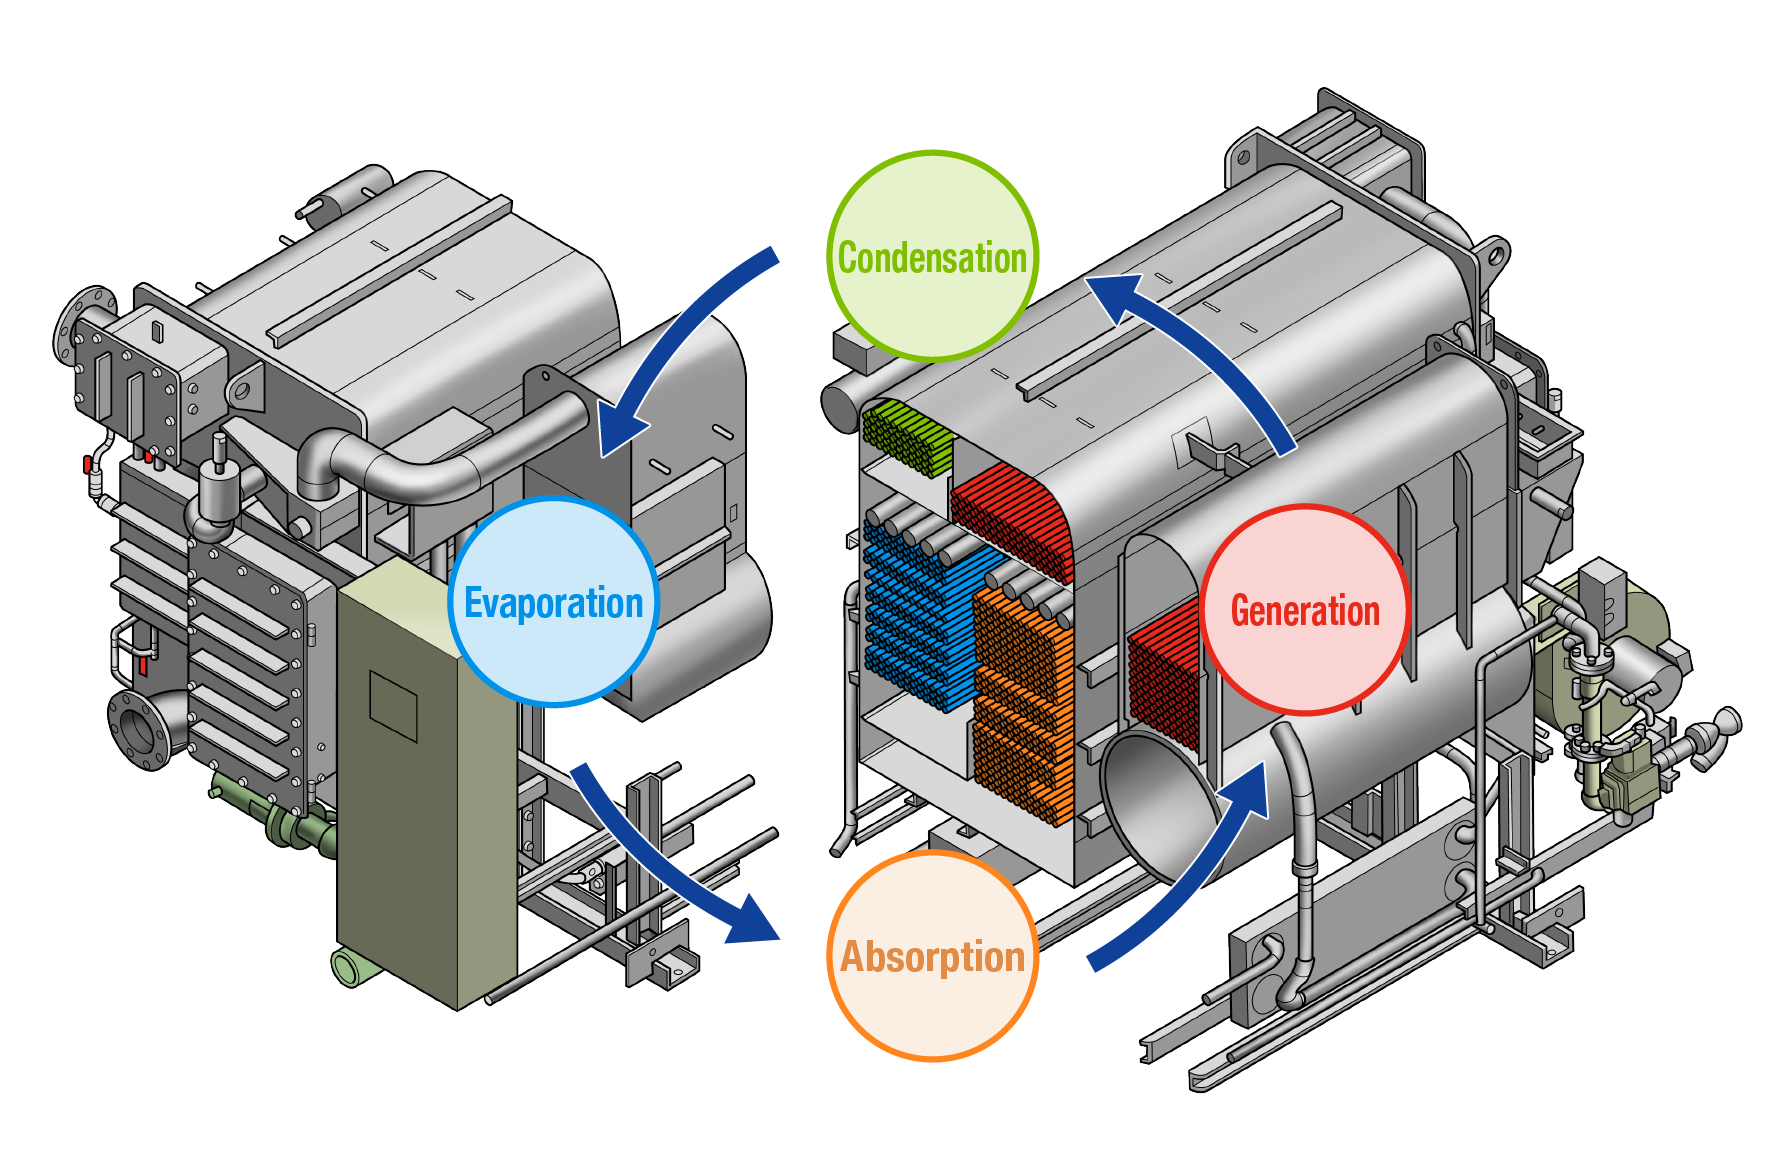
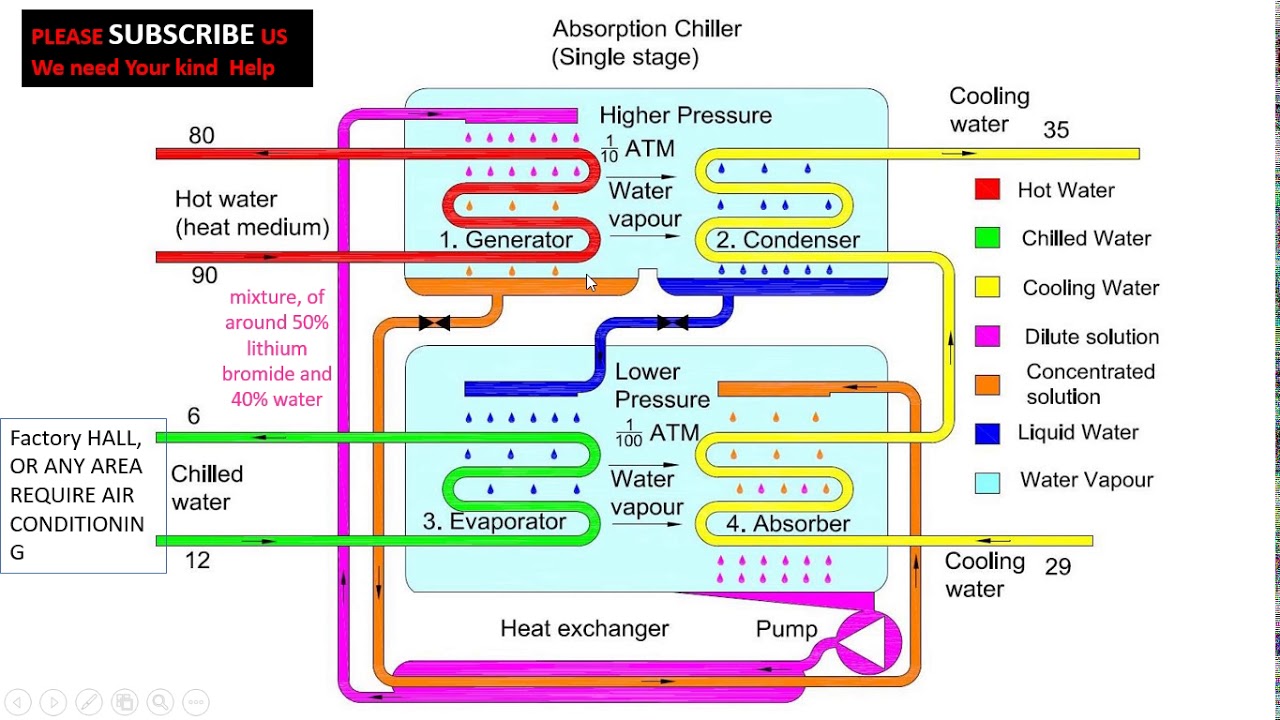
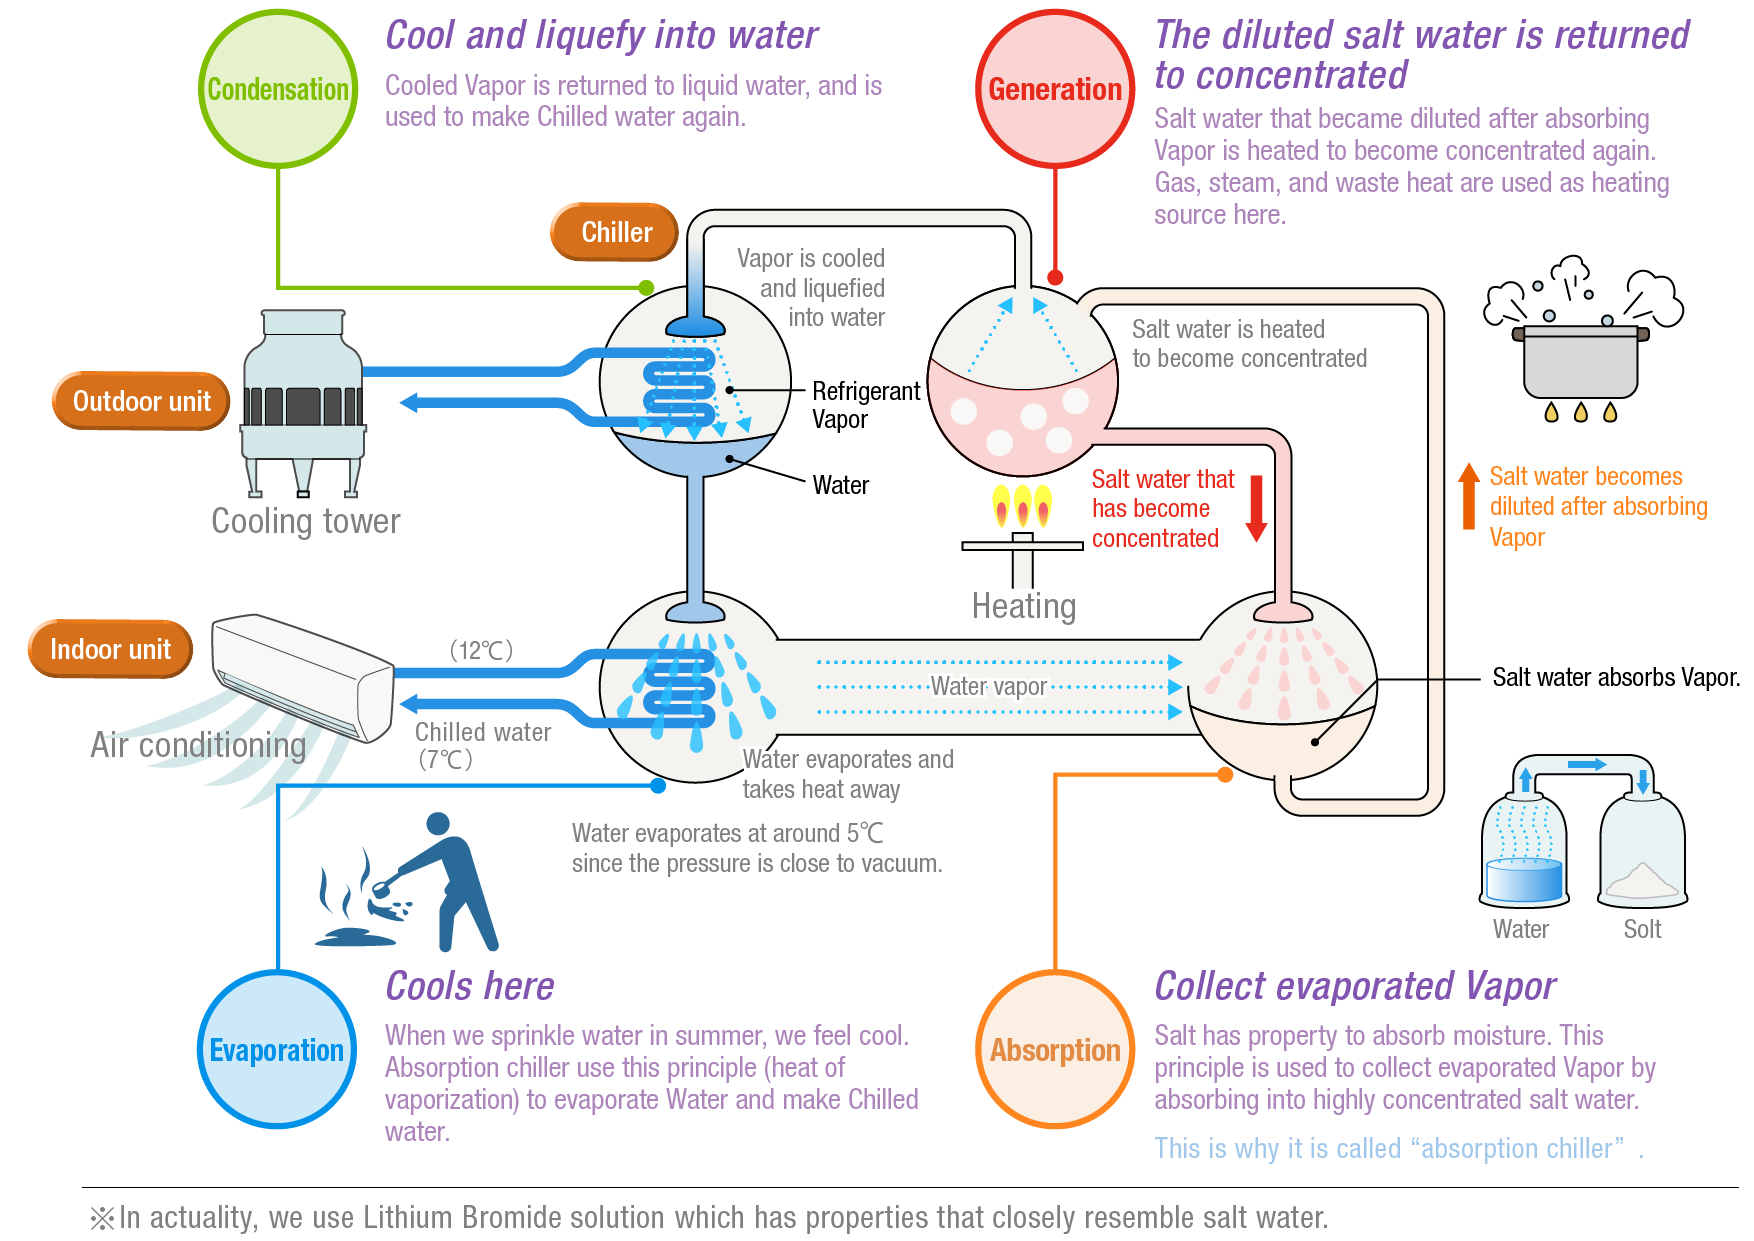
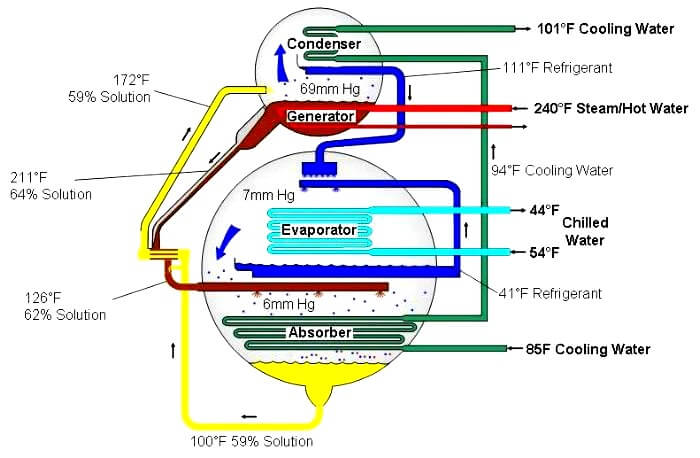
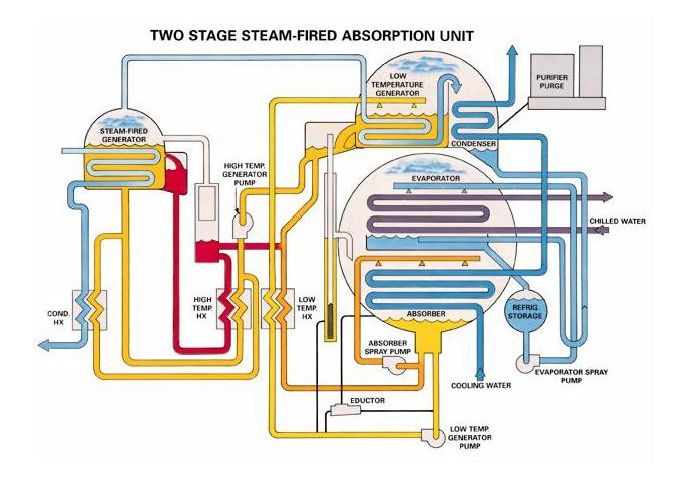
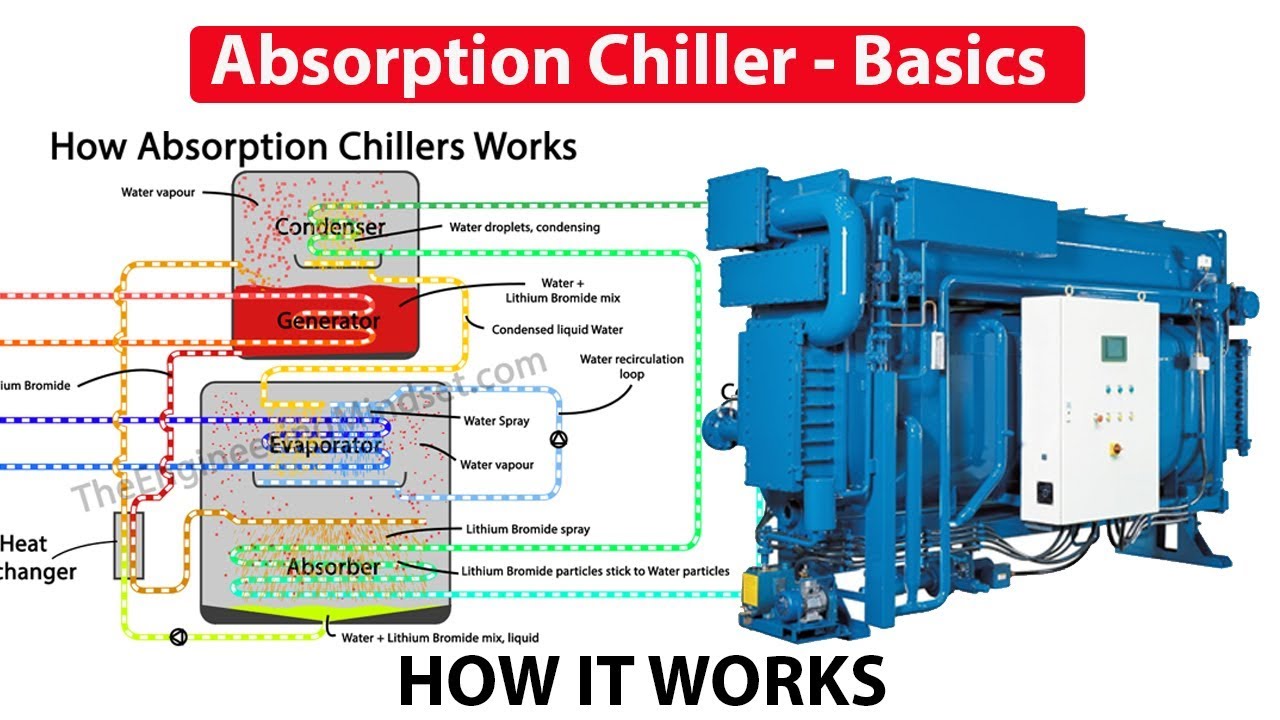
Before diving into troubleshooting, it's crucial to understand the four main components and their roles in the absorption cycle:
- Evaporator: This is where the refrigerant (typically water in lithium bromide systems) evaporates, absorbing heat from the chilled water loop and providing cooling.
- Absorber: Here, the refrigerant vapor from the evaporator is absorbed by a concentrated absorbent solution (typically lithium bromide). This creates a vacuum that allows more refrigerant to evaporate in the evaporator.
- Generator: Heat is applied to the diluted absorbent solution, separating the refrigerant vapor from the absorbent. The refrigerant vapor then travels to the condenser.
- Condenser: The refrigerant vapor condenses back into a liquid, releasing heat. This liquid refrigerant then flows back to the evaporator, completing the cycle.
Think of it as a continuous process: evaporation, absorption, generation, and condensation, all driven by heat.
Common Problem: Reduced Cooling Capacity
One of the most common complaints is a noticeable decrease in cooling capacity. You might find that your building isn't reaching the desired temperature, or the chiller seems to be running constantly without effectively cooling.
Step 1: Check the Basics
Before assuming a major issue, start with the simple checks:
- Power Supply: Ensure the chiller has a stable power supply. Although it primarily uses heat, control systems and pumps often require electricity. Check circuit breakers and fuses.
- Water Flow: Verify adequate water flow in both the chilled water loop and the cooling water loop. Low flow can significantly reduce cooling capacity. Look for closed valves, kinked hoses, or obstructions in the pipes.
- Air Vents: Make sure the system is properly vented to remove any trapped air. Air pockets can impede water flow and heat transfer. Most absorption chillers have automatic air vents, but manually check them if you suspect air is trapped.
DIY Fix: If you find a closed valve or a kinked hose, open the valve or straighten the hose. Ensure the air vents are functioning correctly. These simple fixes can sometimes resolve the issue quickly.
Step 2: Inspect the Cooling Water System
The cooling water system is critical for removing heat from the condenser and absorber. Problems here can drastically impact performance.
- Cooling Tower Performance: If your system uses a cooling tower, check its performance. Ensure the tower fans are running correctly, the water distribution is even, and the fill material is clean.
- Cooling Water Temperature: Monitor the cooling water temperature entering and leaving the chiller. High cooling water temperature can indicate a problem with the cooling tower or scaling in the condenser.
- Scale and Fouling: Inspect the condenser and absorber for scale or fouling. Deposits on heat transfer surfaces reduce efficiency.
DIY Fix: You can visually inspect the cooling tower and clean any debris from the fill material. However, cleaning the condenser and absorber typically requires specialized chemicals and procedures and is best left to a professional. If you notice excessive scaling or fouling, call a technician.
Step 3: Check the Chilled Water System
Issues in the chilled water loop can also lead to reduced cooling capacity.
- Chilled Water Temperature: Monitor the chilled water temperature entering and leaving the chiller. A significant difference between the supply and return temperatures indicates good heat transfer, while a small difference might suggest a problem.
- Chilled Water Flow Rate: Verify the chilled water flow rate is within the manufacturer's specifications. Low flow can result in insufficient cooling.
- Air in the System: Check for air in the chilled water loop. Air can impede water flow and reduce heat transfer efficiency.
DIY Fix: Ensure the chilled water pump is running correctly and there are no obstructions in the pipes. Bleed any air from the system using the air vents. If you suspect a problem with the pump itself (e.g., unusual noise, vibration), consult a professional.
Step 4: Examine the Heat Source (if applicable)
Absorption chillers rely on a heat source, which could be natural gas, steam, hot water, or waste heat. Problems with the heat source directly impact the chiller's performance.
- Fuel Supply (Natural Gas): If your chiller uses natural gas, ensure the gas supply is adequate. Check the gas pressure and look for any issues with the gas burner.
- Steam Supply: If using steam, verify the steam pressure and flow rate are within the specified range. Look for leaks in the steam lines.
- Hot Water Supply: If using hot water, ensure the hot water temperature and flow rate are adequate.
DIY Fix: For natural gas systems, you can check the gas shut-off valve is fully open and ensure the burner is clean. However, any work on the gas burner itself should be performed by a qualified technician. For steam and hot water systems, look for obvious leaks and ensure the supply pressure and temperature are within the specified range. If you suspect a problem with the boiler or hot water heater, contact a professional.
Step 5: Control System Monitoring
Most modern absorption chillers have sophisticated control systems that monitor various parameters and provide diagnostic information.
- Error Codes: Check the control panel for any error codes. These codes can provide valuable clues about the cause of the problem. Consult the chiller's manual for a list of error codes and their meanings.
- Temperature and Pressure Sensors: Monitor the readings from the temperature and pressure sensors. Compare these readings to the manufacturer's specifications to identify any anomalies.
- Operational History: Review the chiller's operational history for any trends or patterns that might indicate a problem.
DIY Fix: Use the error codes to guide your troubleshooting. Some error codes might indicate simple issues you can resolve yourself (e.g., low water level), while others might require professional attention. Resetting the control system might resolve minor issues, but proceed with caution and consult the manual first. If you're unsure about interpreting the data or troubleshooting the control system, call a technician.
When to Call a Professional
While these steps can help you diagnose and resolve some common issues, there are situations where professional intervention is necessary. Always call a qualified HVAC technician if:
- You are uncomfortable working with electrical components, natural gas, or steam.
- You suspect a refrigerant leak. Absorption chillers use lithium bromide solutions, which can be corrosive and require specialized handling.
- You suspect internal damage to the chiller, such as corrosion or erosion.
- The control system displays complex error codes that you cannot understand or resolve.
- The problem persists after you have tried the basic troubleshooting steps.
- You lack the necessary tools or expertise to perform the required repairs.
Specifically, issues regarding the internal components (evaporator, absorber, generator, condenser) should be left to the professionals. This includes:
- Crystallization: Lithium bromide can crystallize within the chiller, blocking flow and reducing performance. This requires specialized cleaning procedures.
- Vacuum Leaks: Absorption chillers operate under a vacuum. Leaks can compromise the vacuum and reduce efficiency. Finding and repairing these leaks requires specialized equipment.
- Pump Failures: Internal pumps circulate the absorbent solution and refrigerant. Failures require specialized knowledge and tools to repair or replace.
Preventative Maintenance
The best way to avoid problems with your absorption chiller is to implement a regular preventative maintenance program. This includes:
- Regularly inspecting and cleaning the cooling tower.
- Monitoring water treatment to prevent scale and corrosion.
- Checking and maintaining the heat source (e.g., cleaning the gas burner, inspecting steam traps).
- Calibrating temperature and pressure sensors.
- Analyzing the absorbent solution for contamination.
While some of these tasks can be performed by the homeowner, it's generally recommended to have a qualified HVAC technician perform a thorough inspection and maintenance check at least once a year. This will help ensure your absorption chiller operates efficiently and reliably for years to come.
By understanding the basics of how an absorption chiller works and following these troubleshooting steps, you can often diagnose and resolve minor issues yourself. However, remember to prioritize safety and don't hesitate to call a professional when needed. Regular maintenance is key to preventing problems and ensuring your system operates efficiently.