How Does An Air Admittance Valve Work
Understanding Air Admittance Valves (AAVs): A Homeowner's Guide
If you've ever noticed a gurgling sound coming from your plumbing fixtures, particularly after flushing a toilet or running water down a sink, an air admittance valve (AAV) might be the culprit (or the solution!). These handy little devices play a crucial role in your home's drain-waste-vent (DWV) system, and understanding how they work can save you from costly plumbing repairs. This guide will walk you through the basics of AAVs, how they function, common issues, and when you should call a professional.
What is an Air Admittance Valve?
An AAV, sometimes called a cheater vent, is a one-way mechanical valve designed to allow air into the drainpipe when negative pressure occurs. This negative pressure, or vacuum, happens when water rushes down the drain, potentially siphoning water from the P-trap of a nearby fixture. The P-trap is that curved section of pipe under your sink that holds a small amount of water, creating a seal that prevents sewer gases from entering your home.
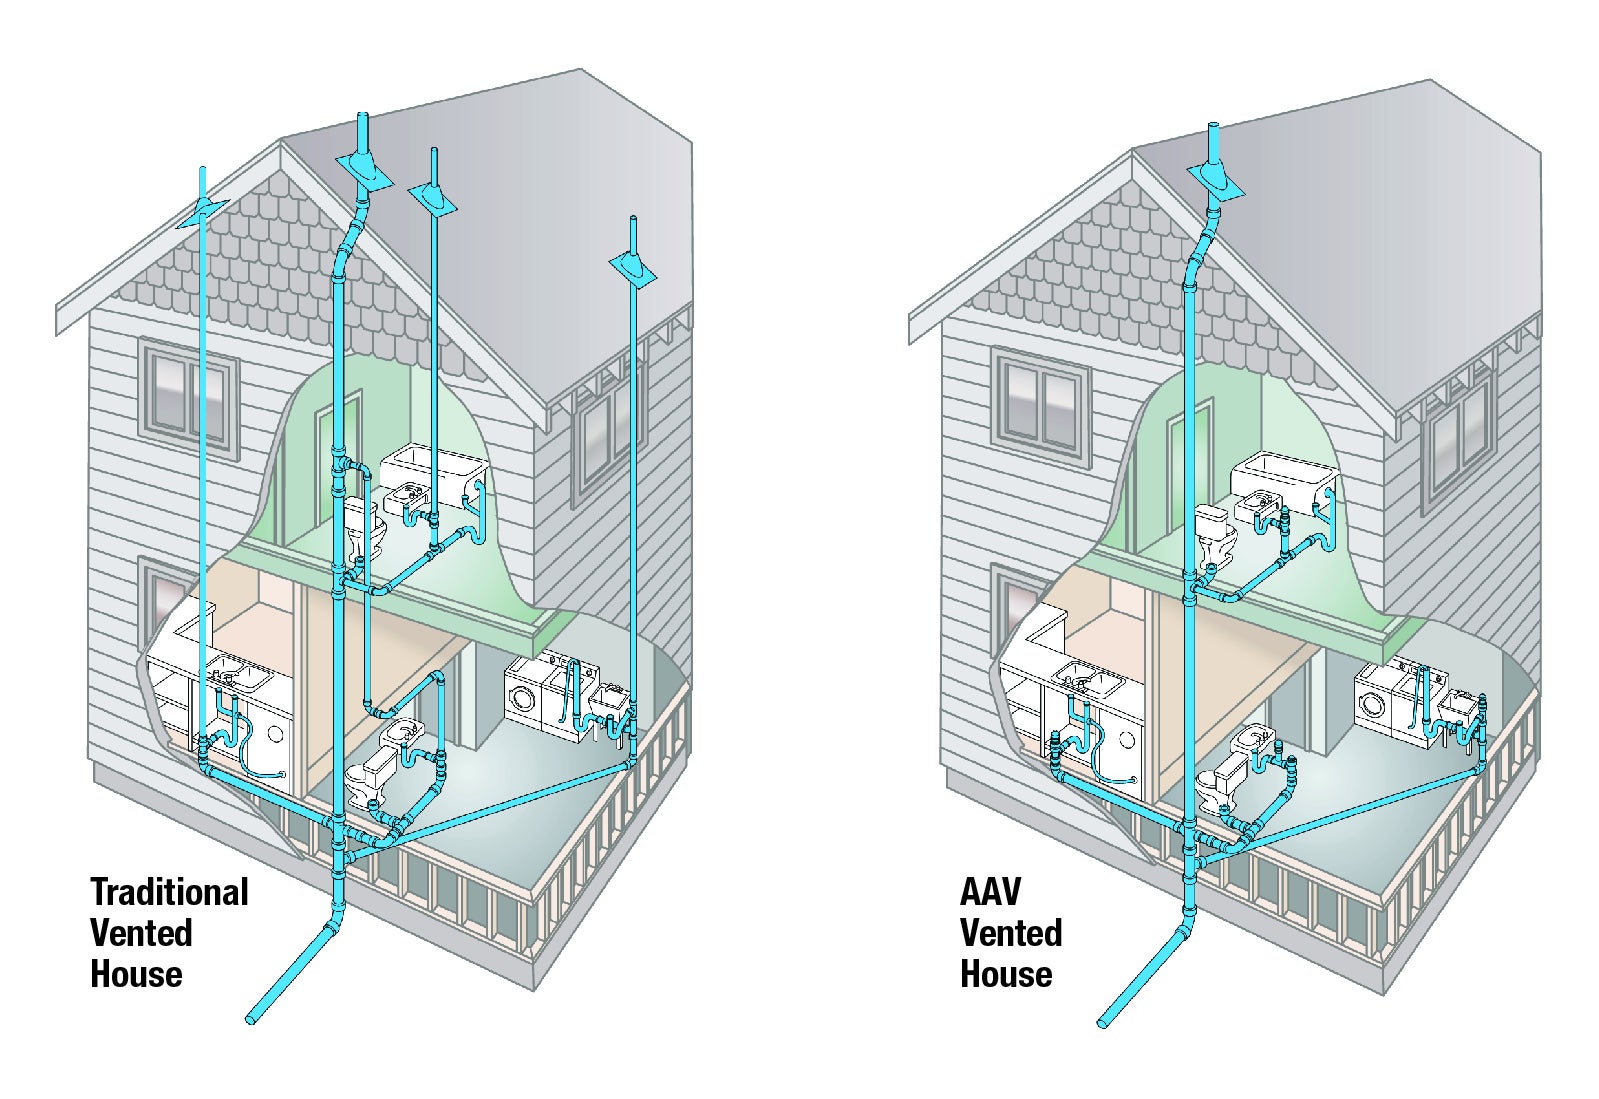
Traditionally, homes relied on a network of vent pipes that extended through the roof to equalize pressure. AAVs offer an alternative to this, particularly in situations where running a vent pipe to the roof is difficult or impossible, like in island sinks or remodels.
How Does an AAV Work?
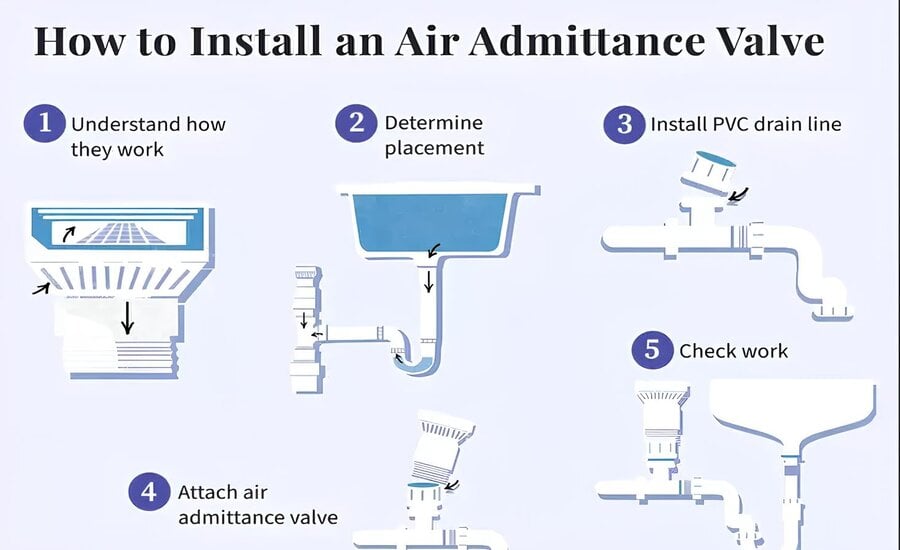
The core function of an AAV is simple yet vital. Here's a breakdown of the process:
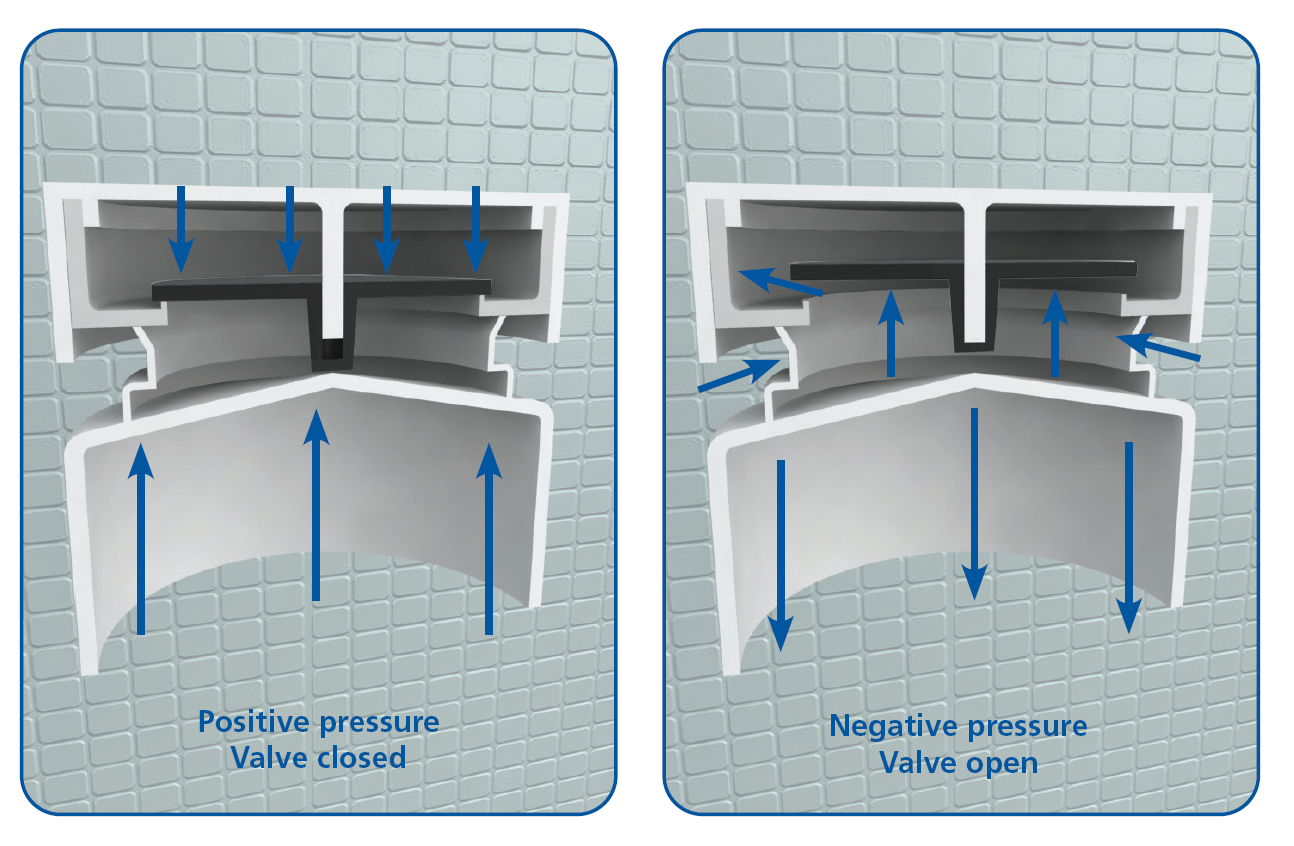
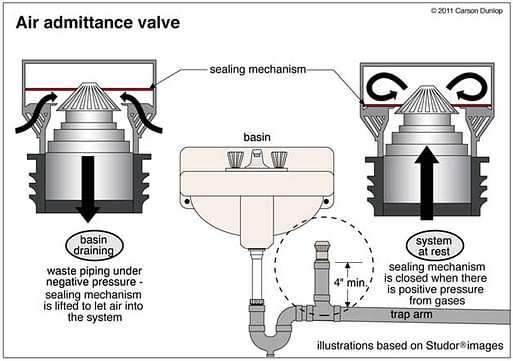
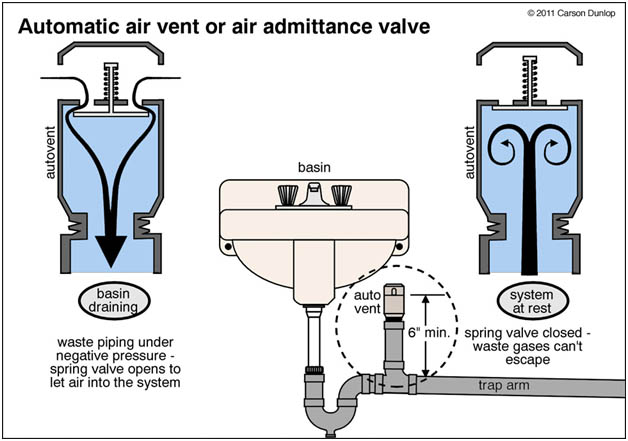
- Normal State: Under normal conditions, when there's no flow in the drainpipe, the AAV is closed. A spring keeps a seal pressed against a valve seat, preventing sewer gases from escaping.
- Negative Pressure: When water drains rapidly, it creates negative pressure (suction) within the drainpipe.
- Valve Opens: This negative pressure pulls the seal away from the valve seat, allowing air to enter the drainpipe. This equalizes the pressure and prevents the P-trap from being siphoned dry.
- Valve Closes: Once the pressure is equalized, the spring forces the seal back onto the valve seat, preventing sewer gases from escaping.
Think of it like a check valve for air. It only allows air to flow in one direction – into the drainpipe.
When Are AAVs Used?
AAVs are most commonly used in the following situations:
- Island Sinks: Running a vent pipe to the roof for an island sink can be challenging and expensive. An AAV provides a simple and effective venting solution.
- Remodeling Projects: When adding a new fixture during a remodel, tying into the existing vent system can be difficult. An AAV can simplify the plumbing.
- Limited Space: In tight spaces where a traditional vent pipe is impractical, an AAV offers a compact alternative.
- Distance from Vent Stack: If a fixture is located far from the main vent stack, an AAV can provide local venting to prevent siphoning.
Common AAV Problems and Troubleshooting
While AAVs are generally reliable, they can occasionally experience problems. Here are some common issues and how to troubleshoot them:
- Gurgling Sounds: This is the most common symptom of a failing AAV. It indicates that the valve is not opening or closing properly, allowing air to be sucked through the P-trap.
- Sewer Gas Odors: If you smell sewer gas near a fixture with an AAV, the valve may be stuck open or the seal may be damaged.
- Slow Draining: A malfunctioning AAV can restrict airflow into the drainpipe, leading to slow draining.
- Visible Damage: Inspect the AAV for cracks, corrosion, or other signs of physical damage.
Troubleshooting Steps:
- Visual Inspection: Carefully examine the AAV for any visible damage.
- Cleaning: Dust and debris can accumulate on the valve seal, preventing it from sealing properly. Clean the AAV with a damp cloth. Do not use harsh chemicals.
- Testing: With a gloved hand, gently lift the cap of the AAV while water is draining from the fixture. If the gurgling stops, the AAV is likely faulty.
- Replacement: If cleaning doesn't resolve the issue, the AAV probably needs to be replaced. This is a relatively simple DIY project for many homeowners.
Replacing an Air Admittance Valve: A Step-by-Step Guide
Replacing an AAV is usually a straightforward process, but always prioritize safety. Make sure you have these tools before you begin:
Tools Needed:
- Adjustable wrench or pliers
- New AAV (make sure it's the correct size and type)
- Teflon tape (optional, but recommended)
- Gloves
- Safety glasses
Replacement Steps:
- Turn off the Water Supply (If Necessary): Depending on the location of the AAV, you might need to turn off the water supply to the fixture to prevent leaks.
- Remove the Old AAV: Use an adjustable wrench or pliers to carefully unscrew the old AAV. Note the direction it's installed for proper reinstallation.
- Clean the Threads: Clean the threads on the drainpipe to remove any debris or old Teflon tape.
- Apply Teflon Tape (Optional): Wrap Teflon tape clockwise around the threads of the drainpipe. This will help create a watertight seal.
- Install the New AAV: Screw the new AAV onto the drainpipe, tightening it securely with an adjustable wrench or pliers. Be careful not to overtighten, as this could damage the valve.
- Turn on the Water Supply (If Necessary): Turn the water supply back on and check for leaks.
- Test the Fixture: Run water down the drain to ensure the AAV is functioning properly. Listen for any gurgling sounds.
When to Call a Professional Plumber
While replacing an AAV is often a DIY-friendly task, certain situations warrant calling a professional plumber:
- Extensive Plumbing Problems: If you're experiencing widespread plumbing issues beyond just a faulty AAV, it's best to consult a plumber.
- Difficult Access: If the AAV is located in a hard-to-reach area, such as behind a wall or under a cabinet, a plumber can safely access and replace it.
- Unsure of the Cause: If you're unsure what's causing the plumbing problem, a plumber can diagnose the issue and recommend the appropriate solution.
- Code Violations: Ensure that using an AAV complies with local plumbing codes. Some jurisdictions may have restrictions on their use.
AAV vs. Traditional Venting
It's important to understand that AAVs are not a replacement for a properly designed and installed vent system. They are supplemental vents that can be used in specific situations where traditional venting is impractical. A traditional vent system is always the preferred option when feasible.
Cost Considerations
The cost of replacing an AAV can vary depending on whether you do it yourself or hire a plumber. Here's a general breakdown:
- DIY: The cost of a new AAV typically ranges from $10 to $30, depending on the size and quality. Add a few dollars for Teflon tape and other supplies.
- Professional Plumber: Hiring a plumber to replace an AAV can cost anywhere from $100 to $300, depending on the plumber's hourly rate and the complexity of the job.
The final cost will also depend on your location and the specific plumber you choose. Always get multiple quotes before hiring a professional.
Safety First!
Before starting any plumbing project, remember to prioritize safety:
- Wear Safety Glasses: Protect your eyes from debris and splashes.
- Wear Gloves: Protect your hands from bacteria and chemicals.
- Turn off the Water Supply: When necessary, turn off the water supply to prevent leaks and water damage.
- Follow Local Codes: Ensure that any plumbing work you do complies with local building codes.
Conclusion
Understanding how an air admittance valve (AAV) works can empower you to diagnose and potentially fix common plumbing issues in your home. By following the troubleshooting steps and replacement guide outlined in this article, you can save money and maintain a properly functioning DWV system. However, remember to always prioritize safety and call a professional plumber when faced with complex or uncertain situations.
:max_bytes(150000):strip_icc()/how-to-install-air-admittance-valve-final-89d96cc201cb4d5a9ae098c7552f5cc5.jpg)
:strip_icc()/air-admittance-valve-b5d78cbecf6e4b26bd8a37f76691a632.jpg)