How Does An Air Conditioner System Work
Facing a sweltering summer or a frigid winter with an air conditioner that's not doing its job? You're not alone! One of the most common complaints homeowners have is an AC system that blows warm air when it should be cooling, or vice versa for heating. Before calling for expensive repairs, let's walk through some troubleshooting steps you can take yourself.
This guide will help you understand how your AC system works, diagnose the problem, and potentially fix it yourself. We'll break down the process into manageable steps, identifying what you can check without tools, what requires basic equipment, and, most importantly, when to call a professional.
Understanding Your Air Conditioner: The Basics
To effectively troubleshoot, you need to understand the basic workings of your air conditioning system. Whether it's a central AC unit, a heat pump, or a window unit, the core principles are the same.
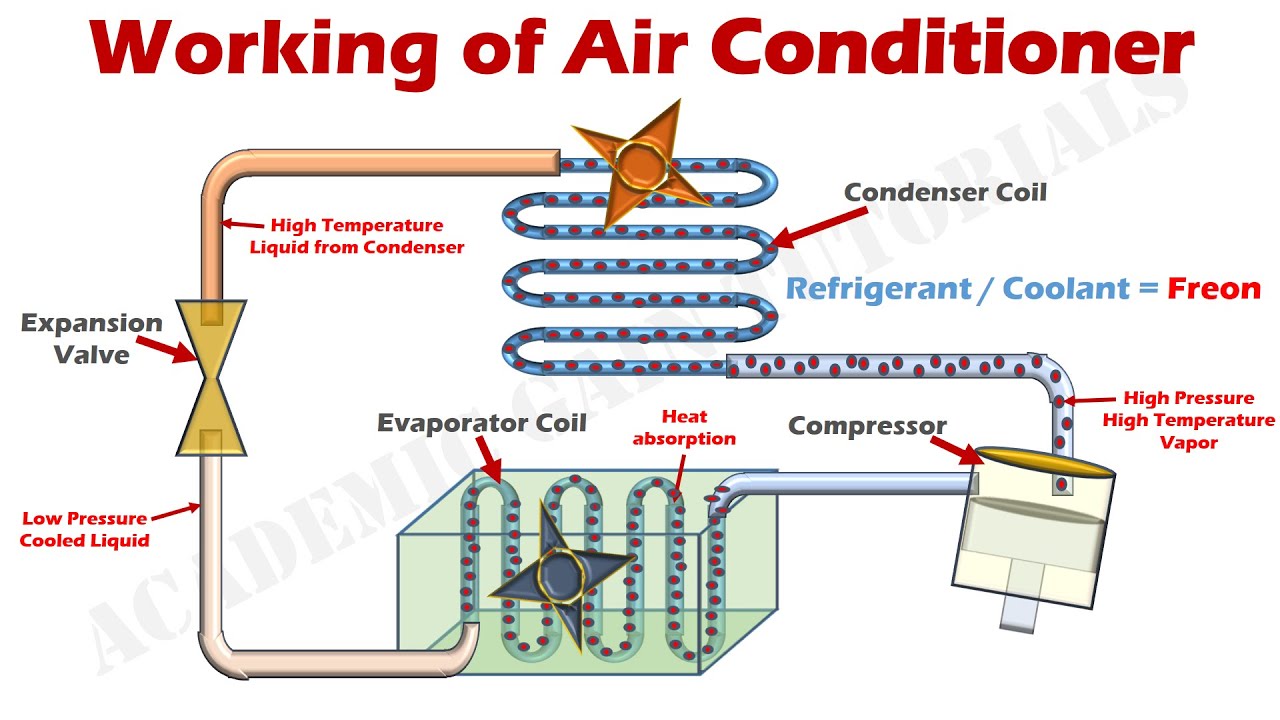
The Refrigeration Cycle: The Heart of Cooling (and Heating)
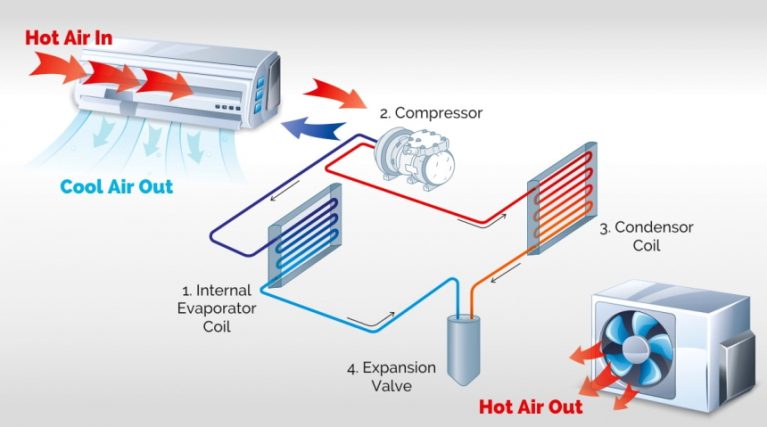
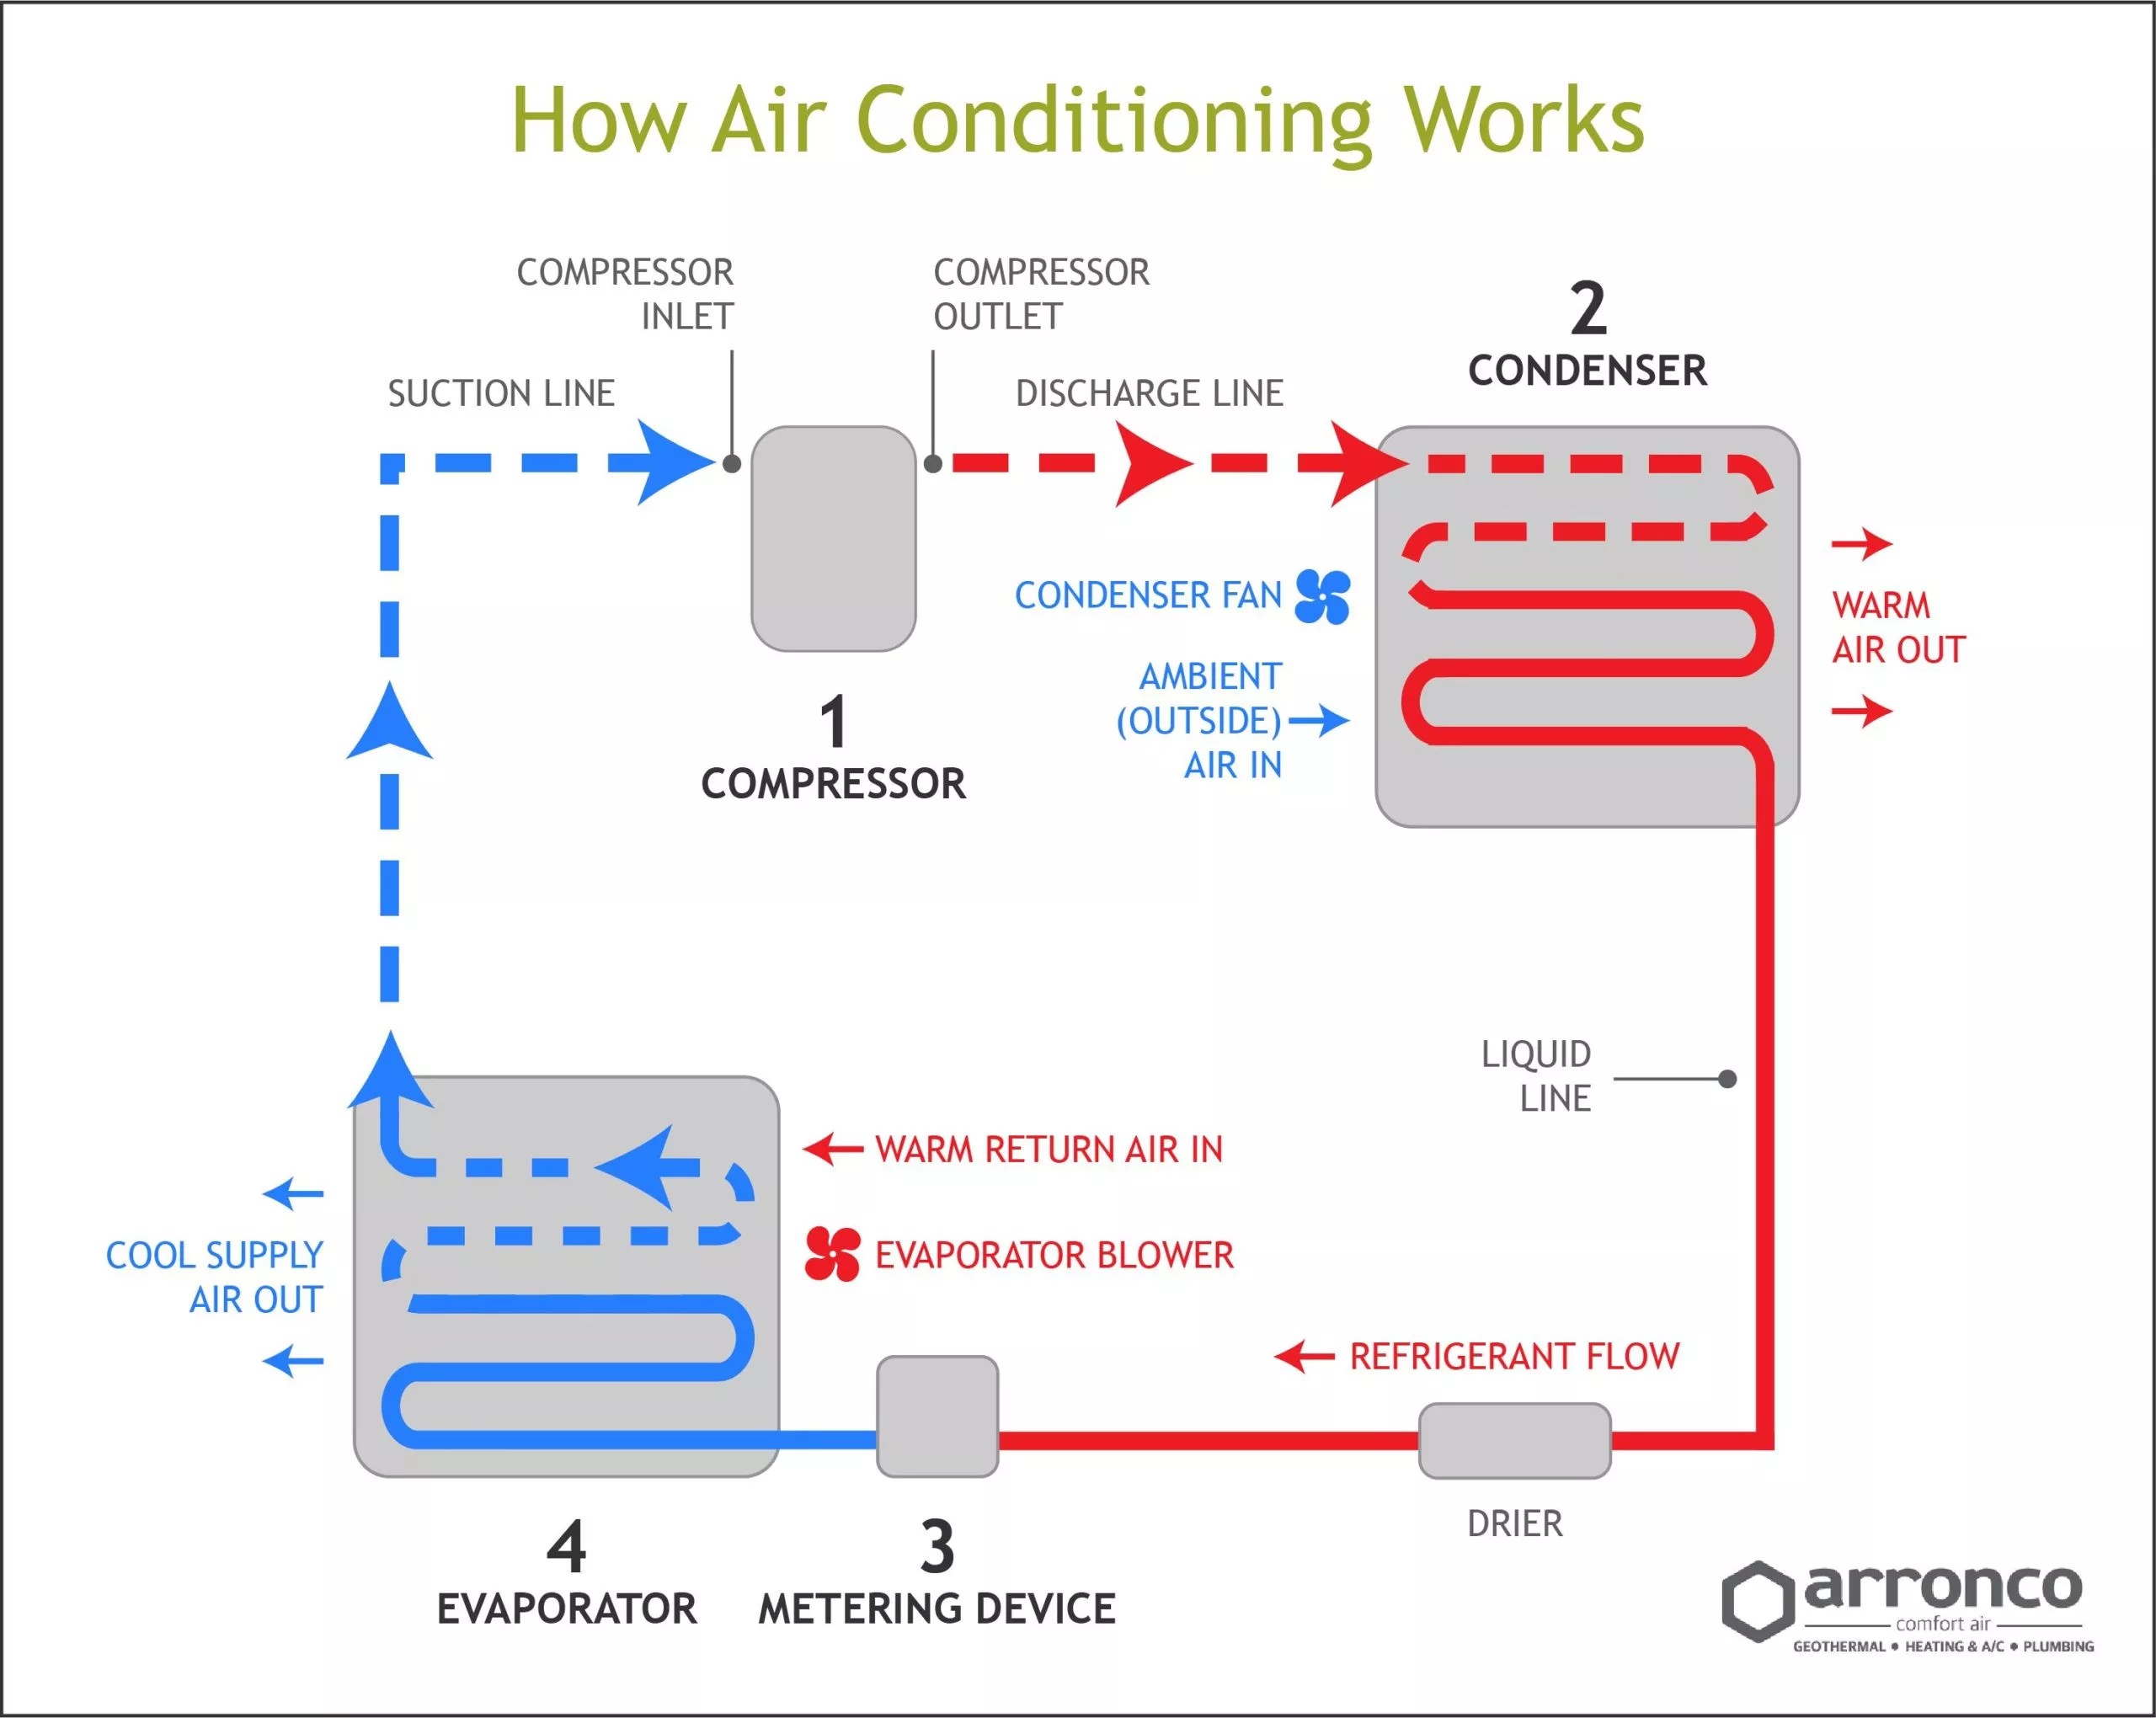
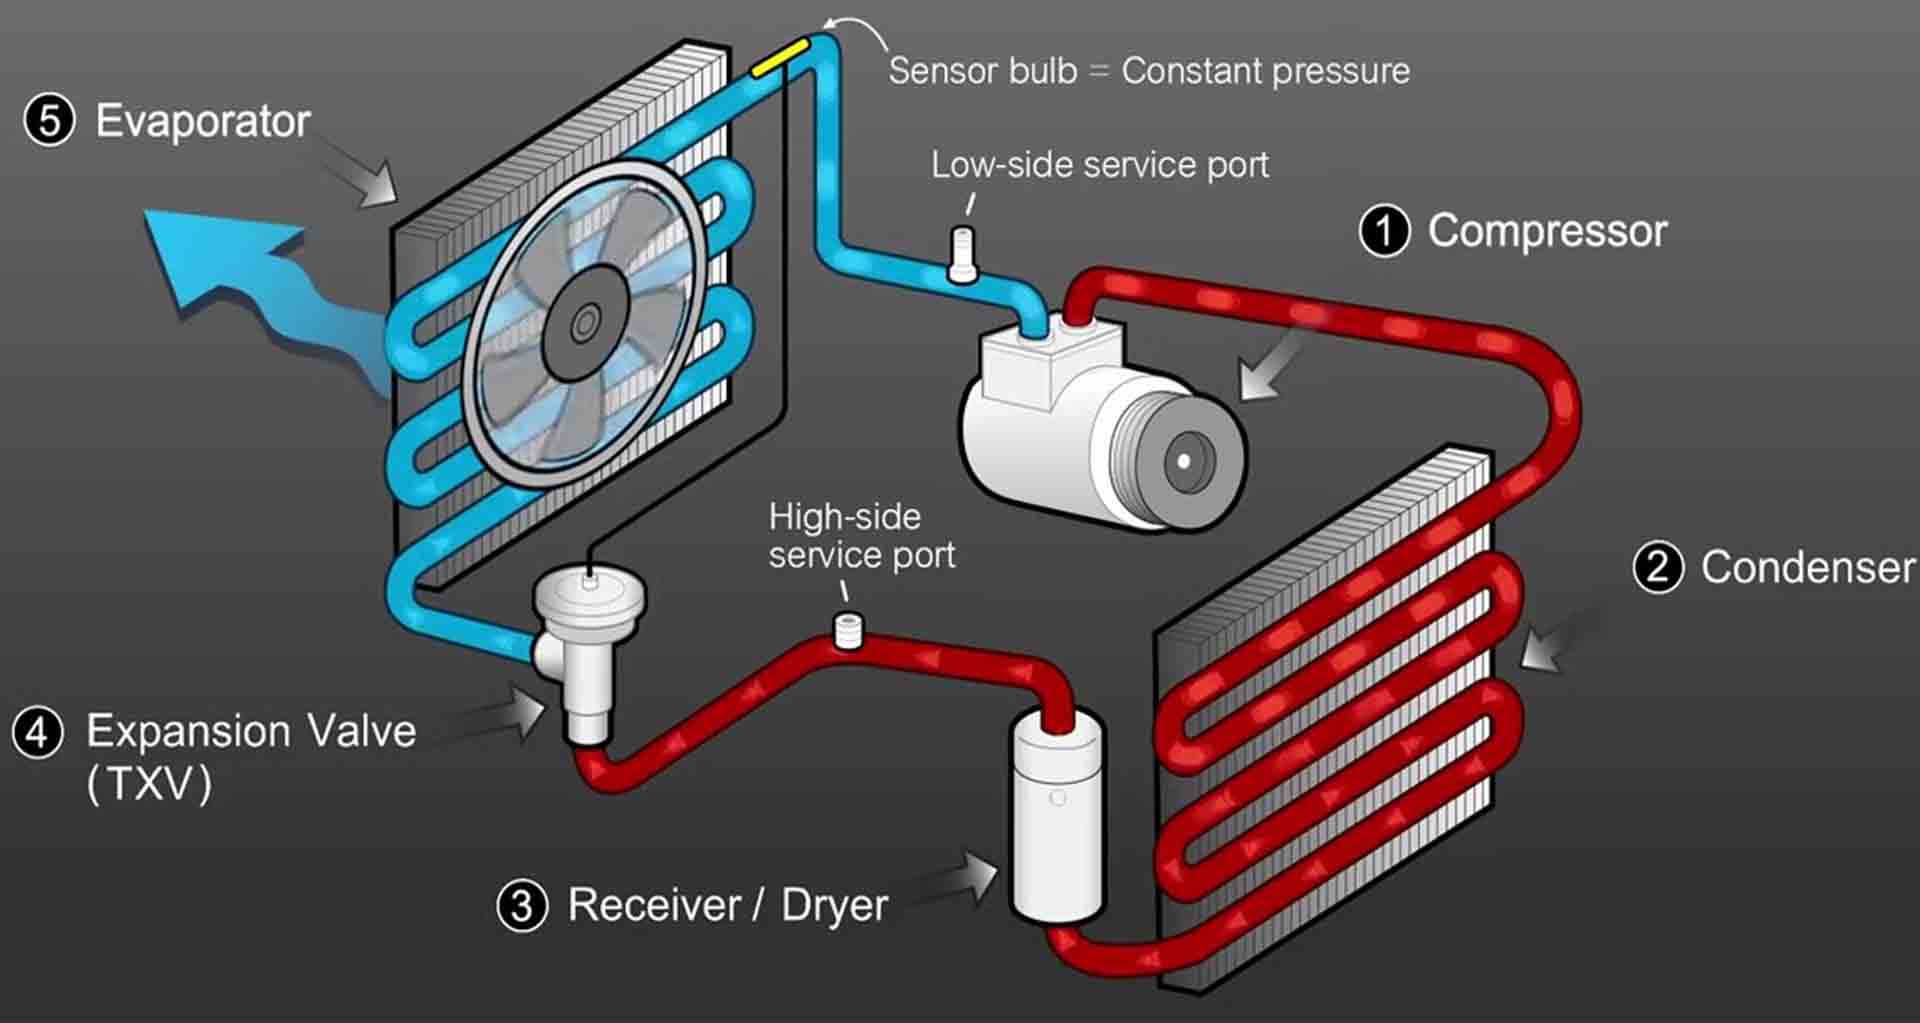
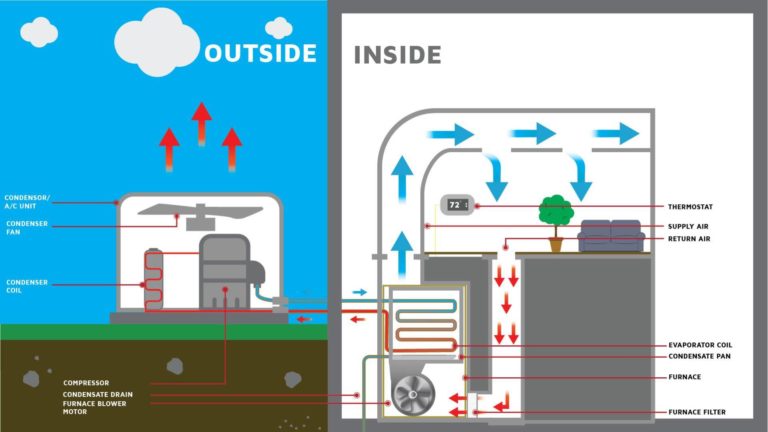
At its core, an AC system uses a refrigerant to transfer heat. This refrigerant cycles through four main components:
- Evaporator: Located inside, the evaporator coil absorbs heat from the indoor air, cooling it down. The refrigerant inside changes from a liquid to a gas.
- Compressor: This is the heart of the system, pumping the refrigerant and increasing its pressure and temperature. It's usually located in the outdoor unit.
- Condenser: Also located in the outdoor unit, the condenser coil releases heat from the refrigerant to the outside air, turning it back into a liquid.
- Expansion Valve (or Metering Device): This controls the flow of refrigerant into the evaporator, reducing its pressure and temperature.
Think of it like this: the refrigerant picks up heat inside, travels outside to dump that heat, and then returns inside to pick up more. In a heat pump, this cycle can be reversed to provide heating.
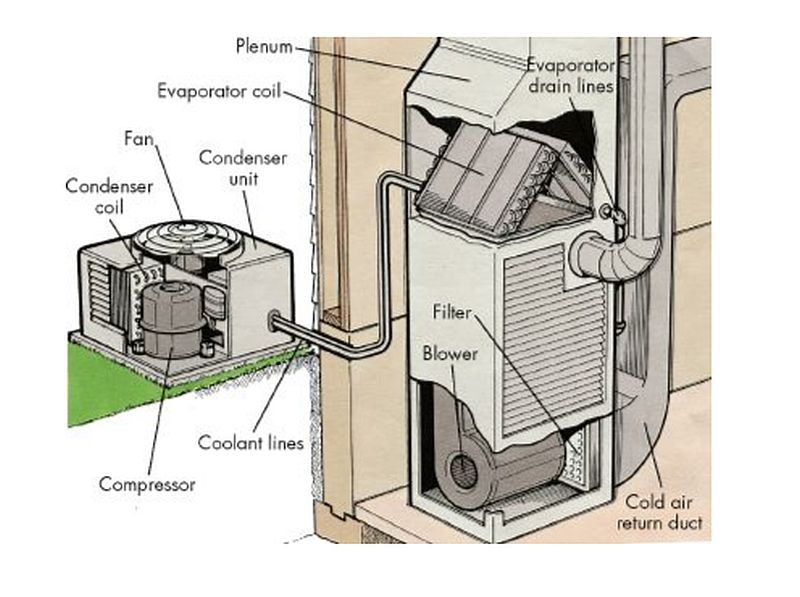
Key Components: Fans and Filters
While the refrigeration cycle is crucial, fans and filters also play vital roles:
- Blower Fan: Located inside, the blower fan circulates air across the evaporator coil, distributing the cooled (or heated) air throughout your home.
- Condenser Fan: Located in the outdoor unit, the condenser fan helps to dissipate heat from the condenser coil.
- Air Filter: This filters out dust, pollen, and other particles from the air before it enters the system. A dirty filter restricts airflow and reduces efficiency.
Troubleshooting: My AC is Blowing Warm Air!
Now that you understand the basics, let's get to the problem at hand: warm air blowing when you expect cool air. Here's a methodical approach to diagnosing the issue:
Step 1: The Obvious – Check the Thermostat (No Tools Required)
This might seem like a no-brainer, but it's often the culprit. Make sure your thermostat is set to "Cool" and the temperature is set lower than the current room temperature. For heat pumps in winter, make sure the thermostat is set to "Heat" and the temperature is higher than the room temperature.
- Verify Mode: Ensure the thermostat is not in "Fan Only" mode. In this mode, the fan runs, but the compressor doesn't, so you won't get any cooling.
- Check Batteries: If your thermostat has batteries, replace them. Low batteries can cause erratic behavior.
- Temperature Setting: Double-check that the desired temperature is significantly lower (or higher for heating) than the current room temperature. A small difference might not trigger the AC to run.
Step 2: The Air Filter: The First Line of Defense (No Tools Required)
A dirty air filter is a common cause of AC problems. It restricts airflow, making the system work harder and reducing its cooling capacity. It can also cause the evaporator coil to freeze up.
- Locate the Filter: The air filter is usually located in the indoor unit, often near the blower fan. Common locations include the return air vent or inside the furnace/air handler.
- Inspect the Filter: Remove the filter and hold it up to the light. If you can't see light through it, it's definitely dirty.
- Replace the Filter: Replace the dirty filter with a new one of the correct size and type. This is a simple and inexpensive DIY task.
- Regular Replacement: Aim to replace your air filter every 1-3 months, depending on usage and the type of filter.
Step 3: Check the Outdoor Unit (No Tools Required, Caution Advised)
The outdoor unit houses the compressor and condenser coil. Inspect it for any obvious problems.
- Visual Inspection: Look for debris such as leaves, grass clippings, or branches blocking the condenser coil. Clear away any obstructions to ensure proper airflow. Turn off the power to the unit at the disconnect box (usually located near the unit) before cleaning around it to avoid electric shock.
- Fan Operation: Observe the condenser fan while the AC is running. Make sure it's spinning freely and not making unusual noises. If the fan isn't running, it could indicate a motor problem that requires professional attention.
- Ice Buildup: Check for ice buildup on the refrigerant lines or the outdoor unit itself. This can indicate a refrigerant leak or airflow problem. If you see ice, turn off the AC and let it thaw completely. Then, try running it again after addressing potential airflow issues (like a dirty filter). If the ice returns, you likely have a refrigerant problem that needs professional help.
Important Safety Note: Never stick your hands or objects inside the outdoor unit while it's running. The fan blades are sharp and can cause serious injury.
Step 4: Check the Indoor Unit (No Tools Required)
The indoor unit, usually a furnace or air handler, houses the evaporator coil and blower fan. Check for any signs of problems here as well.
- Airflow: Feel the air coming out of the vents. Is it weak or non-existent? This could indicate a problem with the blower fan or ductwork.
- Ice Buildup: As with the outdoor unit, check for ice buildup on the evaporator coil. If you see ice, turn off the AC and let it thaw completely. Then, try running it again after addressing potential airflow issues (like a dirty filter). If the ice returns, you likely have a refrigerant problem that needs professional help. Accessing the Evaporator Coil might require removing panels secured by screws. If you're uncomfortable doing this, contact a professional.
- Blower Fan Operation: Listen for the blower fan running. If it's not running, check the circuit breaker for the indoor unit. If the breaker has tripped, reset it. If it trips again, there's likely an electrical problem that needs professional attention.
Step 5: Checking the Circuit Breaker (No Tools Required)
A tripped circuit breaker is a common cause of AC problems. Check the circuit breaker panel for the breaker that controls your AC unit (both indoor and outdoor units usually have their own breakers).
- Locate the Breaker: Identify the breaker labeled "AC," "Air Conditioner," or a similar designation.
- Check the Position: If the breaker is in the "tripped" (middle) position, flip it all the way to the "off" position and then back to the "on" position.
- Monitor for Tripping: If the breaker trips again immediately, there's likely an electrical problem that needs professional attention. Don't repeatedly reset the breaker, as this could damage the system or create a fire hazard.
Step 6: Checking the Condensate Drain Line (Potential Need for a Wet/Dry Vacuum or Stiff Wire)
The condensate drain line removes moisture that condenses on the evaporator coil. A clogged drain line can cause water to back up and shut down the AC system.
- Locate the Drain Line: The drain line is usually a PVC pipe that exits the indoor unit (furnace or air handler) and drains outside or into a floor drain.
- Check for Clogs: Look for any visible clogs or obstructions in the drain line.
- Clear the Drain Line: You can try to clear the drain line using a wet/dry vacuum. Attach the vacuum hose to the end of the drain line and suck out any debris. Alternatively, you can use a stiff wire (like a coat hanger) to gently probe the drain line and break up any clogs. Be careful not to puncture the drain line.
- Prevention: Pour a cup of white vinegar down the drain line every month to help prevent clogs.
When to Call a Professional HVAC Technician
While many AC problems can be resolved with simple DIY troubleshooting, some issues require the expertise of a qualified HVAC technician. Here's when it's time to call in the pros:
- Refrigerant Leaks: Refrigerant is essential for cooling, and if your system is low on refrigerant, it won't cool properly. Diagnosing and repairing refrigerant leaks requires specialized equipment and knowledge. Plus, handling refrigerants is regulated due to environmental concerns.
- Compressor Problems: The compressor is the heart of the AC system, and if it fails, the entire system will be affected. Compressor repairs are complex and expensive, and usually require replacement of the entire unit.
- Electrical Issues: If you suspect an electrical problem (e.g., a repeatedly tripping circuit breaker, burning smell), it's best to call a professional. Electrical work can be dangerous, and a qualified electrician or HVAC technician can safely diagnose and repair the problem.
- Frozen Evaporator Coil (Recurring): If your evaporator coil repeatedly freezes up despite having a clean air filter and proper airflow, there may be a more serious underlying issue, such as a refrigerant leak or a problem with the metering device.
- Unfamiliar Noises: Unusual or loud noises coming from your AC unit (e.g., grinding, rattling, hissing) can indicate a mechanical problem that needs professional attention.
- You're Uncomfortable: If you've tried the troubleshooting steps above and are still unable to resolve the issue, or if you're simply uncomfortable working on your AC system, it's always best to call a professional.
Tools You Might Need
While many of the initial checks can be done without tools, here's a list of basic equipment that might be helpful for more advanced troubleshooting:
- Screwdrivers (Phillips and Flathead): For removing panels and accessing components.
- Wet/Dry Vacuum: For clearing condensate drain lines.
- Stiff Wire (Coat Hanger): For probing condensate drain lines.
- Multimeter (Optional): For checking electrical components (only if you are comfortable and experienced with electrical work!). Caution: working with electricity can be dangerous. If you are not comfortable, call a professional.
Remember: Safety is paramount. If you're unsure about any step, or if you're uncomfortable working on your AC system, it's always best to call a qualified HVAC technician.
Preventative Maintenance: Keeping Your AC Running Smoothly
The best way to avoid AC problems is to perform regular preventative maintenance. Here are some tips:
- Change Air Filters Regularly: As mentioned earlier, replace your air filter every 1-3 months, depending on usage and the type of filter.
- Clean the Outdoor Unit: Periodically clean the outdoor unit by removing any debris that may be blocking the condenser coil. Turn off the power first!
- Inspect the Condensate Drain Line: Check the condensate drain line for clogs and clear it as needed. Pour white vinegar down the drain line monthly to prevent clogs.
- Schedule Professional Maintenance: Have your AC system professionally inspected and serviced at least once a year. A technician can identify and address potential problems before they become major issues.
By following these troubleshooting steps and performing regular maintenance, you can keep your AC system running smoothly and efficiently, saving you money on energy bills and preventing costly repairs.
Disclaimer: This article provides general troubleshooting information and should not be considered a substitute for professional HVAC service. If you are unsure about any step, or if you are uncomfortable working on your AC system, it's always best to call a qualified technician.