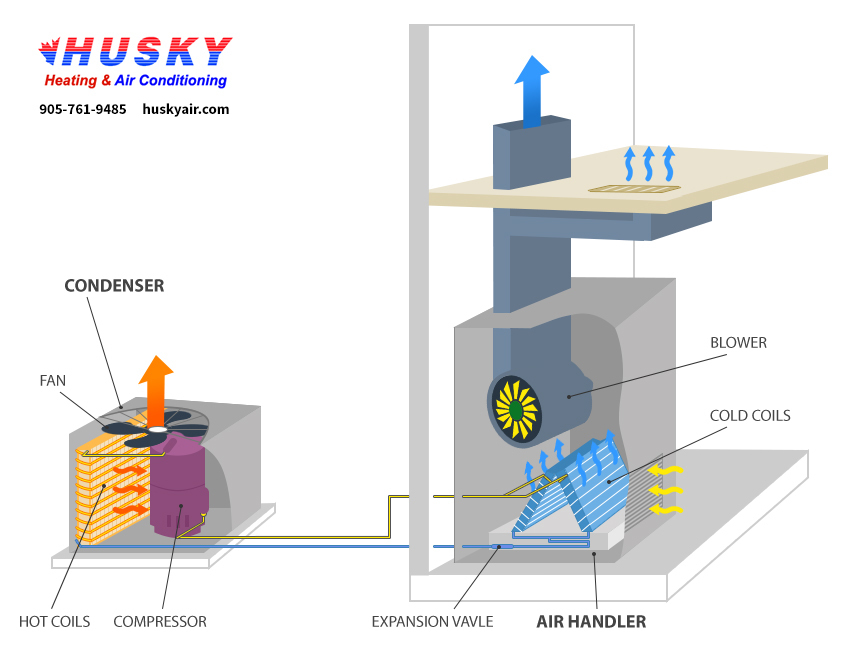
How Does An Air Conditioner Work Diagram
It's a hot summer day, and you expect to walk into a cool, refreshing home. Instead, you're greeted by stagnant, warm air. Your air conditioner has failed. Before calling a technician, let's explore a logical, step-by-step approach to troubleshooting your AC unit, using the "How Does An Air Conditioner Work" diagram as our guide.
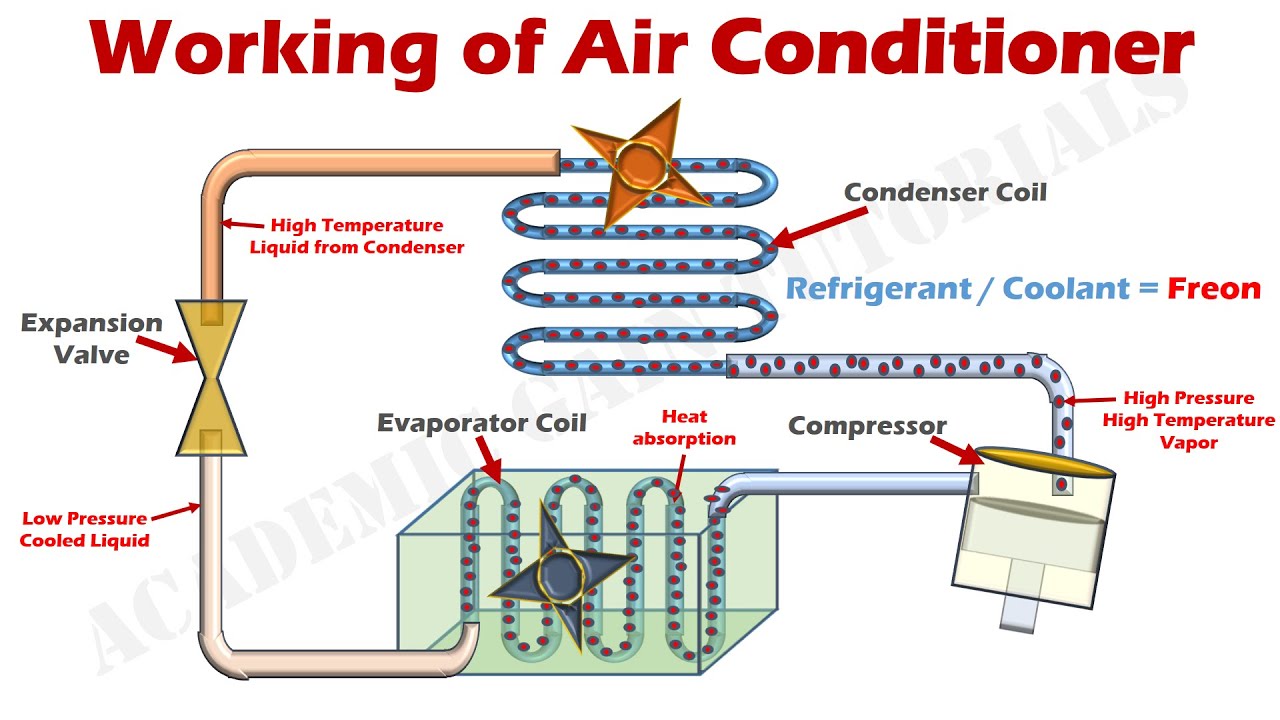
Understanding the Basics: The Air Conditioner's Cycle
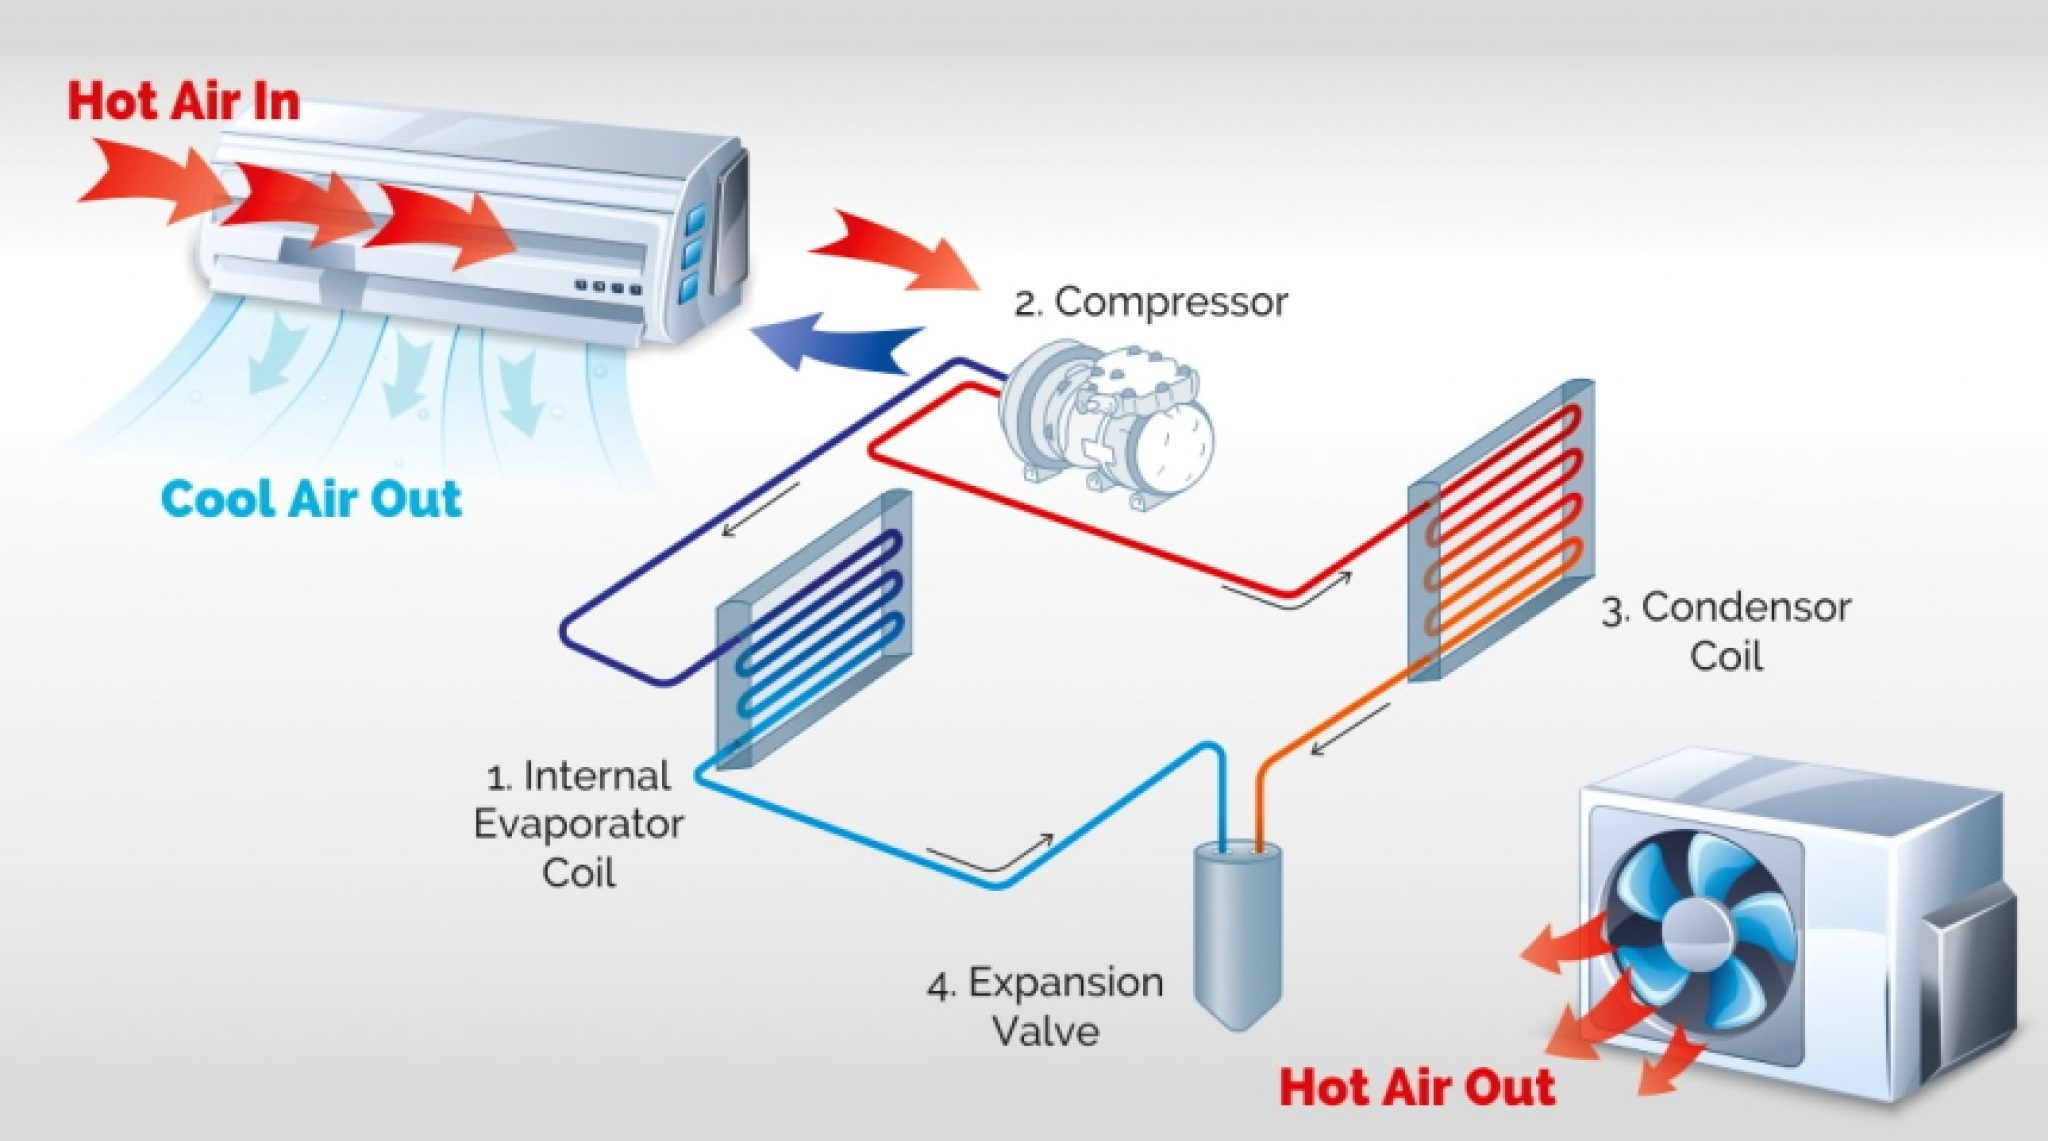
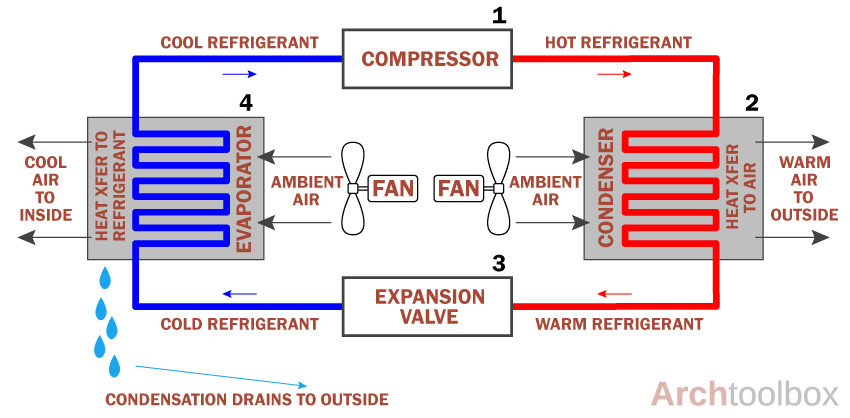
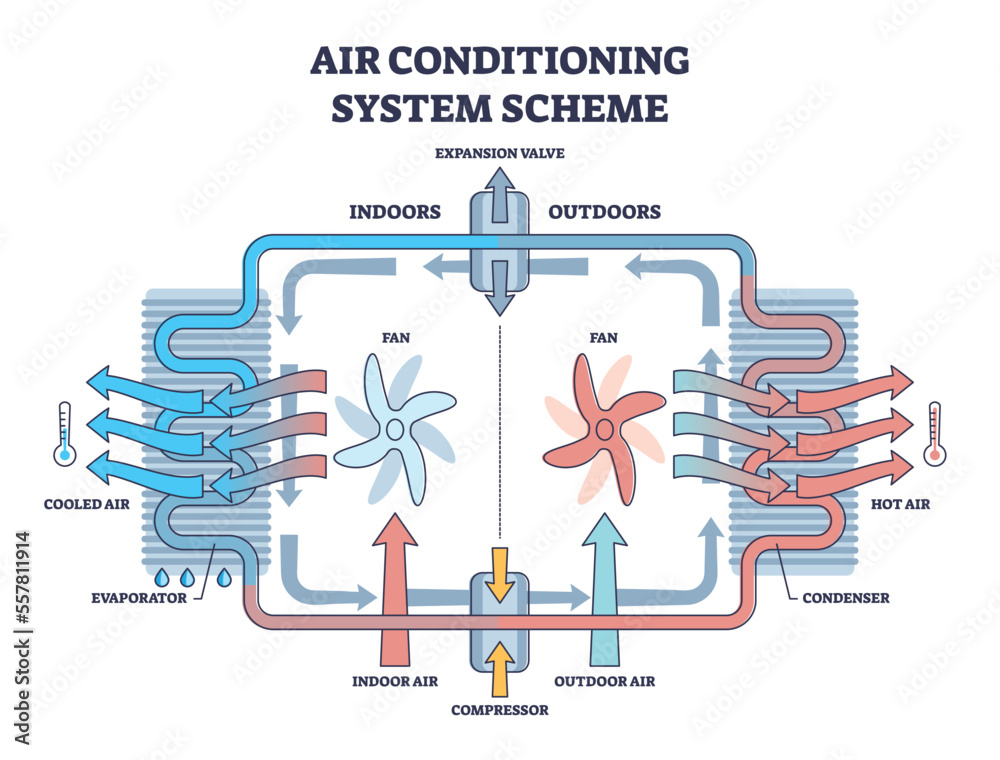
To effectively troubleshoot, it's crucial to understand the basic components and how they work together. Think of your AC as a system that moves heat from inside your home to the outside.
The Core Components and Their Roles
Here's a simplified breakdown using our imaginary "How Does An Air Conditioner Work" diagram:
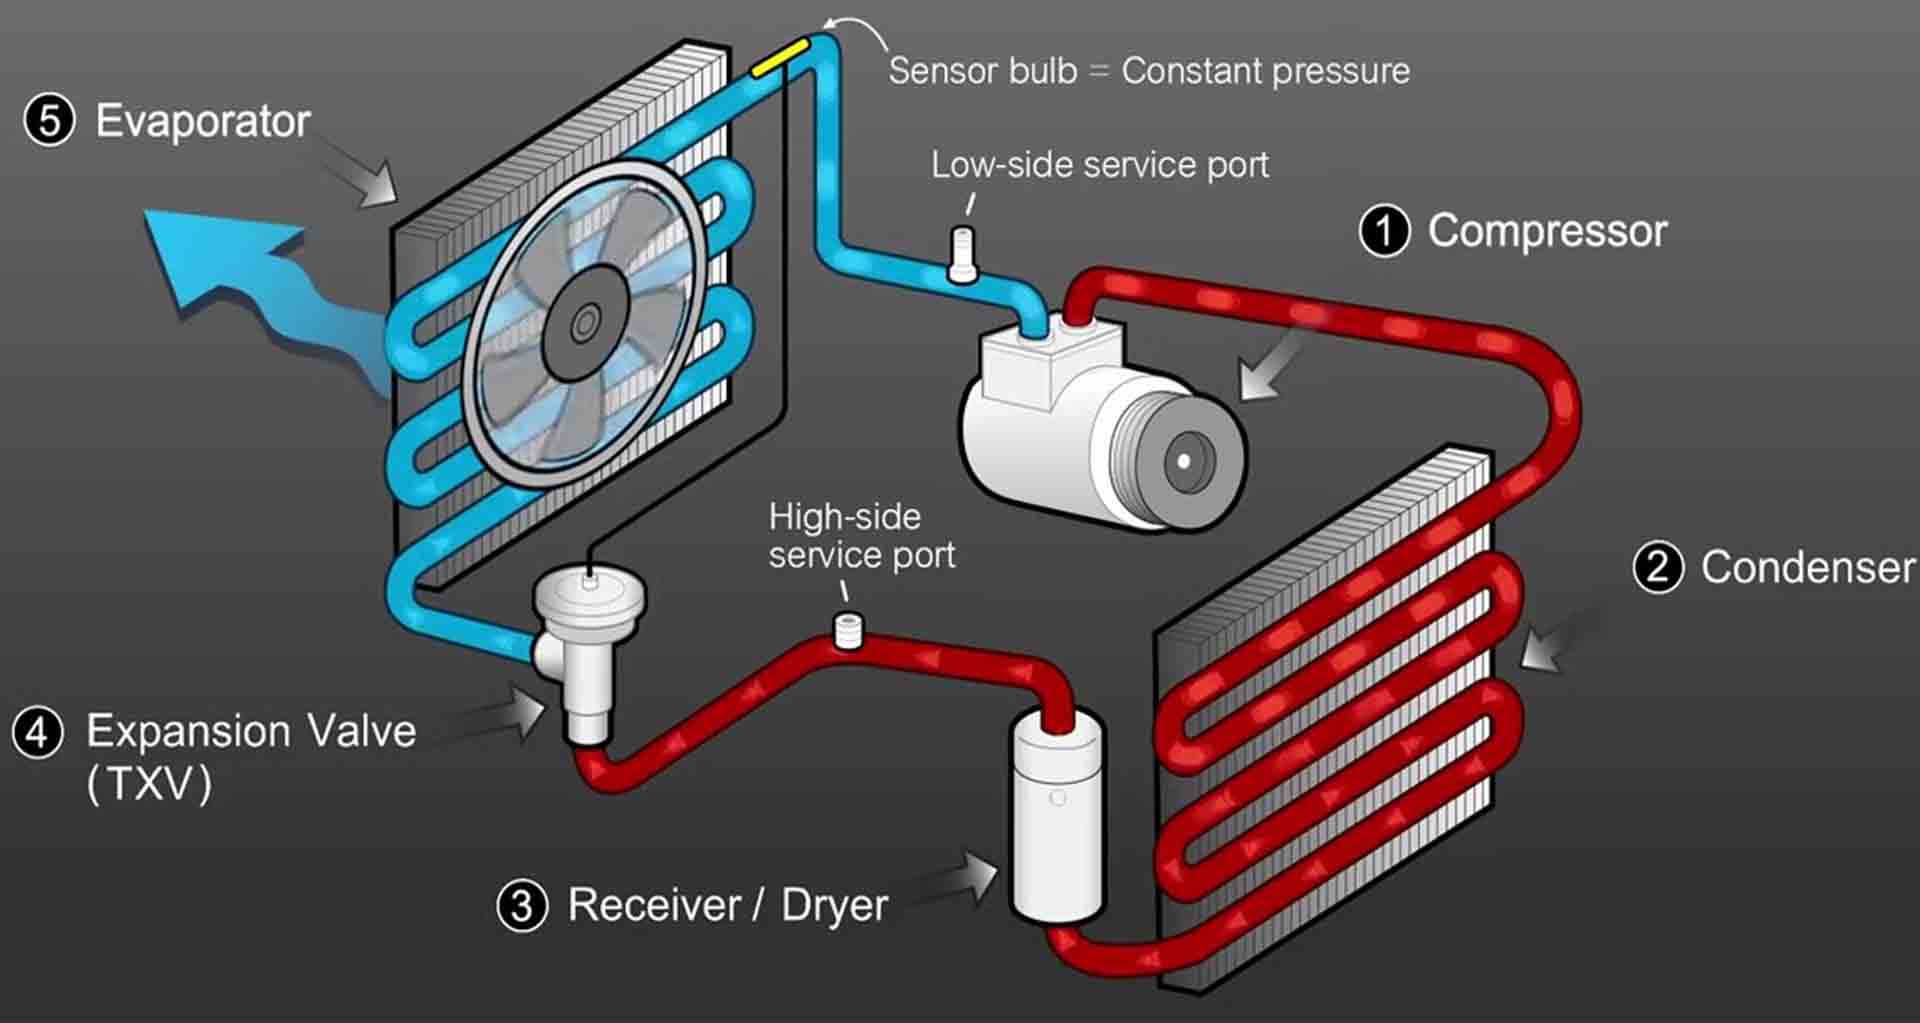
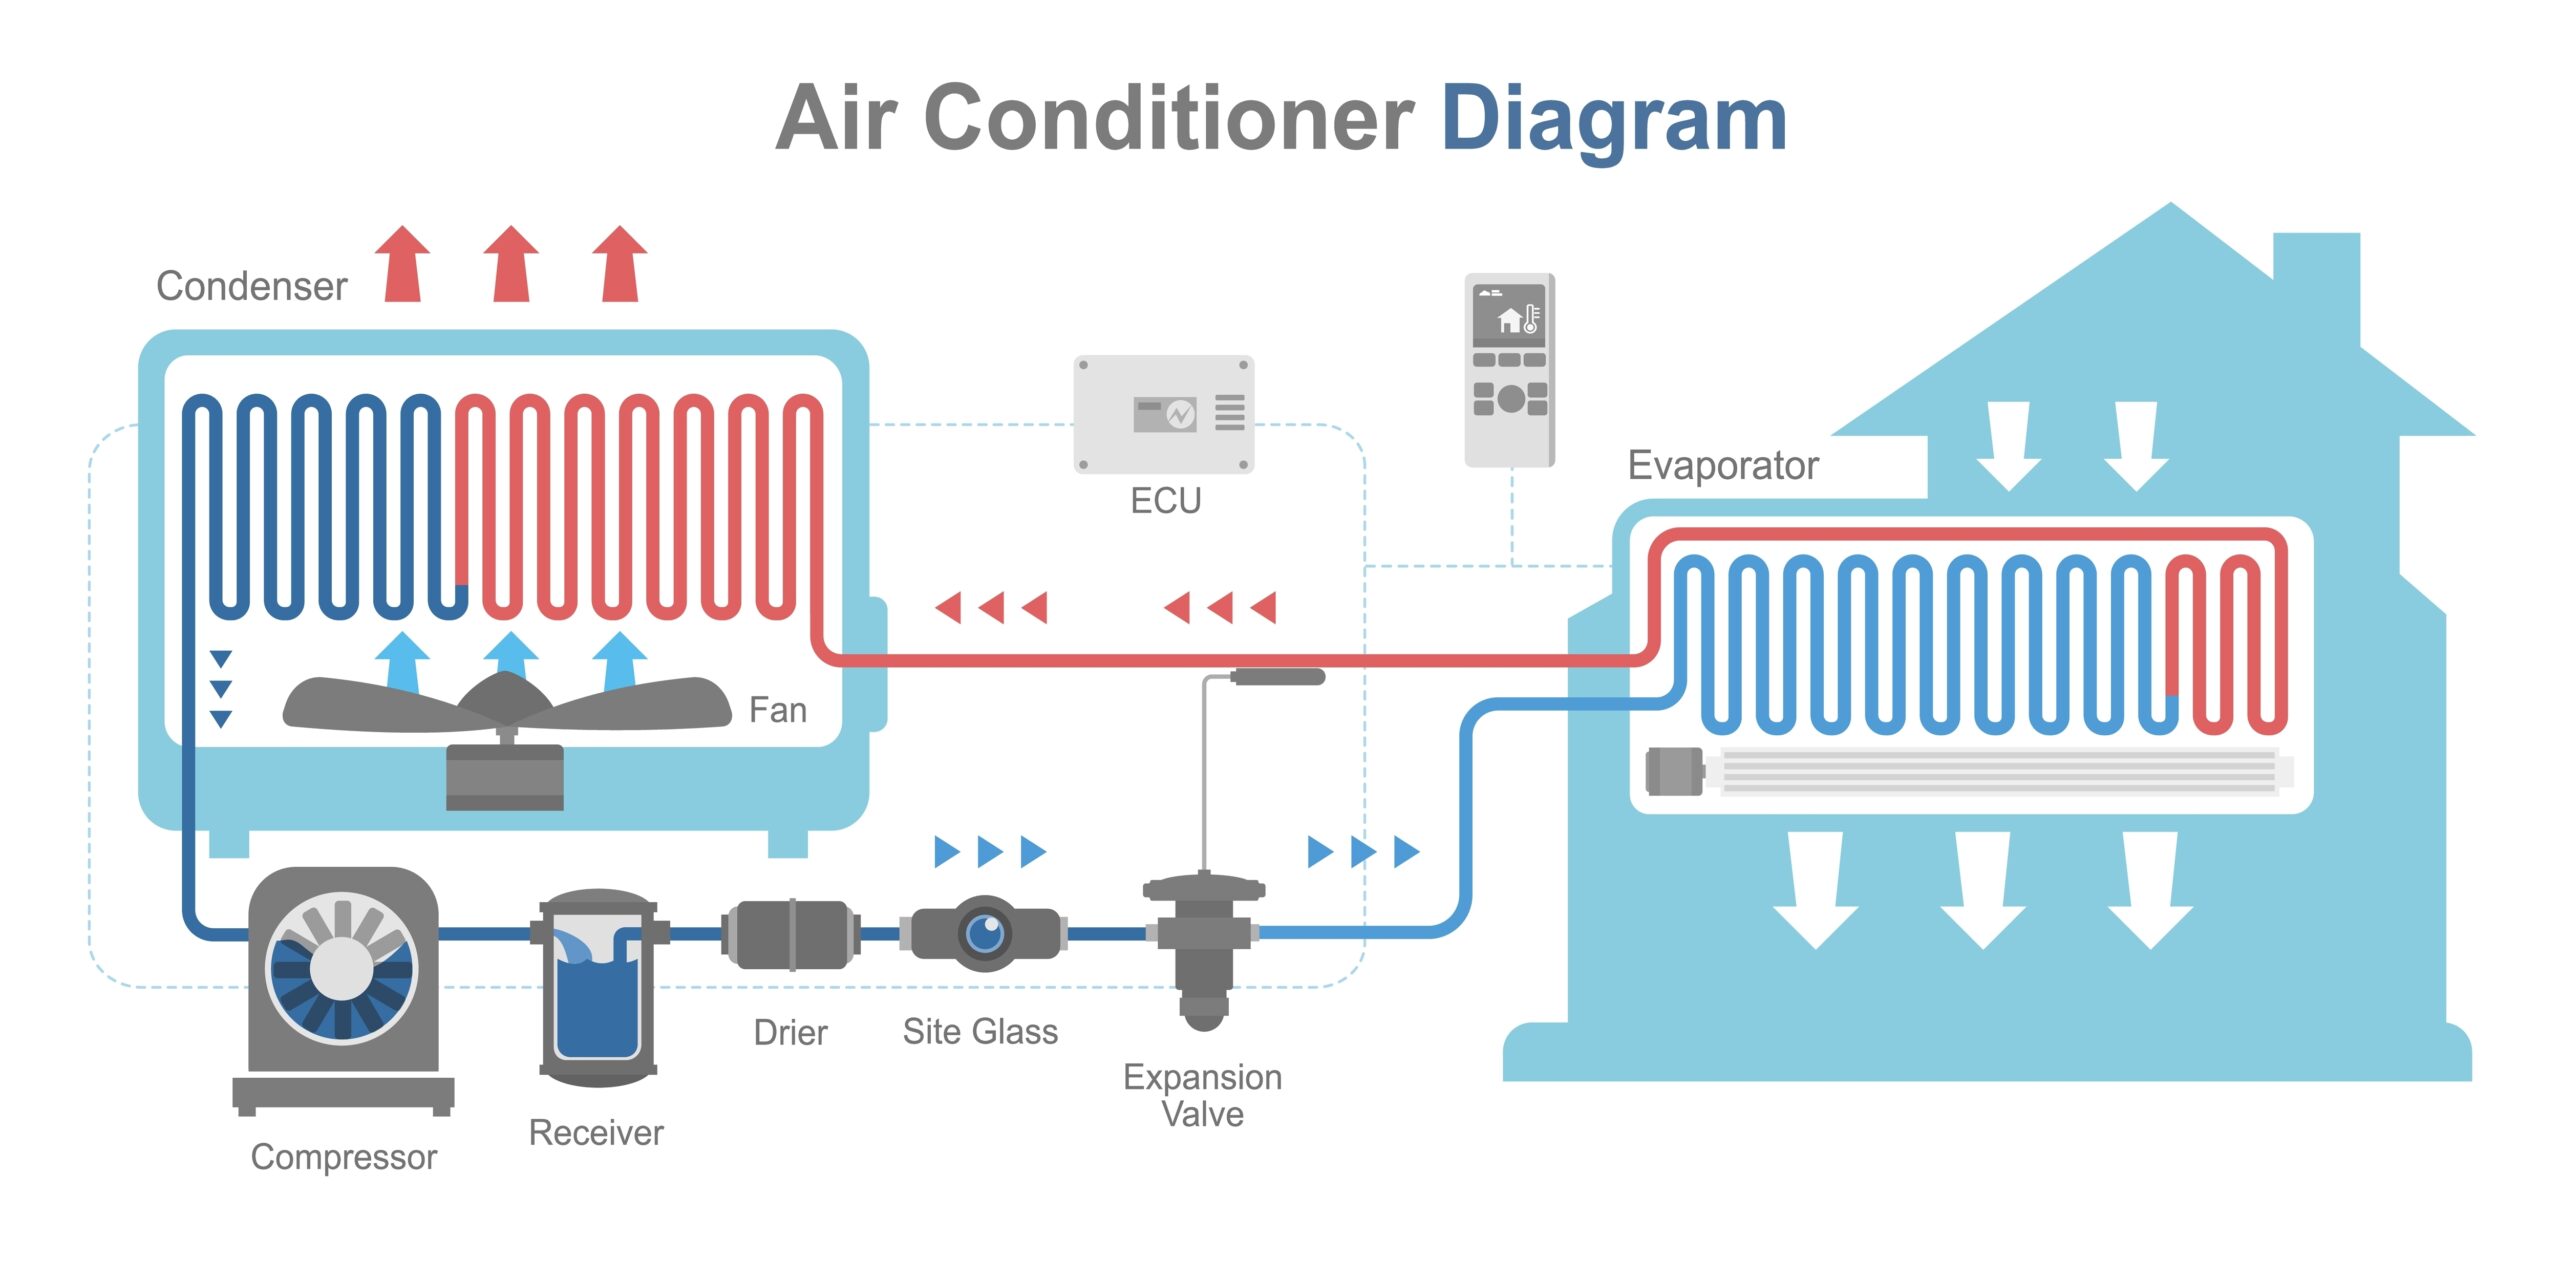
- Refrigerant: The lifeblood of your AC. This special fluid absorbs heat as it evaporates and releases heat as it condenses. It cycles continuously.
- Compressor: The pump of the system. It compresses the refrigerant, increasing its pressure and temperature.
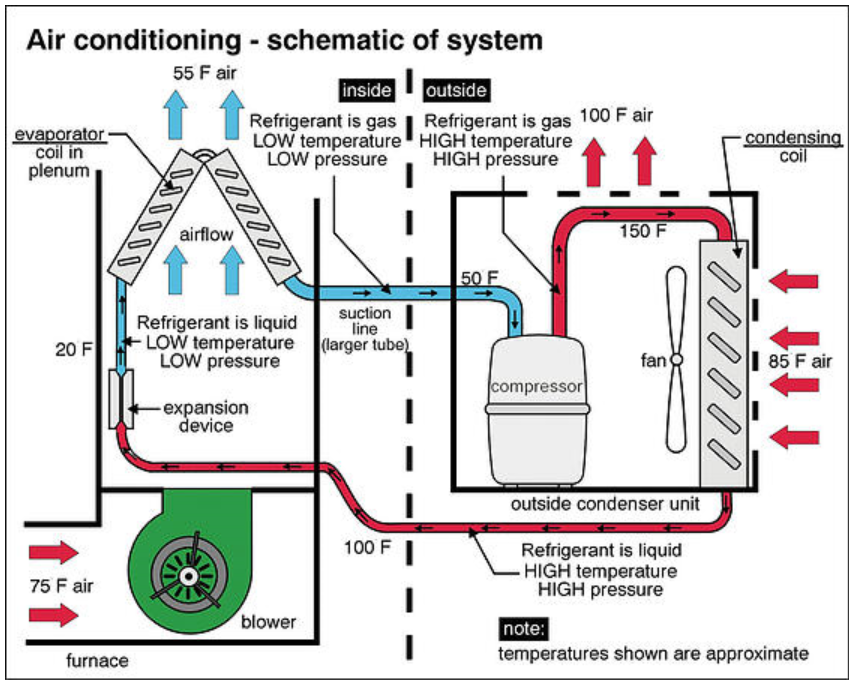
- Condenser: Located outside. It's where the hot, high-pressure refrigerant releases its heat to the outside air and condenses into a liquid.
- Expansion Valve (or Metering Device): This restricts the flow of the high-pressure liquid refrigerant, causing it to rapidly expand and cool down.
- Evaporator Coil: Located inside. The cold, low-pressure refrigerant absorbs heat from the indoor air, cooling it down. A fan then blows this cooled air into your home.
The Cooling Cycle in Brief
The refrigerant goes through these steps:
- Enters the evaporator coil as a cold, low-pressure liquid.
- Absorbs heat from the indoor air, becoming a warm, low-pressure gas.
- Travels to the compressor, where it's compressed into a hot, high-pressure gas.
- Reaches the condenser, where it releases heat to the outside air and becomes a warm, high-pressure liquid.
- Passes through the expansion valve, becoming a cold, low-pressure liquid again.
- The cycle starts over.
Step-by-Step Troubleshooting Guide
Now, let's get practical. Follow these steps to diagnose and potentially fix common AC problems.
Step 1: The Obvious Checks - Power and Settings
Start with the simplest things:
- Thermostat: Is it set to "Cool" and to a temperature lower than the current room temperature? It sounds basic, but it's a frequent oversight. Try lowering the temperature a few degrees to see if the AC kicks on. Ensure it's not in "Fan Only" mode.
- Power Switch: Check the main power switch for the AC unit (usually near the outdoor unit). Make sure it's turned on.
- Circuit Breaker: Locate the circuit breaker in your electrical panel that controls the AC. If it's tripped (in the "off" or middle position), flip it fully to the "off" position and then back to the "on" position. If it trips again immediately, do not keep resetting it. This indicates a more serious electrical problem, and you should call a qualified electrician.
- Air Filter: A dirty air filter restricts airflow, causing the AC to work harder and potentially freeze up the evaporator coil. Replace the filter immediately. This is a maintenance task you should perform regularly (every 1-3 months, depending on usage and filter type).
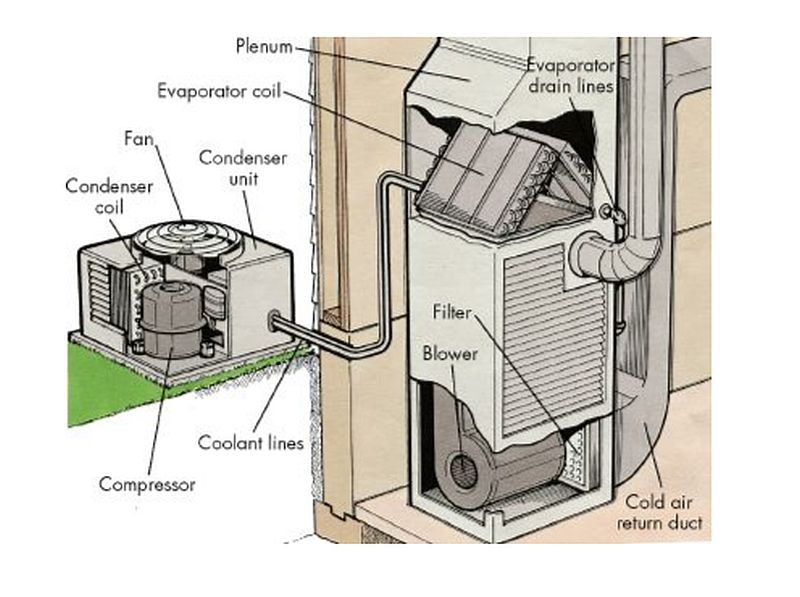
Step 2: Checking the Outdoor Unit (Condenser)
Safety First: Before inspecting the outdoor unit, turn off the power at the disconnect switch or circuit breaker!
- Physical Obstructions: Ensure the condenser unit is free from obstructions like leaves, branches, or debris. Clear away anything blocking airflow around the unit. Use a garden hose (with the power off!) to gently rinse away dirt and debris from the fins. Never use a pressure washer, as it can damage the fins.
- Fan Operation: After restoring power, observe the fan. Is it spinning freely? If not, there may be an obstruction, a faulty motor, or a bad capacitor. If you're comfortable, you can try carefully removing any visible obstructions (again, with the power off!). If the fan motor appears damaged or the fan still doesn't turn, it's best to call a professional.
- Coil Condition: Visually inspect the condenser coils. Are they heavily soiled or damaged? Gentle cleaning with a fin comb (available at most hardware stores) can help straighten bent fins and improve airflow.
Step 3: Inspecting the Indoor Unit (Evaporator)
The indoor unit usually contains the evaporator coil and the blower fan.
- Frozen Evaporator Coil: If you suspect a frozen coil (little to no airflow from vents, signs of ice), turn off the AC and set the fan to "on" to help thaw the coil. This can take several hours. Once thawed, try turning the AC back on. If the coil freezes again quickly, it indicates a problem such as low refrigerant, a dirty air filter, or a malfunctioning blower fan.
- Blower Fan: Ensure the blower fan is operating properly. Listen for unusual noises (squealing, grinding). If the fan isn't working, it could be a faulty motor or a bad capacitor. These repairs are best left to professionals.
- Drainage: Check the condensate drain line (usually a PVC pipe near the indoor unit). A clogged drain line can cause water to back up and shut down the system. You can try clearing the drain line with a wet/dry vacuum or a stiff wire. If the drain line is severely clogged, you may need to call a professional.
Step 4: Simple Part Replacement (Handle with Care!)
Important Safety Note: If you're not comfortable working with electricity, do not attempt these repairs. Turn off the power to the unit at the breaker before attempting any electrical work.
- Capacitors: AC units use capacitors to start and run the motors. A failing capacitor is a common cause of AC problems. Capacitors store an electrical charge, even when the power is off. Discharge the capacitor before handling it. You can do this carefully using a screwdriver with an insulated handle (search online for detailed instructions; it's crucial to do this safely). Replace the capacitor with one of the same voltage and capacitance (microfarads). Make sure to take a picture of the wiring before disconnecting the old capacitor. This is a common DIY repair, but exercise extreme caution.
- Contactor: The contactor is an electrical switch that controls power to the compressor and fan motor. If the contactor is burned or pitted, it may need to be replaced. Ensure the replacement contactor has the same voltage and amperage rating. Again, take a photo of the wiring before disconnecting the old contactor.
Step 5: When to Call a Professional
Certain problems require the expertise of a qualified HVAC technician. These include:
- Refrigerant Leaks: Handling refrigerant requires specialized equipment and training. Never attempt to repair a refrigerant leak yourself. Refrigerant is harmful to the environment and requires proper disposal.
- Compressor Problems: Compressor repairs are complex and expensive. A faulty compressor usually requires replacement, which is best handled by a professional.
- Electrical Issues: If you suspect a major electrical problem (e.g., frequently tripping circuit breakers, burning smells), call an electrician immediately.
- Gas Leaks: If you have a gas-powered AC unit and suspect a gas leak, evacuate the area immediately and call your gas company or a qualified HVAC technician.
- Complex Control System Problems: Modern AC units often have sophisticated control systems with circuit boards and sensors. Diagnosing and repairing these problems requires specialized knowledge and equipment.
Preventive Maintenance: Keeping Your AC Running Smoothly
Regular maintenance can help prevent many AC problems. Here are a few tips:
- Regularly Replace Air Filters: This is the single most important maintenance task.
- Clean the Condenser Coils: At least once a year, clean the condenser coils with a garden hose and a fin comb.
- Trim Vegetation Around the Outdoor Unit: Keep the area around the condenser unit clear of vegetation.
- Schedule Professional Maintenance: Have your AC unit inspected and serviced by a qualified HVAC technician at least once a year.
Understanding Your "How Does An Air Conditioner Work" Diagram Better
Referring back to our imaginary diagram, consider these points as you troubleshoot:
- Restricted Airflow (Evaporator): A dirty filter on the evaporator side reduces heat absorption. Refer to the diagram: less heat absorbed means a higher chance of coil freezing.
- Restricted Airflow (Condenser): A dirty condenser coil means less heat is released to the outside. Referring to our diagram, the refrigerant doesn't fully condense, reducing the system's efficiency and cooling capacity.
- Refrigerant Leaks: Leaks lower the refrigerant level. The diagram shows the ideal refrigerant flow. If there's a leak, the refrigerant can't effectively absorb and release heat.
Final Thoughts
Troubleshooting your air conditioner can seem daunting, but by understanding the basic components and following a logical approach, you can often diagnose and fix simple problems yourself. Remember to prioritize safety and when in doubt, call a qualified professional. By regularly maintaining your AC unit, you can help ensure it runs efficiently and reliably for years to come. The "How Does An Air Conditioner Work" diagram serves as a valuable reference to understand the system's functionality better and tackle any future troubleshooting tasks with confidence.