How Does Thermostatic Expansion Valve Work
The Thermostatic Expansion Valve (TXV), also known as a Thermal Expansion Valve, is a crucial component in your air conditioning or heat pump system. It's responsible for regulating the flow of refrigerant into the evaporator coil, ensuring efficient cooling and preventing damage to your compressor. Understanding how it works can help you troubleshoot common HVAC issues and determine when to call in a professional.
The TXV's Role in the Refrigeration Cycle
To grasp the TXV's function, let's briefly review the refrigeration cycle:
- Compressor: Compresses the refrigerant, increasing its pressure and temperature.
- Condenser: Rejects heat from the high-pressure refrigerant, causing it to condense into a liquid.
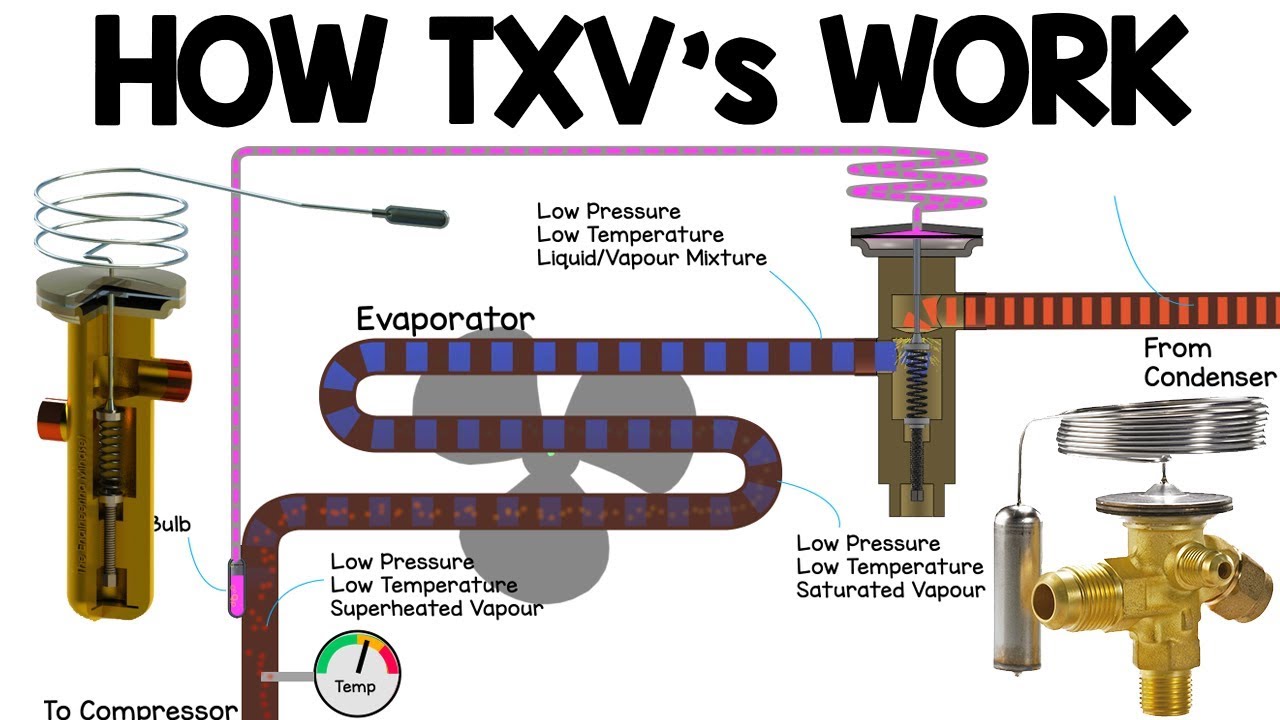
- Metering Device (TXV): Meters the high-pressure liquid refrigerant into the evaporator coil, reducing its pressure.
- Evaporator: The low-pressure liquid refrigerant absorbs heat from the indoor air, causing it to evaporate into a gas. This process cools the air.
- The refrigerant gas returns to the compressor, and the cycle repeats.
The TXV sits between the condenser and the evaporator, playing a vital role in controlling the refrigerant flow to optimize this cycle.
How the TXV Operates
The TXV is a mechanical device that regulates refrigerant flow based on the superheat of the refrigerant leaving the evaporator coil. Superheat refers to the temperature difference between the refrigerant vapor and its saturation temperature (the temperature at which it changes phase from liquid to gas) at a given pressure. Here's a breakdown of its operation:
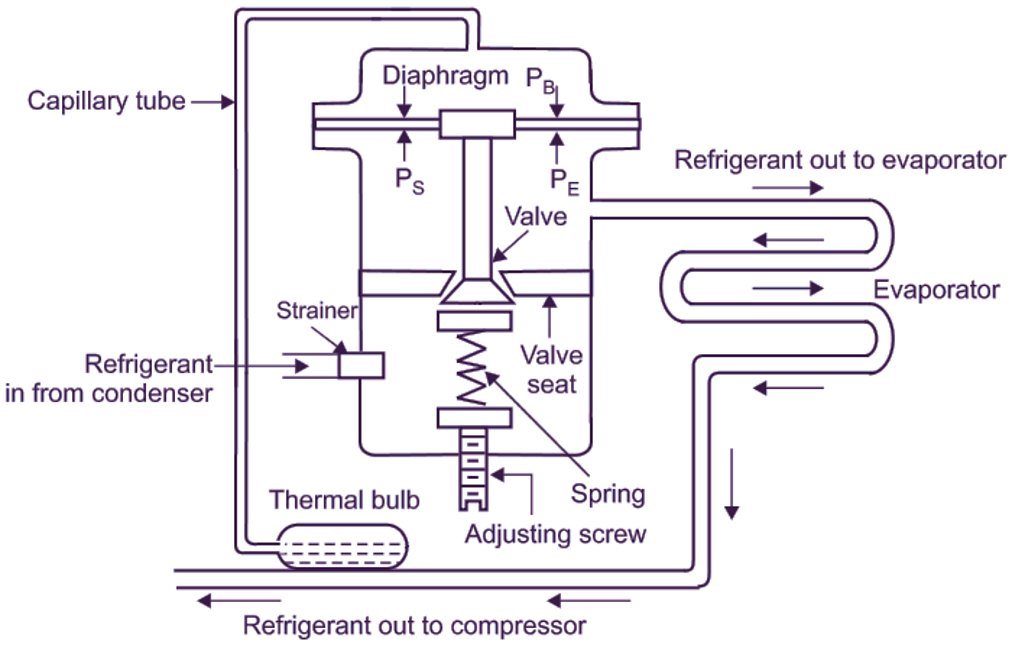
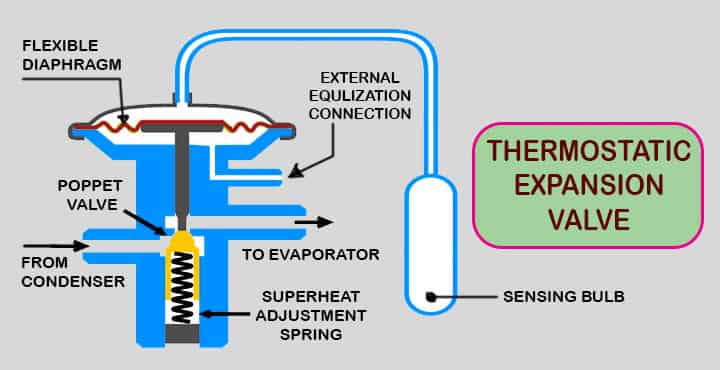
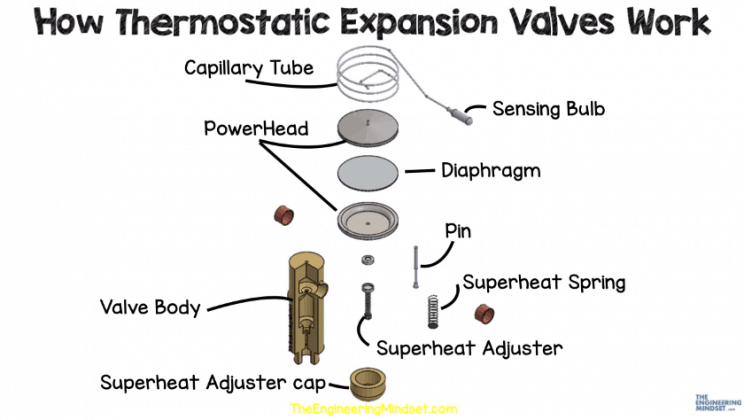
- Sensing Bulb: A temperature-sensing bulb is attached to the suction line (the refrigerant line exiting the evaporator coil). This bulb is filled with a refrigerant similar to, or the same as, the system refrigerant.
- Capillary Tube: The bulb is connected to the TXV body via a thin capillary tube.
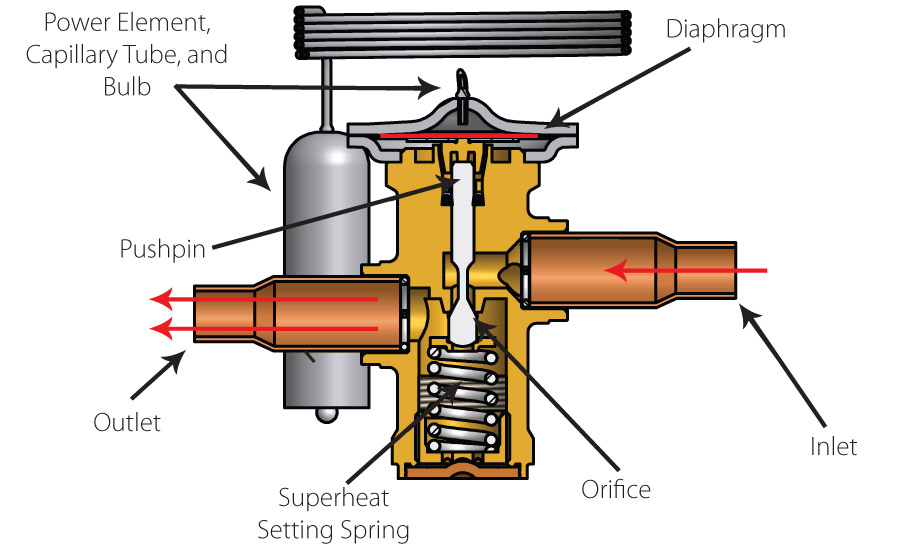
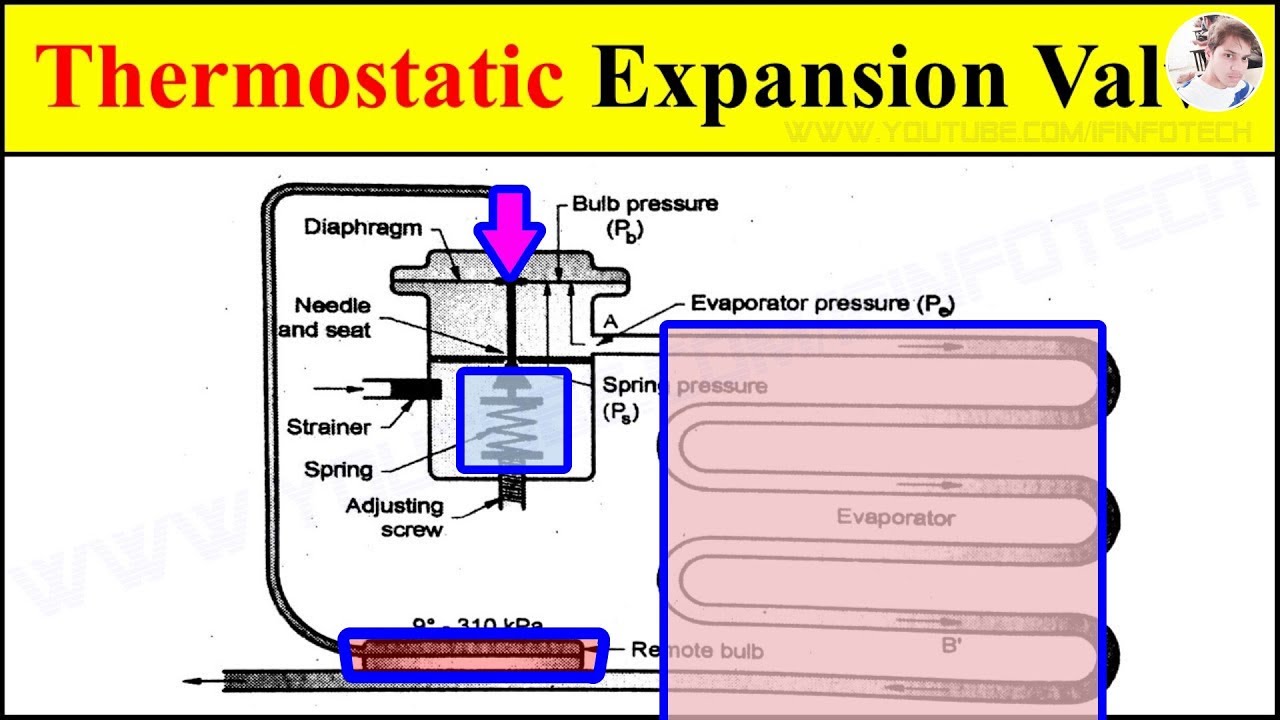
- Diaphragm: The pressure in the bulb, created by the refrigerant inside, acts on a diaphragm within the TXV.
- Valve Needle: The diaphragm is connected to a valve needle, which controls the opening of the valve.
- Superheat Control: As the superheat of the refrigerant leaving the evaporator increases (meaning the refrigerant is fully evaporated and starting to warm up), the bulb temperature rises, increasing the pressure on the diaphragm. This pressure pushes the valve needle further open, allowing more refrigerant to flow into the evaporator.
- Evaporator Pressure: The evaporator pressure also acts on the underside of the diaphragm, opposing the force from the bulb. This pressure helps to regulate the valve opening based on the cooling load.
- Spring Pressure: A spring within the TXV provides additional opposing force to the diaphragm, allowing for adjustment of the desired superheat.
In essence, the TXV constantly adjusts the refrigerant flow to maintain a consistent superheat level, ensuring that the evaporator is fully utilized for cooling without allowing liquid refrigerant to return to the compressor, which could cause serious damage.
Identifying TXV Problems
A malfunctioning TXV can cause various HVAC problems. Here are some common symptoms:
- Insufficient Cooling: If the TXV is stuck closed or partially closed, it restricts refrigerant flow, leading to reduced cooling capacity.
- Icing on the Evaporator Coil: If the TXV is stuck open, it can flood the evaporator with refrigerant, causing ice to form on the coil.
- High Superheat: A restricted TXV results in high superheat, indicating that the refrigerant is being overheated before returning to the compressor.
- Low Superheat: An overfeeding TXV leads to low superheat, meaning that liquid refrigerant may be returning to the compressor.
- High Head Pressure: A TXV stuck closed can cause high head pressure in the system, potentially damaging the compressor.
- Compressor Failure: If a TXV malfunction goes unaddressed, it can eventually lead to compressor failure due to liquid slugging (liquid refrigerant entering the compressor).
- Unusual Noises: Hissing or whistling sounds coming from the TXV area could indicate a problem.
Troubleshooting a TXV
Before attempting any troubleshooting, always disconnect power to the HVAC unit for safety. Wear appropriate personal protective equipment (PPE), including safety glasses and gloves.
- Visual Inspection: Check the TXV and surrounding area for any signs of damage, leaks, or corrosion.
- Check Superheat and Subcooling: Use gauges and thermometers to measure the superheat at the evaporator outlet and the subcooling at the condenser outlet. Compare these readings to the manufacturer's specifications. Incorrect readings can indicate a TXV problem.
- Check Bulb Contact: Ensure the sensing bulb is securely attached to the suction line and properly insulated. Poor contact can lead to inaccurate temperature readings and incorrect valve operation.
- Tap Test: Gently tap on the TXV body with a screwdriver handle. Sometimes, this can dislodge a stuck valve needle.
- TXV Adjustment (If Applicable): Some TXVs have an adjustment screw that allows you to fine-tune the superheat setting. Consult the manufacturer's instructions for proper adjustment procedures. Improper adjustment can damage the system.
- Refrigerant Charge: Verify the refrigerant charge is correct. Low refrigerant can mimic TXV issues.
Tools and Parts
Here's a list of tools and parts you might need for TXV troubleshooting and replacement:
- Manifold Gauge Set
- Thermometer
- Screwdrivers
- Wrenches
- Pliers
- Refrigerant Recovery Machine (for removing refrigerant)
- Vacuum Pump (for evacuating the system)
- Nitrogen Tank and Regulator (for pressure testing)
- Torch and Brazing Equipment (for brazing copper pipes)
- Leak Detector
- Replacement TXV
- Refrigerant
- Safety Glasses
- Gloves
When to Call a Professional
While some basic troubleshooting steps can be performed by homeowners, TXV replacement and repair are complex tasks that often require specialized equipment and knowledge. It's best to call a qualified HVAC technician if:
- You are not comfortable working with refrigerant or electrical components.
- You lack the necessary tools and equipment.
- You suspect a refrigerant leak.
- The TXV requires brazing or soldering.
- You are unsure about the proper superheat and subcooling settings.
- You have tried basic troubleshooting steps and the problem persists.
Attempting to repair a TXV without proper training can be dangerous and may void your HVAC system's warranty. It's always better to err on the side of caution and seek professional help.
Estimated Repair Costs
The cost to repair or replace a TXV can vary depending on several factors, including:
- The type of HVAC system (window AC, split system, heat pump, etc.)
- The accessibility of the TXV.
- The cost of the replacement TXV.
- Labor rates in your area.
- Refrigerant costs.
Generally, you can expect to pay anywhere from $200 to $800 or more for TXV replacement. This typically includes the cost of the TXV, refrigerant, labor, and evacuation/recharging of the system. A simple repair, such as adjusting the superheat setting, might cost less, ranging from $100 to $300. It's always best to get multiple quotes from qualified HVAC technicians to ensure you're getting a fair price.
Preventative Maintenance
Regular maintenance can help prevent TXV problems and extend the life of your HVAC system. Here are some tips:
- Schedule regular HVAC tune-ups: A qualified technician can inspect the TXV and other components, clean the coils, and ensure the system is operating efficiently.
- Keep the air filter clean: A dirty air filter restricts airflow and can cause the evaporator coil to freeze up, potentially damaging the TXV.
- Ensure proper airflow: Make sure vents are not blocked by furniture or other obstructions.
- Address refrigerant leaks promptly: Even small refrigerant leaks can affect system performance and potentially damage the TXV.
By understanding how the TXV works and taking steps to maintain your HVAC system, you can help prevent costly repairs and ensure efficient cooling and heating for years to come. However, remember to prioritize safety and seek professional help when necessary.