How Long Does It Take To Defrost Ac Unit

One of the most frustrating issues homeowners face, especially during the colder months, is a heating system that seems to be struggling. You might notice the house isn't warming up as quickly as it should, or perhaps the heating bills are inexplicably high. Often, this issue stems from a frosted-over outdoor AC unit – even when it's being used for heating in a heat pump system.
Yes, you read that right! Even though it seems counterintuitive, your AC unit can ice up even while providing heat. This happens because heat pumps work by transferring heat from the outside air to the inside. Even seemingly "warm" winter air contains some heat, which the heat pump extracts. However, this process can cause the outdoor coil to become very cold, leading to ice formation when humidity is present. This ice acts as an insulator, drastically reducing the unit's efficiency and potentially damaging components. So, how long does it typically take to defrost an AC unit that's iced over, and more importantly, what can you do about it?
Diagnosing the Frost: A Step-by-Step Approach
Before we dive into defrosting, it's crucial to determine if the icing is normal or indicative of a larger problem. Here's a methodical approach:
Step 1: Visual Inspection (No Tools Required)
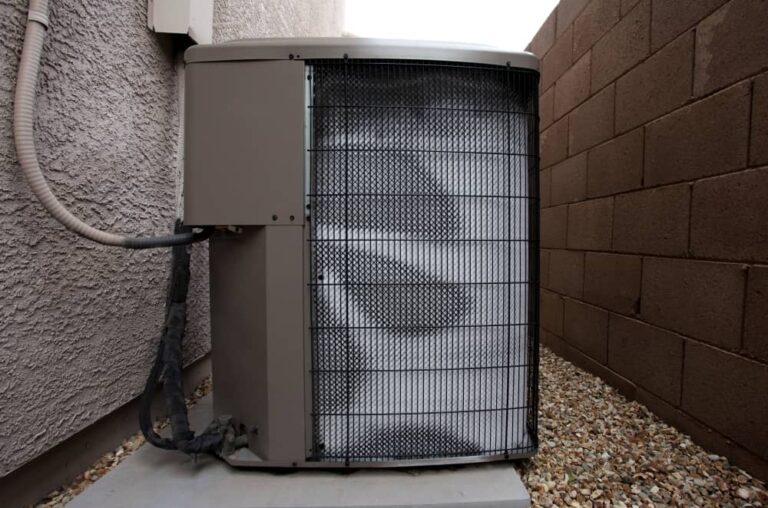
Start with a thorough visual inspection. Carefully examine the outdoor unit, paying close attention to the coils (the finned part that looks like a car radiator). Note the extent and pattern of the ice buildup:
- Light, even frost: A thin, even layer of frost across the coil is often normal during cold weather operation, especially if the unit is actively defrosting (more on that later).
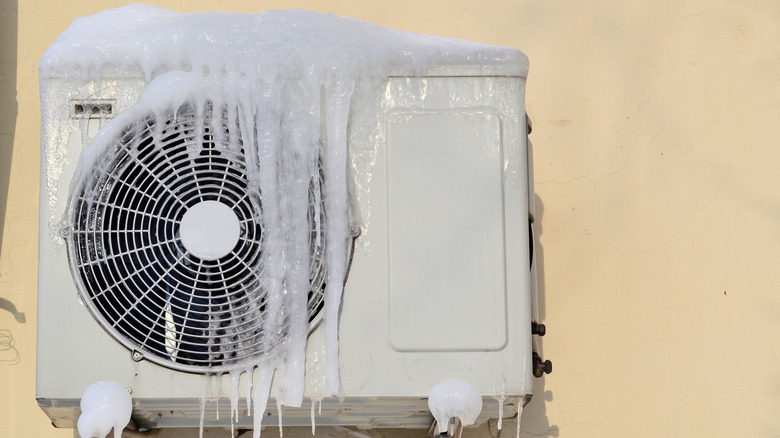
- Thick ice buildup: This is a more serious concern, indicating a potential problem.
- Ice only on one section of the coil: This could indicate a refrigerant leak or airflow issue.
- Ice covering the entire unit, including the fan: This is a severe issue and requires immediate attention.
Check for debris. Look for leaves, branches, snow, or other obstructions blocking airflow to the unit. Blocked airflow is a common cause of icing. Remove any visible debris carefully.
Inspect the surrounding area. Make sure shrubs and other vegetation haven't grown too close to the unit, hindering airflow.
Step 2: Observe Defrost Cycle (No Tools Required)
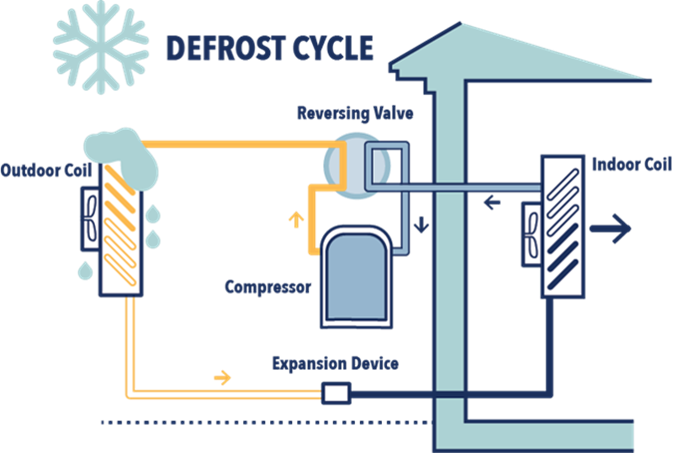
Your heat pump is designed to automatically defrost itself periodically. This usually happens every 30-90 minutes and lasts for a few minutes. During the defrost cycle:
- The outdoor fan will stop.
- You might hear a hissing sound. This is the refrigerant reversing direction.
- The auxiliary heat (electric resistance heat strips) will turn on to compensate for the temporary cooling of the indoor air. You might notice a temporary increase in your electric bill during this period.
- The unit will blow what appears to be cool air. Remember, the unit is temporarily running in "cooling" mode to warm the outdoor coil and melt the ice.
- Water will drip from the bottom of the unit as the ice melts.
Time the Defrost Cycle. Observe your unit for a full cycle. Does it defrost automatically? How long does the cycle take? A normal defrost cycle should last around 5-15 minutes. If the unit isn't defrosting automatically, or if the cycle is excessively long, there's a problem.
Step 3: Check Airflow (No Tools Required - Mostly)
Restricted airflow inside your home can also contribute to outdoor unit icing. Check the following:
- Air Filters: This is the most common culprit! A dirty air filter restricts airflow, reducing the amount of heat absorbed by the indoor coil. This makes the refrigerant colder, increasing the likelihood of outdoor coil icing. Replace your air filter immediately if it's dirty. Check it monthly, and replace it as needed. (You might need a screwdriver to access the filter compartment, which technically makes this a "tool required" check).
- Air Vents: Ensure that all supply and return air vents are open and unobstructed. Closing vents in unused rooms might seem like a good way to save energy, but it can restrict overall airflow and negatively impact your system's performance.
- Ductwork: While you can't visually inspect the entire ductwork system without specialized equipment, look for any obvious kinks or damage to exposed ductwork in basements or attics.
Step 4: Basic Electrical Checks (Requires Caution and Basic Tools)
Warning: Electricity can be dangerous! If you are not comfortable working with electrical components, DO NOT attempt this step. Call a qualified HVAC technician.
Check the Breaker: Ensure that the breaker for your outdoor unit hasn't tripped. If it has, reset it. If it trips again immediately, there's likely a short circuit that needs professional attention.
Inspect the Contactor: The contactor is an electrical switch that controls power to the outdoor unit. With the power to the unit completely shut off at the breaker, carefully inspect the contactor for signs of damage, such as burned or pitted contacts. A faulty contactor can prevent the unit from defrosting properly. This requires a multimeter to properly test, and should only be attempted by someone comfortable with electrical testing.
DIY Defrosting Actions (When Appropriate)
After you've diagnosed the problem, here are some safe and simple DIY actions you can take:
1. Manual Defrost (Use with Caution): If the ice buildup is severe and your unit isn't defrosting automatically, you can try a manual defrost. Only do this if you are absolutely sure you can safely access the unit and that the ice is not dangerously thick.
- Turn off the heat pump system at the thermostat. Set it to "Emergency Heat" or "Auxiliary Heat" mode. This will shut off the outdoor unit and rely solely on the electric resistance heat strips for heating.
- Pour warm (not hot!) water over the iced coils. Use a garden hose with a gentle spray nozzle. Never use boiling water or sharp objects to chip away the ice, as this can damage the delicate fins.
- Be patient. It may take some time to melt all the ice.
- Once the ice is melted, switch the thermostat back to "Heat" mode. Monitor the unit to ensure it's defrosting automatically.
2. Clear Obstructions: As mentioned earlier, removing any debris blocking airflow is crucial. Make sure the area around the unit is clear of snow, ice, leaves, and other obstructions.
3. Replace Air Filter: This is the easiest and most often overlooked solution! A clean air filter ensures proper airflow and can prevent icing.
When to Call a Professional
While some issues can be addressed with simple DIY solutions, certain situations require the expertise of a qualified HVAC technician. Call a professional if:
- The unit doesn't defrost automatically, even after manual defrosting and cleaning the air filter. This could indicate a problem with the defrost control board, sensors, or refrigerant charge.
- The defrost cycle is excessively long (longer than 15 minutes).
- There is ice buildup on only one section of the coil. This often points to a refrigerant leak, which requires specialized equipment to locate and repair.
- The unit is making unusual noises. This could indicate a failing compressor or other mechanical problem.
- The breaker trips repeatedly. This suggests an electrical fault that needs professional diagnosis and repair.
- You are uncomfortable working with electrical components.
- You suspect a refrigerant leak. Refrigerant is harmful to the environment, and only licensed technicians can handle it safely.
Don't delay! Ignoring these problems can lead to more significant and costly repairs down the road. A qualified HVAC technician can accurately diagnose the issue, perform necessary repairs, and ensure your heating system is running efficiently and safely.
Preventing Future Icing
Here are some tips to help prevent your AC unit from icing up in the future:
- Regularly replace your air filter. This is the most important preventative measure.
- Keep the area around the outdoor unit clear of debris.
- Schedule annual maintenance with a qualified HVAC technician. They can inspect and clean the unit, check the refrigerant charge, and identify potential problems before they become major issues.
- Consider installing a base heater. These heaters are designed to keep the base of the unit from freezing, which can help prevent ice buildup.
- Ensure proper drainage. Make sure the unit is properly sloped to allow water to drain away.
By following these troubleshooting steps and preventative measures, you can keep your heating system running smoothly and efficiently all winter long. Remember, when in doubt, always consult with a qualified HVAC technician. They have the knowledge and expertise to address complex issues and ensure your home is comfortable and safe.