How Many Ohms Should A Contactor Have

Understanding the electrical components of your HVAC system is crucial for both homeowners and those investing in property. A seemingly small component, the contactor, plays a vital role in the reliable operation of your air conditioner or heat pump. Knowing how to assess its condition, specifically understanding its resistance in ohms, can save you time, money, and the frustration of a malfunctioning system. This guide will break down what you need to know about contactor resistance, helping you diagnose potential problems and ensure your HVAC system runs smoothly.
What is an HVAC Contactor and Why Does it Matter?
An HVAC contactor is essentially an electrical switch. Its primary function is to control the flow of electricity to the compressor and fan motor, both high-voltage components, within your air conditioning or heat pump unit. When your thermostat calls for cooling, it sends a signal to the contactor, energizing a coil. This energized coil creates a magnetic field that pulls the contactor's contacts closed, allowing electricity to flow to the compressor and fan motor. When the thermostat is satisfied, the signal stops, the coil de-energizes, and the contacts open, stopping the flow of electricity and shutting down the unit.
Because the contactor handles high voltage and current, it's a common point of failure in HVAC systems. Over time, the contacts can become pitted, burned, or corroded, leading to increased resistance and eventually, failure. A faulty contactor can result in:
- The air conditioner or heat pump not turning on.
- The unit short-cycling (turning on and off frequently).
- Reduced cooling or heating capacity.
- Increased energy bills.
- Potential damage to the compressor or fan motor.
Understanding Contactor Resistance (Ohms)
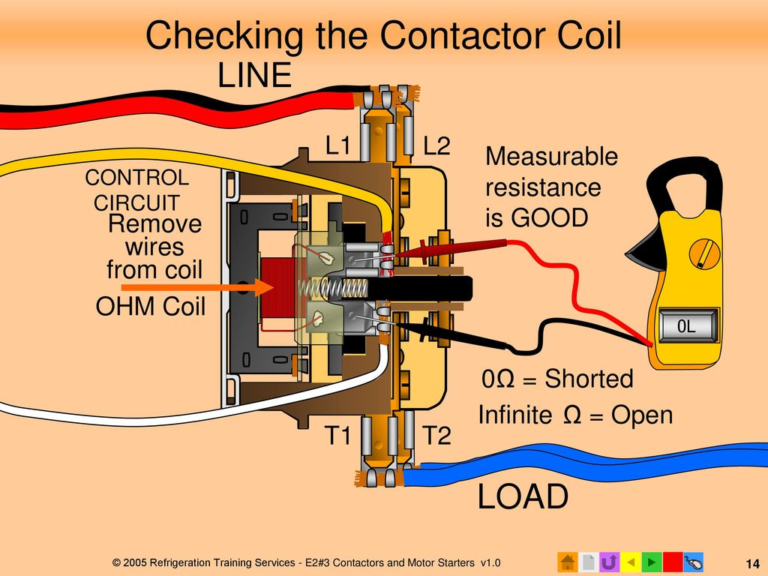
The resistance of a contactor, measured in ohms (Ω), provides valuable insight into its condition. Ideally, when the contactor is closed (energized), the resistance should be very low, close to 0 ohms. This indicates a clean and efficient connection, allowing electricity to flow freely.
When the contactor is open (de-energized), the resistance between the terminals should be infinite, indicating no connection and preventing electricity from flowing. Any significant resistance when the contactor is supposed to be closed suggests a problem with the contacts.
What's a "Good" Ohms Reading for a Contactor?
Determining what constitutes a "good" ohms reading depends on whether the contactor is open or closed, and to some extent, the specific contactor model. However, here's a general guideline:
- Contactor Closed (Energized): A reading close to 0 ohms (ideally less than 0.5 ohms) is considered good. Any reading significantly higher than this indicates resistance and a potential problem.
- Contactor Open (De-Energized): The multimeter should display "OL" (Over Limit) or an infinite resistance reading, indicating a completely open circuit. A reading other than this suggests that the contacts are stuck or shorted.
How to Test Contactor Resistance with a Multimeter
Testing contactor resistance requires a multimeter and basic safety precautions. Always turn off the power to the HVAC unit at the breaker before testing any electrical components. Safety is paramount!
- Safety First: Turn off the power to the HVAC unit at the breaker. Double-check with a non-contact voltage tester to ensure the power is off.
- Gather Your Tools: You'll need a multimeter, screwdrivers to access the contactor, and potentially a wire brush to clean the contacts.
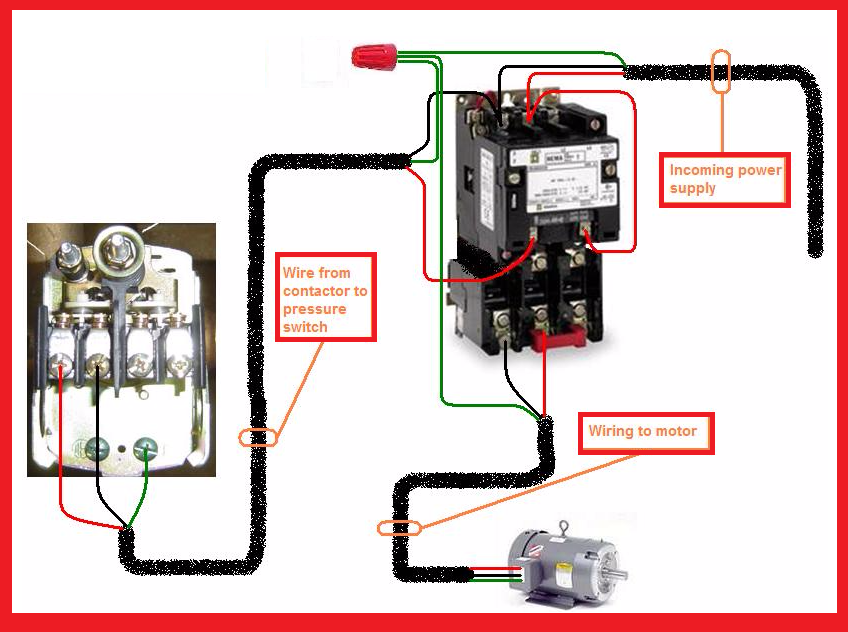
- Locate the Contactor: The contactor is usually located inside the outdoor unit, near the compressor and fan motor. It's a small, rectangular device with several terminals.
- Visual Inspection: Before testing, visually inspect the contactor for any signs of damage, such as burned or pitted contacts, cracks, or loose wires.
- Set the Multimeter: Set the multimeter to the ohms (Ω) setting, usually the lowest range available.
- Test the Contactor (De-Energized - Unit OFF): Place one probe of the multimeter on one terminal and the other probe on another terminal *on the load side* of the contactor. The multimeter should read "OL" or an infinite resistance. Repeat this test for all sets of load-side terminals.
- Test the Contactor (Energized - Unit ON - *CAUTION*): **This step requires extreme caution.** With the power back on and the unit running, *carefully* and *briefly* place the multimeter probes on the *same set of load-side terminals* you tested in step 6. The reading should be close to 0 ohms. Do not touch any other components while the unit is powered on.
If you are uncomfortable performing these tests, it is best to call a qualified HVAC technician.
Interpreting Your Readings and Troubleshooting
Based on your multimeter readings, you can start troubleshooting potential issues:
- High Resistance When Closed: If you measure significant resistance (higher than 0.5 ohms) when the contactor is supposed to be closed, the contacts are likely worn or corroded. Try cleaning the contacts with a wire brush or contact cleaner. If cleaning doesn't improve the reading, the contactor needs to be replaced.
- Low Resistance When Open: If you measure a low resistance (anything other than "OL" or infinite) when the contactor is supposed to be open, the contacts are likely stuck together or there's a short circuit. The contactor needs to be replaced.
Replacing an HVAC Contactor
Replacing a contactor is a relatively straightforward repair for someone with basic electrical knowledge. However, if you're not comfortable working with electricity, it's best to hire a qualified HVAC technician.
Here's a general overview of the replacement process:
- Turn off the power!
- Take a photo: Before disconnecting any wires, take a photo of the existing contactor and wiring connections. This will serve as a reference when connecting the new contactor.
- Disconnect the wires: Carefully disconnect the wires from the old contactor, labeling them if necessary.
- Remove the old contactor: Remove the screws or clips holding the old contactor in place.
- Install the new contactor: Mount the new contactor in the same location.
- Reconnect the wires: Reconnect the wires to the new contactor, following your photo or labels. Ensure all connections are tight.
- Test the new contactor: Turn the power back on and test the new contactor to ensure it's working properly.
Choosing the Right Replacement Contactor
When replacing a contactor, it's crucial to choose the right replacement. Here's what to consider:
- Voltage Rating: The contactor must have the correct voltage rating for your HVAC system (usually 24V for the coil and 208-240V for the contacts).
- Amperage Rating: The contactor must have an amperage rating that is equal to or greater than the amperage draw of your compressor and fan motor.
- Number of Poles: Contactors can be single-pole, double-pole, or three-pole. Match the number of poles to the original contactor.
- Manufacturer and Model: It's often best to use a contactor from a reputable manufacturer that is compatible with your HVAC system. Consult your HVAC system's documentation or an HVAC technician for recommendations.
Preventative Maintenance for HVAC Contactors
While contactors will eventually fail, preventative maintenance can extend their lifespan:
- Regular Inspections: Visually inspect the contactor for signs of damage during routine HVAC maintenance.
- Cleaning: Clean the contacts with a wire brush or contact cleaner if they appear dirty or corroded.
- Tighten Connections: Ensure all wiring connections are tight to prevent arcing and overheating.
HVAC Brands and Models: A Brief Overview
When considering a new HVAC system, several reputable brands offer reliable performance. Here's a brief look at some popular options:
- Carrier: Known for high-efficiency systems and innovative technology. Models like the Carrier Infinity series offer high SEER and AFUE ratings. Warranties typically range from 5 to 10 years.
- Trane: A well-established brand with a reputation for durability. Trane offers a range of systems with varying SEER and AFUE ratings. Consider their XV series for high efficiency. Warranties generally cover parts for 5 to 10 years.
- Goodman: A more budget-friendly option offering good value for the price. Goodman systems may have slightly lower SEER and AFUE ratings compared to premium brands, but they still provide reliable performance. Warranties typically include a 10-year parts warranty.
- Lennox: Known for quiet operation and advanced features. Lennox offers high-efficiency systems with impressive SEER and AFUE ratings. The Dave Lennox Signature Collection is a premium option. Warranties are generally competitive with other major brands.
Remember to compare SEER (Seasonal Energy Efficiency Ratio) for cooling efficiency, AFUE (Annual Fuel Utilization Efficiency) for heating efficiency (for furnaces), and HSPF (Heating Seasonal Performance Factor) for heat pumps. Higher ratings generally translate to lower energy bills.
Conclusion
Understanding the role of the HVAC contactor and how to assess its condition using a multimeter is a valuable skill for any homeowner or property investor. By knowing what ohms reading to expect and how to troubleshoot potential problems, you can ensure your HVAC system operates efficiently and reliably, saving you money and preventing costly breakdowns. While this guide provides valuable information, always prioritize safety and consult with a qualified HVAC technician when in doubt. Regular maintenance and prompt attention to potential issues will help you get the most out of your HVAC system for years to come.