How To Add Branch To Flex Duct

Adding a branch to your flex duct can seem daunting, but with the right preparation and understanding, it's a manageable DIY project. This guide provides a comprehensive, step-by-step approach to safely and effectively add a new duct branch to your existing system.
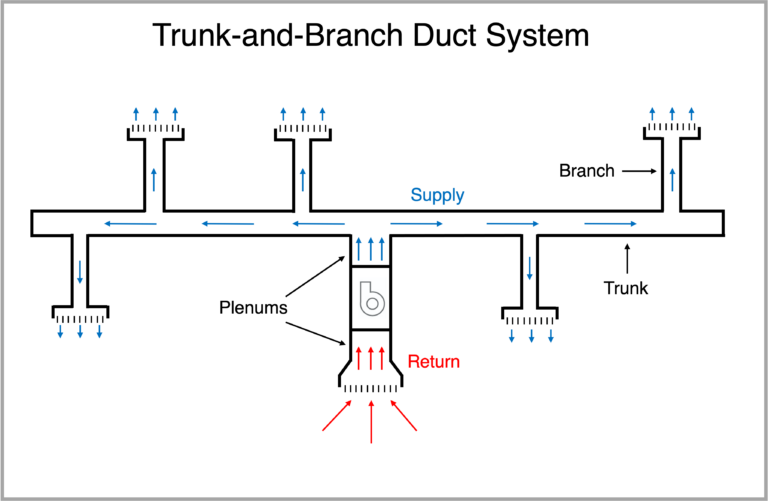
Understanding Flex Duct Systems
Before you start, it's crucial to understand the basics of flexible ductwork. Flex duct is a corrugated, flexible tube often made of plastic or metal. It's used in HVAC systems to connect the main trunk lines to individual vents. Unlike rigid ductwork, flex duct allows for easier installation in tight spaces and around obstacles. However, it's more prone to air leakage and requires careful installation to maintain efficiency.
Why add a branch? Perhaps you're extending your HVAC system to a new room, improving airflow to an existing one, or rerouting ductwork due to renovations. Whatever the reason, adding a branch requires careful planning and execution.
Planning is Key: Before You Begin
Effective planning is the most critical part of adding a duct branch. Rushing into the project without proper preparation can lead to inefficiencies and even damage to your HVAC system.
1. Assess Your Existing System
First, determine if your current HVAC system has the capacity to handle the additional load from a new branch. An undersized system will struggle to heat or cool the entire space effectively. Consult with an HVAC professional if you're unsure about your system's capacity.
Think of your HVAC system like a pump: It can only pump so much "fluid" (air) through the pipes (ducts). Adding more pipes (branches) without ensuring the pump has enough power will result in low pressure and poor performance.
2. Determine Duct Size
Calculating the correct duct size for the new branch is essential for optimal airflow. Use a ductulator (a specialized slide rule or online calculator) to determine the appropriate size based on the room's square footage, the desired airflow (CFM - cubic feet per minute), and the length of the duct run. Local building codes may also specify minimum duct sizes. An undersized duct will restrict airflow, while an oversized duct can lead to uneven heating or cooling.
CFM is like the 'speed' of the air: A higher CFM means more air is flowing through the duct per minute. You need enough CFM to properly heat or cool the room, but too much can cause drafts and noise.
3. Plan the Route
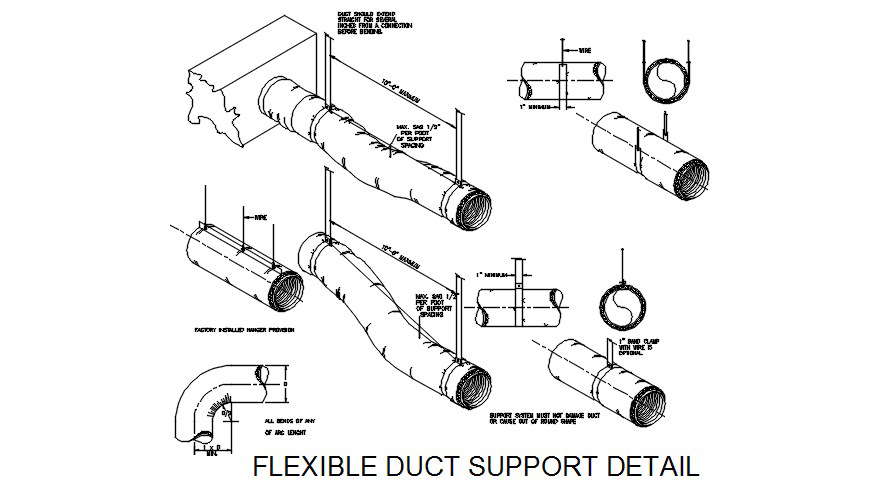
Carefully plan the route for the new duct branch. Consider the shortest and most direct path from the main trunk line to the new vent location. Avoid sharp bends and kinks, as these can significantly restrict airflow. Also, ensure the duct is adequately supported to prevent sagging, which can also reduce airflow and increase the risk of damage.
Imagine water flowing through a hose: Kinks and sharp bends restrict the water flow. The same principle applies to air flowing through a duct.
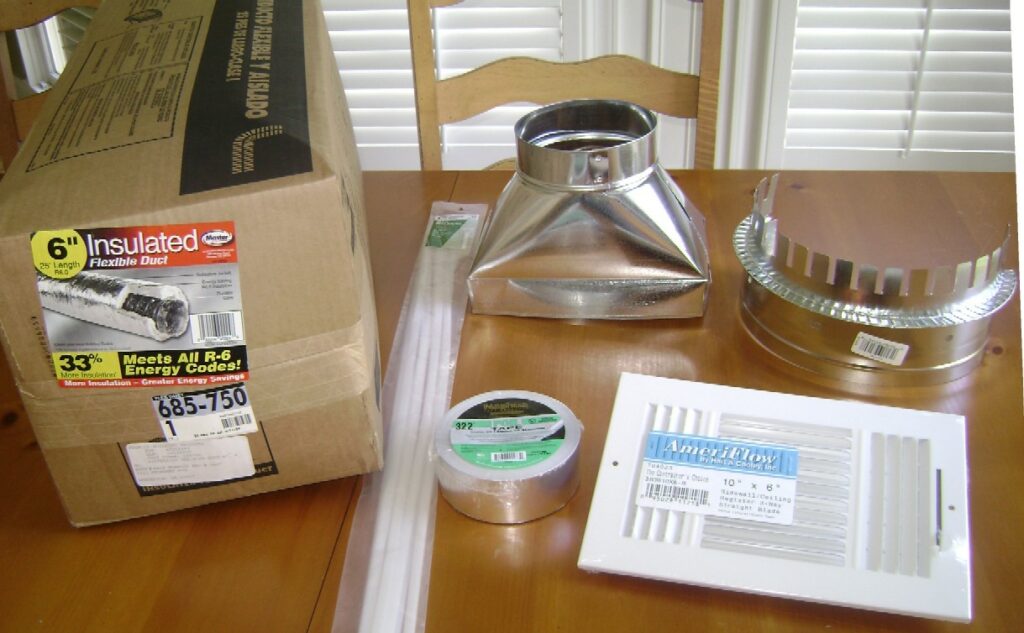
4. Gather Your Tools and Materials
Before you start cutting or connecting anything, gather all the necessary tools and materials. This will save you time and prevent frustration during the project. Here's a list of what you'll likely need:
- Flex duct (appropriate size and length)
- Take-off collar (to connect the branch to the main trunk line)
- Duct tape (foil tape is preferred for its superior sealing properties)
- Screws or zip ties (for securing the duct and connections)
- Utility knife or duct knife (for cutting the duct and insulation)
- Tin snips (for cutting metal ductwork if needed)
- Measuring tape
- Gloves (to protect your hands from fiberglass or metal edges)
- Safety glasses (to protect your eyes from debris)
- Drill (for installing screws)
- Markers (for marking cutting lines)
- Ladder (if working in an attic or crawl space)
Step-by-Step Installation Guide
Now that you've planned the project and gathered your materials, it's time to start the installation. Follow these steps carefully for a successful outcome.
1. Shut Off the HVAC System
Safety first! Always turn off the HVAC system at the breaker before starting any work on the ductwork. This prevents accidental operation and potential injury.
2. Locate the Main Trunk Line
Identify the main trunk line where you'll be tapping in the new branch. This is typically a large, rectangular or round duct that runs throughout the house. Choose a location that is easily accessible and allows for a straight, unobstructed run for the new branch.
3. Cut the Opening for the Take-Off Collar
Using a marker, trace the outline of the take-off collar on the main trunk line. Carefully cut out the opening using tin snips (if the trunk line is metal) or a utility knife (if it's fiberglass duct board). Make sure the opening is clean and smooth to ensure a tight seal with the take-off collar.
A take-off collar is like a 'connector': It allows you to tap into the main duct without significantly disrupting the airflow.
4. Install the Take-Off Collar
Attach the take-off collar to the opening in the main trunk line. Secure it with screws or rivets. Ensure the collar is firmly attached and that there are no gaps or leaks. Apply duct tape around the perimeter of the collar to further seal the connection.
5. Attach the Flex Duct to the Take-Off Collar
Slide the flex duct over the take-off collar. Secure it with a clamp or zip tie, making sure the connection is tight and airtight. Pull the inner liner of the flex duct tightly over the collar and secure it as well. This prevents air leakage and ensures optimal airflow.
6. Run the Flex Duct to the New Vent Location
Carefully run the flex duct to the new vent location, following the planned route. Avoid sharp bends and kinks. Support the duct at regular intervals using hangers or straps to prevent sagging. Ensure the duct is not compressed or pinched in any way.
7. Connect the Flex Duct to the Vent Boot
Attach the flex duct to the vent boot (the connection point for the vent cover). Secure it with a clamp or zip tie, ensuring a tight and airtight connection. Pull the inner liner of the flex duct tightly over the boot and secure it as well. Make sure the vent boot is properly installed in the wall or ceiling.
8. Seal All Connections
Thoroughly seal all connections with duct tape, paying particular attention to the joints between the flex duct, take-off collar, and vent boot. Use foil tape for the best results, as it provides a more durable and airtight seal than cloth duct tape. Ensure that all seams and gaps are completely covered.
9. Insulate the Ductwork
Proper insulation is crucial for maintaining energy efficiency and preventing condensation. If the flex duct is not already insulated, wrap it with insulation and secure it with tape or straps. Pay particular attention to exposed areas and connections.
10. Test the System
After completing the installation, turn the HVAC system back on and test the new branch. Check for proper airflow at the vent. Listen for any unusual noises or leaks. If you notice any problems, troubleshoot the connections and ductwork until the issue is resolved.
Troubleshooting Common Issues
Even with careful planning and execution, you may encounter some common issues when adding a duct branch. Here are some troubleshooting tips:
- Low airflow: This could be due to an undersized duct, a kink in the ductwork, a leak in the connections, or an undersized HVAC system.
- Uneven heating or cooling: This could be due to improper duct sizing, inadequate insulation, or an unbalanced airflow in the system.
- Noise: This could be due to excessive airflow velocity, loose ductwork, or vibration from the HVAC unit.
- Condensation: This could be due to inadequate insulation, air leaks, or high humidity levels.
When to Call a Professional
While adding a duct branch can be a DIY project, there are situations where it's best to call a professional HVAC technician. These include:
- If you're unsure about your HVAC system's capacity.
- If you're working with complex ductwork configurations.
- If you're encountering significant issues during the installation.
- If you're uncomfortable working with electrical components or heights.
- If you need to ensure compliance with local building codes.
An HVAC professional has the expertise and tools to properly assess your system, design the ductwork, and ensure a safe and efficient installation. They can also troubleshoot any issues that may arise and provide ongoing maintenance to keep your HVAC system running smoothly.
Final Thoughts
Adding a branch to your flex duct can improve the comfort and efficiency of your home. By following these steps carefully and understanding the principles of ductwork, you can successfully complete this project. Remember to prioritize safety, plan thoroughly, and don't hesitate to seek professional help when needed.