How To Adjust A Pressure Relief Valve

Is your home's heating or cooling system acting up? Maybe you've noticed a concerning leak near your furnace or air conditioning unit, or perhaps you're experiencing inconsistent temperatures throughout your home. One often-overlooked culprit could be a malfunctioning pressure relief valve. This crucial safety device is designed to protect your system from over-pressurization, and when it's not working correctly, it can lead to a variety of problems. In this guide, we'll walk you through the steps to troubleshoot and, if appropriate, adjust your pressure relief valve. Remember, safety is paramount. If at any point you feel uncomfortable or uncertain, call a qualified HVAC technician.
Understanding the Pressure Relief Valve
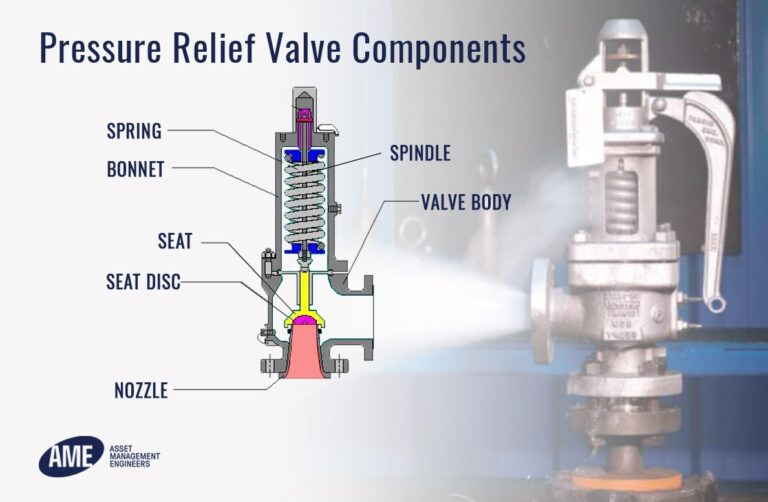
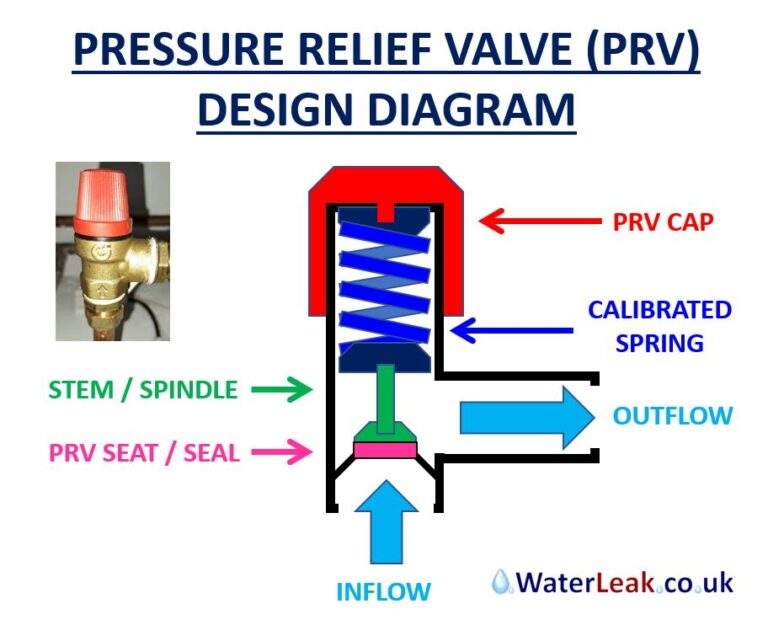
Before we dive into troubleshooting, let's briefly understand what a pressure relief valve does. Also known as a safety valve, it's essentially a spring-loaded valve designed to automatically open and release pressure when it exceeds a safe level within your heating or cooling system. This prevents potentially dangerous situations like explosions or equipment damage.
Pressure relief valves are commonly found on:
- Furnaces: Releasing excessive pressure caused by overheating.
- Boilers: Venting steam or hot water if the pressure gets too high.
- Air Conditioning Systems: Releasing refrigerant pressure.
Knowing where your pressure relief valve is located is the first step. Consult your appliance's manual if necessary.
Diagnosing the Problem: Is it the Pressure Relief Valve?
Okay, you suspect a problem with your pressure relief valve. Here's how to confirm:
1. Initial Visual Inspection (No Tools Required)
This is your first line of defense. Perform a careful visual inspection of the valve and the surrounding area. Look for these telltale signs:
- Water Leaks: Obvious signs of water dripping or pooling around the valve. Even small, consistent leaks can indicate a problem.
- Corrosion or Rust: Corrosion can weaken the valve's components and prevent it from sealing properly.
- Mineral Deposits: White or greenish deposits can indicate hard water buildup, which can interfere with the valve's operation.
- Visible Damage: Check for cracks, dents, or other physical damage to the valve body.
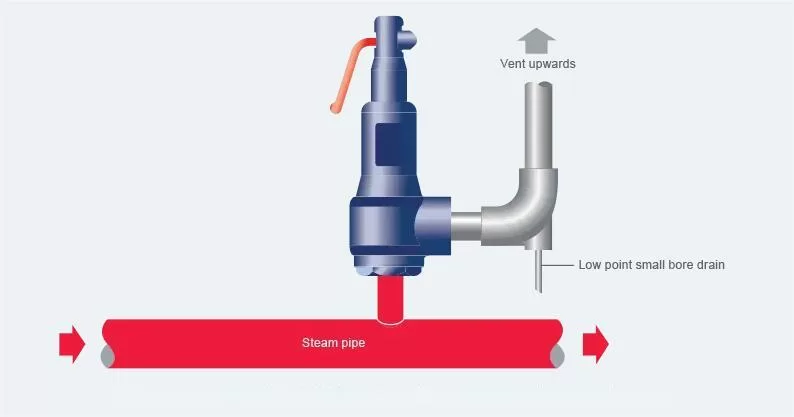
- Discharge Pipe: Examine the discharge pipe (the pipe connected to the valve that directs released pressure away from the unit). Ensure it's clear of obstructions and properly routed.
Important: Never attempt to block or cap the discharge pipe. This could lead to a dangerous pressure buildup.
2. Checking the Pressure Gauge (Requires a Pressure Gauge, if not already installed)
Many heating and cooling systems have a pressure gauge installed. This gauge indicates the current pressure within the system. Observe the reading and compare it to the manufacturer's recommended operating pressure. You can usually find this information in your appliance's manual or on a label near the pressure relief valve.
- High Pressure: If the gauge reads above the recommended level and the pressure relief valve is leaking, the valve is likely doing its job. However, the underlying cause of the high pressure needs to be addressed. This often requires a professional.
- Normal Pressure with Leaking Valve: If the pressure gauge reads within the normal range, but the pressure relief valve is still leaking, the valve itself may be faulty or improperly seated.
If your system doesn't have a pressure gauge, consider having one installed by a professional. It's a valuable tool for monitoring your system's health.
3. Manually Testing the Valve (Simple & Safe)
This test helps determine if the valve is stuck or malfunctioning. Be extremely cautious, as hot water or steam may be released.
- Locate the Test Lever: Most pressure relief valves have a small lever or handle.
- Prepare for Discharge: Place a bucket or container under the discharge pipe to catch any released water.
- Carefully Lift the Lever: Slowly and gently lift the lever. This should allow a brief burst of water or steam to escape.
- Release the Lever: Let the lever snap back into its closed position.
- Observe: The valve should stop leaking immediately after the lever is released. If it continues to leak, it indicates a problem.
Caution: If the valve is very old or corroded, avoid excessive force when lifting the lever, as you could damage it further.
DIY Actions: Adjusting the Pressure Relief Valve (Proceed with Caution)
In some cases, a minor adjustment to the pressure relief valve might resolve the issue. However, proceed with extreme caution and only attempt this if you are comfortable working with plumbing components and understand the risks involved. If you're unsure, call a professional.
Important: Before attempting any adjustments, turn off the power to your heating or cooling system and allow it to cool down completely.
1. Identifying the Adjustment Mechanism
Pressure relief valves typically have an adjustment screw or bolt located on the valve body. The exact location and type of adjustment mechanism can vary depending on the valve's design.
Consult your appliance's manual or the valve's documentation for specific instructions on how to adjust the valve.
2. Making Small Adjustments (Requires a Wrench or Screwdriver)
Only adjust the valve in small increments. A slight turn can make a significant difference in the pressure setting. After each adjustment, monitor the pressure gauge (if available) and observe the valve for leaks.
Here's a general approach:
- If the valve is leaking at normal pressure: Try tightening the adjustment screw slightly. This may help to reseat the valve and stop the leak.
- If the valve is not releasing at high pressure (and you've confirmed the pressure is indeed too high): Loosen the adjustment screw slightly. This may allow the valve to open at a lower pressure.
Note: Some pressure relief valves are not adjustable. If you cannot find an adjustment screw or bolt, do not attempt to force anything. The valve may need to be replaced.
3. Monitoring and Testing
After making an adjustment, carefully monitor the pressure gauge and observe the valve for leaks over a period of several hours. Repeat the manual test described earlier to ensure the valve is functioning correctly.
If the problem persists, or if you notice any new issues, stop and call a qualified HVAC technician.
When to Call a Professional
There are many situations where adjusting a pressure relief valve is beyond the scope of a DIY project. It's crucial to recognize these situations and call a professional HVAC technician. Here are some key indicators:
- You are uncomfortable or uncertain about any of the steps involved.
- You cannot locate the pressure relief valve or the adjustment mechanism.
- The pressure gauge reads excessively high, and you cannot identify the cause.
- The valve is severely corroded or damaged.
- The valve continues to leak after making adjustments.
- You suspect a more serious problem with your heating or cooling system (e.g., a faulty pressure regulator, a blocked heat exchanger).
- Your system is under warranty. Attempting to repair it yourself may void the warranty.
- You live in an apartment or condo. Check with your landlord or property manager before making any adjustments.
Trying to fix a complex issue yourself could lead to further damage, costly repairs, or even dangerous situations. A professional HVAC technician has the knowledge, experience, and tools to diagnose and repair pressure relief valve problems safely and effectively. They can also identify and address any underlying issues that may be causing the valve to malfunction.
Safety First!
Working with heating and cooling systems can be dangerous. Always prioritize safety:
- Turn off the power to the system before working on any components.
- Allow the system to cool down completely before touching any hot surfaces.
- Wear safety glasses and gloves to protect yourself from hot water, steam, and sharp edges.
- If you are working with refrigerant, take extra precautions to avoid exposure. Refrigerant can cause serious health problems.
- If you smell gas, evacuate the area immediately and call your gas company or the fire department.
Preventative Maintenance
The best way to avoid pressure relief valve problems is to perform regular preventative maintenance on your heating and cooling system. This includes:
- Having your system inspected and serviced annually by a qualified HVAC technician.
- Checking the pressure gauge regularly (if available).
- Cleaning the area around the pressure relief valve to prevent corrosion and buildup.
- Flushing your hot water heater periodically to remove sediment buildup.
By taking these simple steps, you can help to ensure that your pressure relief valve functions properly and protects your home from potential hazards.
In conclusion, while adjusting a pressure relief valve can be a simple DIY task in some cases, it's essential to approach it with caution and know your limits. When in doubt, always consult a qualified HVAC professional. Your safety and the proper functioning of your heating and cooling system are worth it!


:max_bytes(150000):strip_icc()/Water-pressure-regulator-2718696_color-8cb88034226e4c43aae61588c648e23f.jpg)