How To Adjust A Thermocouple

Is your gas oven refusing to stay lit? A flickering pilot light, or a burner that ignites only to quickly shut off, are common kitchen frustrations. More often than not, the culprit behind these issues is a faulty thermocouple. This guide provides a safe, step-by-step approach to troubleshoot and potentially adjust your thermocouple, empowering you to resolve the problem or determine when professional help is needed.
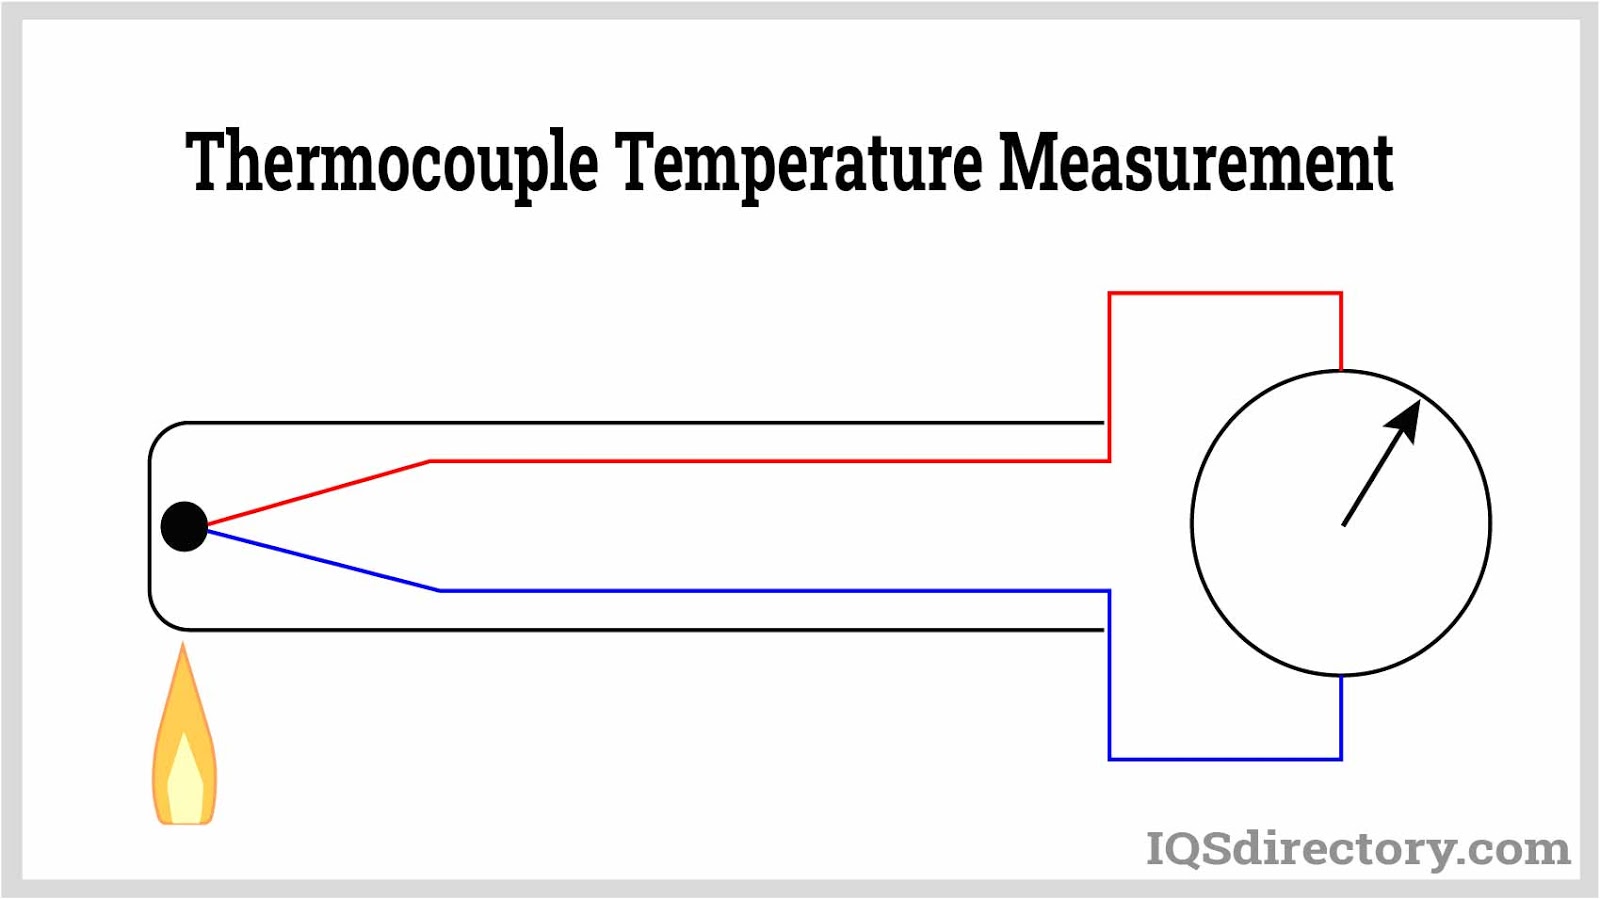
Understanding the Thermocouple: Your Oven's Safety Guardian
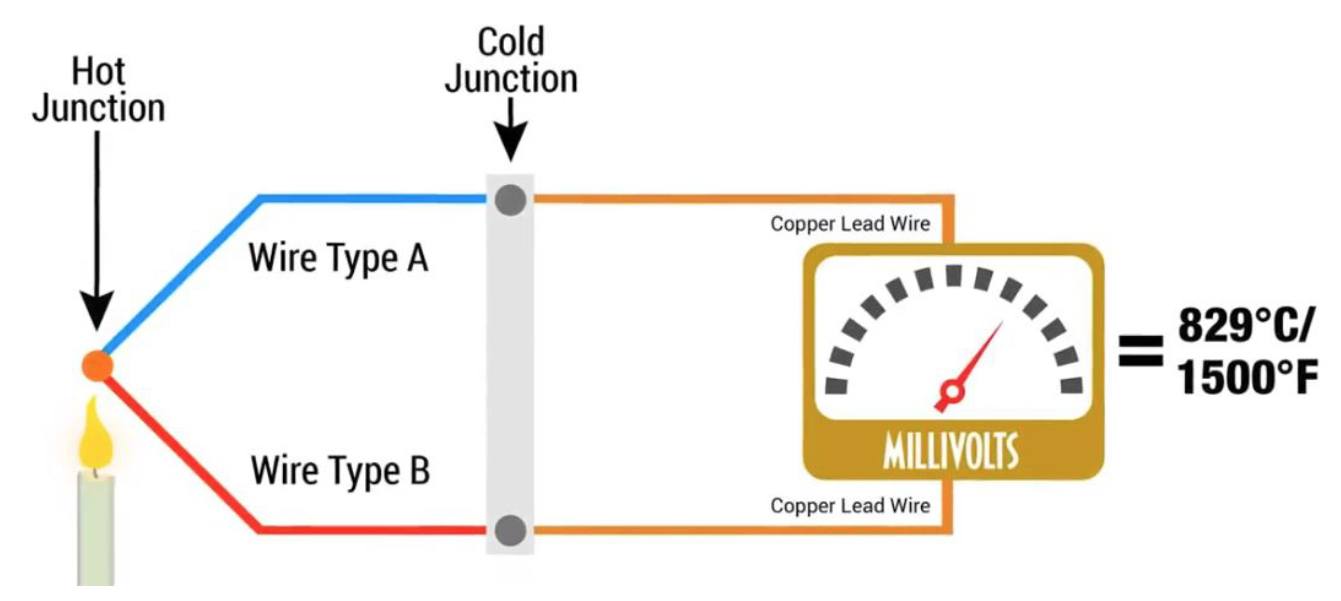
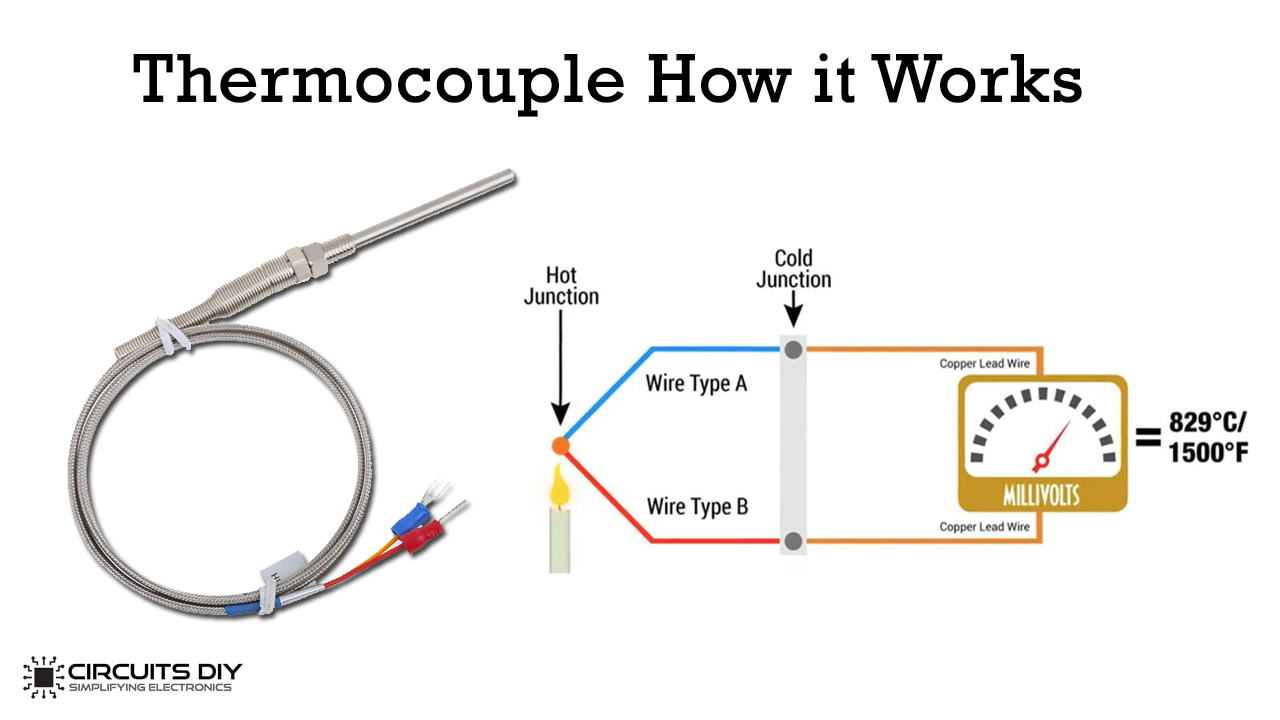
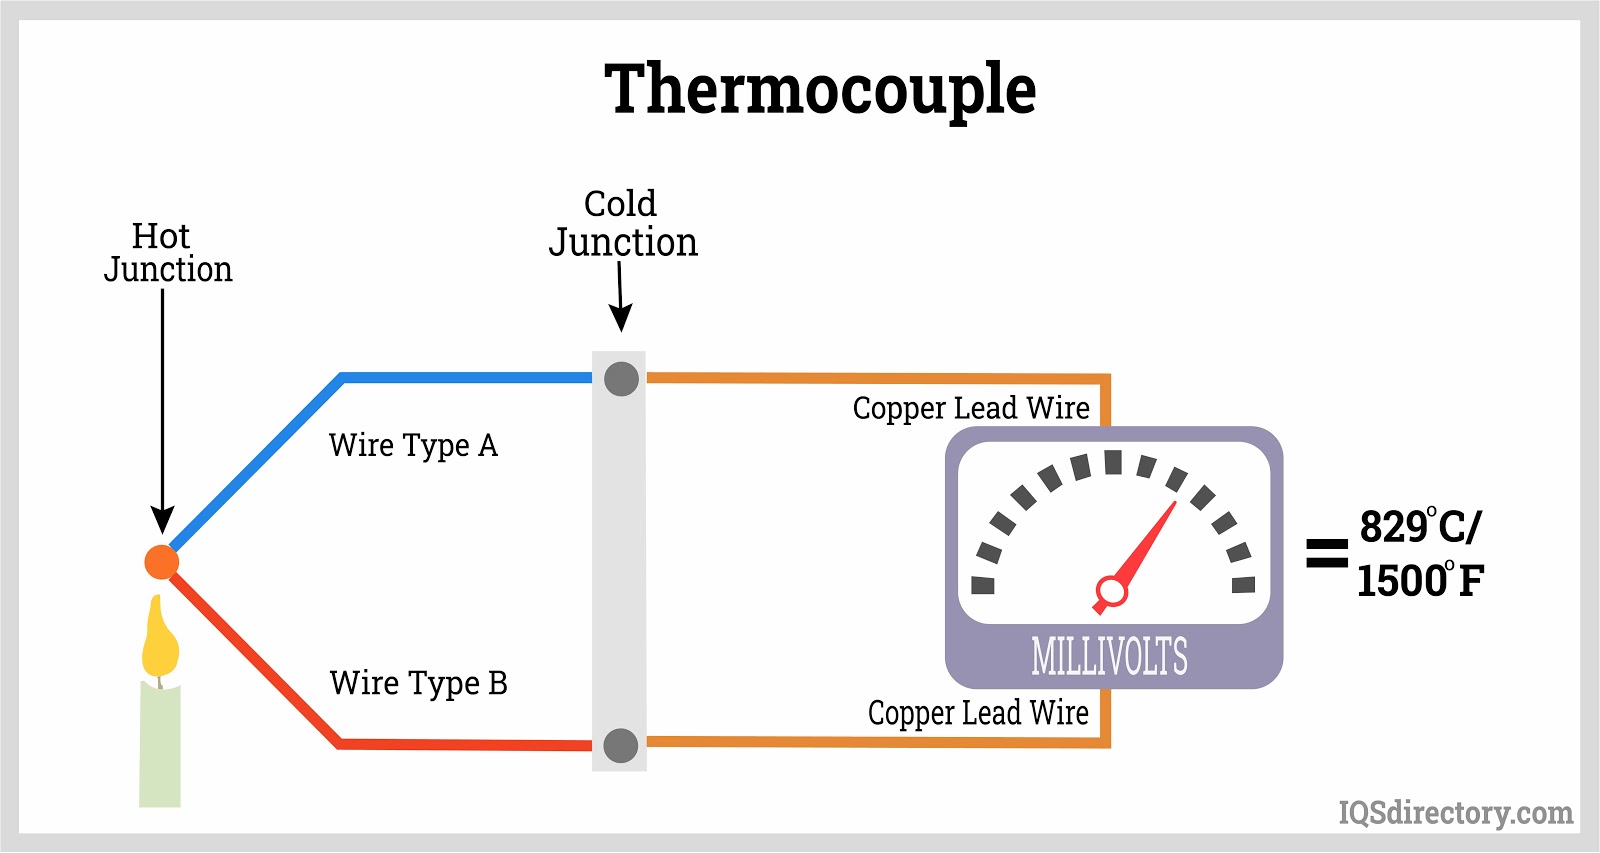
Before diving into troubleshooting, it's important to understand what a thermocouple is and its role in your gas oven. A thermocouple is a safety device that senses the heat from the pilot light or burner flame. It generates a tiny electrical current that keeps the main gas valve open, allowing gas to flow to the burner. If the pilot light goes out or the thermocouple fails to detect heat, it shuts off the gas supply, preventing dangerous gas leaks. Think of it as the oven's safety guardian.
Safety First: Important Precautions
Working with gas appliances can be dangerous. Before attempting any adjustments or repairs, follow these crucial safety precautions:
- Turn off the gas supply: Locate the gas shut-off valve near the oven (usually behind it or in the basement) and turn it to the "off" position.
- Unplug the oven: Disconnect the oven from the electrical outlet to eliminate the risk of electrical shock.
- Ventilate the area: Open windows and doors to ensure proper ventilation.
- No smoking or open flames: Keep all sources of ignition away from the work area.
- Use the right tools: Have the necessary tools on hand, such as screwdrivers, wrenches, and a multimeter (optional).
- When in doubt, call a professional: If you are uncomfortable with any of these steps or unsure about the process, contact a qualified gas appliance technician.
Troubleshooting the Thermocouple: A Step-by-Step Guide
This guide outlines a logical sequence of steps to identify and address common thermocouple-related issues.
Step 1: Check the Obvious – Power Supply and Settings
Before assuming a faulty thermocouple, rule out simpler problems:
- Power supply: Ensure the oven is properly plugged into a functioning electrical outlet. Test the outlet with another appliance if necessary. Even gas ovens often need electricity for the igniter and control panel.
- Oven settings: Verify that the oven is set to the correct mode (bake, broil, etc.) and temperature. A simple setting error could be the cause of the problem.
Step 2: Inspect the Pilot Light (If Applicable)
If your oven has a standing pilot light, carefully examine it:
- Is the pilot light lit? If not, try relighting it according to the oven's instructions. Refer to your owner's manual for specific steps.
- Is the pilot light flame small, weak, or yellow? A weak or dirty pilot light may not be providing enough heat to the thermocouple. Clean the pilot light assembly with a small brush or compressed air. (See Step 4).
- Does the pilot light stay lit only when you hold the gas valve knob in? This is a classic sign of a thermocouple issue.
Step 3: Clean the Thermocouple
Over time, soot and debris can accumulate on the thermocouple, reducing its ability to sense heat. Cleaning the thermocouple is a simple and often effective solution.
- Locate the thermocouple: It's usually a small, thin metal rod positioned directly in the path of the pilot light flame or near the burner.
- Clean the thermocouple: Gently clean the thermocouple with a piece of fine-grit sandpaper or steel wool. Be careful not to damage the metal. The goal is to remove any buildup that may be interfering with heat transfer.
- Reassemble and test: Reassemble the oven components and try lighting the pilot light (if applicable) or turning on the burner. Observe if the burner stays lit after releasing the gas valve knob.
Step 4: Clean the Pilot Light Assembly
A dirty pilot light assembly can restrict gas flow and weaken the pilot light flame, leading to thermocouple problems. If cleaning the thermocouple alone doesn't solve the issue, clean the pilot light assembly as well.
- Locate the pilot light assembly: This is the small component that houses the pilot light orifice.
- Clean the orifice: Use a thin wire or needle to gently clean the pilot light orifice, removing any blockages. Be extremely careful not to enlarge the orifice, as this can affect the gas flow and flame characteristics. Many appliance repair professionals use specialized orifice cleaning tools.
- Use compressed air: After cleaning the orifice, use compressed air to blow out any remaining debris from the pilot light assembly.
- Reassemble and test: Reassemble the oven components and test the pilot light. Ensure the flame is strong, blue, and stable.
Step 5: Check the Thermocouple Connection
The thermocouple connects to the gas valve via a threaded fitting. A loose or corroded connection can disrupt the electrical current and prevent the gas valve from staying open.
- Locate the thermocouple connection: Find where the thermocouple connects to the gas valve. This is usually a small brass fitting.
- Tighten the connection: Gently tighten the fitting with a wrench. Be careful not to overtighten it, as this could damage the threads.
- Check for corrosion: Inspect the connection for signs of corrosion. If corrosion is present, clean the threads with a wire brush and apply a small amount of dielectric grease to prevent further corrosion.
- Reassemble and test: Reassemble the oven components and test the pilot light or burner.
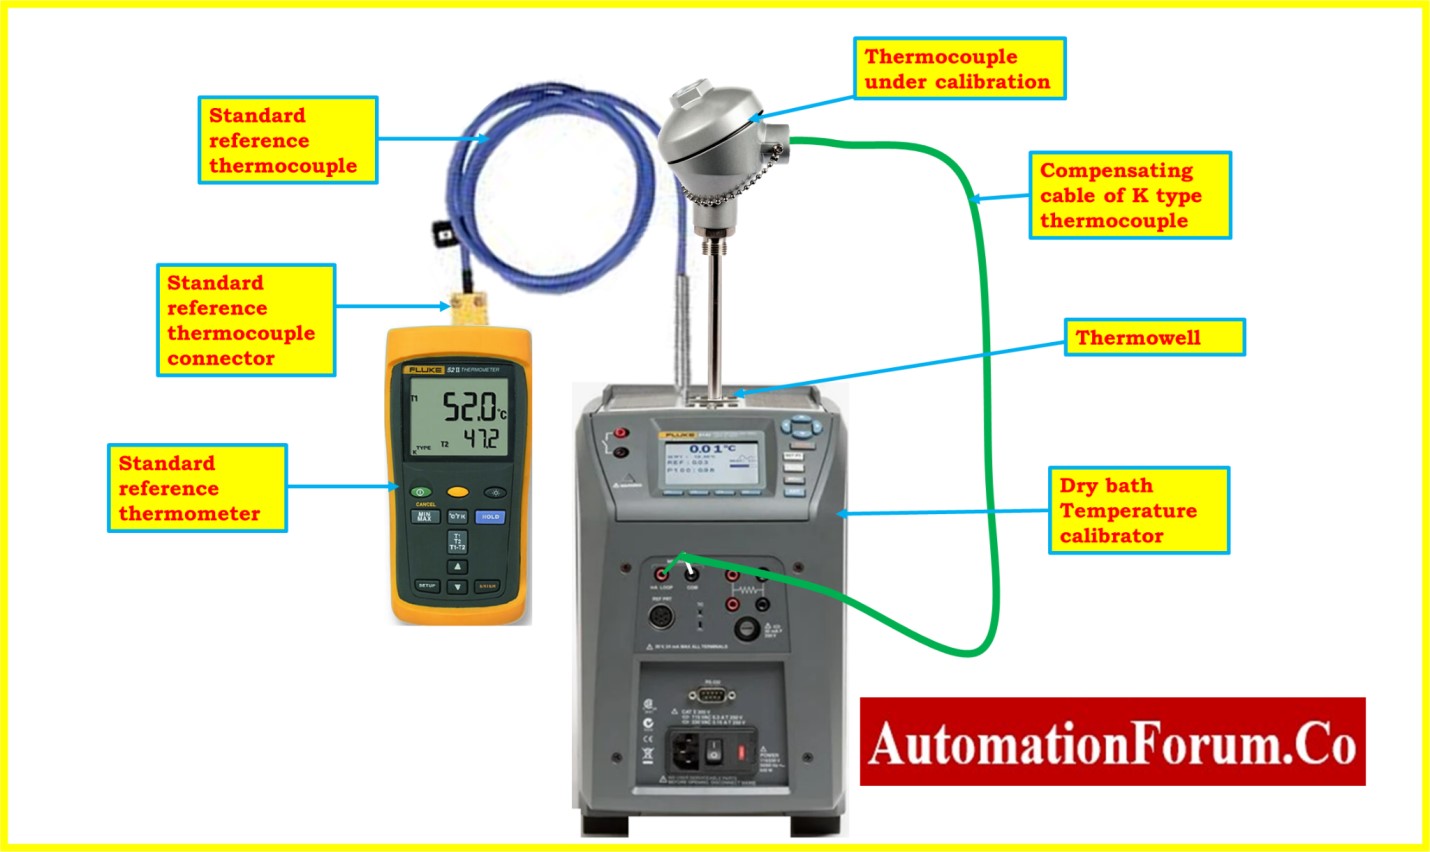
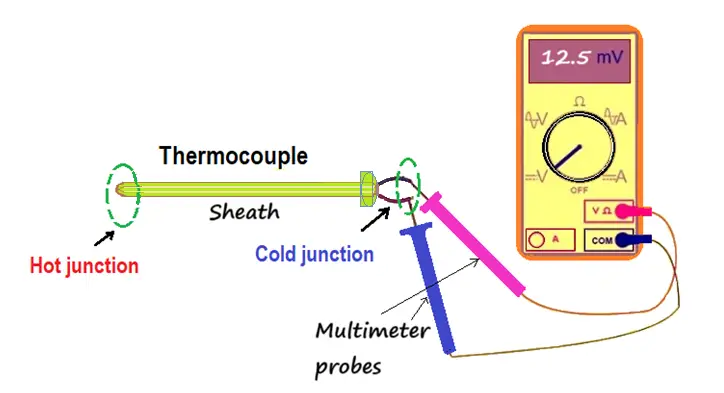
Step 6: Test the Thermocouple with a Multimeter (Advanced)
This step requires a multimeter and some basic electrical knowledge. If you are not comfortable using a multimeter, skip this step and consult a qualified technician.
- Set the multimeter to millivolts (mV) DC: This setting measures the small electrical current generated by the thermocouple.
- Disconnect the thermocouple from the gas valve: Carefully disconnect the thermocouple from the gas valve.
- Connect the multimeter leads: Connect the multimeter leads to the thermocouple terminals.
- Heat the thermocouple tip: Use a lighter or small torch to heat the tip of the thermocouple. Be careful not to overheat it.
- Read the multimeter: Observe the multimeter reading. A healthy thermocouple should generate a reading of at least 25-30 mV DC. A reading significantly lower than this indicates a faulty thermocouple.
Step 7: Replacing the Thermocouple
If the thermocouple is faulty, replacing it is usually a straightforward process. Before replacing any part, ensure you’ve turned off the gas and unplugged the appliance!
- Purchase a replacement thermocouple: Obtain a new thermocouple that is compatible with your oven model. You can usually find replacement parts at appliance repair stores or online retailers. Make sure the replacement is the exact type for your model.
- Remove the old thermocouple: Disconnect the old thermocouple from the gas valve and carefully remove it from its mounting.
- Install the new thermocouple: Install the new thermocouple in the same position as the old one, ensuring that it is properly aligned with the pilot light flame or burner.
- Connect the thermocouple to the gas valve: Connect the new thermocouple to the gas valve and tighten the fitting securely.
- Test the oven: Turn on the gas supply and test the oven to ensure that the pilot light or burner ignites and stays lit.
When to Call a Professional
While many thermocouple issues can be resolved with basic troubleshooting and cleaning, certain situations require the expertise of a qualified gas appliance technician:
- You smell gas: If you smell gas at any time during the troubleshooting process, immediately turn off the gas supply and call your gas company or a qualified technician.
- You are uncomfortable working with gas: If you are not comfortable working with gas appliances, it is best to leave the repairs to a professional.
- The problem persists after troubleshooting: If you have followed all of the steps in this guide and the problem still persists, there may be a more complex issue that requires professional diagnosis and repair.
- You suspect a gas leak: If you suspect a gas leak, evacuate the area and call your gas company immediately.
- You have a newer oven with electronic ignition: Many newer ovens have electronic ignition systems that are more complex than pilot light systems. Troubleshooting these systems requires specialized knowledge and tools.
Additional Tips and Considerations
- Refer to your owner's manual: Your owner's manual contains valuable information about your oven, including troubleshooting tips and diagrams.
- Take pictures: Before disassembling any components, take pictures to help you remember how everything goes back together.
- Keep a clean work area: A clean work area will help you stay organized and prevent losing small parts.
- Don't force anything: If something doesn't seem to fit or come apart easily, don't force it. Consult a professional if necessary.
- Regular maintenance: Periodic cleaning and inspection of your oven can help prevent thermocouple problems and extend the life of your appliance.
By following these steps and prioritizing safety, you can often resolve thermocouple issues and keep your gas oven functioning properly. Remember to err on the side of caution and contact a qualified technician if you are unsure about any aspect of the repair. Gas appliance repair should only be performed by qualified technicians.