How To Bleed A Radiator Without A Key
Imagine waking up on a chilly morning, only to discover your electric blanket isn't working. A cold bed is never a fun way to start the day! Before calling an electrician or tossing it in the trash, let's explore some basic troubleshooting steps you can take to potentially revive it.
Electric Blanket Troubleshooting: A Step-by-Step Guide
This guide offers simple solutions for common electric blanket issues. Remember to always unplug the blanket from the wall outlet before attempting any inspection or repair.
1. The Obvious First: Power Supply
Start with the basics. It sounds simple, but overlooking these steps is a common mistake:
- Check the outlet: Plug another appliance into the same outlet to see if it's working. If not, the problem is with the outlet itself. Try a different outlet or check your circuit breaker.
- Examine the power cord: Look for any signs of damage to the cord, such as frayed wires, cuts, or exposed metal. Never use an electric blanket with a damaged cord as it poses a significant fire hazard. If the cord is damaged, the blanket should be professionally repaired or replaced.
- The Controller Connection: Ensure the controller is securely plugged into the blanket. These connections can sometimes loosen over time. Unplug and replug firmly.
2. Controller Issues: A Closer Look
The controller is the brain of your electric blanket. Malfunctions here are frequent causes of failure.
- Check the settings: Make sure the blanket is switched "on" and set to your desired heat level. It sounds basic, but it's easily overlooked!
- Inspect the controller display (if applicable): If the controller has a digital display, check for error codes or unusual symbols. Consult your blanket's manual to decipher any codes.
- Listen for clicks: When you turn the controller on and off, you should hear a faint click. If you don't hear a click, the controller may be faulty.
3. Resetting the Controller (If Applicable)
Some electric blankets have a reset function, especially those with digital controllers. The reset process varies depending on the brand and model, so refer to your owner's manual. A typical reset might involve:
- Unplugging the blanket from the wall and the controller from the blanket.
- Waiting for a specified period (e.g., 5-10 minutes).
- Reconnecting everything and turning the blanket back on.
4. Inspecting the Heating Elements (Proceed with Caution!)
This step requires extra care. We're looking for obvious damage, not attempting repairs to the wiring within the blanket. If you are not comfortable with this inspection, it is best to consult a professional.
- Visually inspect the blanket: Lay the blanket flat on a clean, dry surface. Look for any signs of scorching, discoloration, or unusual lumps. These could indicate damaged heating elements.
- Feel for cold spots: Turn the blanket on (briefly!) and carefully feel different sections. Note any areas that don't heat up as expected.
Important Safety Note: If you see any signs of damage to the heating elements or smell burning, immediately unplug the blanket and discontinue use. It's no longer safe and should be disposed of properly.
5. Simple Part Replacement: The Controller (Proceed with Caution!)
If you've ruled out other possibilities and suspect the controller is faulty, you *might* be able to replace it. This is only advisable if:
- You can easily find a replacement controller that is specifically designed for your electric blanket model. Using an incompatible controller can be dangerous. Check the blanket's label for the model number and compatibility information.
- You are comfortable with disconnecting and reconnecting the controller. This typically involves unplugging the old controller from the blanket and plugging in the new one.
Important: Even if the controller appears to be the same, never use a controller from a different brand or model unless it's explicitly stated to be compatible by the manufacturer. Mismatched controllers can cause overheating and create a fire hazard.
When to Call a Professional:
Electric blankets involve electrical components and pose a fire risk if not handled properly. It's crucial to know when to seek professional help. Consult an electrician or appliance repair technician if:
- You are uncomfortable performing any of the troubleshooting steps.
- You suspect a problem with the internal wiring of the blanket.
- The blanket has any visible signs of damage, such as burns, frayed wires, or exposed heating elements.
- You are unsure about the compatibility of a replacement controller.
- The blanket continues to malfunction after you've tried the troubleshooting steps.
- You smell burning or detect any unusual odors while the blanket is plugged in.
Working with electricity is dangerous. When in doubt, always call a professional.
How To Bleed A Radiator Without A Key
A cold radiator in an otherwise warm house can be frustrating. Air trapped inside prevents hot water from circulating, reducing efficiency and costing you money. While a radiator key is the standard tool, there are several ways to bleed a radiator without one. Safety is paramount. Always turn off the heating system and allow the radiators to cool down before attempting to bleed them.
Understanding the Bleeding Process
Bleeding a radiator releases trapped air, allowing hot water to fill the entire radiator. This process involves opening the bleed valve, releasing the air until water appears, and then closing the valve. The valve is typically located at the top of the radiator on one end.
Tools You Might Need (Alternatives to a Radiator Key):
- Small Flathead Screwdriver: Many older radiator valves have a slotted screw head.
- Pliers (Needle-nose or Standard): For valves with a square or hexagonal nut.
- Adjustable Wrench: For larger nuts or oddly shaped valves.
- Cloth or Towel: To catch any water that spills out.
- Container: To collect larger amounts of water if necessary.
- Gloves: To protect your hands.
Step-by-Step Guide to Bleeding a Radiator Without a Key:
- Turn Off the Heating System: Crucially important! Allow the radiators to cool down completely to avoid burns and pressure issues.
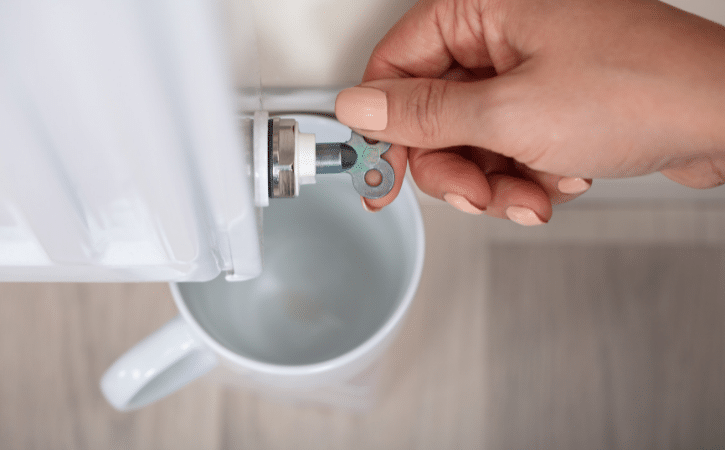
- Locate the Bleed Valve: It's usually a small metal valve at the top of the radiator on one end. It may have a small square or slotted opening.
- Prepare Your Tools and Protection: Place a cloth or towel beneath the bleed valve to catch any drips. Have your chosen tool ready.
- Identify the Valve Type: Determine the shape of the valve opening. This will determine which tool is best to use.
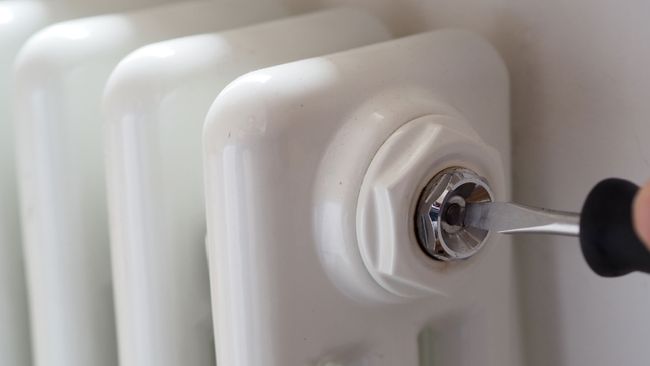
- Using a Flathead Screwdriver: If the valve has a slotted screw head, carefully insert the flathead screwdriver into the slot. Slowly turn the screwdriver counterclockwise.
- Using Pliers: If the valve has a square or hexagonal nut, grip the nut firmly with the pliers. Turn the pliers counterclockwise. Be careful not to damage the nut. Needle-nose pliers can be useful for smaller nuts.
- Using an Adjustable Wrench: If the valve has a larger or oddly shaped nut, adjust the wrench to fit snugly. Turn the wrench counterclockwise.
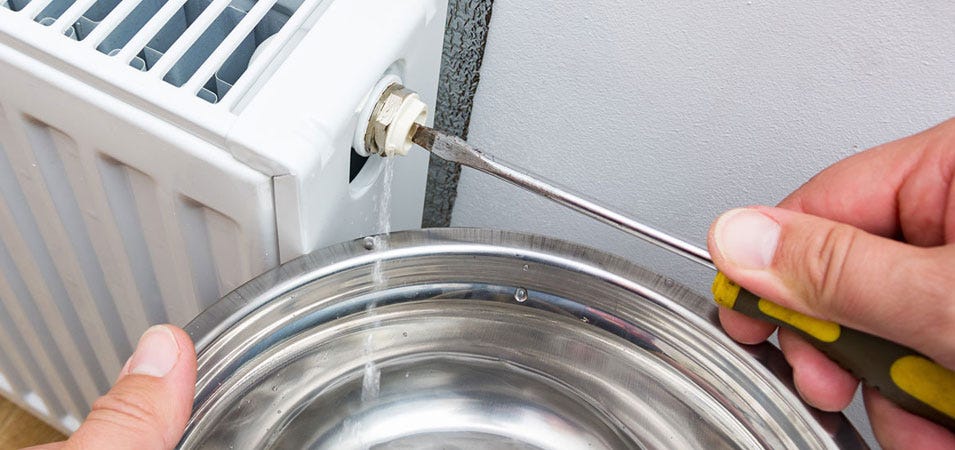
- Listen for Hissing: As you turn the valve, you should hear a hissing sound as air escapes.
- Collect Any Water: Once water starts to trickle out, use a container to collect it to prevent staining surfaces.
- Close the Valve: Once a steady stream of water (without air bubbles) flows out, carefully tighten the valve by turning your tool clockwise. Don't overtighten, as this can damage the valve.
- Repeat for Other Radiators: Repeat the process for all radiators in your home, starting with the ones furthest from the boiler.
- Check the Boiler Pressure: After bleeding the radiators, check the pressure gauge on your boiler. Bleeding radiators can sometimes lower the pressure. If the pressure is too low, you may need to add water to the system (consult your boiler's manual for instructions).
- Turn the Heating System Back On: Once you've bled all the radiators and checked the boiler pressure, turn the heating system back on.
- Monitor Radiator Performance: Check that all radiators are now heating up evenly. If any radiator remains cold, repeat the bleeding process.
Important Tips and Cautions:
- Start with Radiators Furthest from the Boiler: Air tends to accumulate in the radiators furthest from the boiler, so it's best to start there.
- Be Patient: Bleeding a radiator can take a few minutes. Don't rush the process.
- Protect Your Surfaces: Water from radiators can be dirty and can stain carpets and furniture. Use plenty of towels and containers to prevent spills.
- Don't Overtighten the Valve: Overtightening the valve can damage it and make it difficult to open in the future.
- Consider Upgrading to Modern Valves: If you frequently need to bleed your radiators, consider upgrading to modern valves with a built-in key or a standard wrench fitting.
- Regular Bleeding: It's a good practice to bleed your radiators annually, typically before the start of the heating season.
When to Call a Professional:
While bleeding a radiator is a relatively simple task, there are situations where it's best to call a qualified heating engineer:
- You Can't Locate the Bleed Valve: If you can't find the bleed valve on your radiator, don't attempt to force anything.
- The Valve is Damaged or Stuck: If the bleed valve is damaged, corroded, or stuck, don't try to force it open. You could break it and cause a leak.
- You Suspect a More Serious Problem: If bleeding the radiator doesn't solve the problem, there may be a more serious issue with your heating system, such as a blockage or a faulty pump.
- You Are Not Comfortable Performing the Task: If you are not comfortable working with your heating system, it's always best to call a professional.
- Persistent Air Problems: If you find yourself frequently bleeding your radiators, it could indicate a problem with your system drawing in air, which needs professional diagnosis.
Remember, dealing with central heating systems involves working with hot water and pressurized systems. If you're unsure about anything, don't hesitate to seek professional help. A qualified heating engineer can diagnose and fix any problems safely and efficiently.