How To Build A Freeze Dryer
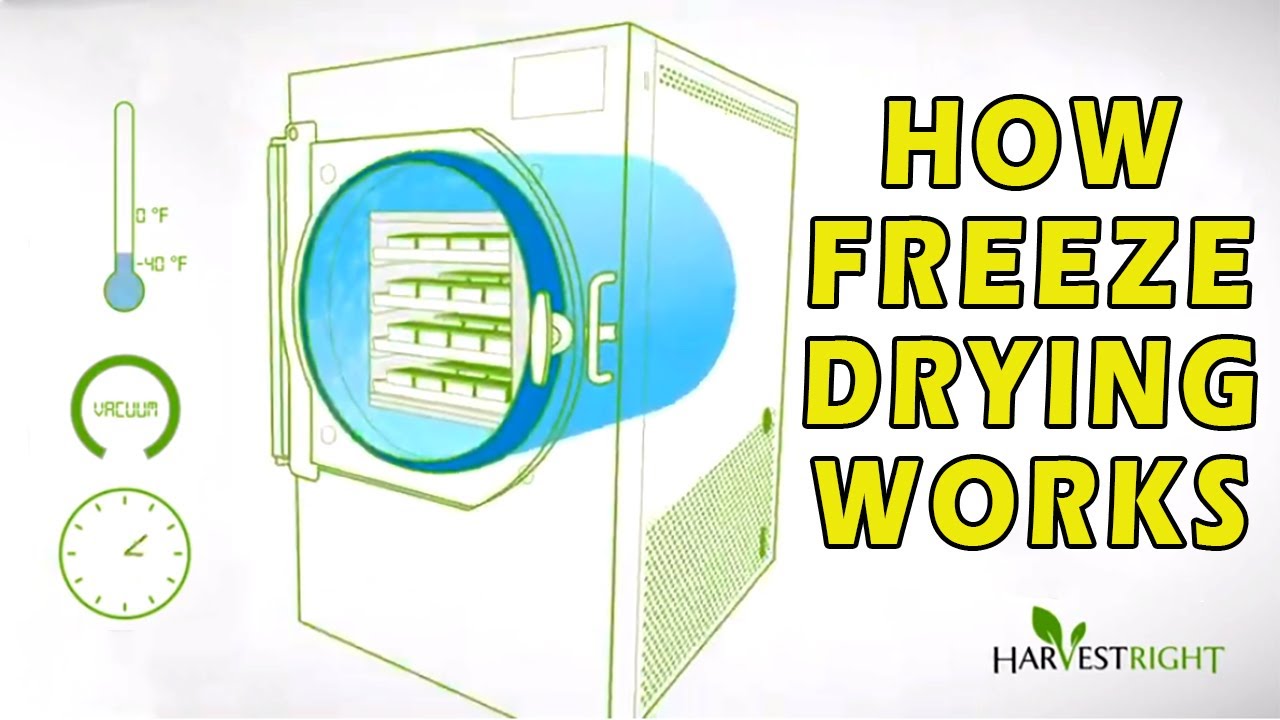
In a world increasingly focused on sustainability and reducing energy consumption, exploring alternative methods for food preservation is becoming crucial. While often associated with industrial applications, freeze-drying can be adapted for smaller-scale use. This guide explores the potential of building a DIY freeze dryer, offering a pathway to energy savings and sustainable food preservation. We'll cover the essential components, construction considerations, safety measures, and potential integration with smart home systems to maximize efficiency.
Understanding Freeze Drying: A Primer
Freeze-drying, also known as lyophilization, removes water from a product by freezing it and then reducing the surrounding pressure to allow the frozen water to sublimate directly from the solid phase to the gas phase. This process preserves the food without the need for additives or high temperatures, retaining its nutritional value, flavor, and texture better than other preservation methods. Traditional freeze dryers are energy-intensive, but DIY approaches, coupled with smart technologies, can significantly reduce their environmental footprint and operating costs.
The Core Components of a DIY Freeze Dryer
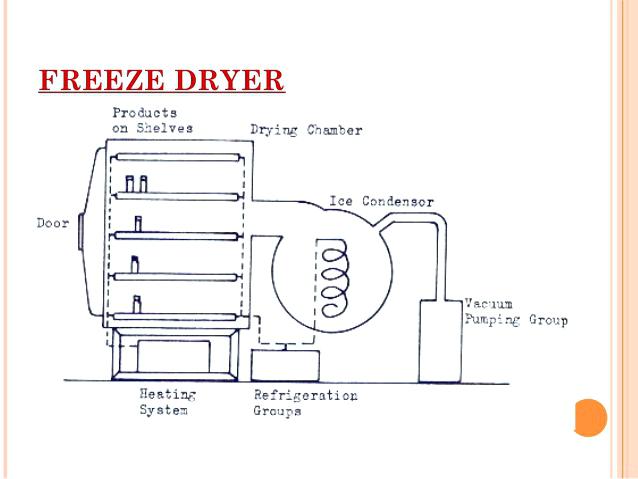
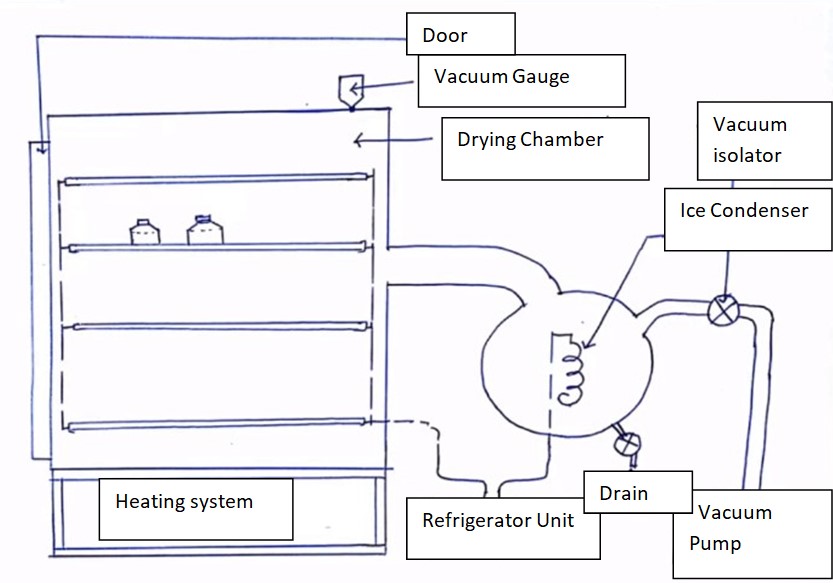
Building a functional freeze dryer requires several key components:
- Vacuum Chamber: This airtight enclosure houses the items to be freeze-dried. It needs to be robust enough to withstand significant pressure differences.
- Vacuum Pump: This essential component creates and maintains the low-pressure environment needed for sublimation. Choosing an efficient pump is critical for energy savings. Look for pumps with variable speed settings.
- Refrigeration System: This system freezes the product and maintains a low temperature during the sublimation process. A repurposed refrigerator or a dedicated refrigeration unit can be used.
- Heating System (Optional but Recommended): Gentle heating can accelerate sublimation. This can be achieved with heating pads or low-wattage resistors, carefully controlled to avoid overheating.
- Condenser: The condenser traps the water vapor removed from the product, preventing it from entering the vacuum pump and damaging it. A cold trap, often using dry ice or a dedicated refrigeration unit, is typically employed.
- Control System: This system monitors and controls the temperature, pressure, and duration of the freeze-drying process. This is where smart home integration becomes highly valuable.
Constructing Your DIY Freeze Dryer: A Step-by-Step Guide
Step 1: Building the Vacuum Chamber. A robust, airtight chamber is paramount. Stainless steel is an ideal material due to its durability and resistance to corrosion. Acrylic or polycarbonate can also be used, but they need to be significantly thicker to withstand the vacuum. Consider the size of the chamber based on your anticipated freeze-drying needs. A gasket system using silicone or rubber seals will ensure an airtight seal. Test the chamber thoroughly for leaks before proceeding.
Step 2: Implementing the Refrigeration System. A repurposed chest freezer can serve as a cost-effective refrigeration unit. Ensure the freezer can reach temperatures low enough for effective freeze-drying, ideally below -20°C (-4°F). If using a dedicated refrigeration unit, select one with a high Coefficient of Performance (COP) to minimize energy consumption. Consider using a smart plug to monitor the energy usage of the refrigeration unit and identify opportunities for optimization. Some rebates might exist for replacing inefficient freezers with newer, more energy-efficient models; check with your local utility company or Energy Star for details.
Step 3: Integrating the Vacuum Pump. A two-stage rotary vane vacuum pump is generally recommended for freeze-drying applications. Look for a pump with a high pumping speed (CFM or liters per minute) and a low ultimate pressure (in Torr or Pascals). Variable-speed pumps allow for finer control and energy savings by adjusting the pumping speed based on the stage of the freeze-drying process. Regular maintenance, including oil changes, is crucial for the longevity and efficiency of the pump.
Step 4: Constructing the Condenser (Cold Trap). The cold trap is essential for protecting the vacuum pump. A simple cold trap can be constructed using an insulated container filled with dry ice and a suitable solvent like ethanol or isopropyl alcohol. For a more sophisticated and energy-efficient solution, consider using a thermoelectric cooler (TEC) or a dedicated refrigeration unit. The cold trap needs to be significantly colder than the product being freeze-dried to effectively capture the water vapor.
Step 5: Implementing the Heating System (Optional). Gentle heating can significantly reduce the freeze-drying time. Heating pads designed for reptile enclosures or low-wattage resistors can be used. It's crucial to use a temperature controller to prevent overheating, which can damage the product. Precise temperature control is key to maintaining product quality and minimizing energy consumption.
Step 6: Assembling the Control System. This is where smart home integration comes into play. A microcontroller (e.g., Arduino, Raspberry Pi) can be used to monitor and control the temperature, pressure, and duration of the freeze-drying process. Integrate sensors to monitor temperature inside the chamber, the temperature of the cold trap, and the pressure within the system. Use relays to control the refrigeration unit, vacuum pump, and heating system. Data logging allows for tracking energy usage and optimizing the process for different types of foods.
Safety Considerations: Handling Vacuum and Refrigeration
Working with vacuum systems and refrigerants poses several safety risks. Always wear safety glasses when working with vacuum pumps and refrigerants. Ensure the vacuum chamber is properly rated for the pressures involved. When using dry ice, wear insulated gloves and work in a well-ventilated area to avoid frostbite and carbon dioxide buildup. Dispose of refrigerants properly, according to local regulations. Consult with a qualified HVAC technician for any work involving refrigerants.
Smart Home Integration for Optimal Energy Efficiency
Integrating your DIY freeze dryer with a smart home system offers numerous benefits:
- Remote Monitoring and Control: Monitor the temperature, pressure, and energy consumption from anywhere using a smartphone or tablet.
- Automated Operation: Program the freeze dryer to automatically adjust the temperature, pressure, and duration based on the type of food being processed.
- Energy Optimization: Use smart plugs and energy monitors to track the energy consumption of each component and identify opportunities for optimization.
- Alerts and Notifications: Receive alerts if the temperature or pressure deviates from the set parameters or if there is a power outage.
Consider using a smart thermostat connected to the refrigeration unit to optimize its performance. Smart thermostats can learn your usage patterns and adjust the temperature accordingly, further reducing energy consumption. Energy Star certified smart thermostats offer additional energy savings and may qualify for rebates.
Calculating ROI and Energy Savings
While the initial investment in building a DIY freeze dryer may seem significant, the long-term ROI can be substantial. Consider the cost savings from preserving food that would otherwise spoil, the reduced need to purchase commercially freeze-dried products, and the potential for selling freeze-dried goods. Track the energy consumption of your freeze dryer and compare it to the cost of alternative preservation methods, such as canning or freezing. Government rebates and tax incentives for energy-efficient appliances can further offset the initial cost.
To maximize energy savings, optimize the freeze-drying process for each type of food. Smaller batches and proper pre-freezing can reduce the freeze-drying time and energy consumption. Regularly maintain the vacuum pump and refrigeration unit to ensure optimal performance. Proper insulation of the vacuum chamber and cold trap can also significantly reduce energy losses.
Troubleshooting Common Issues
Vacuum Leaks: Vacuum leaks are a common issue in DIY freeze dryers. Use a vacuum gauge to identify leaks and seal them with silicone sealant or Teflon tape. Check all connections and fittings for tightness.
Insufficient Cooling: If the refrigeration unit is not cooling sufficiently, check the refrigerant levels and the condition of the compressor. Ensure proper ventilation around the refrigeration unit.
Slow Sublimation: Slow sublimation can be caused by insufficient vacuum, inadequate heating, or a cold trap that is not cold enough. Increase the vacuum pump speed, adjust the heating temperature, and ensure the cold trap is properly chilled.
Conclusion: A Sustainable Path to Food Preservation
Building a DIY freeze dryer offers a unique opportunity to embrace sustainable food preservation practices and reduce energy consumption. By carefully selecting components, implementing smart home integration, and optimizing the freeze-drying process, you can create a cost-effective and environmentally friendly solution for preserving food. The potential for long-term cost savings, reduced food waste, and the ability to control the quality of your preserved food make a DIY freeze dryer a worthwhile investment for both homeowners and businesses seeking to reduce their environmental footprint and lower their energy bills. Remember to consult with qualified professionals for any aspects of the build that require specialized knowledge or skills, particularly regarding refrigeration and electrical systems. Explore available rebates and incentives to further reduce the cost and maximize the ROI of your sustainable freeze-drying project. Look for programs like those offered by your local utility or state energy office, many of which promote energy efficiency through financial incentives.