How To Change Ac Capacitor

Your air conditioner is crucial for comfort, especially during hot weather. A common culprit behind AC problems is a faulty capacitor. This component acts like a battery, providing the initial jolt of electricity needed to start the motor. Understanding how to identify a failing capacitor and, potentially, replace it yourself can save you money and time. However, working with electricity can be dangerous, so proceed with caution and prioritize safety.
Understanding AC Capacitors
An AC capacitor is an electrical component that stores energy in an electrical field. Think of it like a small, temporary battery within your AC unit. It's primarily used to:
- Start the motor: AC motors require a significant surge of power to get moving. The capacitor provides this boost.
- Improve efficiency: By providing the initial surge, the capacitor helps the motor run more smoothly and efficiently.
Types of AC Capacitors
There are typically two types of capacitors found in an AC unit:
- Start Capacitor: This provides a high burst of energy to start the motor and then quickly disconnects from the circuit. These are generally larger and have a higher voltage rating.
- Run Capacitor: This remains in the circuit continuously while the motor is running, helping to improve its efficiency and performance. These are usually smaller than start capacitors.
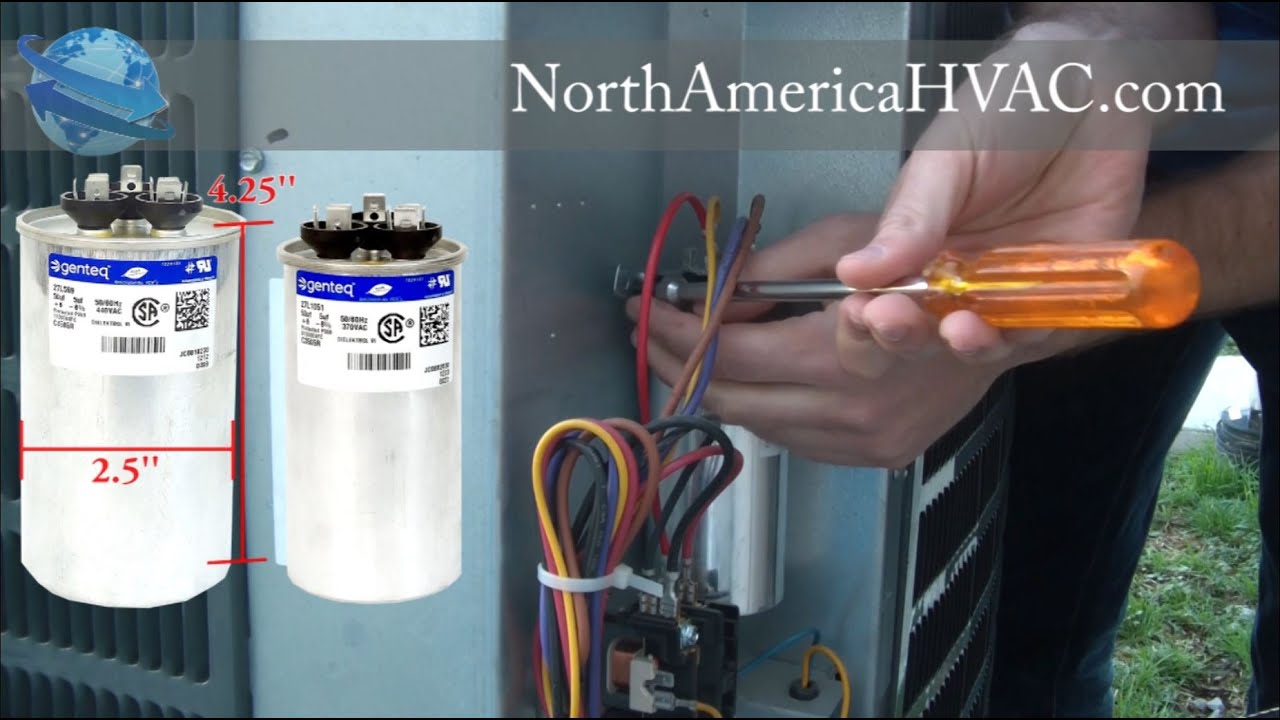
Many AC units use a dual run capacitor, which combines the functions of both start and run capacitors into a single unit. This capacitor has three terminals labeled "C" (common), "FAN," and "HERM" (Hermetically sealed compressor).
Identifying a Failing Capacitor
Recognizing the signs of a failing capacitor can help you address the issue before it causes more significant damage to your AC system.
Common symptoms include:
- AC won't start: This is the most common symptom. The motor may hum but won't turn on.
- Humming noise: A failing capacitor may cause the motor to hum loudly.
- Delayed start: The AC takes a long time to start or struggles to start.
- AC shuts off frequently: The AC may run for a short period and then shut off.
- Increased energy bills: An inefficient motor, due to a failing capacitor, can lead to higher energy consumption.
- Bulging or leaking capacitor: A visually damaged capacitor is a clear sign of failure. Never touch a leaking capacitor; it may contain corrosive chemicals.
Testing the Capacitor (Advanced)
If you suspect a capacitor is failing, you can test it using a multimeter with capacitance measurement capabilities. This requires electrical knowledge and should only be attempted if you are comfortable working with electrical circuits.
- Disconnect power: Absolutely crucial. Turn off the AC unit at the breaker and disconnect the power at the outdoor unit's disconnect switch.
- Discharge the capacitor: Use a screwdriver with an insulated handle to carefully short the terminals of the capacitor. This discharges any stored energy. (See safety section below)
- Disconnect the wires: Carefully disconnect the wires connected to the capacitor, noting their positions (take a picture!).
- Measure capacitance: Set your multimeter to capacitance mode and connect the probes to the capacitor terminals.
- Compare readings: Compare the measured capacitance to the capacitor's rated capacitance (printed on the capacitor). A reading significantly lower (more than 10% off) indicates a faulty capacitor.
Safety Precautions: Working with Electricity
Electricity is dangerous. Before attempting any repairs, understand and follow these safety precautions:
- Turn off the power: The most important step. Turn off the AC unit at the breaker and the outdoor disconnect switch. Double-check with a voltage tester to ensure the power is off.
- Discharge the capacitor: Capacitors store electrical energy even when the power is off. Always discharge the capacitor before handling it. Use a screwdriver with an insulated handle to carefully short the terminals. Be prepared for a spark.
- Wear safety glasses: Protect your eyes from potential sparks or debris.
- Use insulated tools: Use tools with insulated handles to prevent electric shock.
- Don't work in wet conditions: Water conducts electricity, increasing the risk of shock.
- If unsure, call a professional: If you are not comfortable working with electricity, it's best to hire a qualified HVAC technician.
Replacing the AC Capacitor: Step-by-Step Guide
If you've determined that the capacitor needs replacing and you are comfortable working with electricity, follow these steps:
- Gather your materials:
- New capacitor: Make sure it has the same voltage and microfarad (µF) rating as the old one.
- Screwdriver with insulated handle
- Pliers with insulated handle
- Voltage tester
- Camera or phone for taking pictures
- Work gloves
- Safety Glasses
- Turn off the power: As emphasized before, this is critical. Turn off the AC unit at the breaker and disconnect the power at the outdoor unit's disconnect switch. Double check with a voltage tester.
- Discharge the old capacitor: Carefully discharge the capacitor using a screwdriver with an insulated handle. Short the terminals to discharge any remaining energy.
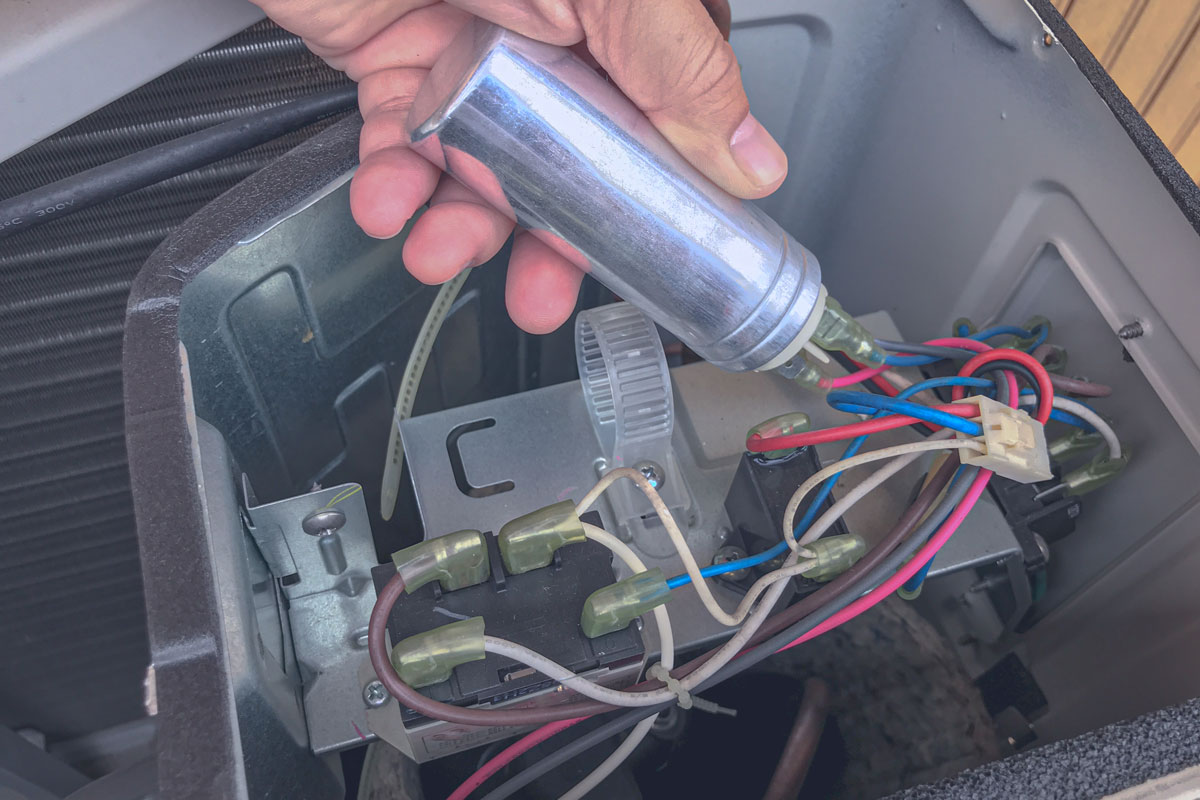
- Take a picture: Before disconnecting any wires, take a clear picture of the capacitor and the wires connected to it. This will serve as a reference when connecting the new capacitor. Label the wires if the picture is not clear enough.
- Disconnect the wires: Carefully disconnect the wires from the old capacitor. Use pliers to gently pull the connectors off. Avoid pulling on the wires themselves.
- Remove the old capacitor: Loosen any screws or clips holding the capacitor in place and remove it.
- Install the new capacitor: Place the new capacitor in the same position as the old one and secure it with screws or clips.
- Connect the wires: Using the picture you took as a reference, connect the wires to the new capacitor terminals. Make sure each wire is connected to the correct terminal (C, FAN, HERM for a dual run capacitor). Incorrect wiring can damage the capacitor or the AC unit.
- Double-check your work: Before restoring power, double-check that all wires are securely connected and that the capacitor is properly installed.
- Restore power: Turn on the disconnect switch and the breaker.
- Test the AC: Turn on the AC unit and observe its operation. It should start smoothly and run normally.
Choosing the Right Replacement Capacitor
Selecting the correct replacement capacitor is crucial for the proper functioning and longevity of your AC unit. Here's what to consider:
- Voltage Rating: The voltage rating of the new capacitor must be equal to or higher than the voltage rating of the old capacitor. Never use a capacitor with a lower voltage rating.
- Microfarad (µF) Rating: The microfarad rating must be exactly the same as the old capacitor. A slight variation (within 5%) *may* be acceptable in some cases, but it's best to stick to the original rating. Using a capacitor with the wrong microfarad rating can damage the motor.
- Physical Size: While not as critical as the electrical ratings, the physical size of the new capacitor should be similar to the old one to ensure it fits properly in the AC unit.
- Brand and Quality: Choose a capacitor from a reputable brand known for quality and reliability. A cheaper capacitor may fail prematurely.
You can find the capacitor's specifications printed directly on the capacitor itself.
When to Call a Professional
While replacing an AC capacitor can be a DIY project for some, there are situations where it's best to call a qualified HVAC technician:
- You're not comfortable working with electricity: Safety is paramount. If you're unsure about any part of the process, it's best to leave it to a professional.
- You can't identify the problem: If you're not sure if the capacitor is the issue, a technician can diagnose the problem and recommend the appropriate solution.
- The AC unit is still under warranty: Replacing the capacitor yourself may void the warranty.
- You encounter complications: If you run into any problems during the replacement process, it's best to stop and call a professional.
- You suspect other issues: If the capacitor replacement doesn't fix the problem, there may be other underlying issues with the AC unit that require professional attention.
Troubleshooting After Replacement
Even after replacing the capacitor, you might encounter issues. Here are some common problems and potential solutions:
- AC still doesn't start: Double-check the wiring to ensure everything is connected correctly. Also, consider that other components, like the contactor or motor, might be faulty.
- AC runs for a short time then shuts off: This could indicate a problem with the compressor or a refrigerant leak. Call a professional.
- Loud humming noise persists: This might point to a problem with the motor itself. A technician can diagnose and repair or replace the motor.
- New capacitor fails quickly: If the new capacitor fails shortly after installation, there might be an underlying problem with the AC unit that is causing the capacitor to fail. A professional can identify and address the root cause.
Replacing an AC capacitor can be a straightforward repair, but it's essential to prioritize safety and follow the instructions carefully. If you're unsure about any part of the process, don't hesitate to call a qualified HVAC technician. Regular AC maintenance, including checking the capacitor's condition, can help prevent future problems and ensure your AC system runs efficiently for years to come.