How To Change An Expansion Tank On A Boiler

How to Change an Expansion Tank on a Boiler: A Comprehensive Guide
The expansion tank is a crucial component of your boiler system, responsible for accommodating the expansion of water as it heats. A failing expansion tank can lead to pressure problems, leaks, and ultimately, damage to your boiler. Replacing it is a task many homeowners can undertake with the right knowledge and preparation. This guide provides a step-by-step process, safety considerations, and helpful tips to ensure a successful replacement.
Understanding the Importance of the Expansion Tank
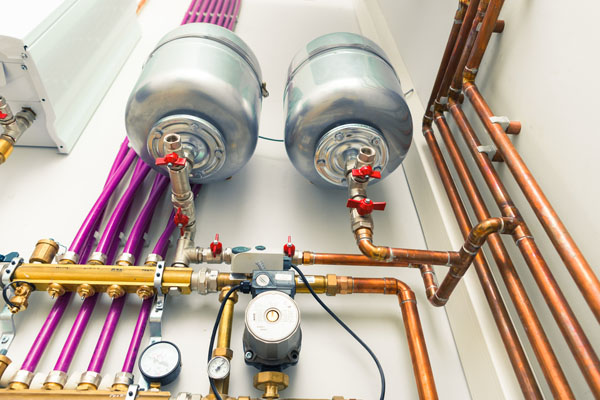
Before diving into the replacement process, it's essential to understand why the expansion tank is so important. As water heats, it expands. In a closed boiler system, this expansion can create significant pressure buildup. The expansion tank provides a space for this expanding water, preventing over-pressurization and potential damage to the boiler and its components.
Signs of a failing expansion tank include:
- Water leaking from the tank or pressure relief valve.
- Excessive pressure readings on the boiler gauge.
- Banging or gurgling noises coming from the heating system.
- Frequent cycling of the pressure relief valve.
If you notice any of these symptoms, it's crucial to inspect your expansion tank and consider replacement if necessary.
Tools and Materials Needed
Before you begin, gather all the necessary tools and materials. This will ensure a smooth and efficient replacement process.
- New expansion tank (ensure it's the correct size and type for your boiler)
- Adjustable wrench
- Pipe wrench
- Screwdrivers (Phillips and flathead)
- Bucket
- Rags or towels
- Thread sealant (pipe dope or Teflon tape)
- Drain valve (optional, but highly recommended)
Step-by-Step Replacement Process
Safety First: Before starting any work on your boiler, turn off the power and gas supply to the unit. This is crucial to prevent electrical shock or gas leaks.
- Isolate the Boiler: Close the water supply valve to the boiler. This will prevent water from entering the system while you're working.
- Drain the System: Locate the drain valve at the bottom of the boiler. Attach a hose to the valve and run it to a drain or bucket. Open the drain valve and allow the water to drain from the boiler. This will relieve pressure in the system. Continue draining until the water level is below the expansion tank.
- Locate and Disconnect the Old Tank: The expansion tank is typically located near the top of the boiler. Carefully disconnect the tank from the piping. You may need to use a pipe wrench to loosen the connections. Be prepared for some residual water to spill out, so have a bucket and rags handy.
- Inspect the Connections: Examine the threads on the piping that connected to the old tank. Clean any corrosion or debris from the threads. If the threads are damaged, you may need to repair or replace the piping.
- Prepare the New Tank: Apply thread sealant (pipe dope or Teflon tape) to the threads of the new expansion tank. This will ensure a watertight seal. Wrap the Teflon tape clockwise around the threads, overlapping each layer.
- Install the New Tank: Carefully screw the new expansion tank onto the piping. Tighten the connection securely with a pipe wrench, but avoid over-tightening, which could damage the threads.
- Recharge the Tank (if necessary): Some expansion tanks require pre-charging with air. Check the manufacturer's instructions for your specific tank model. Use a bicycle pump or air compressor to inflate the tank to the recommended pressure.
- Refill the System: Slowly open the water supply valve to the boiler. Allow the system to fill with water, checking for any leaks around the new expansion tank connections.
- Bleed the System: Once the system is full, bleed the air from the radiators or baseboard heaters. This will ensure proper circulation and prevent noise.
- Restore Power and Gas: Turn the power and gas supply back on to the boiler.
- Test the System: Monitor the boiler pressure gauge to ensure it's operating within the normal range. Check for any leaks around the expansion tank connections. Run the boiler through a heating cycle to ensure it's functioning properly.
Choosing the Right Expansion Tank
Selecting the correct expansion tank is critical for optimal boiler performance. Consider the following factors when choosing a new tank:
- Tank Size: The size of the expansion tank should be appropriate for the size of your boiler and the volume of water in your heating system. Consult your boiler's manual or a qualified HVAC professional to determine the correct tank size.
- Tank Type: There are two main types of expansion tanks: bladder tanks and diaphragm tanks. Bladder tanks have a rubber bladder that separates the water from the air, while diaphragm tanks use a flexible diaphragm. Bladder tanks are generally more durable and longer-lasting, but diaphragm tanks are less expensive.
- Material: Expansion tanks are typically made of steel or composite materials. Steel tanks are more durable but can be susceptible to corrosion. Composite tanks are corrosion-resistant but may be less durable than steel tanks.
Popular brands for expansion tanks include Amtrol, Watts, and Caleffi. These brands offer a range of tank sizes and types to suit various boiler systems.
Troubleshooting Common Problems
Even with careful installation, you may encounter some problems during or after the expansion tank replacement. Here are some common issues and how to address them:
- Leaks: If you notice leaks around the expansion tank connections, tighten the fittings or reapply thread sealant. If the leaks persist, the threads may be damaged, and you may need to replace the piping.
- Excessive Pressure: If the boiler pressure is too high, even after installing the new expansion tank, there may be another problem with the system, such as a faulty pressure relief valve or a blockage in the piping. Consult a qualified HVAC professional.
- Noisy Operation: If you hear banging or gurgling noises from the heating system, there may be air trapped in the system. Bleed the air from the radiators or baseboard heaters until the noise disappears.
Maintenance Tips for Your Boiler System
Proper maintenance is essential for extending the life of your boiler system and preventing costly repairs. Here are some key maintenance tips:
- Regular Inspections: Inspect your boiler system regularly for leaks, corrosion, and other signs of damage.
- Pressure Checks: Monitor the boiler pressure gauge to ensure it's operating within the normal range.
- Bleed Radiators: Bleed the air from the radiators or baseboard heaters periodically to ensure proper circulation.
- Professional Servicing: Schedule annual servicing by a qualified HVAC professional. They can inspect the system, clean the components, and identify any potential problems before they become major issues.
Replacing an expansion tank is a manageable task for many homeowners. By following these steps carefully and prioritizing safety, you can restore your boiler system to optimal performance and prevent potential damage. Remember to consult your boiler's manual and seek professional assistance if needed.
Warranty Considerations
When purchasing a new expansion tank, be sure to understand the manufacturer's warranty. Most reputable brands offer warranties that cover defects in materials and workmanship for a specific period, typically ranging from one to five years. Keep your purchase receipt and warranty information in a safe place in case you need to make a claim. Properly installed and maintained systems are more likely to be covered.
Cost Considerations
The cost of replacing an expansion tank can vary depending on several factors, including the type of tank, the brand, and whether you hire a professional for installation. Expect to pay between $50 and $200 for the expansion tank itself. Professional installation can add another $100 to $300 to the cost, depending on the complexity of the job and the plumber's hourly rate. Getting multiple quotes from local contractors is always recommended.