How To Check Ma With Multimeter
Frequently Asked Questions: Checking Milliampere (mA) with a Multimeter
This article answers common questions about using a multimeter to measure current in milliamperes (mA). Understanding this process is crucial for troubleshooting low-current circuits, identifying parasitic drains in automotive systems, and ensuring the proper operation of electronic devices.
Question 1: What is a milliampere (mA) and why would I want to measure it?
A milliampere (mA) is a unit of electrical current, equal to one-thousandth of an ampere (A). Current, in simple terms, is the flow of electrical charge. Measuring current, especially in the milliampere range, is important for several reasons:
- Troubleshooting electronics: Many electronic circuits operate with very low currents. Measuring mA helps pinpoint faulty components or shorts.
- Detecting parasitic draws: In cars, a parasitic draw is an unwanted current drain when the engine is off. Measuring mA can identify the source draining your battery.
- Verifying device functionality: Ensuring a device draws the expected mA confirms it's operating within its specified parameters.
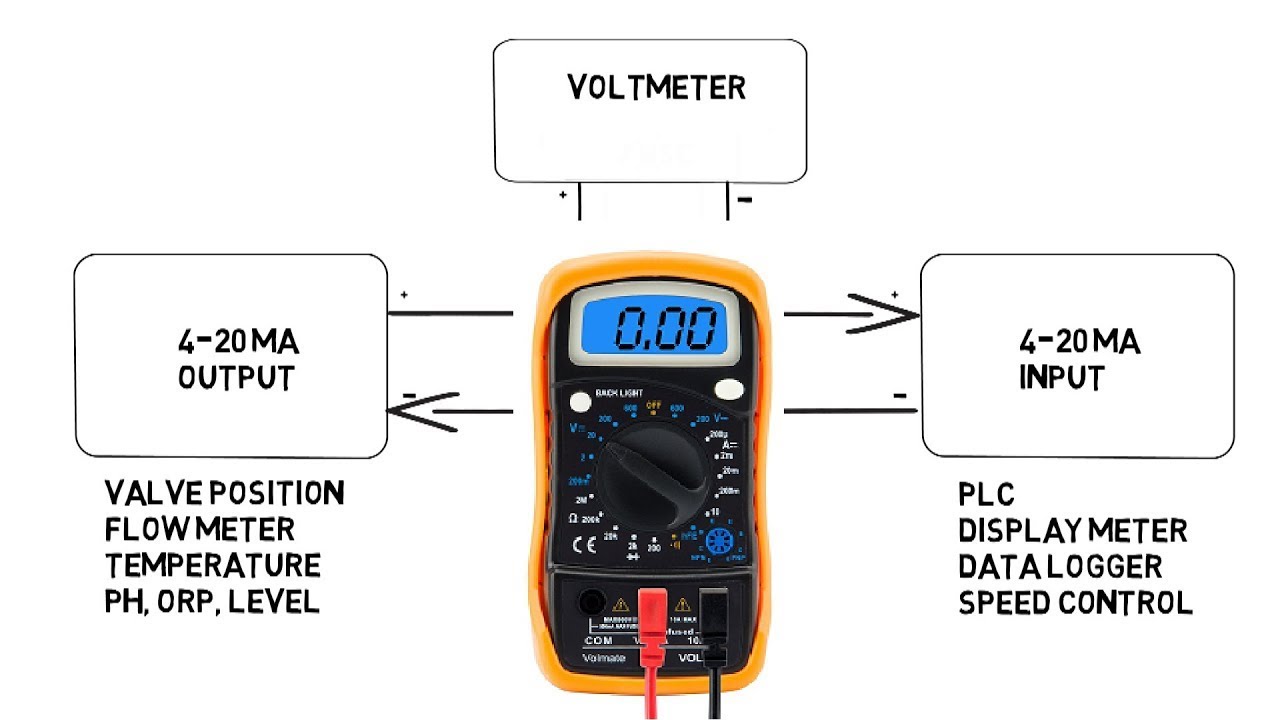
- Monitoring sensor output: Many sensors output signals in the mA range, allowing you to monitor things like temperature or pressure.
Essentially, knowing the mA consumption of a circuit or device provides valuable insights into its health and performance.
Question 2: What do I need to measure mA with a multimeter?
To accurately measure mA with a multimeter, you'll need the following:
- A Multimeter: A digital multimeter (DMM) is recommended for its accuracy and ease of use. Make sure it has a mA range setting. An analog multimeter can be used, but it's generally less precise.
- Safety Glasses: Protecting your eyes is always paramount when working with electricity.
- The Circuit or Device to be Measured: Make sure you have access to the circuit and understand how to safely interrupt the current flow to insert the multimeter in series.
- (Optional) Alligator Clips: These can be helpful for connecting the multimeter leads to the circuit, especially in tight spaces.
- Knowledge of the Circuit: Understand the voltage and expected current of the circuit you are testing. Measuring current in a high voltage circuit, for example, can be dangerous and potentially damage the multimeter if not handled correctly.
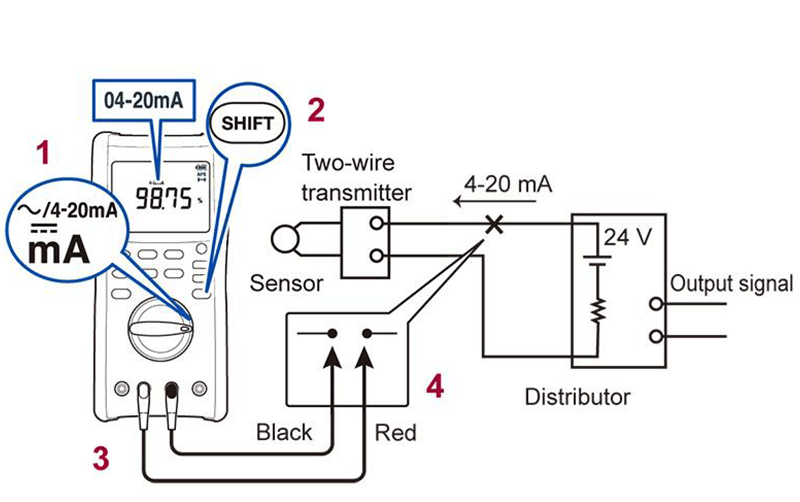
Question 3: How do I set up my multimeter to measure mA?
Setting up your multimeter correctly is crucial for accurate readings and preventing damage. Here's a step-by-step guide:
- Turn off the power: Always turn off the power to the circuit before connecting the multimeter. This is a fundamental safety precaution.
- Select the mA Range: On your multimeter, find the dial or button that allows you to select the measurement range. Choose the mA range. Many multimeters have multiple mA ranges (e.g., 200mA, 20mA, 2mA). Important: If you don't know the approximate current, start with the highest mA range. If the reading is very low (e.g., 0.5 mA on a 200mA range), you can switch to a lower range (e.g., 20mA or 2mA) for better precision. However, never exceed the maximum current rating for the selected range.
- Plug in the Test Leads: Your multimeter has multiple input jacks. You'll need to connect the test leads to the correct ones for measuring current.
- Common (COM) Jack: Connect the black test lead to the "COM" or "-" jack.
- mA Jack: Connect the red test lead to the jack labeled "mA" or sometimes "A" (for Amperes) with an "mA" indication nearby. Some multimeters may have separate jacks for fused and unfused current measurements. Refer to your multimeter's manual to know which jack to use for lower mA readings and where the fuse is located. If the current measurement is expected to be above a certain limit (often 200mA to 500mA, but consult your multimeter's manual), a separate "A" (Amperes) jack is used. However, for mA measurements, use the designated mA jack.
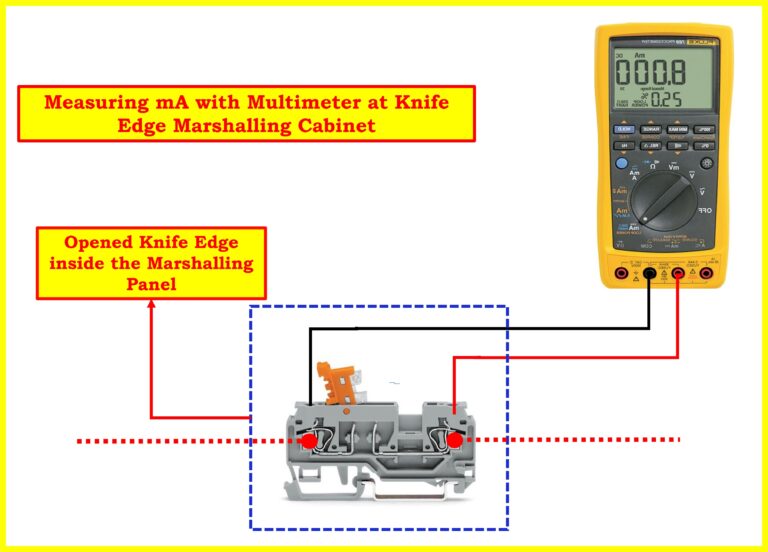
Question 4: How do I actually measure the mA current in a circuit?
Measuring current with a multimeter involves placing the meter in series with the circuit. This means you need to break the circuit at a certain point and connect the multimeter so that the current flows through the meter.
- Identify a Break Point: Find a point in the circuit where you can safely and easily break the connection. This could be at a wire connection, a component lead, or a designated test point.
- Open the Circuit: Carefully disconnect the circuit at the chosen break point.
- Connect the Multimeter in Series:
- Connect the red test lead of the multimeter to one side of the break.
- Connect the black test lead of the multimeter to the other side of the break.
Now, the multimeter is acting as a bridge, and all the current flowing through the circuit will also flow through the multimeter.
- Restore Power (Carefully!): Turn the power back on to the circuit.
- Read the Display: The multimeter will display the current flowing through the circuit in milliamperes (mA).
- Record the Reading: Note the mA reading for analysis and troubleshooting.
- Turn Off Power and Disconnect: Once you've recorded the reading, turn off the power before disconnecting the multimeter.
- Reconnect the Circuit: Restore the circuit to its original configuration by reconnecting the break point.
Important Safety Note: Never connect a multimeter in parallel across a voltage source when set to measure current. This will create a short circuit and can damage the multimeter, the circuit, and potentially cause injury. Current measurement always requires a series connection.
Question 5: What if the multimeter shows "OL" or "1." on the display?
If your multimeter displays "OL" (Overload) or "1." (depending on the model) when trying to measure current, it indicates that the current flowing through the circuit is higher than the selected range on the multimeter. Here's what to do:
- Immediately Turn Off the Power: Disconnect the power supply to prevent further damage.
- Increase the Range: Switch the multimeter to a higher mA range (if available) or to the Ampere (A) range if you suspect the current is greater than the maximum mA range.
- Check the Fuse: If the multimeter still shows "OL" after increasing the range, or if the meter doesn't seem to be functioning correctly, the internal fuse might have blown. Refer to your multimeter's manual to locate and replace the fuse with the correct type and rating.
- Re-evaluate the Circuit: Consider whether you're measuring the correct circuit point. Are you sure you're not accidentally trying to measure the total current draw of a high-power device using the mA setting?
- Consult a Professional: If you're unsure about the circuit or the multimeter's operation, consult a qualified electrician or electronics technician.
Important: A blown fuse is a sign that you've exceeded the multimeter's current rating. Continuing to attempt measurements without addressing the underlying cause could damage the meter or pose a safety risk.
Question 6: What are some common mistakes to avoid when measuring mA?
To ensure accurate readings and prevent damage to your multimeter or the circuit, avoid these common mistakes:
- Connecting the Multimeter in Parallel when measuring current: As mentioned earlier, this is a critical mistake. Current must always be measured in series. Connecting in parallel creates a short circuit.
- Exceeding the Multimeter's Current Rating: Always start with a higher range if you're unsure about the current value.
- Using the Wrong Input Jack: Double-check that the test leads are plugged into the correct jacks (COM and mA) for current measurement.
- Forgetting to Turn Off Power Before Connecting: Always disconnect power before breaking the circuit and connecting the multimeter.
- Ignoring the Fuse Rating: Use the correct replacement fuse if it blows. Using a fuse with a higher rating can damage the multimeter.
- Misinterpreting the Display: Understand what the multimeter is displaying. "OL" or "1." means overload, not a valid reading.
- Not Understanding the Circuit: A basic understanding of the circuit's operation and expected current levels helps in troubleshooting and ensures safe measurement practices.
- Using a Low Quality Multimeter: Cheap multimeters often lack the accuracy and safety features required for reliable measurements, especially in sensitive mA ranges.
Question 7: Are there any specific safety precautions I should take?
Working with electricity always involves some degree of risk. These safety precautions will help minimize the risks when measuring mA:
- Wear Safety Glasses: Protect your eyes from potential sparks or debris.
- Work in a Dry Environment: Avoid measuring current in wet or damp conditions, as water is a conductor of electricity.
- Use Insulated Tools: Use tools with insulated handles to prevent accidental shocks.
- Be Aware of Voltage: Even low-current circuits can have high voltages. Understand the voltage levels involved and take appropriate precautions.
- Avoid Touching Exposed Wires: Never touch exposed wires or components while the circuit is powered on.
- Double-Check Connections: Ensure all connections are secure and properly insulated.
- If Unsure, Ask a Professional: If you're not comfortable working with electricity, consult a qualified electrician or electronics technician. It's always better to be safe than sorry.
- Know Your Multimeter's Limitations: Be aware of your multimeter's voltage and current ratings and never exceed them.
- Regularly Inspect Your Multimeter: Check the test leads for damage, and ensure the multimeter is in good working order. Replace damaged components.
By following these guidelines and understanding the principles of current measurement, you can safely and effectively use a multimeter to measure mA in a variety of applications.