How To Clean Dirty Air Conditioner Coils

Dirty air conditioner coils are silent energy thieves, slowly but surely inflating your electricity bills. Whether you're a homeowner looking to cut costs, a business aiming for sustainable operations, or an HVAC contractor seeking to offer value-added services, understanding how to clean these coils is crucial. This guide provides a detailed walkthrough, emphasizing energy savings, potential ROI, and the benefits of integrating smart HVAC technology.
Understanding the Importance of Clean AC Coils
Your air conditioner's coils, both the evaporator coil (inside) and the condenser coil (outside), play a vital role in the cooling process. The evaporator coil absorbs heat from your indoor air, while the condenser coil releases that heat outside. When these coils are coated with dirt, dust, pollen, and other debris, they become less efficient at transferring heat. This forces your AC unit to work harder, consuming more energy to achieve the same level of cooling.
According to the Energy Star program, a dirty coil can reduce cooling capacity by as much as 30%. This translates to a significant increase in energy consumption and higher utility bills. Regular coil cleaning can restore your AC unit's efficiency, potentially saving you 15% to 30% on your cooling costs.
Step-by-Step Guide to Cleaning Your AC Coils
Before you begin, always prioritize safety. Disconnect the power to the AC unit at the breaker box to avoid electric shock. Gather the necessary materials:
- Fin comb: A tool designed to straighten bent coil fins.
- Soft-bristled brush: For gentle cleaning of the coils.
- Coil cleaner: Available at most hardware stores; choose a non-acidic, biodegradable option.
- Garden hose: With a spray nozzle.
- Screwdriver: To remove access panels.
- Safety glasses: To protect your eyes.
- Gloves: To protect your hands.
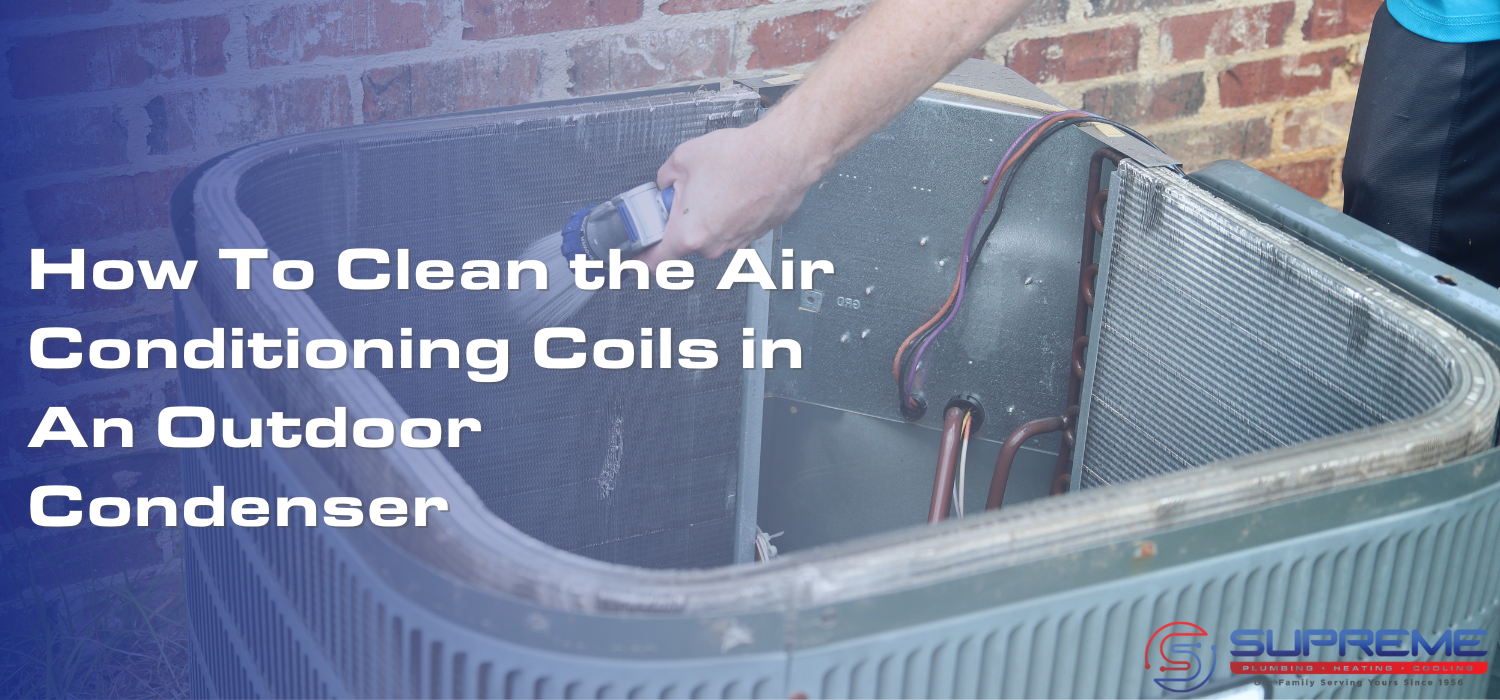
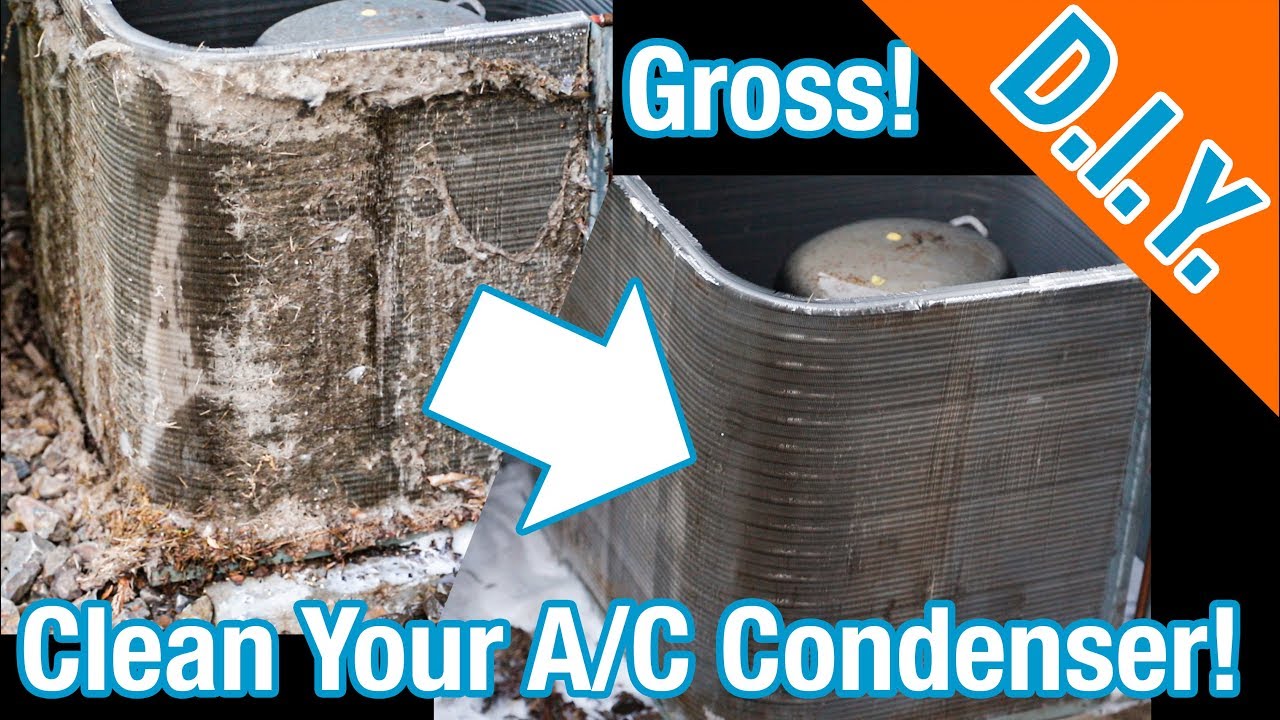
Cleaning the Condenser Coil (Outdoor Unit)
- Preparation: Turn off the power to the unit. Clear away any vegetation or debris around the condenser unit. Ensure there is ample space to work comfortably.
- Remove the outer casing: Use a screwdriver to remove the screws holding the protective grill or panels in place. Carefully detach the casing and set it aside.
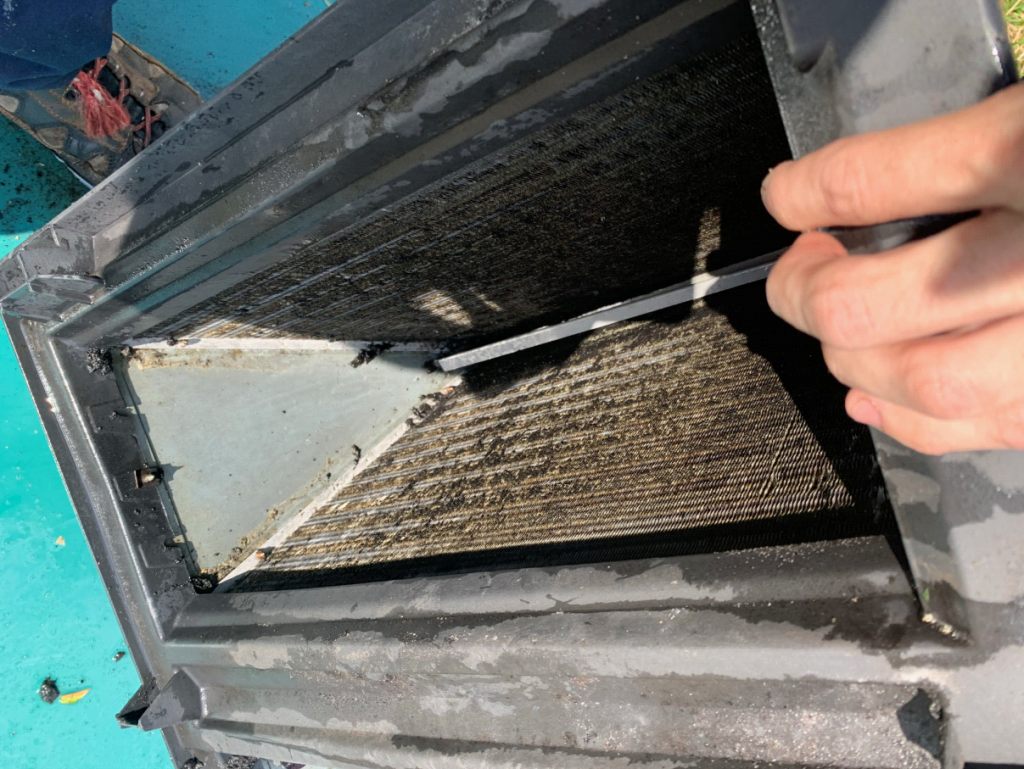
- Inspect the coil: Look for any visible dirt, debris, or bent fins.
- Straighten bent fins: Use a fin comb to carefully straighten any bent fins. This improves airflow and coil efficiency. Gently slide the comb over the fins, following their original direction.
- Dry brush the coil: Use a soft-bristled brush to remove loose dirt and debris from the coil. Brush in a downward motion to avoid pushing dirt further into the coil.
- Apply coil cleaner: Follow the manufacturer's instructions on the coil cleaner. Typically, you'll spray the cleaner onto the coil, ensuring complete coverage. Allow the cleaner to dwell for the recommended time (usually 10-15 minutes).
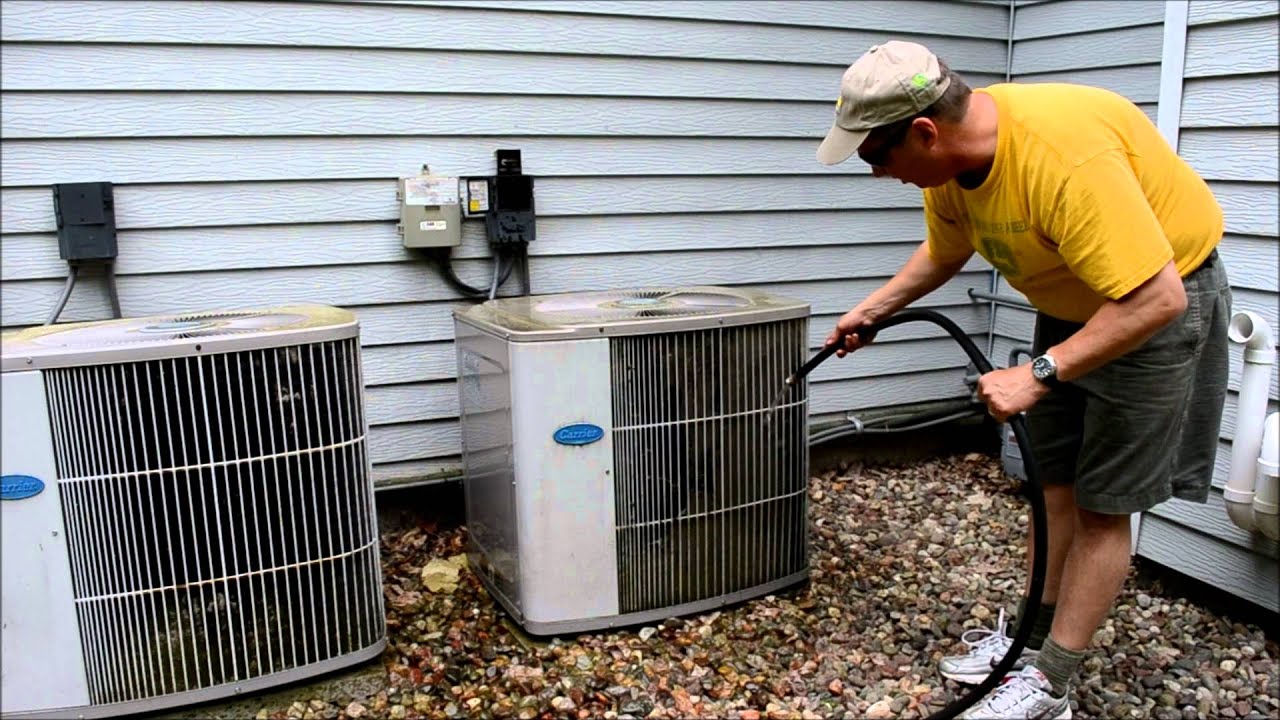
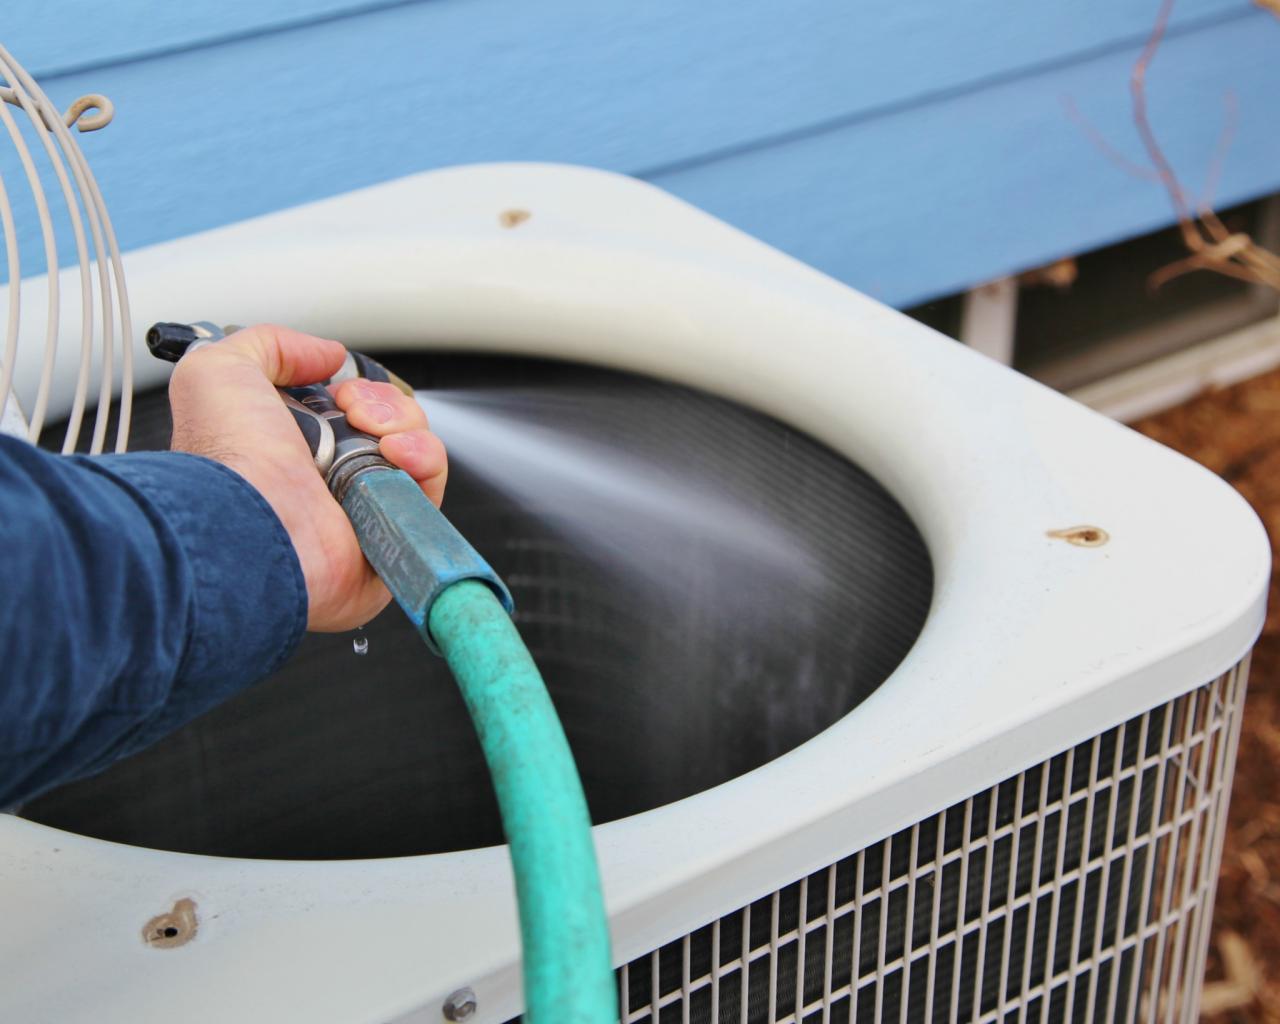
- Rinse the coil: Use a garden hose with a gentle spray nozzle to rinse the coil thoroughly. Spray from the inside out to flush out any remaining dirt and cleaner. Avoid using high pressure, as this can damage the fins.
- Reassemble the unit: Once the coil is dry, reattach the outer casing and secure it with the screws.
- Restore power: Turn the power back on at the breaker box.
Cleaning the Evaporator Coil (Indoor Unit)
Cleaning the evaporator coil requires a bit more caution, as it's located inside your home and often requires accessing it through the air handler.
- Locate the evaporator coil: The evaporator coil is typically located inside the air handler unit, which is usually in your attic, basement, or a closet.
- Turn off the power: Disconnect the power to the air handler at the breaker box.
- Access the coil: Remove the access panel to the evaporator coil compartment. This may require removing screws or clips. Be careful not to damage any wiring or components.
- Inspect the coil: Look for any visible dirt, debris, or mold growth. Mold growth should be addressed by a professional.
- Dry brush the coil: Use a soft-bristled brush to remove loose dirt and debris.
- Apply coil cleaner: Use a coil cleaner specifically designed for evaporator coils. These cleaners are typically formulated to be safe for indoor use and to minimize moisture.
- Rinse the coil (optional): Some evaporator coils can be rinsed with a small amount of water using a spray bottle. However, avoid over-saturating the coil, as this can damage nearby components. Refer to the coil cleaner instructions for specific rinsing recommendations.
- Clean the drain pan: While you have access, clean the drain pan located beneath the evaporator coil. This pan collects condensation, and if it becomes clogged, it can lead to water damage and mold growth. Use a wet/dry vacuum to remove any standing water and debris. You can also use a bleach solution (1 part bleach to 10 parts water) to disinfect the pan.
- Reassemble the unit: Once the coil is dry, reattach the access panel and secure it with the screws or clips.
- Restore power: Turn the power back on at the breaker box.
Frequency of Coil Cleaning
The frequency of coil cleaning depends on several factors, including your local climate, the amount of dust and pollen in the air, and whether you have pets. As a general guideline, clean your condenser coil at least once a year, preferably in the spring before the cooling season begins. The evaporator coil may only need cleaning every two to three years. However, if you notice a decrease in cooling performance or an increase in energy bills, it's a good idea to inspect the coils and clean them as needed.
The ROI of Clean Coils: Energy Savings and Rebates
The investment in time and materials for cleaning your AC coils is well worth it, considering the potential energy savings. As mentioned earlier, clean coils can improve cooling efficiency by 15% to 30%. For example, if your average monthly cooling bill is $200, cleaning your coils could save you $30 to $60 per month. Over the course of a cooling season, this can add up to hundreds of dollars.
In addition to energy savings, many utility companies and government agencies offer rebates and incentives for energy-efficient upgrades, including HVAC maintenance. Check with your local utility company and the Energy Star website to see if any rebates are available in your area.
Integrating Smart HVAC for Enhanced Efficiency
Cleaning your AC coils is just one piece of the energy-efficiency puzzle. Consider integrating smart HVAC technology to further optimize your cooling performance and reduce energy consumption. Smart thermostats, for example, can learn your cooling preferences and automatically adjust the temperature based on your schedule. They can also be controlled remotely via your smartphone, allowing you to adjust the temperature even when you're away from home.
Some smart thermostats also offer features like energy monitoring and reporting, which can provide valuable insights into your energy usage patterns. This information can help you identify areas where you can further reduce energy consumption. Furthermore, smart sensors can detect occupancy and adjust the temperature accordingly, ensuring that you're not cooling unoccupied rooms.
By combining regular coil cleaning with smart HVAC technology, you can maximize your energy savings and create a more comfortable and sustainable home or business environment. Look for Energy Star certified smart thermostats to ensure optimal performance and energy efficiency.
When to Call a Professional
While cleaning your AC coils is a relatively straightforward task, there are certain situations where it's best to call a professional HVAC technician:
- Mold growth: If you notice significant mold growth on your evaporator coil, it's important to have it professionally cleaned and disinfected. Mold can pose health risks and should be handled by a qualified technician.
- Complex systems: If you have a complex HVAC system or are uncomfortable working with electrical components, it's best to leave the coil cleaning to a professional.
- Refrigerant leaks: If you suspect a refrigerant leak, do not attempt to repair it yourself. Refrigerant leaks can be harmful to the environment and should be handled by a licensed technician.
- Warranty concerns: Cleaning the AC coils yourself might void the warranty on your system. If you’re under warranty, consider having the system professionally serviced to maintain its coverage.
A professional HVAC technician can also perform a more thorough cleaning and inspection of your AC system, identifying any potential problems and ensuring that your unit is running at peak efficiency.
Conclusion
Maintaining clean air conditioner coils is a simple yet effective way to improve energy efficiency, lower utility bills, and extend the lifespan of your AC system. By following the steps outlined in this guide and considering the integration of smart HVAC technology, you can create a more comfortable, sustainable, and cost-effective living or working environment. Remember, regular maintenance is key to maximizing the performance and longevity of your HVAC system. Don't underestimate the power of clean coils – they're a small investment that can yield significant returns.

:max_bytes(150000):strip_icc()/how-to-clean-air-conditioner-coils-5225557-step-12-2ba92c6572654da1997facb50c456218.jpg)