How To Discharge A Capacitor Air Conditioner

It's a sweltering summer day, and your air conditioner decides to take an unscheduled vacation. Instead of cool, refreshing air, you're met with…nothing. Or maybe just a weak fan. Before you panic and call for professional help, there are a few basic troubleshooting steps you can take. This guide will focus on a common culprit: the capacitor.
Important Safety First! Working with electricity can be dangerous. If you're not comfortable with these steps, or if at any point you feel unsure, please call a qualified HVAC technician. Your safety is paramount.
Understanding the Capacitor's Role
The capacitor in your air conditioner is like a battery – it stores energy and then releases it to help start the motor for the fan and compressor. Over time, capacitors can weaken or fail, leading to starting problems or a complete shutdown. A failing capacitor is a very common reason why an AC stops working.
Troubleshooting: Is it the Capacitor?
Before diving into capacitor discharge, let's confirm it might be the problem. Here are some telltale signs:
- The AC hums but doesn't start: This often indicates the motor is trying to start but doesn't have enough power, a classic symptom of a weak capacitor.
- The fan blades struggle to turn: You might see the fan blades move slowly or jerkily.
- The AC starts intermittently: Sometimes it works, sometimes it doesn't, pointing to a capacitor that's on its last legs.
- A clicking sound: Repeated clicking from the unit could indicate the starter relay struggling due to a capacitor issue.
However, these symptoms can also be caused by other issues. Let’s go through the initial checks first:
Step 1: Basic Checks
- Check the Thermostat: Make sure it's set to "Cool" and the temperature is lower than the current room temperature. It sounds simple, but it's often the culprit.
- Check the Breaker: Go to your electrical panel and check the breaker for the AC unit. Make sure it hasn't tripped. If it has, reset it. If it trips again immediately, there's a more serious electrical problem that requires professional attention. Do not keep resetting a breaker that trips immediately!
- Check the Power Switch: Most outdoor AC units have a disconnect switch near the unit itself. Make sure it's in the "On" position.
- Air Filter: A clogged air filter can restrict airflow, causing the AC to overheat and potentially shut down. Replace the filter with a clean one.
If these basic checks don't resolve the issue, it's time to investigate the capacitor.
Safety First: Discharging the Capacitor
This step is absolutely crucial for your safety. A capacitor can hold a dangerous electrical charge even when the AC unit is turned off. Discharging it removes this risk.
YOU WILL NEED:
- Insulated Screwdriver: A screwdriver with a fully insulated handle. This is essential for protecting you from electrical shock.
- Safety Glasses: Protect your eyes from any sparks that may occur.
- Work Gloves: Insulated work gloves provide an extra layer of protection.
Step 2: Accessing the Capacitor
- Turn off the Power: Go to the electrical panel and turn off the breaker for the AC unit. Double-check that the power is off by testing the wires with a non-contact voltage tester.
- Locate the Service Panel: On the outdoor AC unit, find the access panel that covers the electrical components. It's usually held in place by screws.
- Remove the Service Panel: Carefully remove the screws and take off the panel. Be mindful of any wires attached to the panel itself.
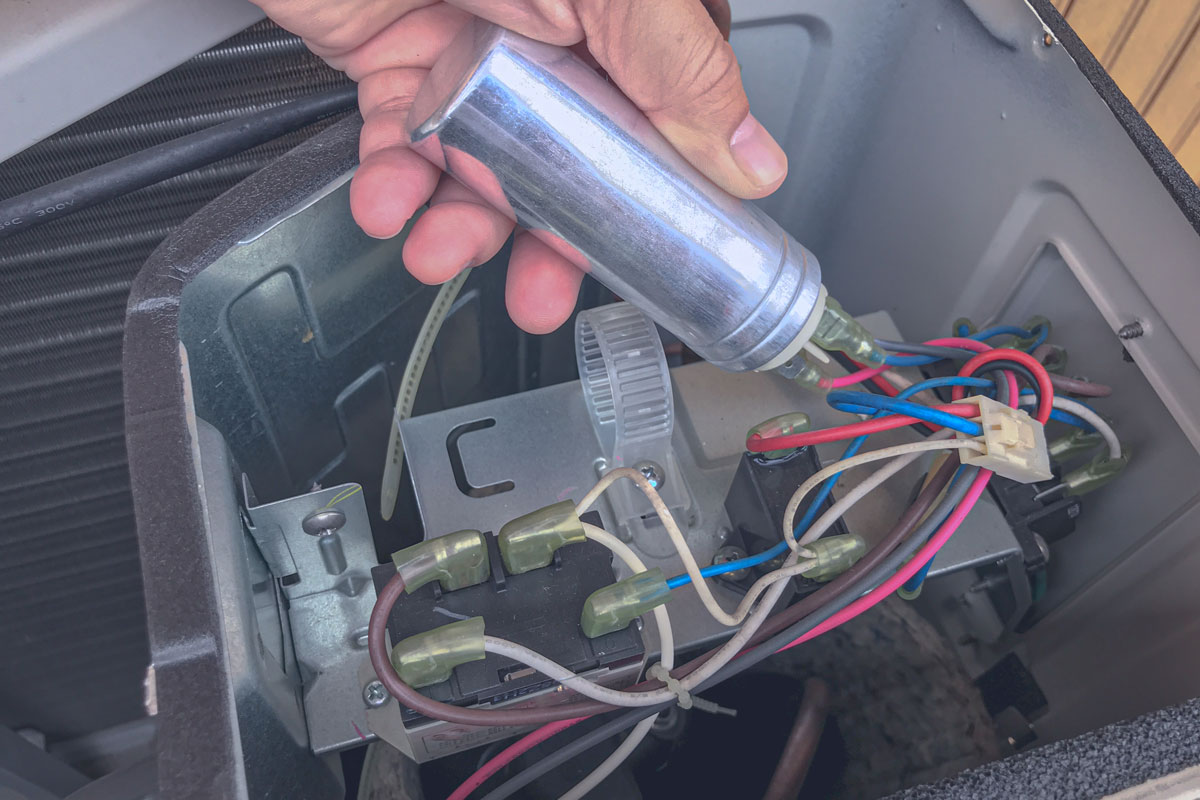
- Locate the Capacitor: The capacitor is typically a cylindrical metal object, often silver or gray, with terminals on top. There will likely be two (dual capacitor) or three (single capacitor) terminals.
Step 3: Discharging the Capacitor
This is the most important safety step. Take your time and be deliberate.
- Wear Safety Glasses and Gloves: Ensure you're wearing your safety glasses and insulated work gloves.
- Using your Insulated Screwdriver: Carefully touch the metal shaft of the insulated screwdriver to both terminals on the capacitor simultaneously. This creates a short circuit, discharging the stored energy. You might see a small spark or hear a popping sound – this is normal.
- Repeat: Repeat this process several times, touching both terminals simultaneously, to ensure the capacitor is fully discharged.
- Wait: After discharging, wait at least 5 minutes to allow any residual charge to dissipate.
Inspecting the Capacitor
Now that the capacitor is safely discharged, you can inspect it for signs of damage:
- Bulging or Swelling: A capacitor that's bulging or swelling is definitely bad and needs to be replaced.
- Leaking: Look for any signs of oil or fluid leaking from the capacitor.
- Rust or Corrosion: Check the terminals and the body of the capacitor for rust or corrosion.
If you see any of these signs, the capacitor needs to be replaced.
Replacing the Capacitor (DIY – With Caution!)
If the capacitor looks visually damaged, replacement is often the best option. However, proceed with caution. If you're not comfortable with this step, call a professional.
Step 4: Getting the Right Replacement
This is crucial. You must get a capacitor with the exact same specifications as the original.
- Note the Specifications: The capacitor will have markings on it indicating its capacitance (measured in microfarads, or µF) and voltage (measured in volts, or V). Write these down. For example, you might see "45+5 µF 370 VAC."
- Take a Photo: Take a photo of the capacitor and the wiring connected to it. This will be invaluable when you're reconnecting the new capacitor.
- Purchase a Replacement: Go to an HVAC supply store or online retailer and purchase a capacitor with the exact same capacitance and voltage ratings as the original. Using a capacitor with incorrect specifications can damage your AC unit.
Step 5: Replacing the Capacitor
- Disconnect the Wires: Before disconnecting any wires, take a clear photo of the wiring configuration. Then, carefully disconnect the wires from the terminals of the old capacitor. Use pliers if necessary, and make sure you're not pulling on the wires themselves.
- Install the New Capacitor: Connect the wires to the terminals of the new capacitor, matching the wiring configuration from the photo you took. Ensure the wires are securely attached.
- Replace the Service Panel: Carefully replace the service panel and secure it with the screws.
Step 6: Testing the AC
- Turn on the Power: Go back to the electrical panel and turn the breaker for the AC unit back on.
- Turn on the AC: Turn on your thermostat and set it to "Cool."
- Observe: Watch the AC unit to see if it starts properly. It should start smoothly and the fan should run at full speed.
If the AC starts and runs properly, congratulations! You've successfully replaced the capacitor. If it still doesn't start, or if you notice any unusual noises or smells, turn off the power immediately and call a qualified HVAC technician.
When to Call a Professional
While these steps can help you diagnose and potentially fix a capacitor issue, there are times when calling a professional is the best course of action:
- You're Not Comfortable: If you're not comfortable working with electricity, don't attempt these repairs.
- The Problem Persists: If you've replaced the capacitor and the AC still doesn't work, there's likely a more complex problem.
- Refrigerant Leaks: If you suspect a refrigerant leak (e.g., you see oily residue or hear a hissing sound), call a professional immediately. Refrigerant is harmful to the environment and requires specialized handling.
- Compressor Issues: If you suspect the compressor is the problem, call a professional. Compressor repairs are complex and require specialized tools and knowledge.
- Gas Leaks: If you have a gas-powered AC unit and suspect a gas leak, evacuate the area immediately and call your gas company and a qualified HVAC technician.
- Complex Wiring: If the wiring inside the AC unit is complex or damaged, don't attempt to repair it yourself. Call a professional electrician or HVAC technician.
Preventative Maintenance
To help prevent capacitor failure and other AC problems, consider these preventative maintenance tips:
- Regularly Replace Air Filters: A clean air filter improves airflow and reduces strain on the AC unit.
- Clean the Outdoor Unit: Remove any debris (leaves, grass clippings, etc.) from around the outdoor unit. This will help improve airflow and prevent overheating.
- Schedule Annual Maintenance: Have a qualified HVAC technician inspect and service your AC unit annually. This can help identify and address potential problems before they become major issues.
By following these troubleshooting steps and preventative maintenance tips, you can keep your air conditioner running smoothly and efficiently for years to come. Remember, safety is always the priority. When in doubt, call a professional.