How To Flare A Copper Pipe

Flaring copper pipe is a common task in plumbing and HVAC work, creating a reliable, leak-proof connection. This guide provides a comprehensive, easy-to-understand explanation of the process, empowering you to tackle flaring projects with confidence. We'll cover the necessary tools, step-by-step instructions, and important safety considerations.
Understanding Flaring: The Basics
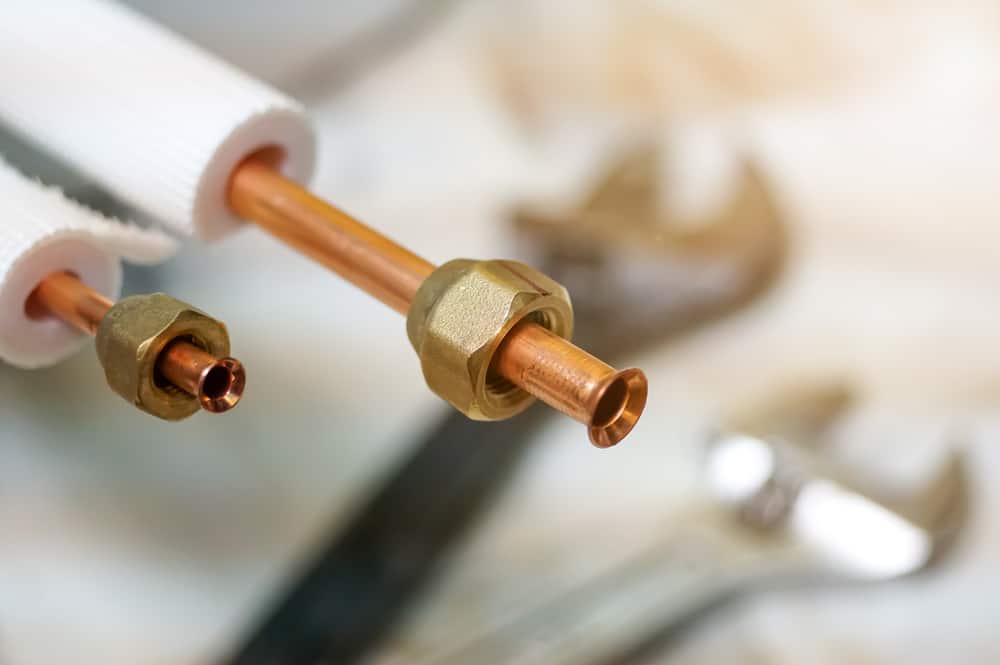
A flare is a conical expansion at the end of a copper pipe. This flared end is then mated with a corresponding fitting on another pipe or component, and a flare nut is tightened to create a secure, leak-proof seal. Think of it like a funnel that perfectly fits into another funnel, with a nut holding them tightly together.
Why use flares? They're particularly important in systems that carry liquids or gases under pressure, such as refrigerant lines in air conditioning systems. A properly made flare ensures that the connection remains airtight and leak-free even under these demanding conditions. Imagine refrigerant as the 'blood' of your AC system; you wouldn't want a leak!
Essential Tools for Flaring
Having the right tools is crucial for creating a quality flare. Here's a breakdown of what you'll need:
- Tube Cutter: Used to precisely cut the copper pipe. A clean, square cut is essential.
- Reamer (or Deburring Tool): Removes burrs and sharp edges from the inside and outside of the cut pipe. This ensures a smooth, consistent flare.
- Flaring Tool: This is the heart of the operation. It consists of a flaring bar (or yoke) and a flaring cone (or die). The bar holds the pipe securely, while the cone presses against the pipe to create the flare. There are several types of flaring tools, which we'll discuss later.
- Wrench (adjustable or flare nut wrench): Used to tighten the flare nut onto the flared connection. A flare nut wrench, also known as a crowfoot wrench, is preferred as it grips the nut on multiple sides, reducing the risk of rounding off the corners.
- Copper Tubing: Of course, you'll need the copper tubing you intend to flare. Ensure it's the correct size and type for your application.
- Deburring Tool or File: To remove burrs after cutting the copper.
- Sand Cloth or Emery Cloth: To clean the tubing and ensure a clean, smooth surface for flaring.
- Safety Glasses: Protect your eyes from debris.
Types of Flaring Tools
Several types of flaring tools are available, each with its own advantages. Understanding the differences will help you choose the right tool for your needs.
- Standard Flaring Tool: This is the most common type, consisting of a flaring bar and a cone that is manually advanced. It's a good all-around choice for occasional use.
- Eccentric Flaring Tool: This type uses an eccentric cone that rotates as it presses against the pipe. This creates a smoother, more uniform flare with less risk of cracking or work hardening the copper. It's a step up from the standard tool and often preferred by professionals. The eccentric motion essentially burnishes the flare, creating a smoother, more reliable surface.
- Hydraulic Flaring Tool: This tool uses hydraulic pressure to create the flare. It requires less manual effort and is ideal for making a large number of flares or working with larger diameter tubing. It's generally the most expensive option.
- Lever Type Flaring Tool: This tool use a lever to operate the flaring cone, these are ideal to create 45 degree flares.
For beginners, a standard flaring tool or an eccentric flaring tool is a good starting point. The eccentric flaring tool will generally produce better results and is worth the investment if you plan to do a significant amount of flaring.
Step-by-Step Guide to Flaring Copper Pipe
Here's a detailed breakdown of the flaring process:
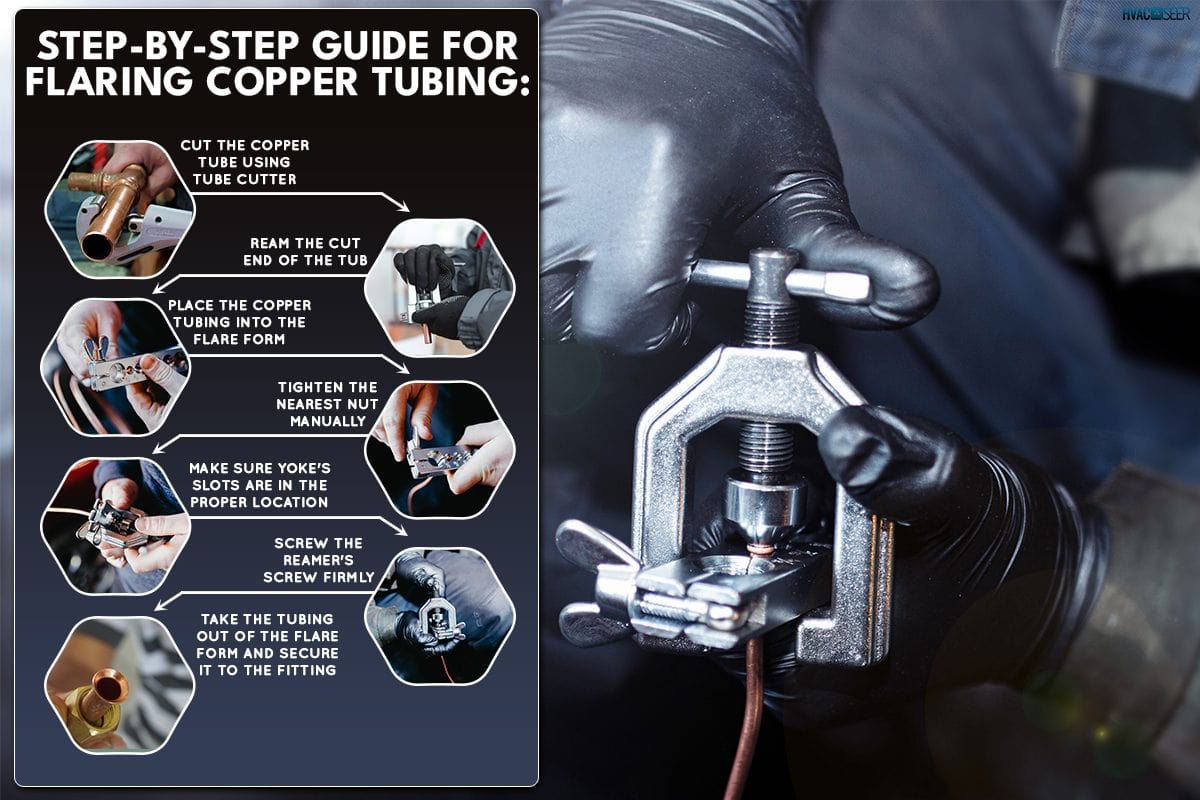
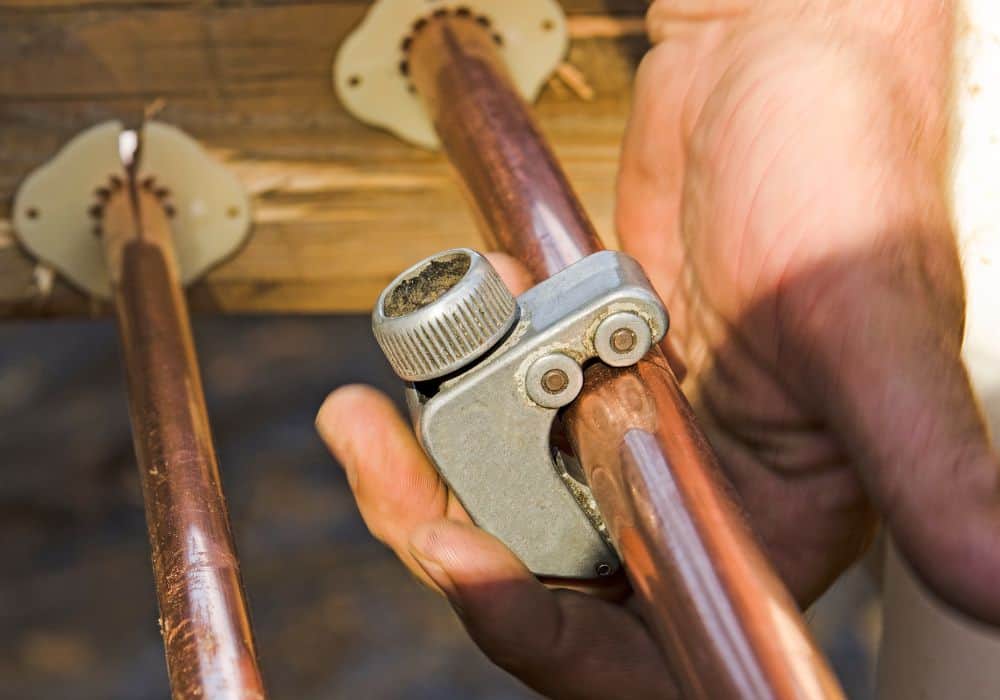
Step 1: Cutting the Copper Pipe
Use a tube cutter to cut the copper pipe to the desired length. Rotate the cutter around the pipe, tightening the cutting wheel slightly with each rotation. Avoid over-tightening, as this can deform the pipe. The goal is a clean, square cut without any burrs or distortions.
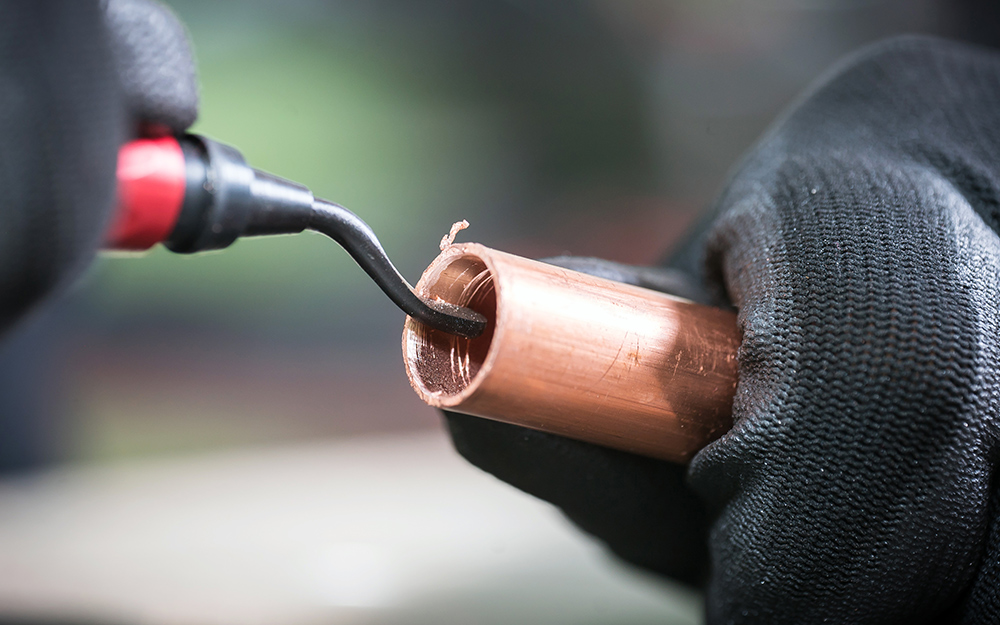
Step 2: Reaming and Deburring
This is a critical step. Use a reamer or deburring tool to remove any burrs or sharp edges from both the inside and outside of the cut pipe. Burrs can prevent the flare from seating properly and can create leaks. Ensure the inside and outside edges are smooth and slightly beveled. Think of it like sanding wood before painting; a smooth surface is essential for a good finish.
Step 3: Cleaning the Pipe
Use sand cloth or emery cloth to clean the outside of the pipe end that will be flared. Remove any oxidation, dirt, or grease. A clean surface will ensure a good, tight seal.
Step 4: Installing the Flare Nut
Slide the flare nut onto the copper pipe before flaring. This is a step that's easy to forget, and it's impossible to install the nut after the flare is made. Make sure the nut is oriented correctly, with the threads facing the end of the pipe that will be flared. It's like putting on your shoes before your socks; it just won't work the other way around!
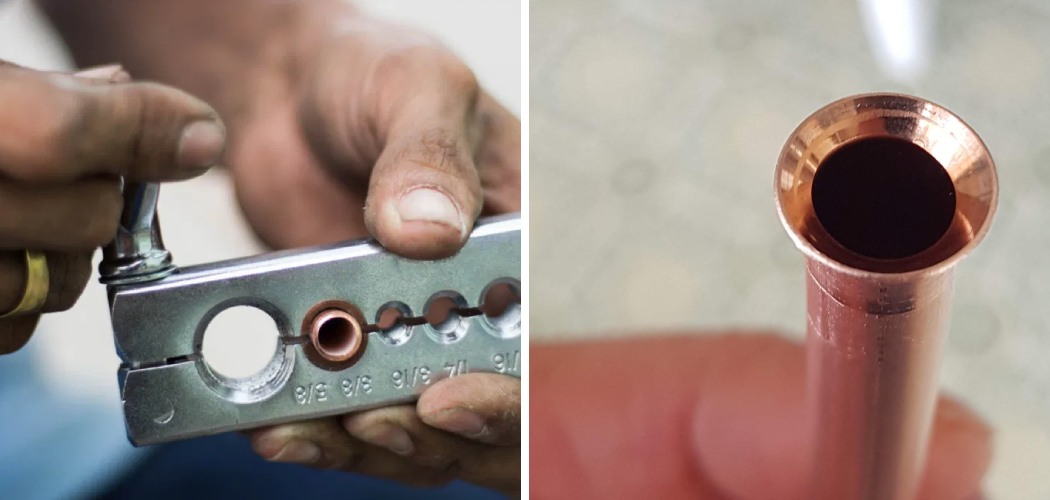
Step 5: Setting Up the Flaring Tool
Select the correct size opening in the flaring bar that matches the diameter of your copper pipe. Place the pipe into the opening, ensuring that the end of the pipe extends slightly above the top of the bar. The amount of extension is crucial; too little, and the flare will be too small; too much, and the flare will be too large or crack. The flaring tool instructions should provide guidance on the correct extension height. Generally, a very slight extension (about the thickness of a fingernail) is recommended.
Tighten the flaring bar securely to hold the pipe in place. Make sure the pipe is centered in the opening.
Step 6: Creating the Flare
Position the flaring cone over the end of the pipe. If using a standard flaring tool, center the cone and tighten the handle gradually, applying even pressure. If using an eccentric flaring tool, rotate the cone as you tighten it, following the tool's instructions.
Avoid over-tightening the cone, as this can damage the flare or the tool. The goal is to create a smooth, even flare that is consistent with the angle of the flaring tool.
Step 7: Inspecting the Flare
Carefully remove the flared pipe from the flaring tool. Inspect the flare for any cracks, imperfections, or unevenness. The flare should be smooth, uniform, and free of any defects. A good flare will have a consistent, polished look.
If you see any cracks or imperfections, discard the flared end and repeat the process from the beginning with a new section of pipe. It's better to start over than to risk a leak with a faulty flare.
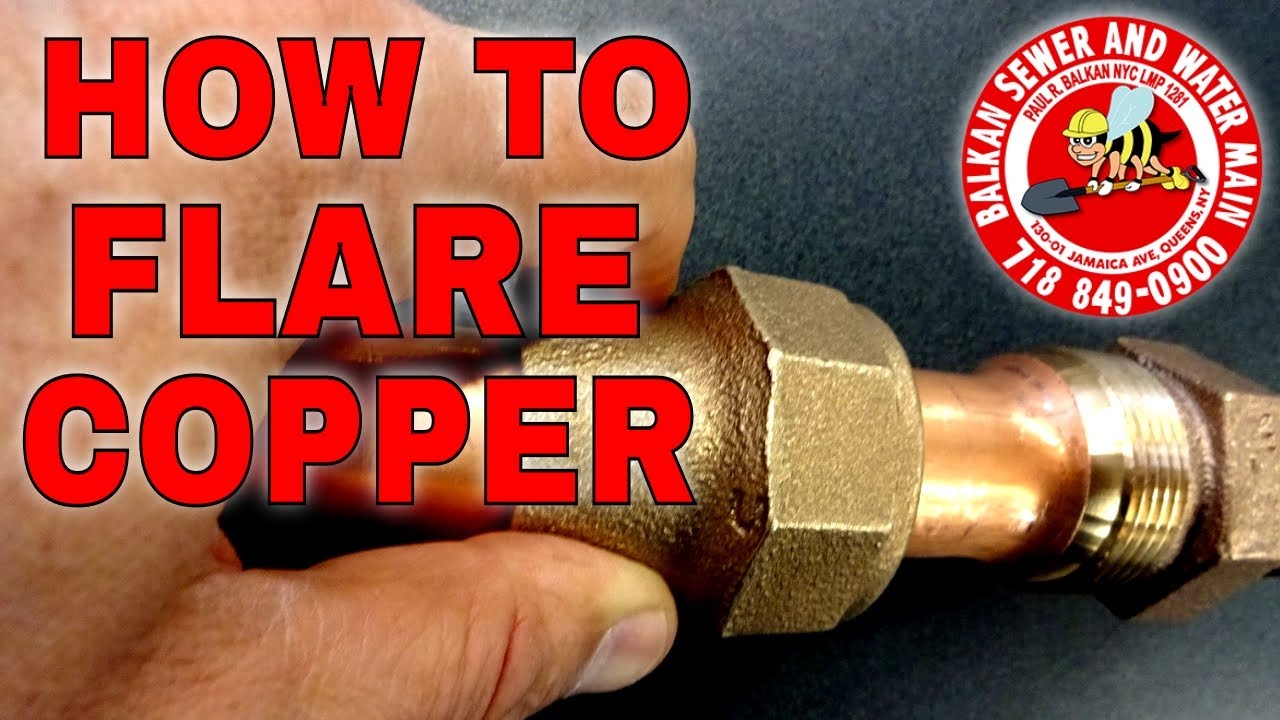
Step 8: Connecting the Flare
Carefully align the flared end of the pipe with the corresponding fitting. Ensure that the flare seats properly against the fitting's surface. Hand-tighten the flare nut to secure the connection.
Step 9: Tightening the Flare Nut
Use a wrench (preferably a flare nut wrench) to tighten the flare nut. Avoid over-tightening, as this can damage the flare or the fitting. Tighten the nut until it is snug and secure, but not excessively tight. The "feel" for proper tightness comes with experience, but a good starting point is to tighten until you feel resistance, then tighten another quarter turn.
Important Considerations and Tips
- Practice Makes Perfect: Before working on a critical system, practice flaring on scrap pieces of copper pipe. This will help you develop the "feel" for the process and avoid mistakes.
- Proper Tool Maintenance: Keep your flaring tools clean and well-maintained. Lubricate moving parts as needed to ensure smooth operation.
- Copper Type Matters: Use the correct type of copper tubing for your application. Different types of copper have different properties and are designed for different uses.
- Don't Rush: Take your time and pay attention to detail. Flaring is a process that requires precision and care.
- Avoid Cross-Threading: Be extremely careful not to cross-thread the flare nut when tightening it. Cross-threading can damage the threads and create a leak.
- Leak Testing: After making a flared connection, it's always a good idea to test for leaks. You can use a leak detection solution or soapy water to check for bubbles around the connection.
- Work Hardening: Excessive force or repeated bending of the copper can cause it to work harden, making it brittle and prone to cracking. Avoid overworking the copper.
Safety Precautions
Safety should always be your top priority when working with tools and materials. Here are some important safety precautions to keep in mind:
- Wear Safety Glasses: Protect your eyes from flying debris.
- Wear Gloves: Protect your hands from sharp edges and burrs.
- Work in a Well-Ventilated Area: If working with materials that produce fumes or vapors, work in a well-ventilated area to avoid inhalation.
- Follow Manufacturer's Instructions: Always follow the manufacturer's instructions for the tools and materials you are using.
- Disconnect Power: If working on electrical systems, disconnect the power before starting any work.
Troubleshooting Common Flaring Problems
Even with careful attention to detail, problems can sometimes arise during the flaring process. Here are some common problems and their solutions:
- Cracked Flare: This is often caused by over-tightening the flaring cone or using a dull or damaged flaring tool. Use a sharp flaring tool, avoid over-tightening, and ensure the copper is properly deburred.
- Uneven Flare: This can be caused by an improperly aligned flaring tool or uneven pressure. Ensure the flaring tool is properly aligned and apply even pressure when tightening the cone.
- Flare Too Small: This is usually caused by not extending the pipe far enough above the flaring bar. Adjust the pipe extension according to the flaring tool's instructions.
- Flare Too Large: This is usually caused by extending the pipe too far above the flaring bar. Adjust the pipe extension according to the flaring tool's instructions.
- Leaking Connection: This can be caused by a faulty flare, a loose flare nut, or damaged threads. Inspect the flare for imperfections, tighten the flare nut properly, and ensure the threads are not damaged. If the connection still leaks, disassemble and inspect all components, and consider re-flaring the pipe.
By following these guidelines, you can successfully flare copper pipe and create reliable, leak-proof connections. Remember to practice, take your time, and always prioritize safety. Good luck!