How To Hook Up A Thermostat To A Furnace
Is your home feeling more like an icebox than a cozy haven? Or maybe your AC is blasting but the temperature isn't budging? One of the most common frustrations homeowners face is a malfunctioning thermostat. Often, the issue stems from incorrect or faulty wiring between the thermostat and the furnace. This article will guide you through troubleshooting and, if possible, safely fixing the connection.
Diagnosing the Disconnect: Is it the Thermostat?
Before you dive into the wiring, let's confirm that the problem is indeed thermostat-related. Here’s a methodical way to figure it out:
Step 1: The Obvious Checks (No Tools Needed!)
Start with the basics; you'd be surprised how often these simple checks solve the problem.
- Power Supply: Is the thermostat screen blank? If so, check if it's battery-powered. Replace the batteries with fresh ones. For hardwired thermostats, check the breaker box for a tripped breaker labeled "Furnace," "HVAC," or something similar. Reset the breaker.
- Thermostat Settings: Is the thermostat set to "Heat" or "Cool" and at a temperature that's actually *higher* (for heat) or *lower* (for cooling) than the current room temperature? It sounds silly, but double-check! Also, ensure it’s not in “Fan Only” mode.
- Air Filter: A clogged air filter can restrict airflow, causing the furnace to overheat and shut down prematurely. Check your air filter. If it's dirty, replace it.
Step 2: Basic Thermostat Functionality Tests (Still No Tools!)
These tests help determine if the thermostat is communicating *at all* with the furnace.
- Fan Test: Set the thermostat to "Fan On" mode. The blower fan in your furnace should start running continuously. If it doesn't, the problem might be deeper than just thermostat settings.
- Temperature Adjustment Test: Set the thermostat to call for heat (or cool) and listen carefully near the furnace. You should hear a faint click from the thermostat itself (indicating it's sending a signal) and, after a short delay, the furnace igniting (for heat) or the compressor kicking on (for cooling). If you hear the click but *no action* from the furnace, that points to a wiring or furnace issue.
Step 3: Time for a Closer Look: What You’ll Need
If the basic tests haven’t revealed the problem, it’s time to investigate the wiring. Before you proceed, ALWAYS turn off the power to the furnace at the breaker box! Safety first! You will need:
- Screwdriver: A small, insulated screwdriver (both Phillips head and flathead) will be necessary to remove the thermostat cover and loosen wiring screws.
- Flashlight or Headlamp: Good lighting is essential for seeing the wiring clearly.
- Multimeter (Optional but Recommended): A multimeter can be used to test the voltage and continuity of the wires. This is especially helpful for diagnosing broken wires or short circuits.
- Camera or Phone: Take a picture of the existing wiring *before* you disconnect anything. This is crucial for reassembling it correctly.
Checking the Wiring: A Step-by-Step Guide
Now, let's get down to the nitty-gritty of checking the thermostat wiring.
Step 1: Thermostat Inspection
- Power Off: Confirm the power to the furnace is OFF at the breaker box!
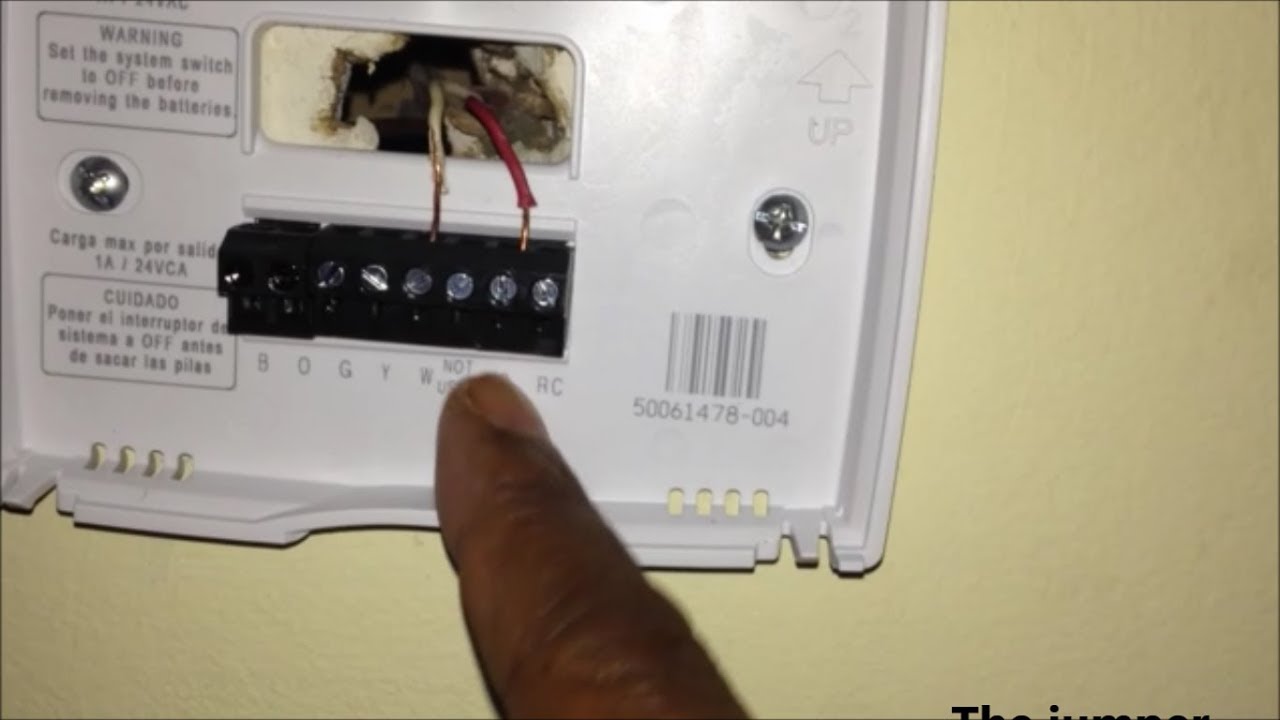
- Remove the Thermostat Cover: Most thermostats have a cover that can be gently pried off or unscrewed. Refer to your thermostat's manual if you're unsure.
- Photograph the Wiring: Before touching anything, take a clear picture of the wiring. This is your safety net!
- Inspect the Wires: Look for obvious signs of damage: frayed wires, corroded connections, loose screws, or wires that have come completely detached.
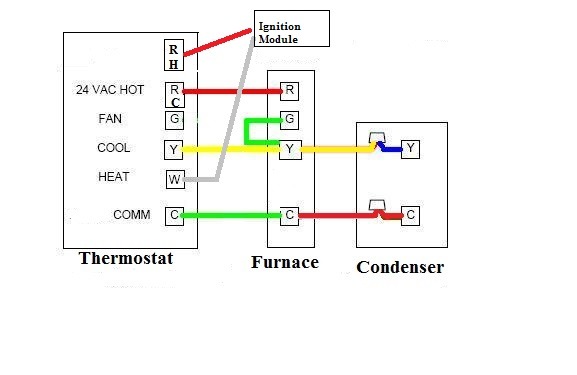
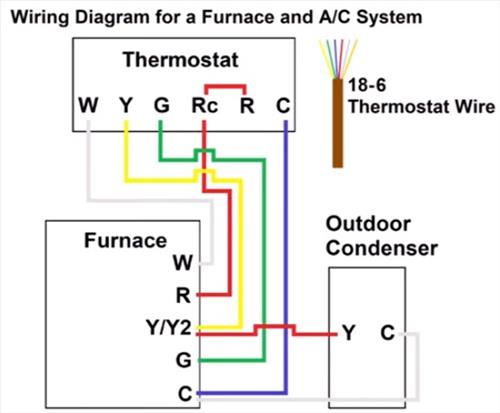
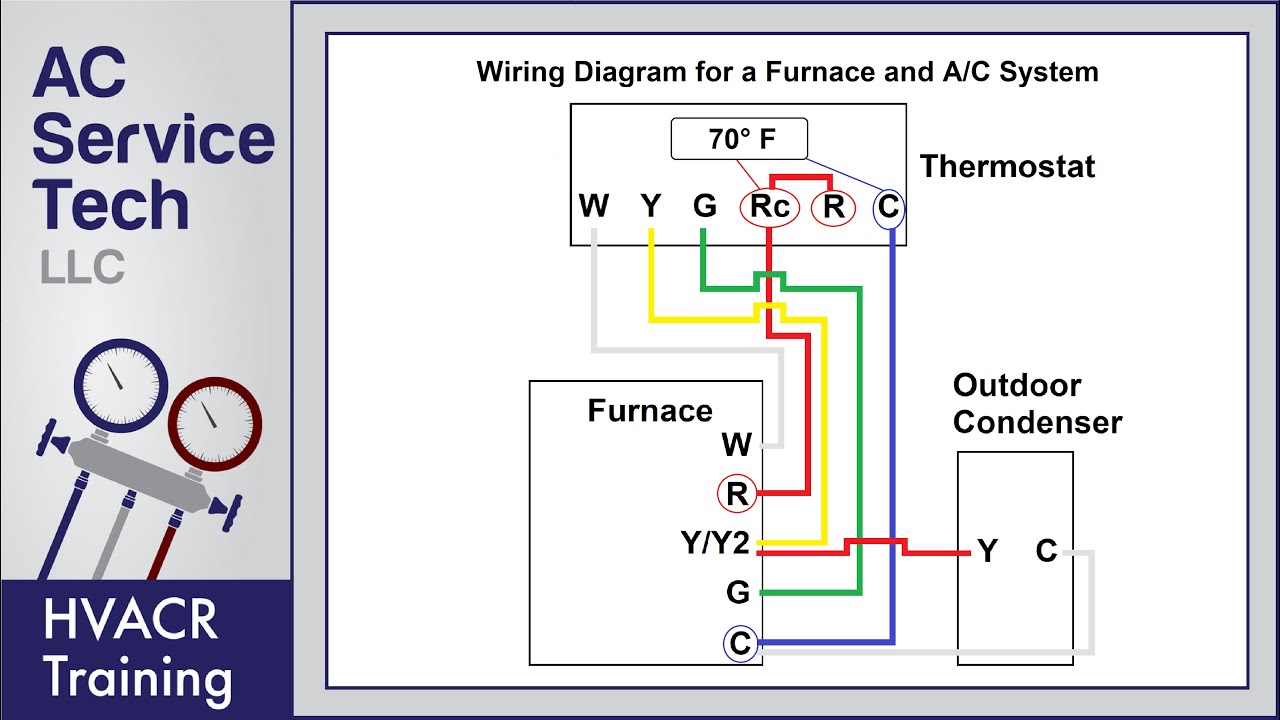
- Wire Color Consistency: Check if the wire colors match the terminals they're connected to. Standard wiring color codes are common, but not always followed. If the colors are wildly inconsistent, it could indicate a previous wiring error.
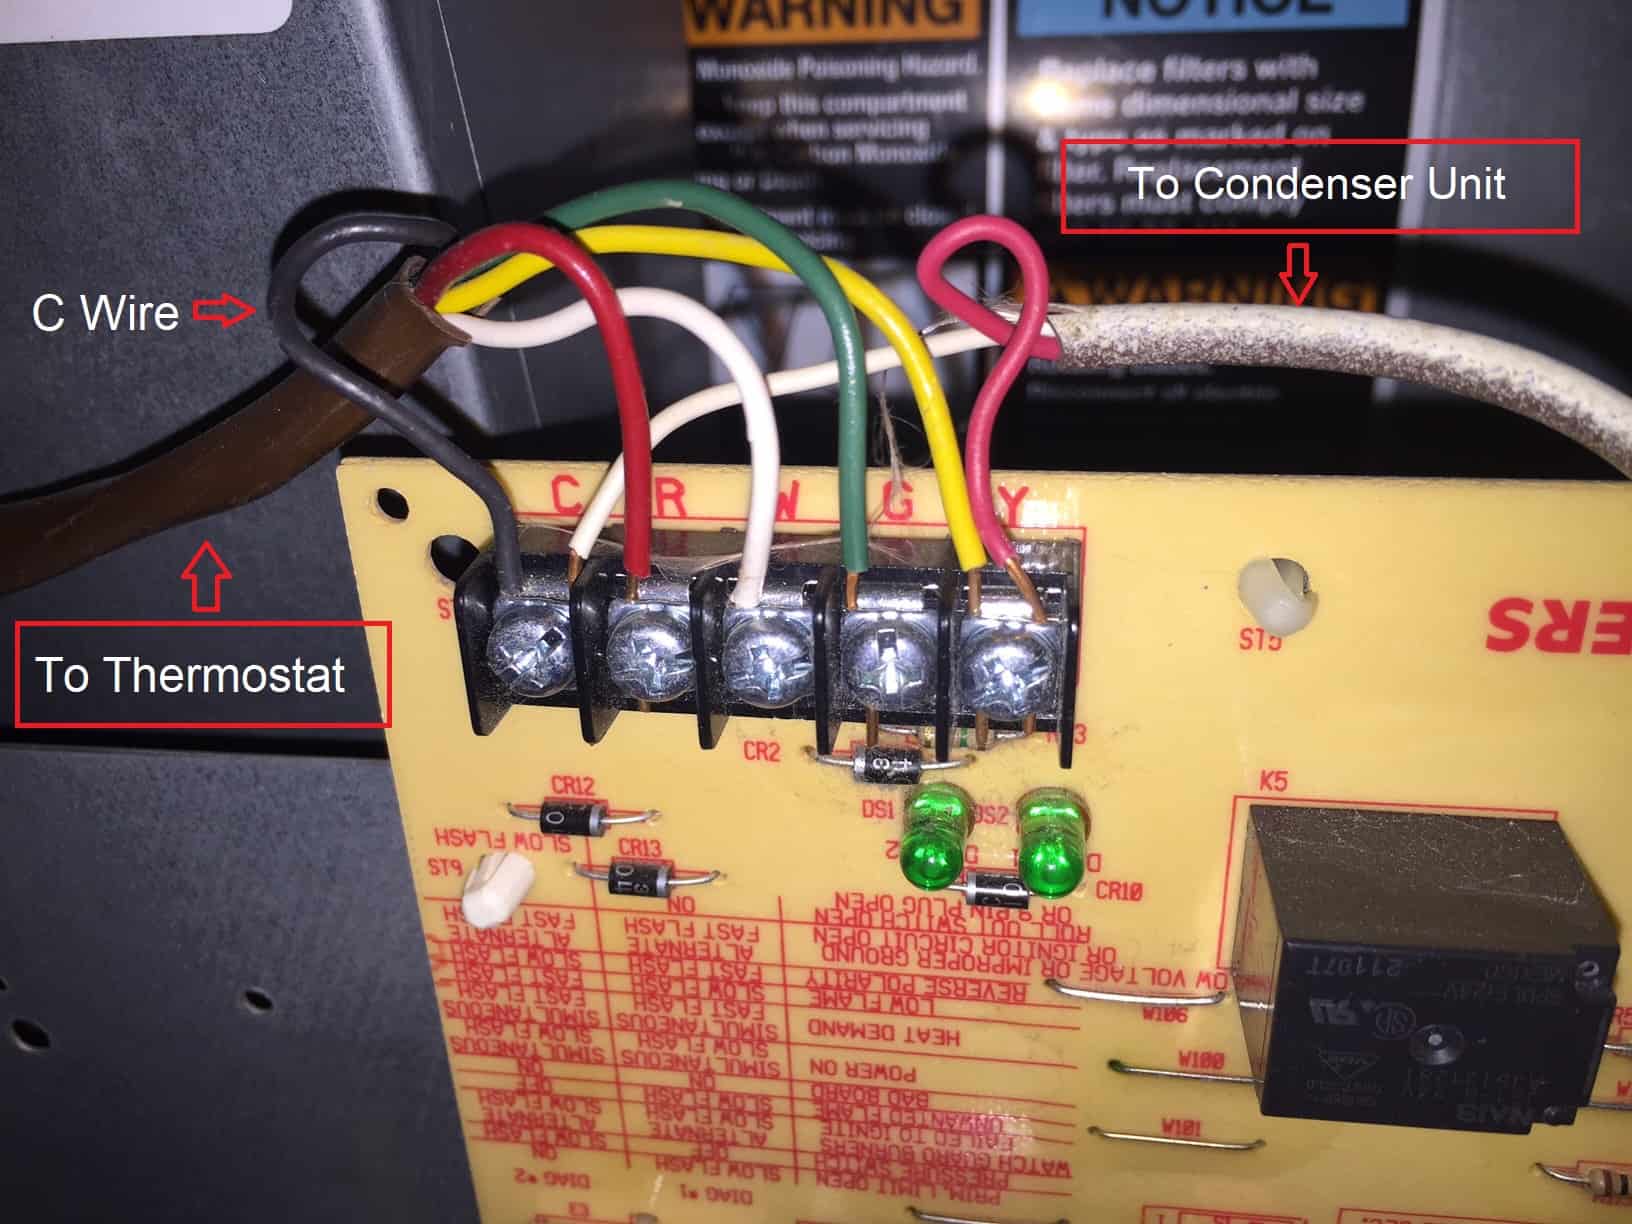
Step 2: Furnace Control Board Inspection
The thermostat wires run to a control board inside your furnace. This board is usually located behind an access panel.
- Power Off: Double-check that the power is OFF at the breaker box!
- Remove the Furnace Access Panel: The panel is usually held in place by screws or clips.
- Locate the Control Board: The control board is a small circuit board with labeled terminals.
- Inspect the Wiring: Compare the wiring on the furnace control board to your thermostat wiring picture. Are the wire colors connected to the corresponding terminals? Look for loose connections, frayed wires, or corrosion.
DIY Actions: Simple Fixes You Can Try
If you've identified a simple wiring issue, you might be able to fix it yourself.
- Loose Wires: If a wire is loose, carefully tighten the screw holding it in place. Make sure the wire is making good contact with the terminal.
- Corroded Connections: If the connections are corroded, gently clean them with a small wire brush or emery cloth. Be careful not to damage the wires or terminals.
- Reconnecting Detached Wires: If a wire has come completely detached, refer to your wiring picture and reconnect it to the correct terminal. Ensure the wire is securely fastened.
- Wire Color Correction: If you find wires connected to the wrong terminals based on common conventions (and your "before" picture allows), carefully switch them to the correct terminals. For example, red wire to "R," white wire to "W," etc.
Tools in Action: Using a Multimeter (Advanced)
A multimeter can help you pinpoint more subtle wiring problems, but this requires some basic electrical knowledge.
- Testing for Voltage: Set your multimeter to the AC voltage setting. Carefully touch the probes to the "R" (power) and "C" (common) terminals on the thermostat. You should read approximately 24 volts AC. If you don't, there's a problem with the power supply to the thermostat.
- Testing for Continuity: Set your multimeter to the continuity setting. Disconnect the wires from the thermostat terminals. Touch the probes to the ends of each wire. The multimeter should beep, indicating a continuous connection. If it doesn't beep, the wire is broken somewhere along its length.
When to Call a Professional: Knowing Your Limits
While some thermostat wiring issues are simple to fix, others are best left to the professionals. Here are some situations where you should call an HVAC technician:
- You're Uncomfortable Working with Electricity: If you're not comfortable working with electrical wiring, don't risk it. It's better to be safe than sorry.
- You Suspect a Deeper Problem: If you've checked the wiring and the thermostat still isn't working, the problem might be with the furnace itself. Don't attempt to repair the furnace yourself.
- You're Not Sure What You're Doing: If you're unsure about any of the steps outlined in this article, or if you're not comfortable diagnosing the problem, call a professional.
- Your Furnace is Old or Has Existing Issues: If your furnace is old or has a history of problems, it's best to have a professional inspect it.
- You Discover Burned or Melted Wires: Burned or melted wires indicate a serious electrical problem that requires immediate attention. Do not attempt to fix this yourself.
- You Find Signs of Rodent Damage: Rodents can chew through wires, creating dangerous electrical hazards.
Final Steps: Reassembly and Testing
After making any repairs, follow these steps to reassemble and test your thermostat:
- Reconnect the Wires: Carefully reconnect the wires to the thermostat terminals, referring to your wiring picture.
- Replace the Thermostat Cover: Replace the thermostat cover.
- Restore Power: Turn the power back on to the furnace at the breaker box.
- Test the Thermostat: Set the thermostat to call for heat or cool and see if the furnace starts up.
- Monitor Performance: Monitor the temperature in your home to ensure the thermostat is working correctly.
By following these steps, you can troubleshoot and potentially fix common thermostat wiring issues. Remember to prioritize safety and call a professional when needed. A properly functioning thermostat is essential for maintaining a comfortable and energy-efficient home.