How To Install A Grease Trap
Dealing with a slow or clogged drain in your kitchen? You might be facing a grease buildup issue. Grease traps, also called grease interceptors, are designed to prevent fats, oils, and grease (FOG) from entering your plumbing system and potentially causing major backups. While professional installation is always recommended, some homeowners comfortable with plumbing can handle a grease trap installation. This guide provides a step-by-step approach, but remember to assess your skill level and local regulations before attempting this project. If you are uncomfortable with any of the steps, call a licensed plumber. Improper installation can lead to leaks and costly repairs.
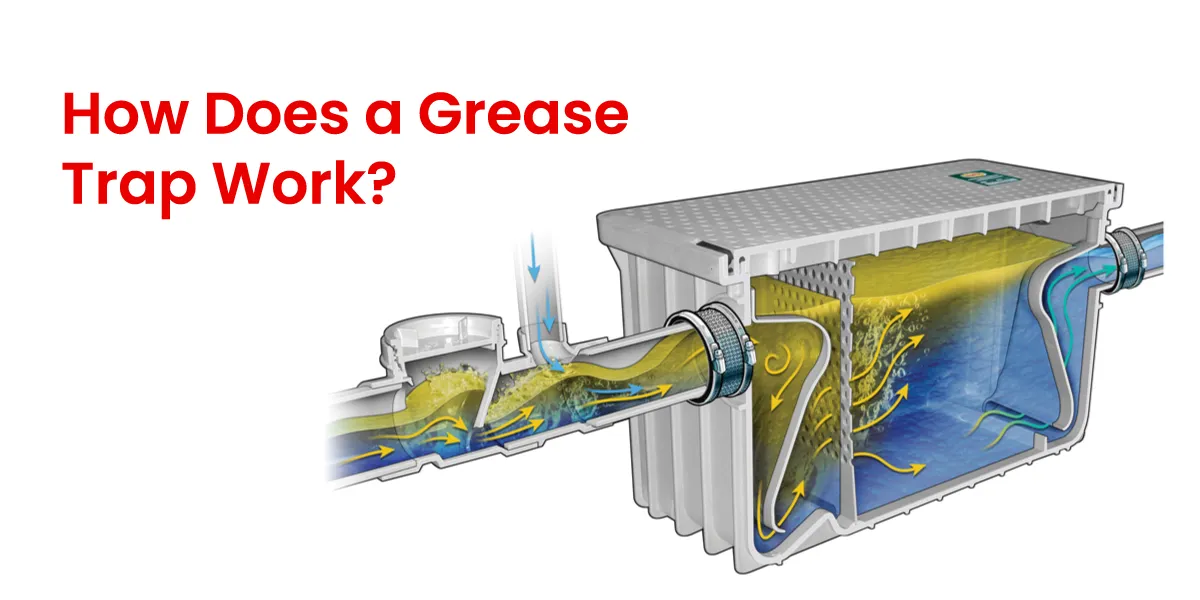
Understanding Grease Traps
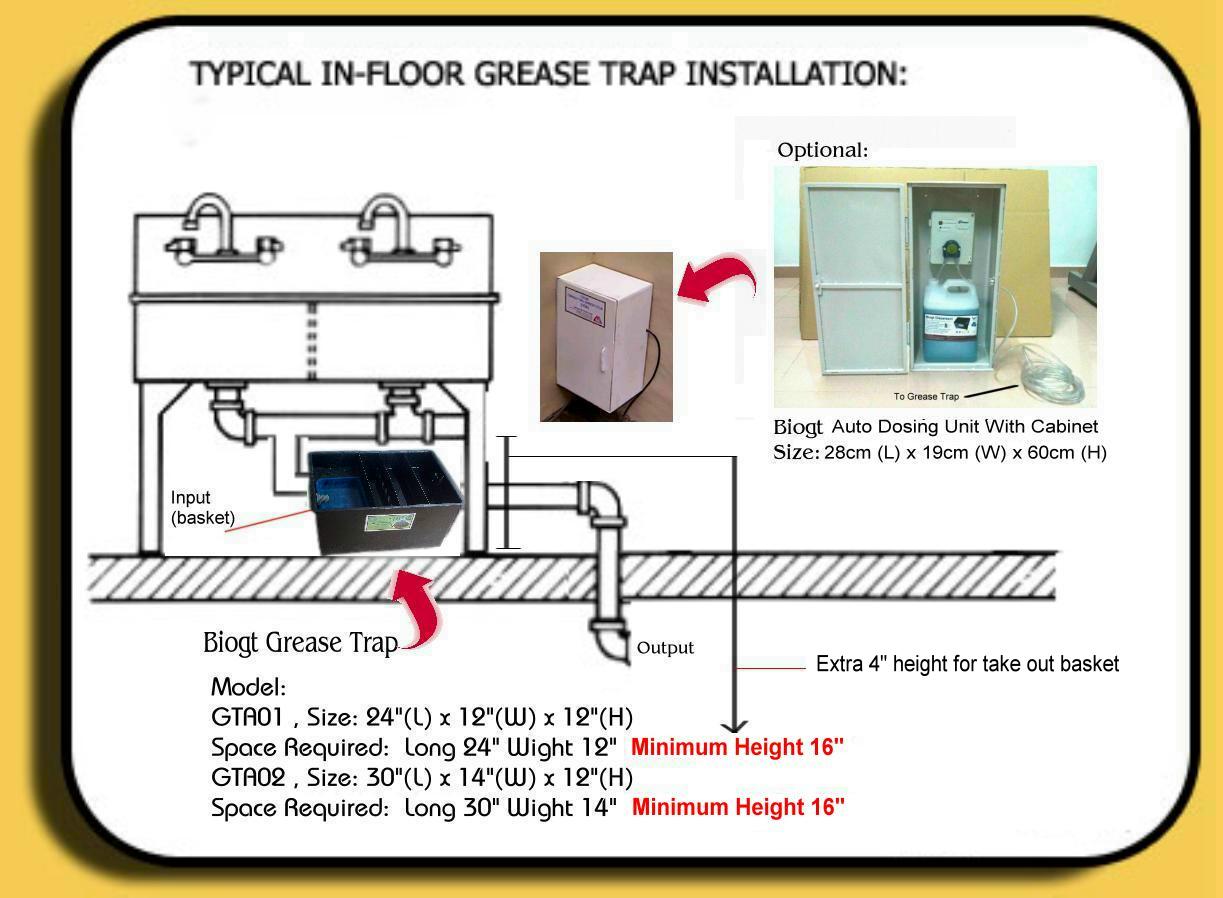
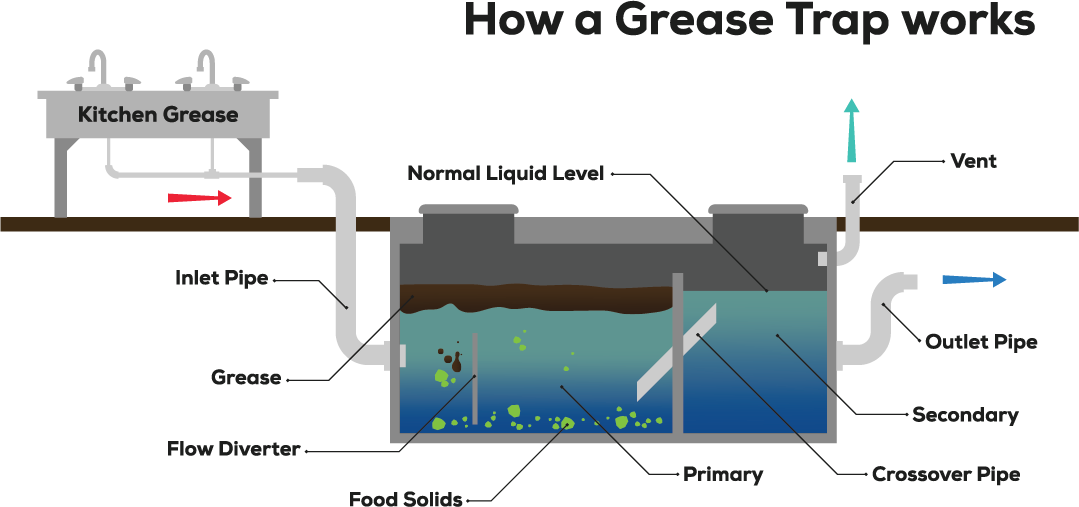
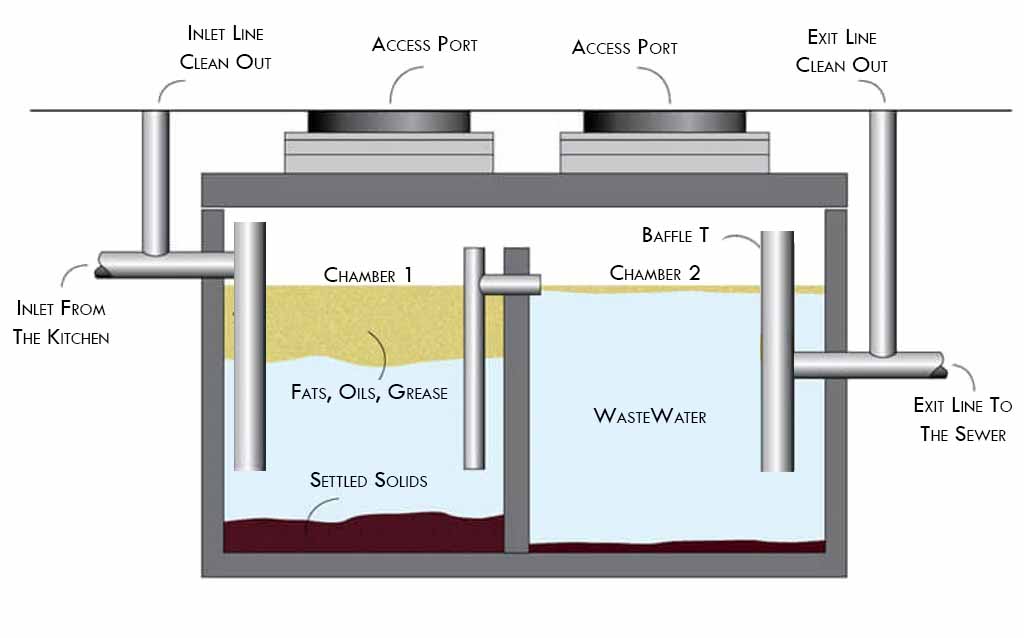
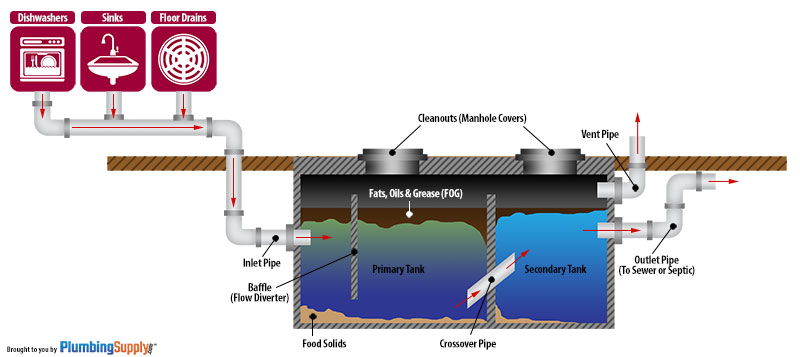
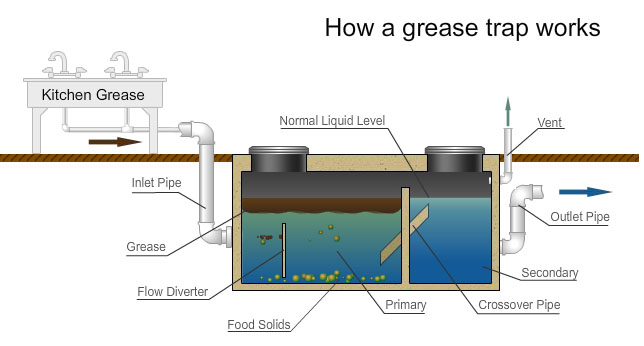
Grease traps work by slowing down the flow of wastewater, allowing the FOG to cool and separate. The grease floats to the top, while the cleaner water flows out of the trap and into the drain. There are different types of grease traps, including under-sink models suitable for residential use and larger in-ground models for commercial applications. This guide focuses on the installation of a typical under-sink grease trap. Before you start, familiarize yourself with the manufacturer's instructions for your specific model.
Before You Begin: Planning and Preparation
Proper planning is crucial for a successful installation. This includes checking local codes and regulations, gathering the necessary tools and materials, and preparing the workspace. Ignoring this step could lead to costly mistakes, code violations, and system failures.
1. Check Local Codes and Regulations
Many municipalities have specific regulations regarding the installation of grease traps. Contact your local building department or plumbing inspector to determine if permits are required and what the specific code requirements are. Failure to comply with local codes can result in fines and the need to redo the installation.
2. Gather Your Tools and Materials
Having the right tools and materials on hand will make the installation process much smoother. Here’s a list of what you’ll likely need:
- Grease trap kit (including the trap itself, inlet/outlet fittings, and any necessary mounting hardware)
- Adjustable wrench
- Pipe wrench
- Pliers
- Screwdrivers (Phillips and flathead)
- Measuring tape
- PVC pipe cutter (or hacksaw)
- PVC primer and cement
- Plumber's putty or Teflon tape
- Level
- Bucket
- Gloves
- Safety glasses
- Clean rags
3. Prepare the Workspace
Clear the area under your sink. Remove any items that might be in the way. Protect the floor with a drop cloth to catch any spills. Shut off the water supply to the sink. This can usually be done using the shut-off valves located under the sink. Place a bucket under the drain lines to catch any remaining water.
Step-by-Step Grease Trap Installation
With your planning and preparation complete, you can now move on to the installation itself. Follow these steps carefully to ensure a proper and leak-free installation.
1. Disconnect the Existing Drain Lines
Using your adjustable wrench and pipe wrench, carefully disconnect the existing drain lines from the sink drain and the drain pipe in the wall. Be prepared for some water to spill out, even if you've shut off the water supply. Have your bucket and rags ready to catch any drips. Inspect the existing pipes for any signs of corrosion or damage. If necessary, replace them before proceeding.
2. Measure and Cut the PVC Pipes
Measure the distance between the sink drain outlet and the grease trap inlet, and between the grease trap outlet and the drain pipe in the wall. Cut the PVC pipes to the appropriate lengths using a PVC pipe cutter or a hacksaw. Ensure the cuts are clean and straight. Deburr the cut ends of the pipes to prevent any restrictions in flow.
3. Connect the Inlet and Outlet Fittings to the Grease Trap
Apply plumber's putty or Teflon tape to the threads of the inlet and outlet fittings. Screw the fittings into the corresponding ports on the grease trap. Tighten the fittings securely, but be careful not to overtighten and damage the plastic. Refer to the manufacturer’s instructions for the correct torque specifications, if available.
4. Assemble the Drain Lines
Dry-fit the PVC pipes to the grease trap and the existing drain lines to ensure a proper fit. Mark the areas where the pipes will connect. Apply PVC primer to the outside of the pipes and the inside of the fittings. Then, apply PVC cement to the same areas. Quickly connect the pipes and fittings, holding them firmly in place for a few seconds to allow the cement to set. Repeat this process for all the drain line connections.
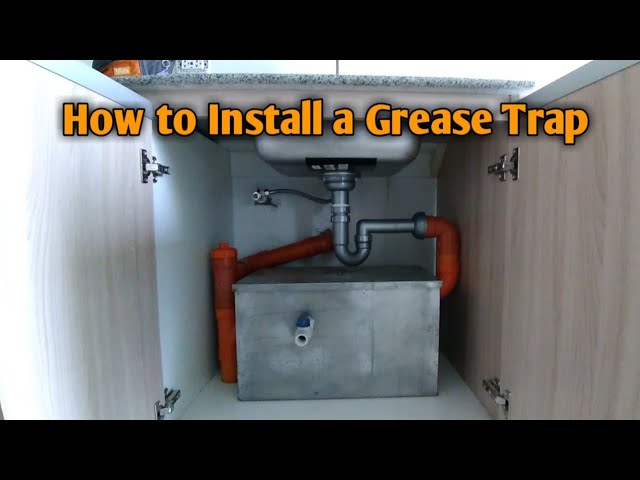
5. Mount the Grease Trap
Most under-sink grease traps are designed to sit on the cabinet floor. Ensure the floor is level. Use shims if necessary to level the trap. Some models may have mounting brackets for securing the trap to the cabinet wall. If so, install the brackets according to the manufacturer's instructions. Make sure the trap is securely mounted to prevent movement and potential leaks.
6. Reconnect the Drain Lines
Carefully reconnect the drain lines to the sink drain and the drain pipe in the wall. Tighten all connections securely. Double-check that all fittings are properly aligned and that there are no gaps or leaks.
7. Test for Leaks
Turn the water supply back on slowly. Carefully inspect all the connections for leaks. If you find any leaks, tighten the connections or disassemble and reassemble the joints with fresh plumber's putty or Teflon tape and PVC cement. Run water through the sink for several minutes to ensure the grease trap is functioning properly and that there are no hidden leaks.
Common Issues and Troubleshooting
Even with careful installation, some issues can arise. Here are a few common problems and how to address them:
- Leaks: The most common issue. Retighten connections. If the leak persists, disassemble the joint, clean the surfaces, and reapply plumber's putty or Teflon tape and PVC cement.
- Slow Drainage: Could be due to an obstruction in the drain lines or the grease trap itself. Check for clogs and remove any debris. Regularly clean the grease trap to prevent buildup.
- Foul Odors: Indicates a buildup of grease and bacteria. Clean the grease trap more frequently. Consider using a grease trap treatment to help break down the FOG.
- Grease Trap Overflow: Means the trap is full and needs to be emptied. Establish a regular cleaning schedule to prevent overflows.
Maintenance and Cleaning
Regular maintenance is essential for the proper functioning of your grease trap. The frequency of cleaning will depend on the amount of grease entering the trap. A good rule of thumb is to clean it every one to three months. To clean the grease trap, carefully remove the lid and scoop out the accumulated grease. Dispose of the grease properly according to local regulations. Do not pour it down the drain. After removing the grease, clean the inside of the trap with warm, soapy water. Rinse thoroughly and replace the lid. Using enzyme-based grease trap treatments can help break down FOG and reduce the frequency of cleaning.
When to Call a Professional
While some homeowners can successfully install a grease trap, there are situations where it’s best to call a licensed plumber. Consider calling a professional if:
- You are uncomfortable with plumbing work.
- You encounter complex plumbing configurations.
- You need to modify existing plumbing lines.
- You are unsure about local codes and regulations.
- You experience persistent leaks or other issues after installation.
Attempting to perform complex plumbing work without the necessary skills and knowledge can lead to costly mistakes and even safety hazards. It’s always better to err on the side of caution and seek professional assistance when needed.
Estimated Repair Costs
While DIY installation can save money, professional installation costs vary depending on location, complexity, and the plumber's hourly rate. Here's a rough estimate:
- Grease Trap (Material Cost): $50 - $200 (depending on size and type)
- Professional Installation Labor: $150 - $500 (or more for complex installations)
- Total Cost (Professional Installation): $200 - $700+
These are just estimates. Always get multiple quotes from qualified plumbers in your area before making a decision. Remember that the cheapest option isn't always the best. Choose a plumber with a good reputation and experience.
HVAC Considerations
While grease traps are primarily related to plumbing, their proper function can indirectly impact your HVAC system. For example, a clogged drain line due to grease buildup can lead to backups and moisture problems. Excessive moisture can create a breeding ground for mold and mildew, which can then be circulated throughout your home by your HVAC system. This can lead to poor indoor air quality and potentially exacerbate respiratory problems. Therefore, maintaining your plumbing system, including your grease trap, is an important part of ensuring a healthy and comfortable home environment. While seemingly unrelated, a properly functioning plumbing system can contribute to optimal HVAC performance and overall indoor air quality.
Safety First: Always prioritize safety when working with plumbing. Wear safety glasses and gloves to protect yourself from chemicals and debris. Turn off the water supply before disconnecting any drain lines. If you are unsure about any step of the installation process, consult a professional.
Installing a grease trap is a project that can save you money and prevent plumbing problems in the long run. By following these steps and taking the necessary precautions, you can potentially handle the installation yourself. However, remember to assess your skill level and local regulations before attempting this project. If you are uncomfortable with any of the steps, call a licensed plumber. A professional installation will ensure that your grease trap is functioning properly and safely, giving you peace of mind.