How To Install A Mini Split In Garage

Installing a mini-split system in your garage can be a fantastic way to maintain a comfortable temperature year-round, whether you're working on projects, storing temperature-sensitive items, or simply want a more usable space. This guide will walk you through the process, helping you understand the steps involved and make an informed decision about whether to tackle this project yourself or hire a professional.
Understanding Mini-Split Systems
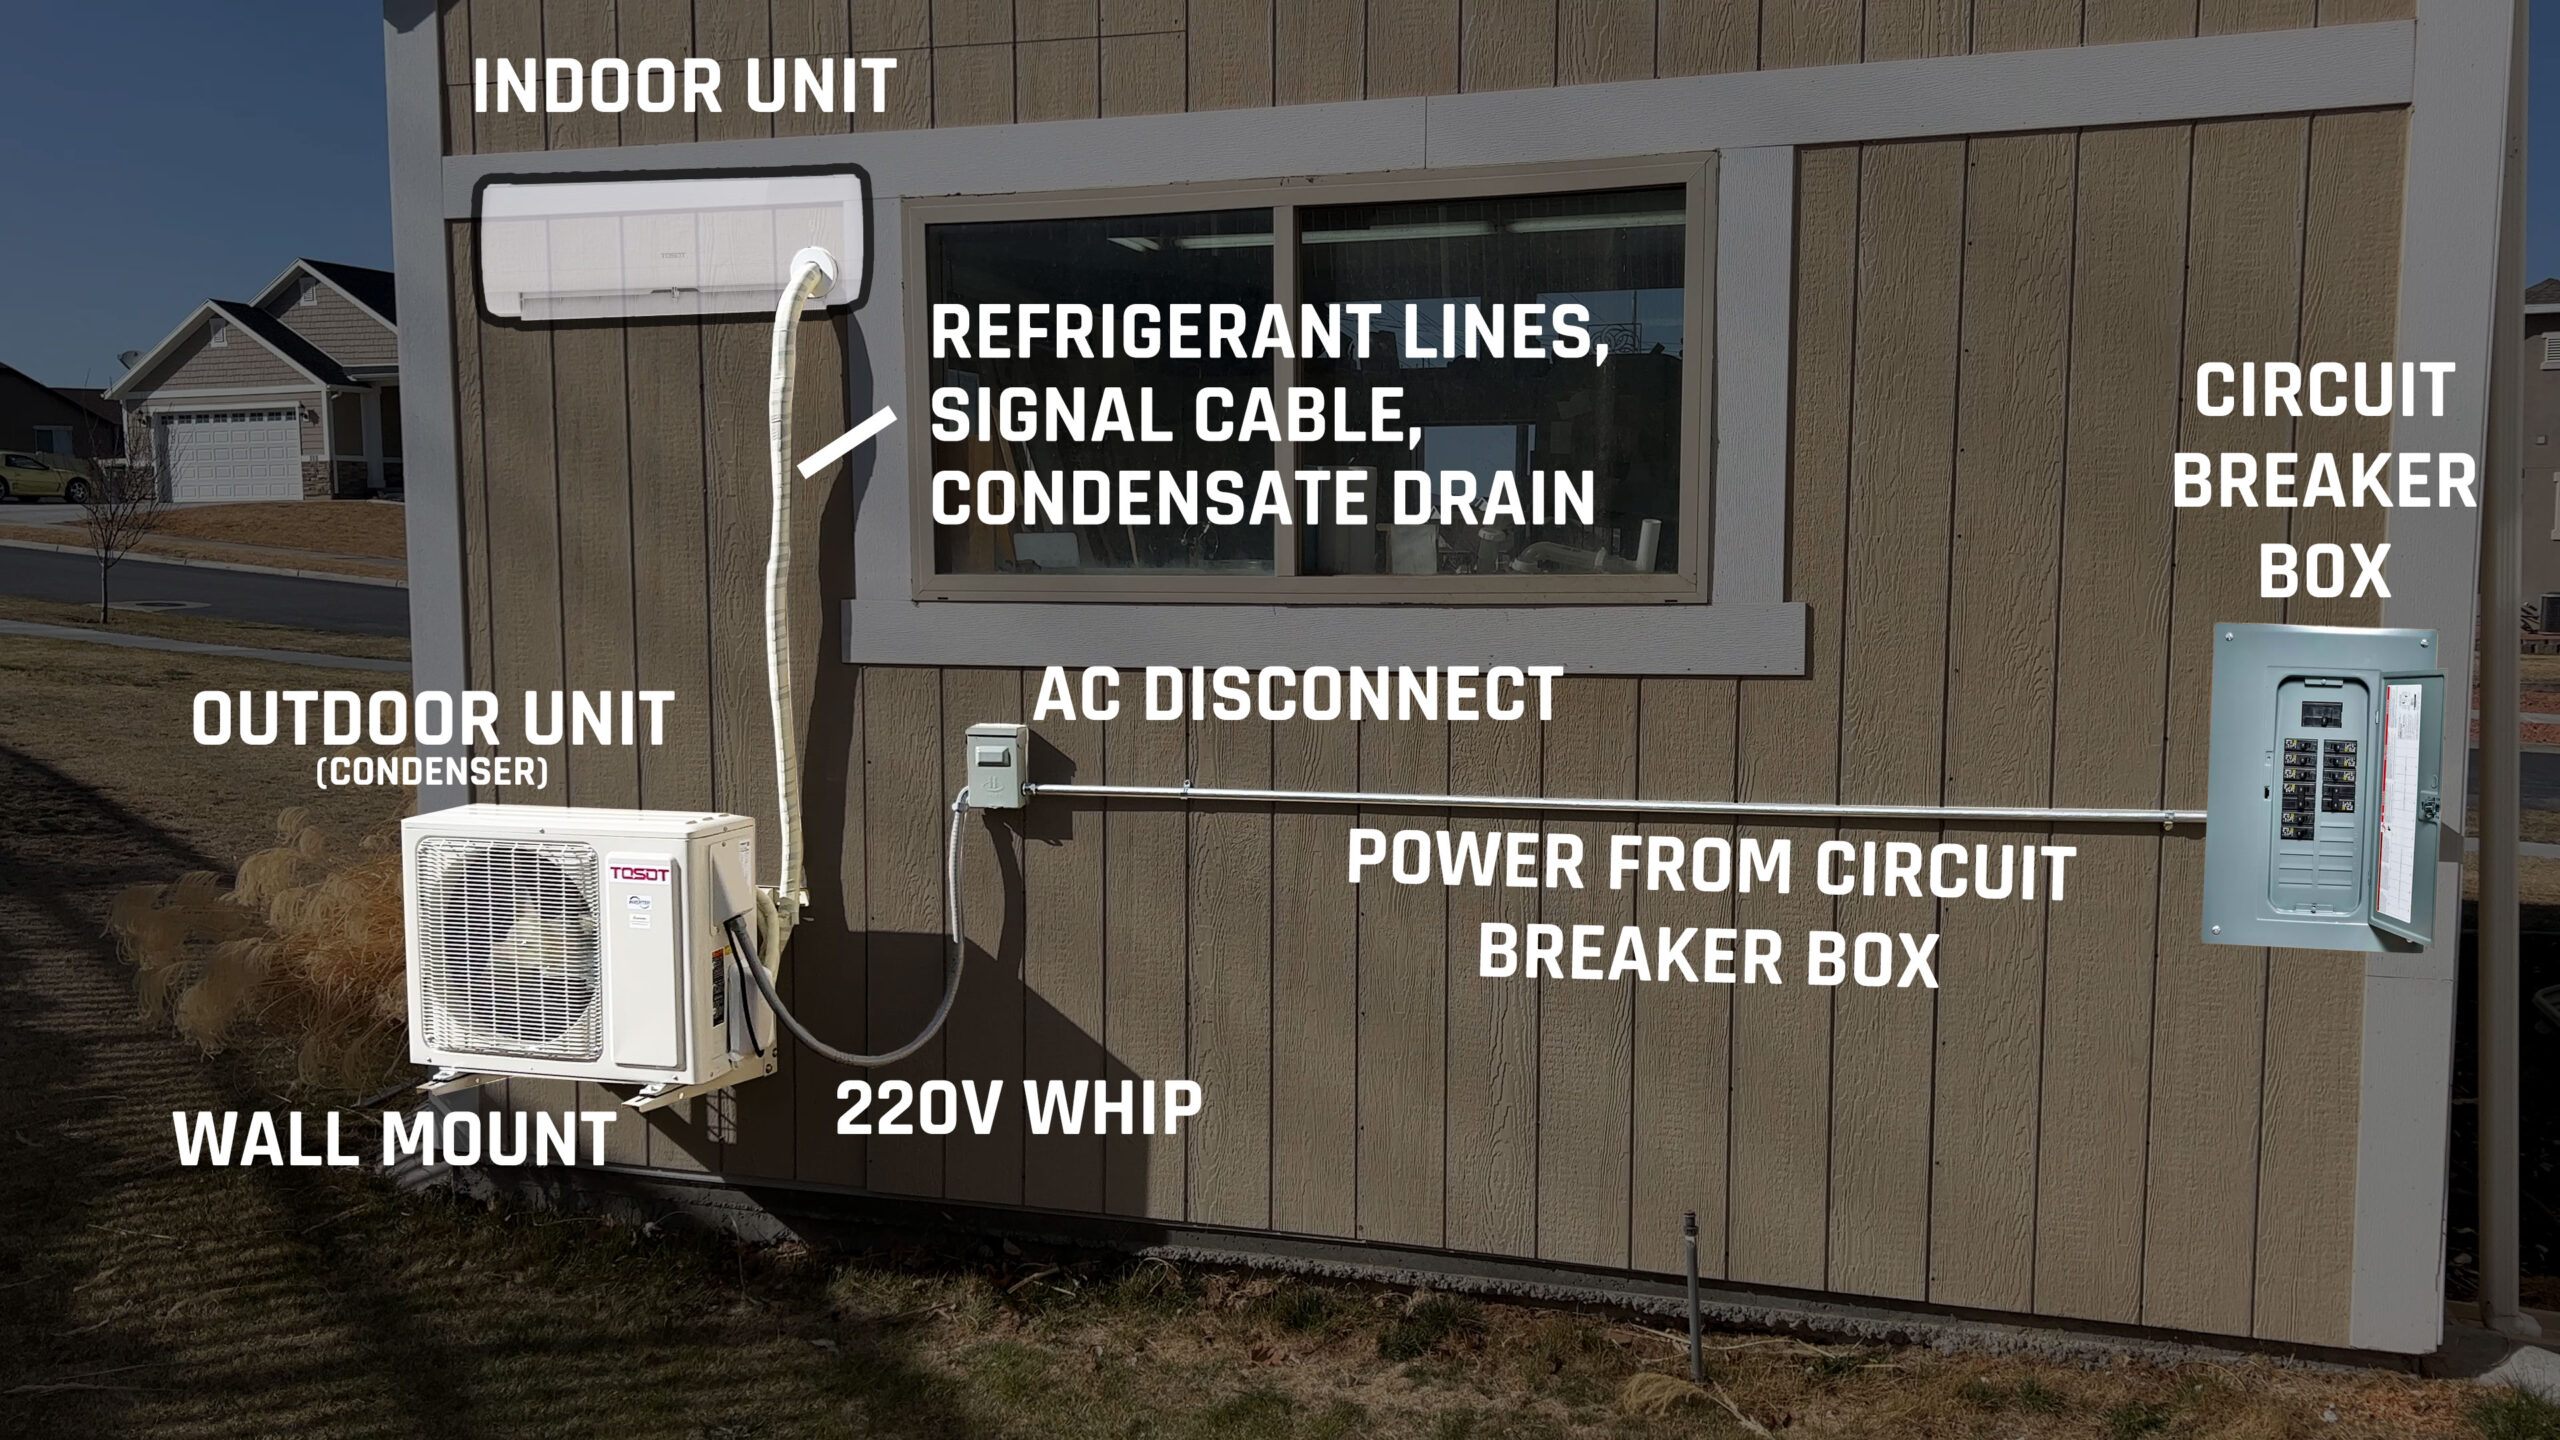
A mini-split system, also known as a ductless mini-split, is a heat pump system that doesn't require ductwork. It consists of two main components: an outdoor unit (condenser) and an indoor unit (air handler). These units are connected by refrigerant lines and electrical wiring that run through a small hole in the wall.
Think of the refrigerant as the "blood" of your AC system, carrying heat from inside to outside during cooling and reversing that process during heating. The condenser unit expels or absorbs heat from the outside air, while the air handler circulates conditioned air within your garage.
Why choose a mini-split for your garage? They offer several advantages:
- No ductwork required: Perfect for garages that lack existing duct systems.
- Energy efficiency: Often more efficient than window units or space heaters.
- Zoned cooling and heating: You can control the temperature specifically in your garage.
- Quiet operation: Mini-splits are generally quieter than window AC units.
Is DIY Installation Right for You?
While DIY mini-split installation is possible, it's not recommended for everyone. It involves working with electricity, refrigerant lines, and potentially heights, which can be dangerous if not handled correctly. You'll also need specialized tools, such as a vacuum pump, manifold gauges, and a flaring tool.
Consider these factors when deciding whether to DIY:
- Your DIY experience: Have you successfully completed similar projects involving electrical work, plumbing, or HVAC?
- Your comfort level with tools: Are you comfortable using power tools and specialized HVAC tools?
- Your knowledge of electrical and HVAC systems: Do you understand wiring diagrams, refrigerant pressures, and safety protocols?
- Permits and local regulations: Are you aware of the permits required for mini-split installation in your area? (More on this later)
- Warranty implications: DIY installation might void the manufacturer's warranty.
If you're unsure about any of these aspects, it's best to hire a qualified HVAC technician. They have the expertise, tools, and licenses to ensure a safe and proper installation.
Planning and Preparation
Proper planning is crucial for a successful mini-split installation. Here's what you need to do:
1. Determine the Correct Size
The size of the mini-split system (measured in BTUs - British Thermal Units) depends on the size of your garage, its insulation, and climate. A system that's too small won't adequately cool or heat the space, while one that's too large will cycle on and off frequently, wasting energy and potentially leading to discomfort.
Factors to consider:
- Square footage of the garage: Multiply the length by the width.
- Insulation level: Garages are often poorly insulated, requiring a larger BTU rating.
- Climate: Warmer climates require more cooling power, while colder climates require more heating power.
- Sun exposure: Garages with a lot of sun exposure will need more cooling power.
- Heat-generating appliances: If you plan to use the garage for welding or other heat-intensive activities, factor that into the BTU calculation.
A general rule of thumb is to use 20 BTU per square foot in a moderately insulated space. However, it's best to consult with an HVAC professional to get an accurate sizing recommendation.
2. Choose a Location
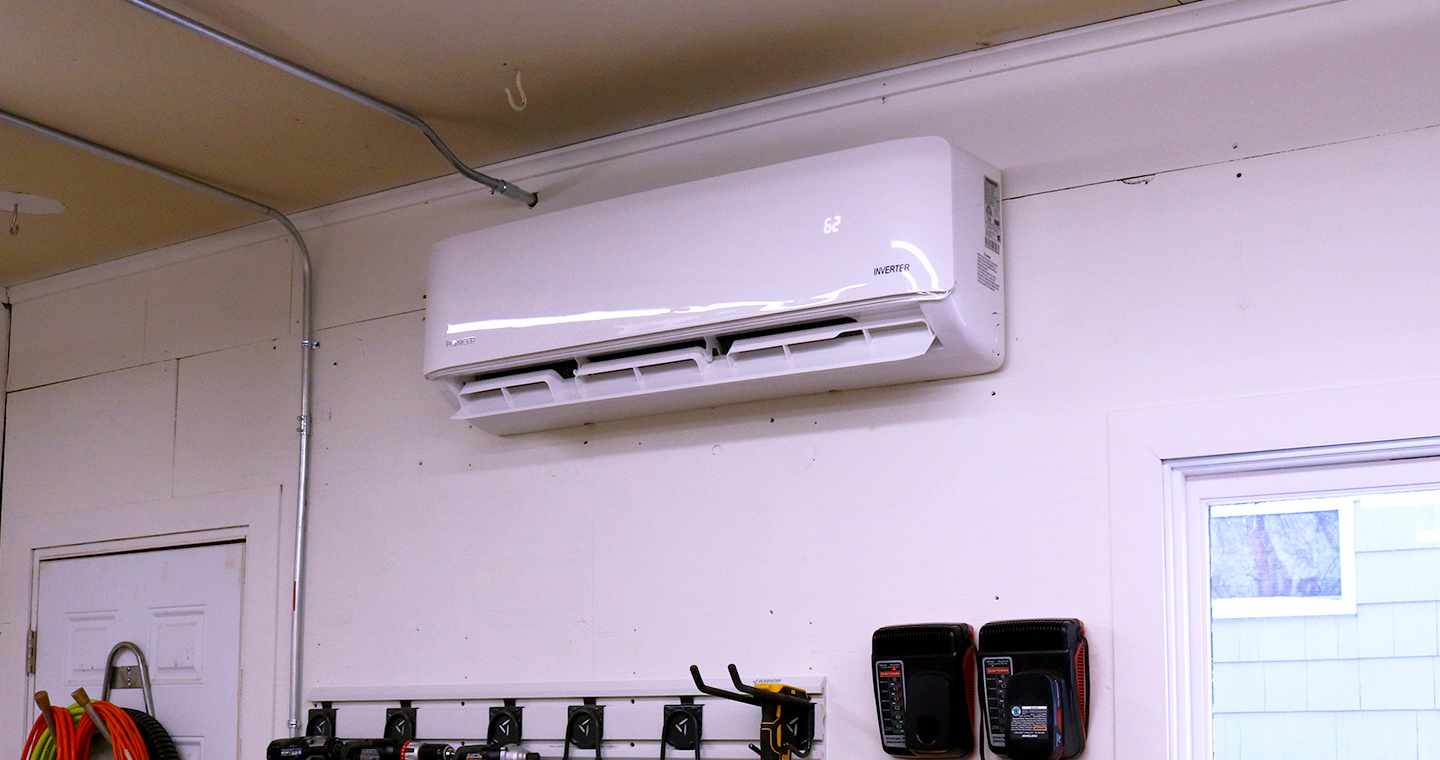
For the Indoor Unit (Air Handler):
- Mount it on an interior wall, preferably high up for optimal air circulation.
- Ensure there are no obstructions in front of the unit that could block airflow.
- Consider the aesthetics and how the unit will blend with the garage's interior.
- Make sure you can easily access it for cleaning and maintenance.
For the Outdoor Unit (Condenser):
- Place it on a level surface, such as a concrete pad or mounting bracket.
- Ensure there's adequate clearance around the unit for proper airflow. Follow the manufacturer's recommendations for minimum clearances.
- Protect it from direct sunlight and extreme weather conditions if possible.
- Choose a location that minimizes noise disruption to neighbors.
- Keep it away from flammable materials and potential obstructions.
3. Obtain Necessary Permits
Many municipalities require permits for HVAC installations. Contact your local building department to inquire about permit requirements and inspections. Ignoring this step can result in fines and delays.
4. Gather Tools and Materials
You'll need a variety of tools and materials for the installation, including:
- Mini-split system (indoor and outdoor units)
- Refrigerant lines (pre-charged or field-charged)
- Electrical wiring and connectors
- Mounting brackets for both units
- Drill with various drill bits
- Level
- Screwdrivers
- Wrench set
- Wire strippers and crimpers
- Vacuum pump
- Manifold gauges
- Flaring tool (if using field-charged lines)
- Refrigerant leak detector
- Voltage tester
- Wall sleeve or pipe
- Sealant or caulk
- Safety glasses and gloves
5. Electrical Considerations
Mini-split systems require a dedicated electrical circuit. Consult with a licensed electrician to ensure your electrical panel can handle the additional load and that the wiring is properly installed and grounded. Never attempt electrical work unless you are qualified and comfortable doing so.
Installation Steps
Disclaimer: These steps are a general guide and may vary depending on the specific mini-split system you're installing. Always refer to the manufacturer's instructions for detailed guidance. If you are not confident in your abilities, hire a qualified HVAC technician.
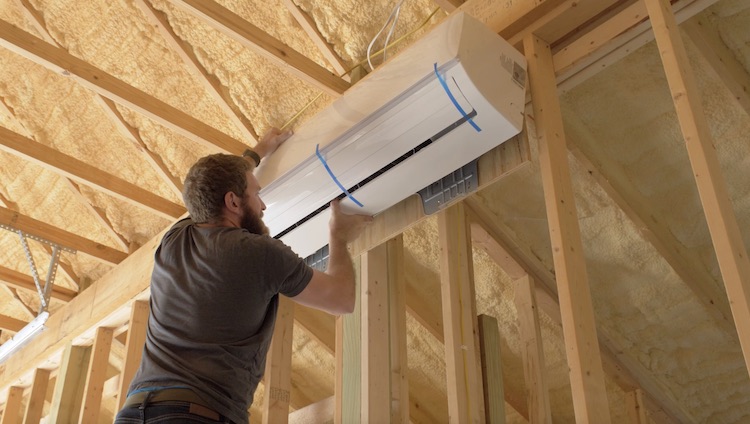
1. Mount the Indoor Unit
a. Locate the mounting bracket for the indoor unit. b. Use a level to ensure the bracket is perfectly horizontal. c. Secure the bracket to the wall using appropriate screws. d. Carefully hang the indoor unit onto the bracket.
2. Drill the Wall Hole
a. Determine the location for the hole that will connect the indoor and outdoor units. This hole needs to be large enough to accommodate the refrigerant lines, electrical wiring, and drain line. b. Use a core drill or a hole saw to drill a hole through the wall. c. Insert a wall sleeve or pipe through the hole to protect the lines and wiring. d. Seal the gap around the sleeve with sealant or caulk to prevent air and moisture infiltration.
3. Connect the Refrigerant Lines and Wiring
a. Carefully run the refrigerant lines and electrical wiring through the wall sleeve. b. If using pre-charged lines, ensure they are properly connected and tightened. c. If using field-charged lines, you'll need to flare the ends of the lines and connect them to the units. This requires specialized tools and knowledge. d. Connect the electrical wiring according to the wiring diagram provided by the manufacturer. Double-check all connections to ensure they are secure.
4. Mount the Outdoor Unit
a. Place the outdoor unit on the concrete pad or mounting bracket. b. Secure the unit to the pad or bracket using bolts or screws. c. Connect the refrigerant lines and electrical wiring to the outdoor unit. d. Ensure all connections are tight and secure.
5. Evacuate the Refrigerant Lines (If Necessary)
a. If using field-charged lines, you'll need to evacuate the lines using a vacuum pump to remove air and moisture. b. Connect the vacuum pump to the service ports on the outdoor unit. c. Run the vacuum pump for the recommended time to achieve the required vacuum level. d. Close the service valves to isolate the refrigerant lines.
6. Release Refrigerant (If Necessary)
a. If using field-charged lines, carefully release the refrigerant into the system according to the manufacturer's instructions. b. Monitor the refrigerant pressure using manifold gauges.
7. Test for Leaks
a. Use a refrigerant leak detector to check all connections for leaks. b. If you find any leaks, tighten the connections or repair the fittings. c. Repeat the leak test until all connections are leak-free.
8. Electrical Hookup
a. Before doing any electrical work, turn off the power to the circuit at the breaker box. b. Connect the electrical wiring from the indoor unit to the outdoor unit. c. Connect the power supply to the outdoor unit, following the manufacturer's instructions and local electrical codes. d. Double-check all wiring connections to ensure they are secure and properly grounded.
9. Final Checks and Startup
a. Double-check all connections and wiring. b. Ensure the refrigerant lines are properly insulated. c. Turn on the power to the circuit at the breaker box. d. Turn on the mini-split system and test its operation. e. Monitor the system's performance and ensure it's cooling or heating properly.
Post-Installation
Once the installation is complete, it's important to:
- Clean up the work area.
- Dispose of any waste materials properly.
- Register your mini-split system with the manufacturer to activate the warranty.
- Schedule regular maintenance to keep your system running efficiently. This includes cleaning the filters and coils.
Troubleshooting
If your mini-split system isn't working properly, consult the manufacturer's troubleshooting guide. Common issues include:
- Insufficient cooling or heating: Check the filter, refrigerant level, and thermostat settings.
- Water leaks: Check the drain line for clogs.
- Strange noises: Inspect the units for loose parts or obstructions.
- Error codes: Consult the manufacturer's guide for code definitions and troubleshooting steps.
If you're unable to resolve the issue yourself, contact a qualified HVAC technician.
Conclusion
Installing a mini-split system in your garage can significantly improve its comfort and usability. However, it's a complex project that requires careful planning, specialized tools, and a good understanding of electrical and HVAC systems. If you're not confident in your abilities, it's best to hire a qualified HVAC technician to ensure a safe and proper installation. This will protect your investment and provide you with years of reliable performance.