How To Install A Pressure Reducing Valve

Understanding Pressure Reducing Valves (PRVs) and Their Installation
In plumbing and HVAC systems, maintaining optimal water pressure is crucial for efficient operation and preventing damage to fixtures and appliances. A Pressure Reducing Valve (PRV), sometimes referred to as a pressure regulator, plays a vital role in ensuring this. This article provides a detailed guide on how to install a PRV, tailored for homeowners, HVAC technicians, and facility managers alike.
Why Install a PRV?
High water pressure can lead to several issues, including:
- Damaged Pipes: Excessive pressure can strain pipes, leading to leaks and even bursts.
- Fixture Damage: Faucets, toilets, and appliances like washing machines and dishwashers can experience premature wear and tear.
- Water Waste: Higher pressure often translates to increased water usage.
- Noisy Pipes: Water hammering, a loud banging sound in pipes, is often a result of high pressure.
A PRV regulates the incoming water pressure from the main supply line to a safer, more manageable level, typically around 50-60 psi for residential applications. Commercial buildings often have different requirements, so checking local codes is important.
Tools and Materials Required
Before starting the installation process, gather the necessary tools and materials:
- New PRV: Select a PRV with the appropriate size and pressure range for your system.
- Pipe Cutter: For cutting copper or PEX piping.
- Pipe Wrench: Two wrenches are needed, one to hold the pipe steady and another to tighten fittings.
- Adjustable Wrench: For adjusting the PRV's pressure setting.
- Soldering Torch (for copper pipe): Including flux and solder. Alternatively, use push-fit fittings for solderless connections.
- Teflon Tape or Pipe Dope: For sealing threaded connections.
- Union Fittings (Optional): Can make future PRV replacement easier.
- Pressure Gauge: To verify the outlet pressure after installation.
- Safety Glasses: For eye protection.
- Gloves: To protect your hands.
- Bucket and Towels: For catching any water spillage.
Step-by-Step Installation Guide
Follow these steps to install your PRV:
1. Shut Off the Main Water Supply
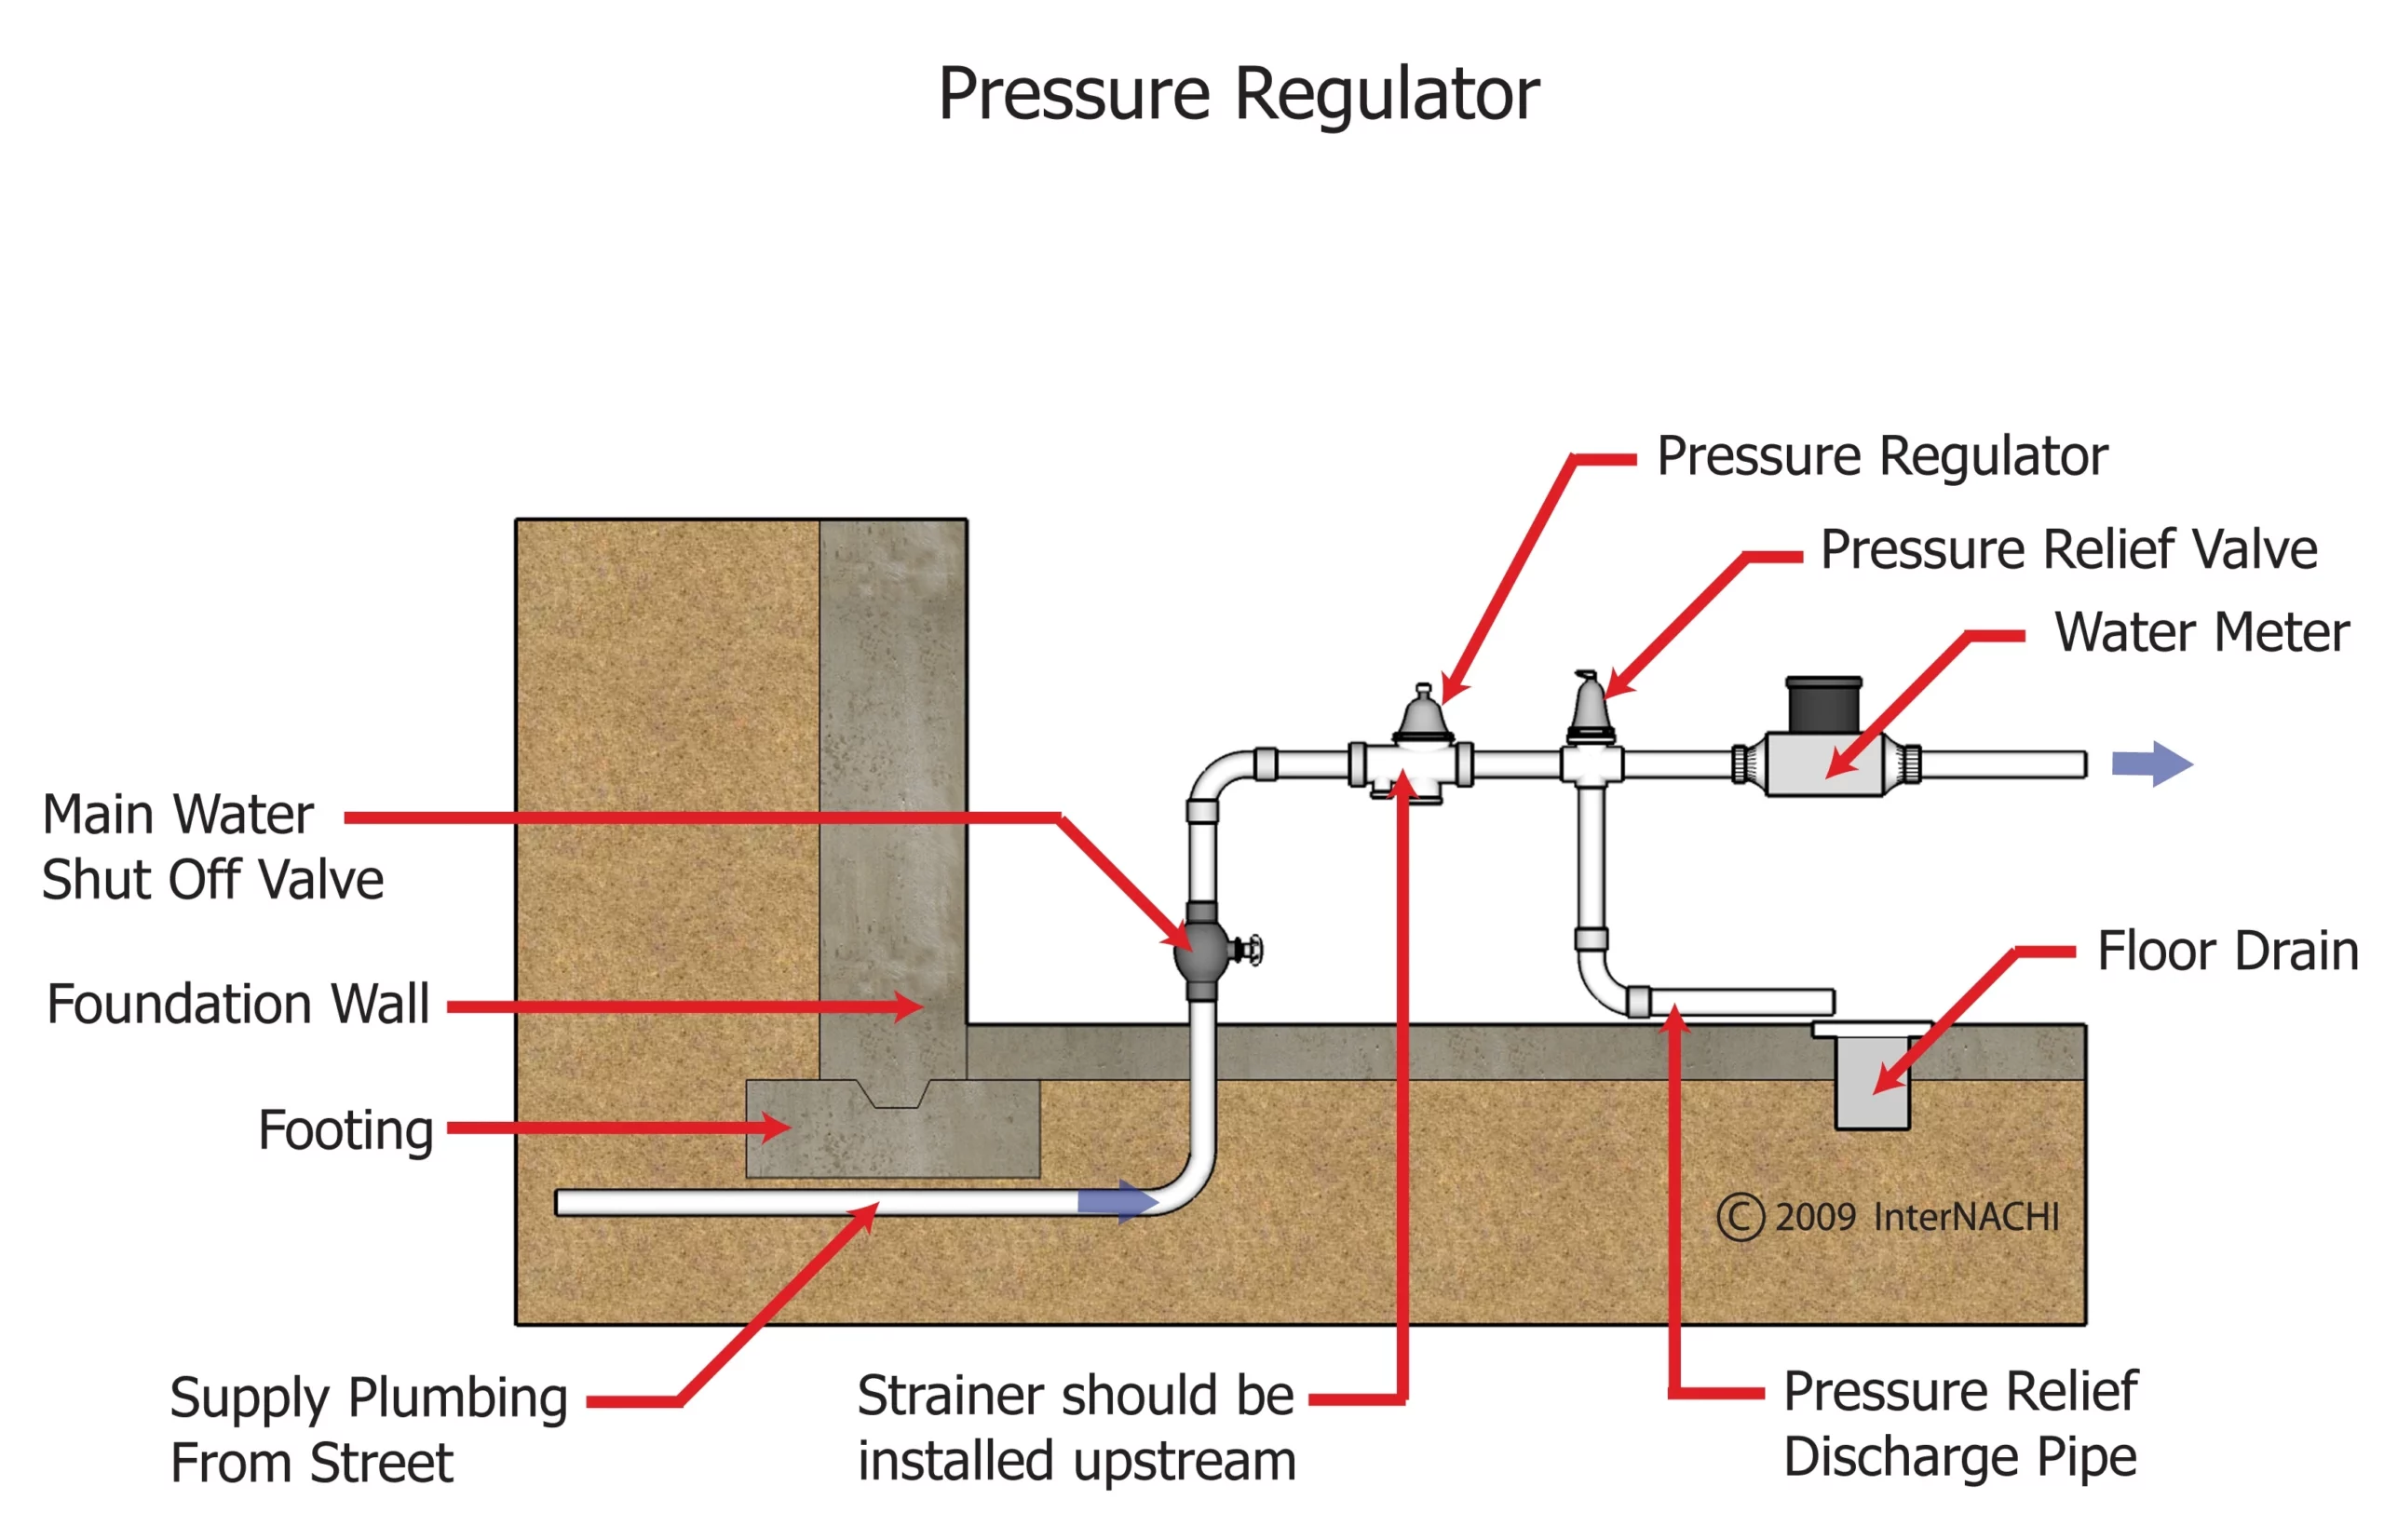
Locate the main water shut-off valve, typically near the water meter or where the water line enters the building. Turn off the valve completely to stop water flow to the entire system. Open a faucet at the lowest point in the house to drain any remaining water from the pipes. This reduces pressure and prevents water from spraying during the cutting process.
2. Locate the Installation Point
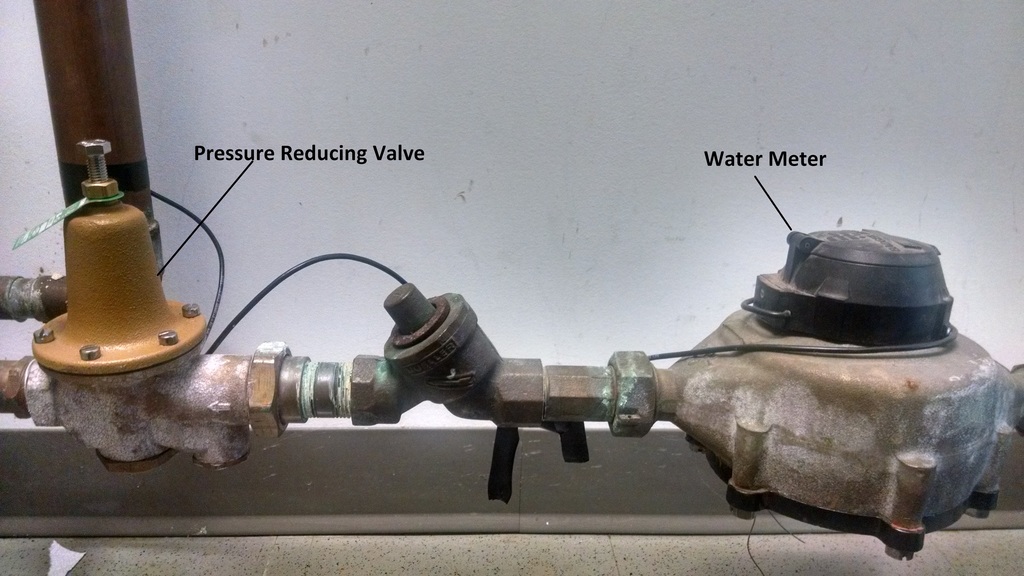
The PRV should be installed on the main water line, downstream from the water meter and any backflow preventers, but before any branches to fixtures or appliances. Ensure there is enough straight pipe length (usually specified by the PRV manufacturer) before and after the installation point for proper flow.
3. Cut the Pipe
Using a pipe cutter, carefully cut the main water line at the chosen location. Make clean, straight cuts to ensure proper fitting. Remove any burrs or sharp edges from the cut ends.
4. Prepare the Pipe Ends
Depending on the type of pipe, prepare the ends for connection to the PRV. For copper pipes, clean the outside of the pipe and the inside of the fitting with a wire brush and apply flux. For threaded fittings, wrap Teflon tape clockwise around the threads, or apply pipe dope, to ensure a watertight seal.
5. Install the PRV
Connect the PRV to the prepared pipe ends. Ensure the PRV is installed with the flow arrow pointing in the correct direction (towards the building). For copper pipes, solder the fittings to the pipe, ensuring a strong and leak-free joint. For threaded connections, tighten the fittings using two pipe wrenches – one to hold the pipe and the other to tighten the fitting. Avoid overtightening, which can damage the threads.
Pro Tip: Installing union fittings on both sides of the PRV will simplify future maintenance and replacement. Unions allow you to disconnect the PRV without cutting the pipe.
6. Turn On the Water Supply Gradually
Slowly open the main water shut-off valve to allow water to flow back into the system. Check all connections for leaks. Tighten any leaking fittings slightly until the leak stops. Avoid drastic tightening, which can worsen the problem.
7. Adjust the Pressure Setting
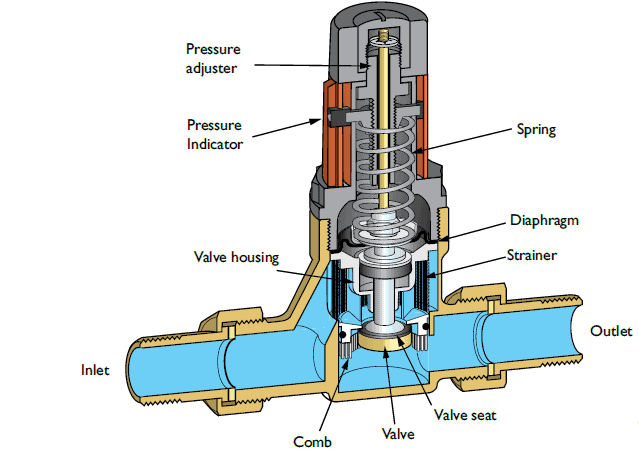
Locate the adjustment screw or bolt on the PRV. Use an adjustable wrench to turn the screw and adjust the outlet pressure. Most PRVs have a range of adjustment. Connect a pressure gauge to a nearby faucet or hose bib to monitor the outlet pressure. Turn the adjustment screw clockwise to increase the pressure and counterclockwise to decrease it. Set the pressure to the desired level, typically between 50 and 60 psi for residential applications. Refer to the PRV manufacturer's instructions for specific adjustment procedures.
8. Test and Monitor
After setting the pressure, monitor the system for a few days to ensure the pressure remains stable and there are no leaks. Periodically check the pressure gauge to verify the PRV is functioning correctly.
Troubleshooting Common Issues
- Leaking Connections: Tighten the fittings or reapply Teflon tape/pipe dope. If the leak persists, consider replacing the fitting or the PRV itself.
- No Water Flow: Check for blockages in the PRV or the water supply line. Make sure the PRV is installed in the correct direction.
- Pressure Too High or Too Low: Adjust the pressure setting on the PRV. If the pressure cannot be adjusted, the PRV may be faulty and need replacement.
- Noisy Pipes: May be related to water hammer. Installing water hammer arrestors near fixtures can mitigate the noise. Also, ensure the PRV's pressure setting is appropriate.
PRV Maintenance and Lifespan
To ensure the longevity and optimal performance of your PRV, perform regular maintenance:
- Annual Inspection: Check for leaks, corrosion, and proper pressure regulation.
- Cleaning: Periodically flush the PRV to remove any sediment or debris that may have accumulated. Some PRVs have a strainer that can be cleaned.
- Replacement: PRVs typically last 5-10 years, depending on water quality and usage. Replace the PRV if it becomes faulty or cannot maintain consistent pressure.
The cost of a PRV ranges from $30 to $200, depending on the size, brand, and features. Professional installation can add another $100 to $300 to the overall cost. While DIY installation is possible, it is essential to have a good understanding of plumbing practices and local codes. If you are unsure about any aspect of the installation, consult a qualified plumber or HVAC technician.
Comparing PRV Options
When selecting a PRV, consider the following factors:
- Size: Choose a PRV with the correct pipe size for your water system.
- Pressure Range: Ensure the PRV's pressure range matches your needs.
- Material: Brass PRVs are durable and corrosion-resistant.
- Brand: Choose a reputable brand known for quality and reliability (e.g., Watts, Honeywell, Wilkins).
- Warranty: Look for a PRV with a good warranty.
Conclusion
Installing a PRV is an essential step in protecting your plumbing system and ensuring efficient water usage. By following these steps and maintaining the PRV properly, you can safeguard your home or building from the damaging effects of high water pressure. Remember to always prioritize safety and consult a professional if needed.





:max_bytes(150000):strip_icc()/Water-pressure-regulator-2718696_color-8cb88034226e4c43aae61588c648e23f.jpg)