How To Install A Thermal Expansion Tank

A thermal expansion tank is a vital component in closed-loop water heating systems, including domestic hot water systems and hydronic heating systems. Its primary function is to accommodate the increased volume of water as it heats up, preventing pressure buildup that could damage your plumbing or appliances. Whether you're a homeowner tackling a DIY project, an HVAC technician on the job, or a facility manager overseeing a large building, understanding how to properly install a thermal expansion tank is crucial for system longevity and safety.
Understanding the System and Components
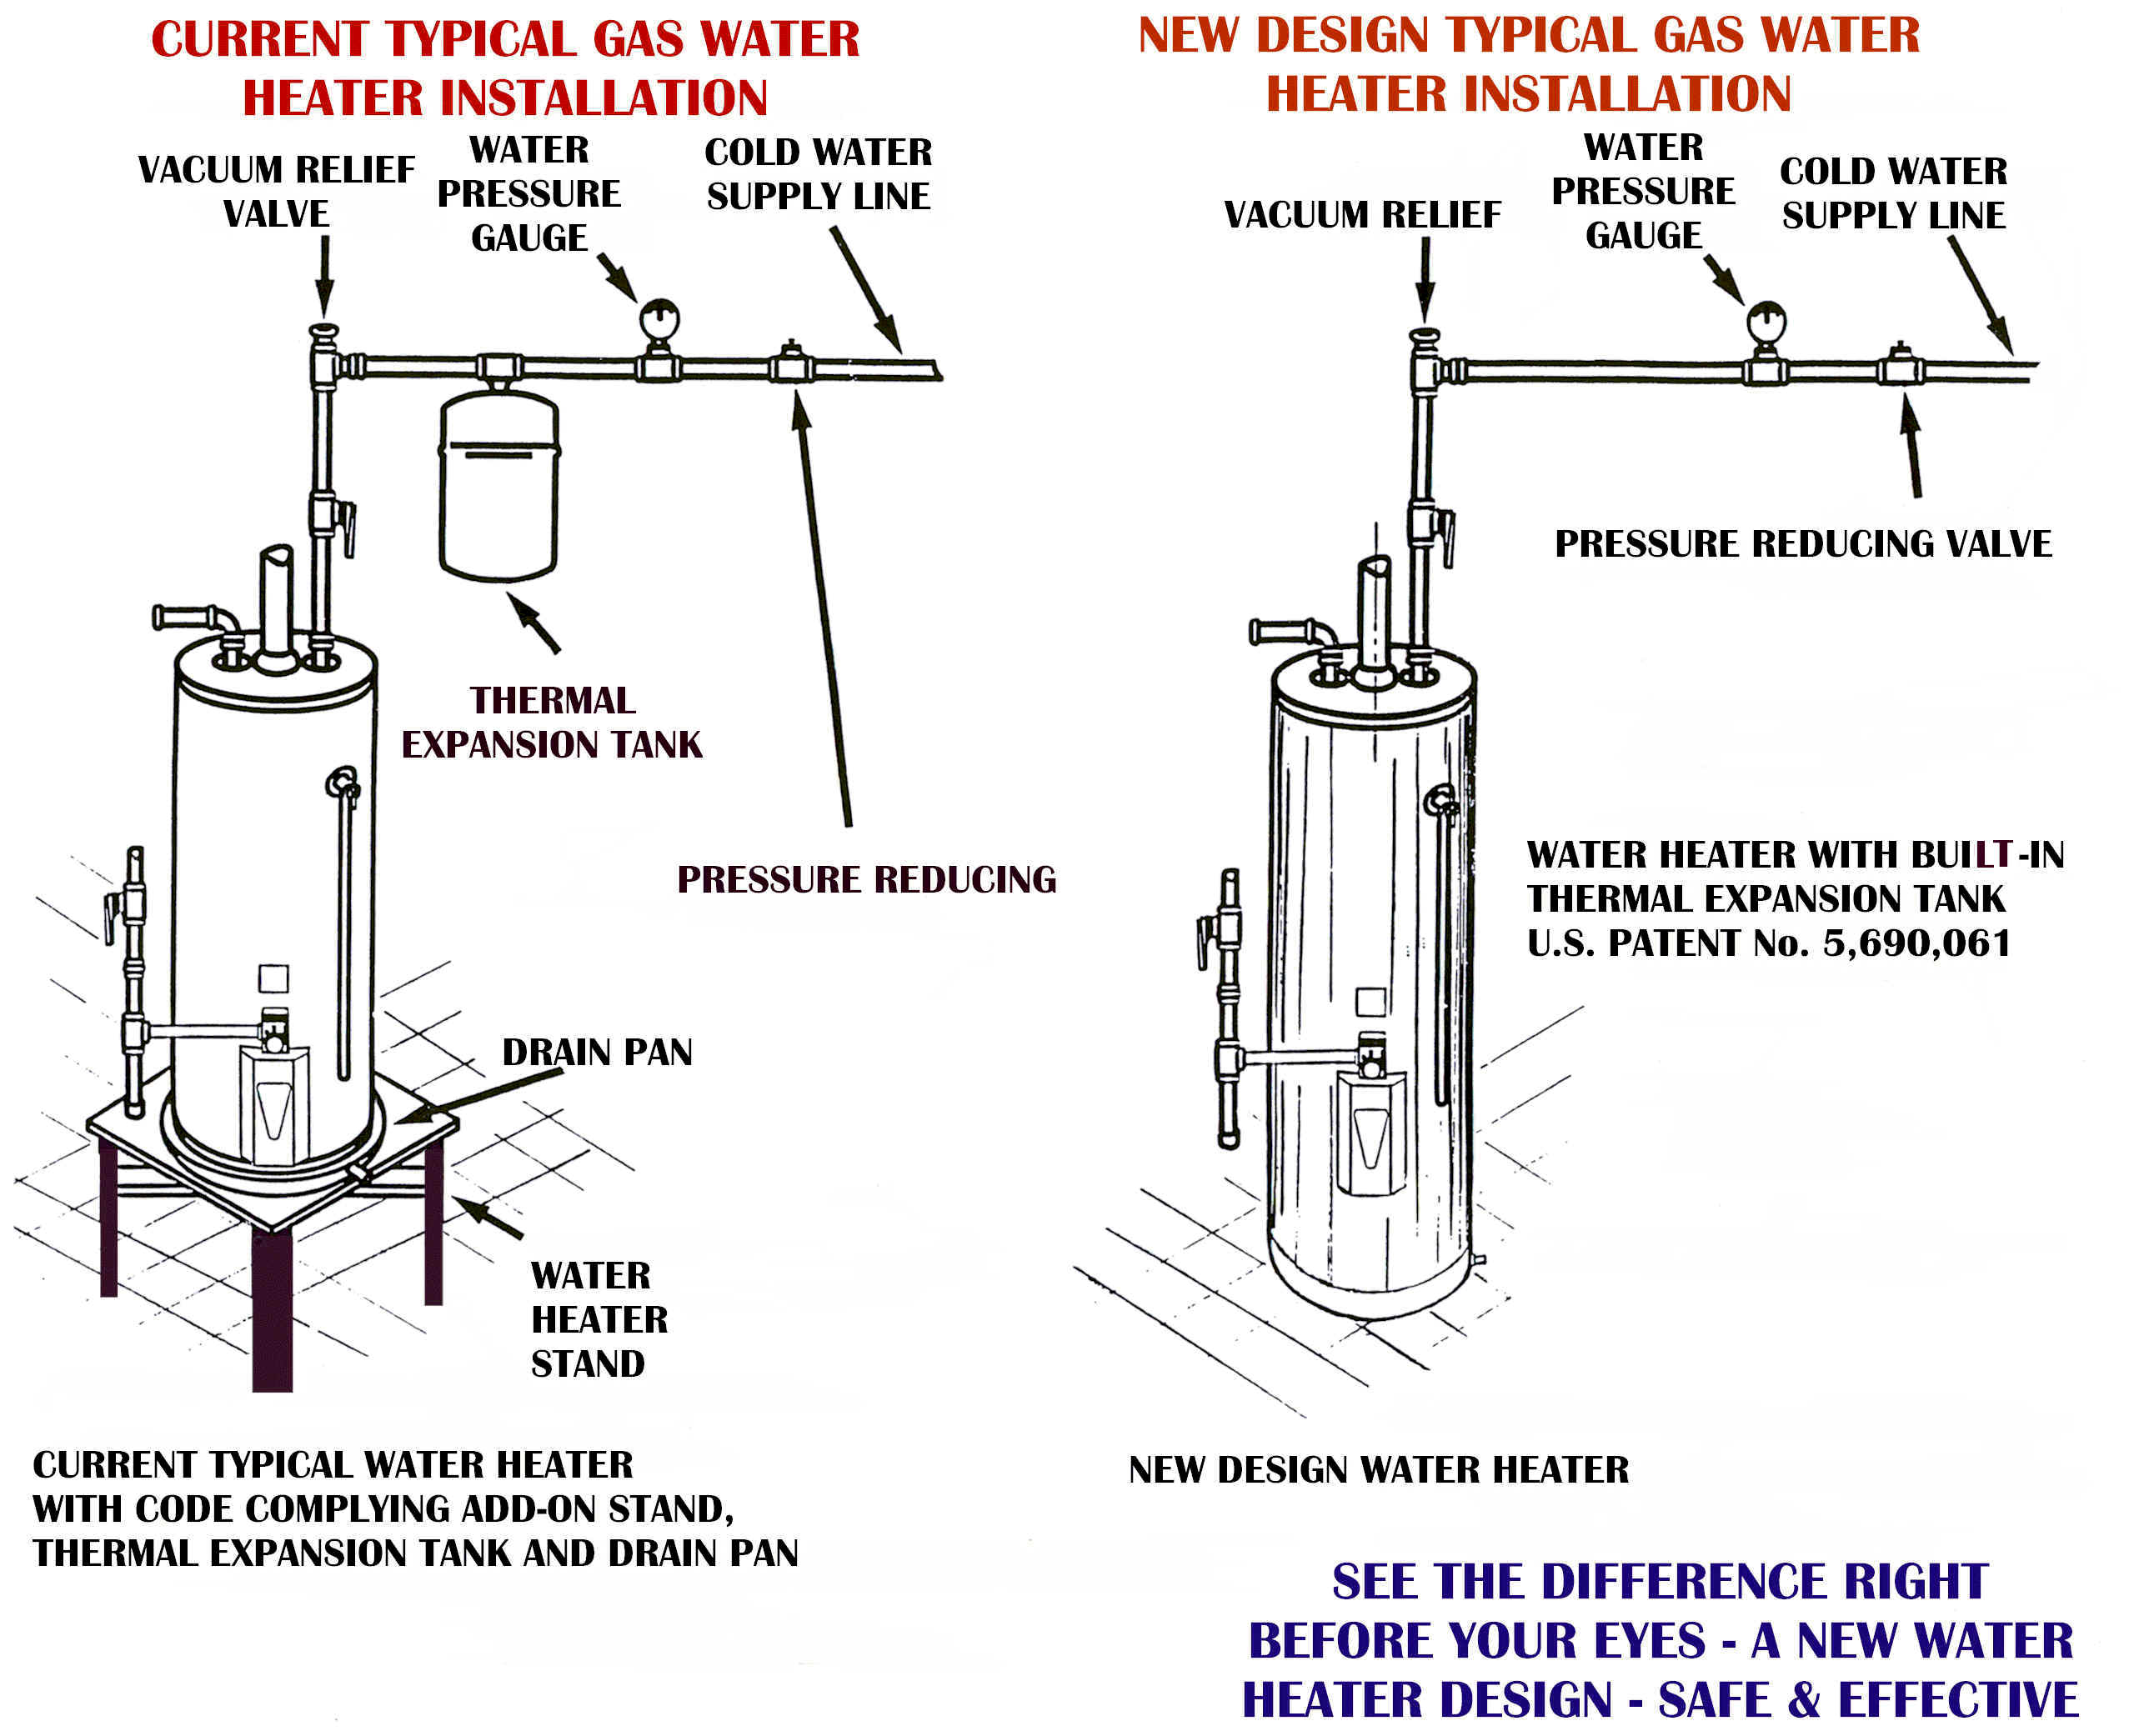
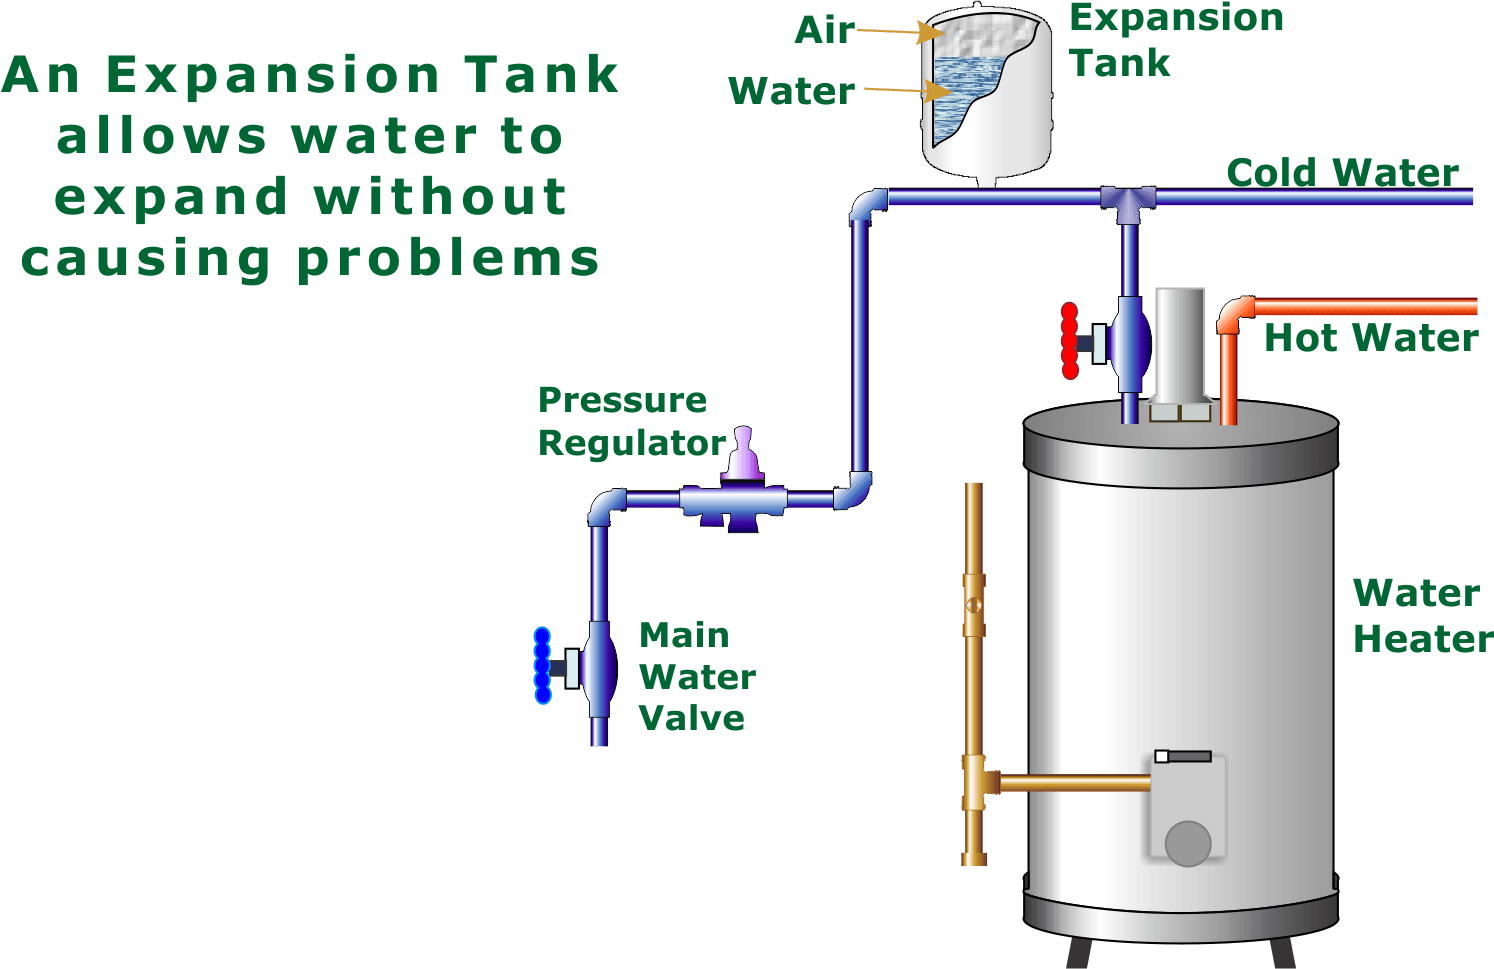
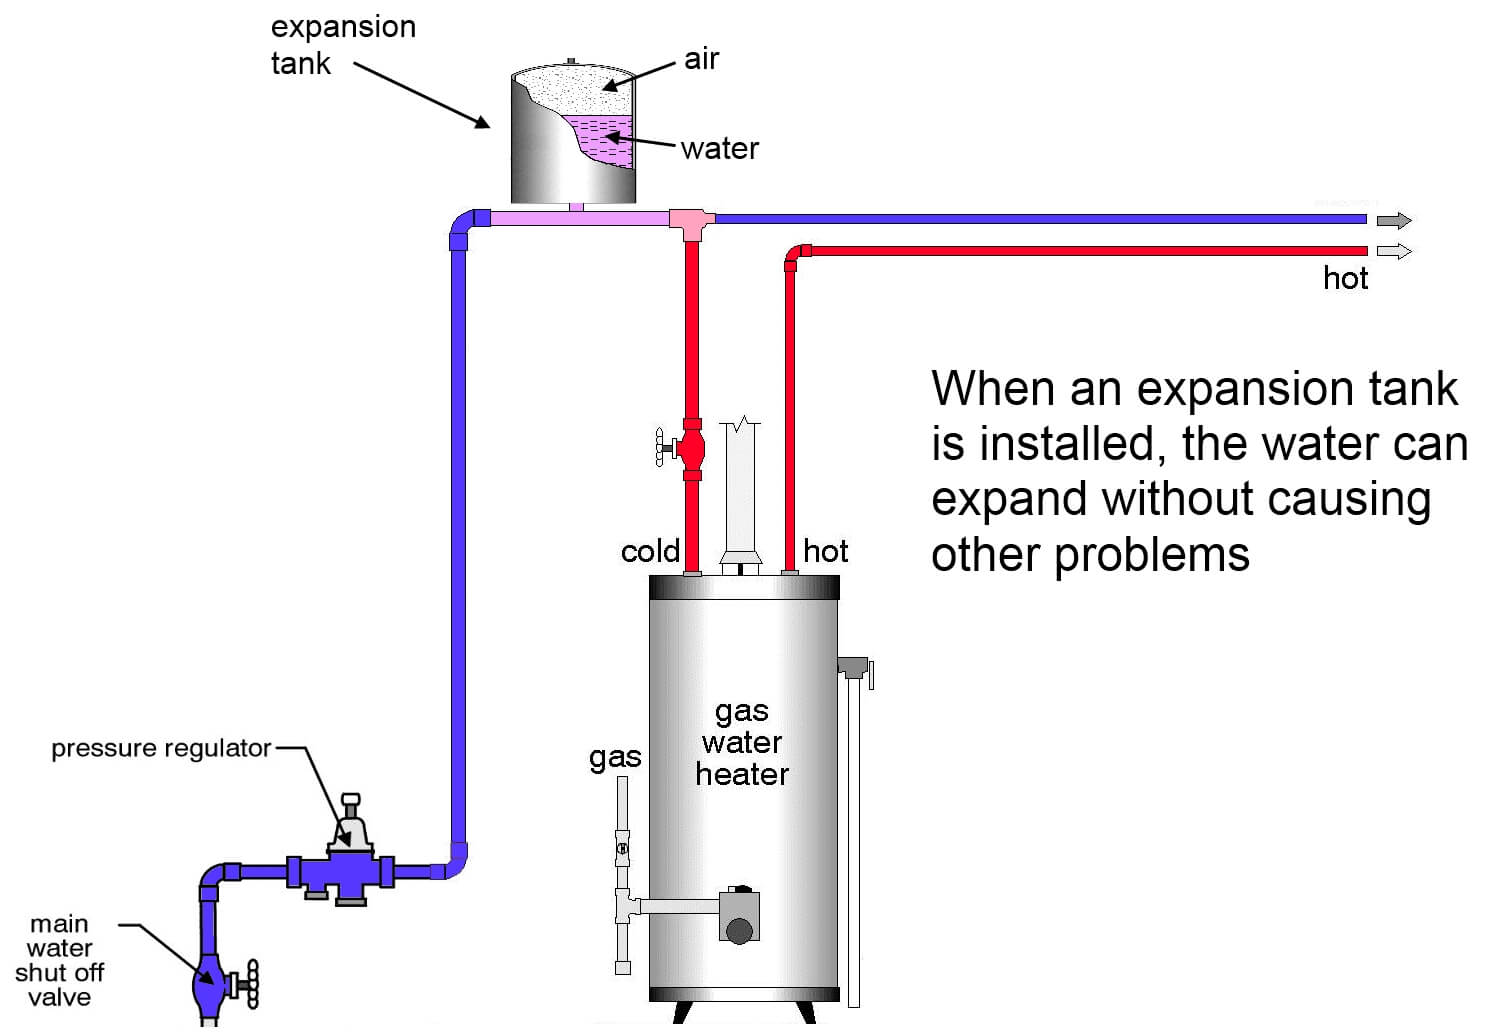
Before diving into the installation process, let's clarify the role of a thermal expansion tank and its place within your water heating system. Think of it as a buffer, absorbing the extra water volume created by thermal expansion. Without it, the expanding water would relentlessly push against closed valves and fixtures, potentially leading to leaks, burst pipes, or premature appliance failure. These tanks are pre-charged with air, separated from the water by a diaphragm or bladder. As the water expands, it compresses the air within the tank, maintaining a stable pressure throughout the system.
Key Components:
- Thermal Expansion Tank: The main component, sized appropriately for your system's volume and temperature range.
- Pipe Fittings: Various fittings such as tees, nipples, couplings, and adapters to connect the tank to the water line. Ensure compatibility with your existing plumbing material (copper, PEX, CPVC).
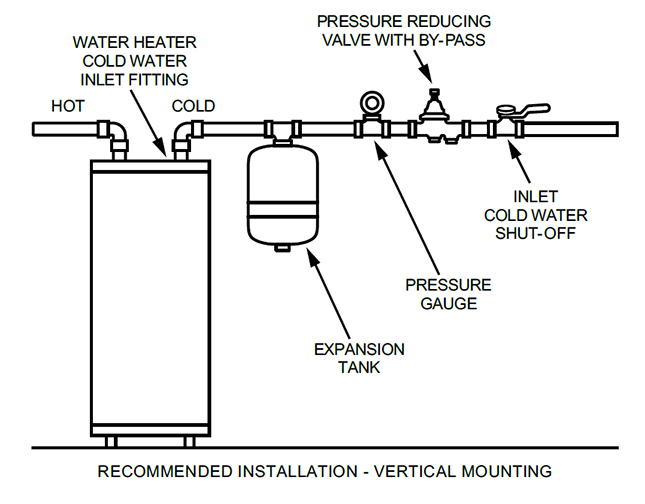
- Shut-Off Valve: A ball valve or gate valve installed upstream of the tank allows you to isolate it for maintenance or replacement.
- Pressure Reducing Valve (PRV): Often found in municipal water supply systems. If you have a PRV, the expansion tank is even more critical.
- Pressure Gauge: To monitor system pressure.
- Teflon Tape or Pipe Dope: For sealing threaded connections.
- Mounting Bracket (if required): For securely mounting the tank to a wall or structure.
Tools You'll Need
Gathering the right tools will make the installation process smoother and safer:
- Pipe Wrench: For tightening and loosening pipe fittings.
- Adjustable Wrench: For smaller fittings and adjustments.
- Pipe Cutter or Hacksaw: For cutting pipes to the correct length.
- Soldering Torch and Supplies (if working with copper): Including flux and solder.
- PEX Crimp Tool or Expansion Tool (if working with PEX): Depending on the type of PEX fittings you're using.
- Drill and Screws: For mounting the tank bracket.
- Level: To ensure the tank is installed vertically (if required).
- Multi-meter: To test for continuity on any electrical connections.
- Safety Glasses and Gloves: For personal protection.
Step-by-Step Installation Guide
Here's a detailed breakdown of how to install a thermal expansion tank:
- Preparation and Safety First: Turn off the water supply to your water heater or hydronic system at the main shut-off valve. Drain a small amount of water from the system to relieve pressure. Disconnect power to the water heater if applicable.
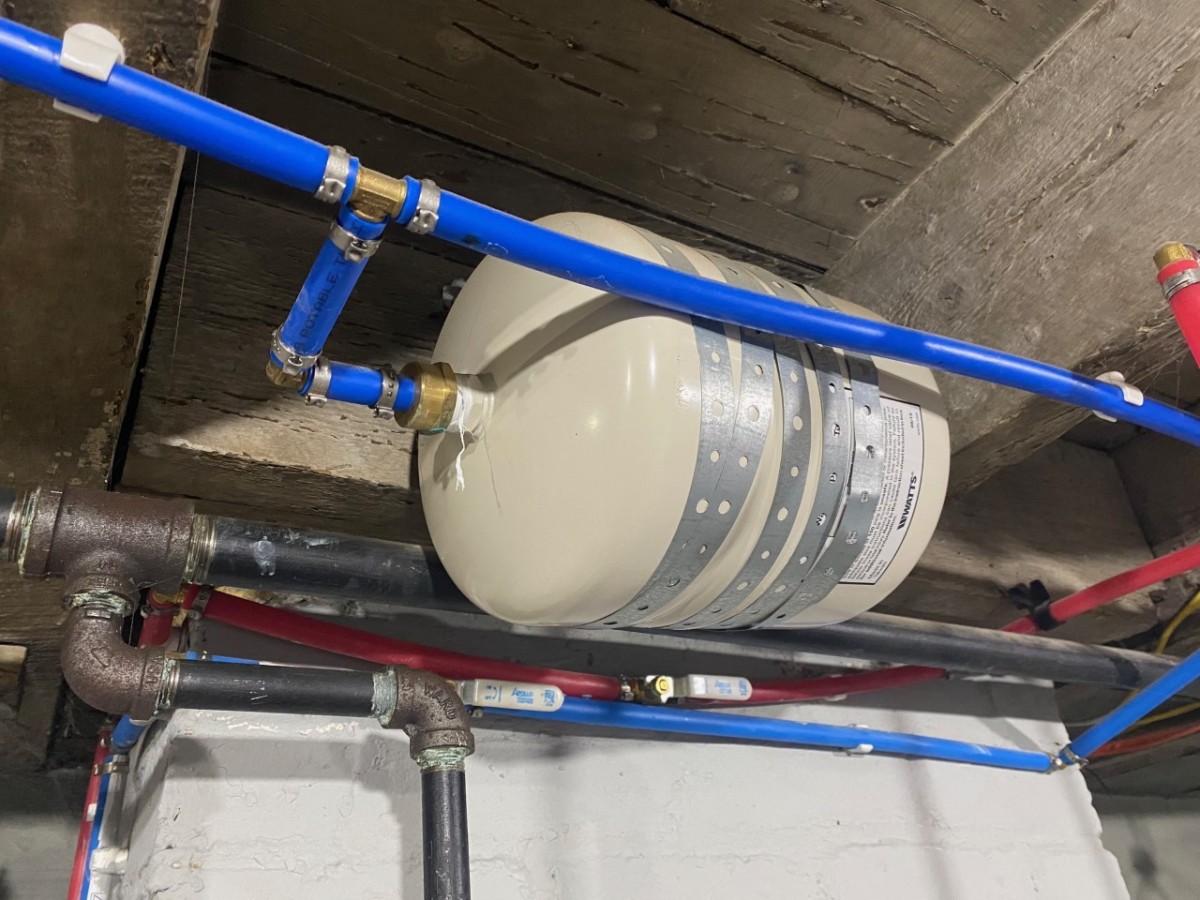
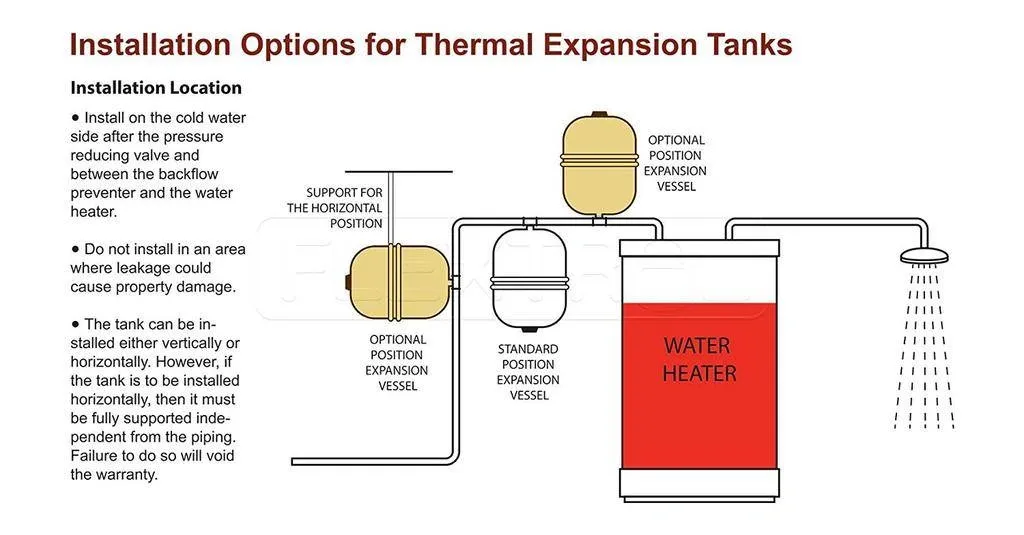
- Location Selection: Choose a location near the cold water inlet of your water heater or boiler. The tank should be easily accessible for future maintenance. Avoid locations prone to freezing temperatures. Most tanks can be installed horizontally or vertically, depending on the model. Vertical installation is often preferred as it helps prevent sediment buildup.
- Mounting the Tank (if applicable): If your tank requires a mounting bracket, securely attach it to a wall or sturdy structure using appropriate screws. Ensure the bracket is level.
- Installing the Shut-Off Valve: Install a shut-off valve on the cold water supply line, as close as possible to where you intend to connect the expansion tank. This allows you to isolate the tank for future maintenance without shutting off the entire water supply.
- Connecting the Tank: Use the appropriate pipe fittings to connect the tank to the water line downstream of the shut-off valve. Use Teflon tape or pipe dope on all threaded connections to ensure a watertight seal. If soldering copper pipes, clean the pipe ends thoroughly, apply flux, and solder the connections. Allow the connections to cool completely before proceeding. For PEX connections, use the correct crimping or expansion tool and fittings.
- Checking the Pre-Charge Pressure: Before opening the shut-off valve, check the pre-charge pressure of the tank. This is usually indicated on a label on the tank. The pre-charge pressure should ideally match the static water pressure in your system. You can measure the static water pressure using a pressure gauge connected to an outdoor faucet or appliance connection. If the pre-charge pressure is too high, use a Schrader valve (like on a car tire) to release air. If it's too low, use an air compressor to add air. Incorrect pre-charge can dramatically shorten the lifespan of the tank and reduce efficiency.
- Opening the Shut-Off Valve: Slowly open the shut-off valve to allow water to flow into the expansion tank. Listen for any leaks.
- Checking for Leaks: Carefully inspect all connections for leaks. Tighten any fittings as needed. It's a good practice to wrap the connection points with paper towels to quickly identify any slow leaks over the next few days.
- Verifying System Pressure: Monitor the system pressure using a pressure gauge. As the water heats up, the pressure will increase, but the expansion tank should prevent it from exceeding the maximum allowable pressure for your system.
Sizing the Expansion Tank
Proper sizing is crucial for the expansion tank to function effectively. An undersized tank won't be able to accommodate the expanding water volume, leading to pressure buildup. An oversized tank, while not harmful, is an unnecessary expense. Several factors influence the required tank size:
- Water Heater or Boiler Capacity: The larger the water heater or boiler, the larger the expansion tank needs to be.
- Water Temperature: Higher water temperatures result in greater expansion, requiring a larger tank.
- Water Pressure: Higher water pressure necessitates a larger tank.
Many manufacturers provide sizing charts or calculators to help you determine the correct tank size based on these factors. These charts usually take into account the tank's acceptance factor which varies between models. As a general guideline, for a standard 50-gallon water heater, a 2-gallon expansion tank is often sufficient. For larger systems or higher temperature applications, consult a sizing chart or consult with an HVAC professional.
Maintenance and Troubleshooting
Thermal expansion tanks are relatively low-maintenance, but periodic inspections can help ensure optimal performance and longevity:
- Check for Leaks: Regularly inspect the tank and connections for leaks.
- Check the Pre-Charge Pressure: At least once a year, check the pre-charge pressure and adjust as needed. A loss of pre-charge pressure indicates a potential problem with the diaphragm or bladder.
- Drain and Flush (Optional): Depending on the water quality in your area, you may want to occasionally drain and flush the tank to remove sediment buildup.
Common Issues and Troubleshooting:
- Waterlogged Tank: If the tank becomes filled with water, it means the diaphragm or bladder has failed. The tank will need to be replaced. Symptoms include constantly fluctuating pressure and water dripping from the air valve.
- Excessive Pressure Buildup: If the system pressure is consistently too high, even with the expansion tank installed, it could indicate an undersized tank, a faulty pressure reducing valve, or a problem with the water heater thermostat.
- Noisy Operation: Banging or clanging noises in the pipes could be a sign of water hammer, which can be exacerbated by a malfunctioning expansion tank.
Cost Considerations
The cost of a thermal expansion tank can vary depending on its size, brand, and features. Smaller tanks for residential applications typically range from $50 to $150. Larger tanks for commercial or industrial applications can cost several hundred dollars. Installation costs will depend on the complexity of the job and whether you hire a professional. DIY installation can save on labor costs, but it's essential to have the necessary skills and tools. Professional installation typically ranges from $100 to $300. When considering cost, remember that a thermal expansion tank is a relatively inexpensive investment that can prevent costly plumbing repairs and extend the lifespan of your water heating system.
Choosing the Right Tank: Factors to Consider
Selecting the right expansion tank involves several key considerations to ensure optimal performance and longevity of your plumbing system:
* **Tank Size:** This is paramount. As mentioned before, using a proper sizing chart ensures the tank can adequately handle the thermal expansion of water in your system. An undersized tank can lead to pressure buildup and potential damage. * **Maximum Working Pressure:** Ensure the tank's maximum working pressure exceeds the highest pressure expected in your system. Exceeding this limit can cause tank failure. * **Maximum Operating Temperature:** Similar to pressure, the tank's maximum operating temperature should accommodate the highest water temperature in your system. High temperatures can degrade the bladder or diaphragm. * **Tank Material:** Expansion tanks are commonly made from steel or stainless steel. Stainless steel offers superior corrosion resistance, especially in areas with hard water. * **Bladder or Diaphragm Type:** Bladder-type tanks generally provide better separation between water and air, reducing air loss. Diaphragm-type tanks are also reliable and widely used. * **Connection Type:** Ensure the tank's connection type (e.g., threaded, flanged) is compatible with your existing plumbing. * **Certification:** Look for tanks that are certified by reputable organizations like NSF or ASME. These certifications ensure the tank meets specific performance and safety standards.HVAC System Integration and Efficiency
Integrating a thermal expansion tank correctly into your HVAC system contributes to overall efficiency and system longevity. Preventing pressure spikes not only protects plumbing components but also ensures that water heaters and boilers operate within their designed pressure ranges, maximizing their efficiency. By maintaining stable pressure, the tank prevents unnecessary stress on pumps and valves, reducing wear and tear and minimizing energy consumption for pumping water. Regular maintenance and proper pre-charge ensure that the system operates optimally, further enhancing its efficiency.
Conclusion
Installing a thermal expansion tank is a worthwhile investment for any closed-loop water heating system. By understanding the system components, following the step-by-step installation guide, and performing regular maintenance, you can protect your plumbing, extend the lifespan of your appliances, and ensure the safe and efficient operation of your HVAC system. Whether you're a homeowner, HVAC technician, or facility manager, the knowledge and skills presented here will empower you to confidently tackle this essential plumbing task. Remember to always prioritize safety and consult with a qualified professional if you have any doubts or concerns. Proper installation and maintenance of a thermal expansion tank contribute to a more reliable and efficient water heating system, saving you money and headaches in the long run.



:max_bytes(150000):strip_icc()/installing-an-expansion-tank-2719066-hero-375405ad9eaa426a880e3ed978ba00f5.jpg)