How To Install Air Conditioner Split System

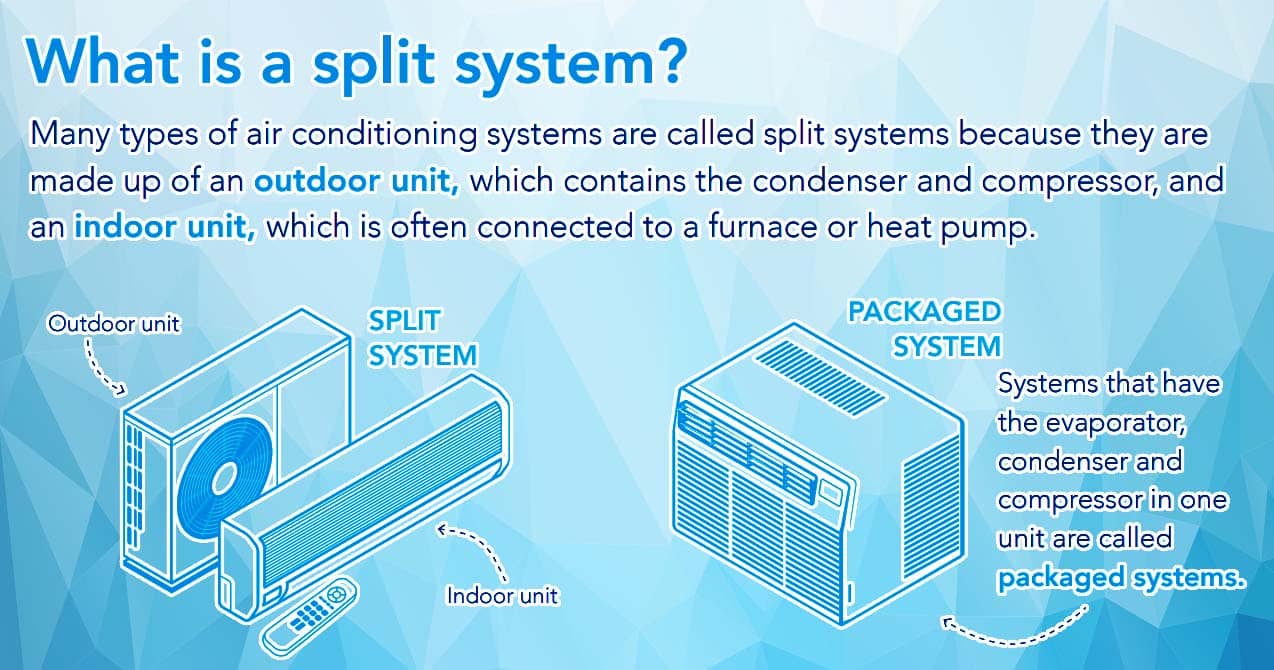
Thinking about installing a new air conditioning system? A split system, with its separate indoor and outdoor units, offers efficient cooling and heating for individual rooms or your entire home. While professional installation is always recommended, understanding the process can help you make informed decisions and potentially tackle some aspects yourself. This guide provides a detailed overview of how to install an air conditioner split system, highlighting key steps and essential safety precautions. Remember, working with refrigerant and electrical components can be dangerous. Always consult local building codes and consider hiring a qualified HVAC technician for tasks beyond your comfort level.
Understanding the Components
Before you begin, familiarize yourself with the key components of a split system:
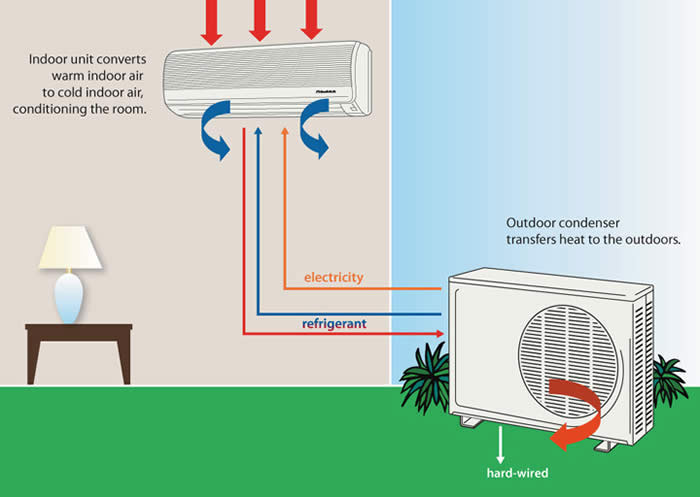
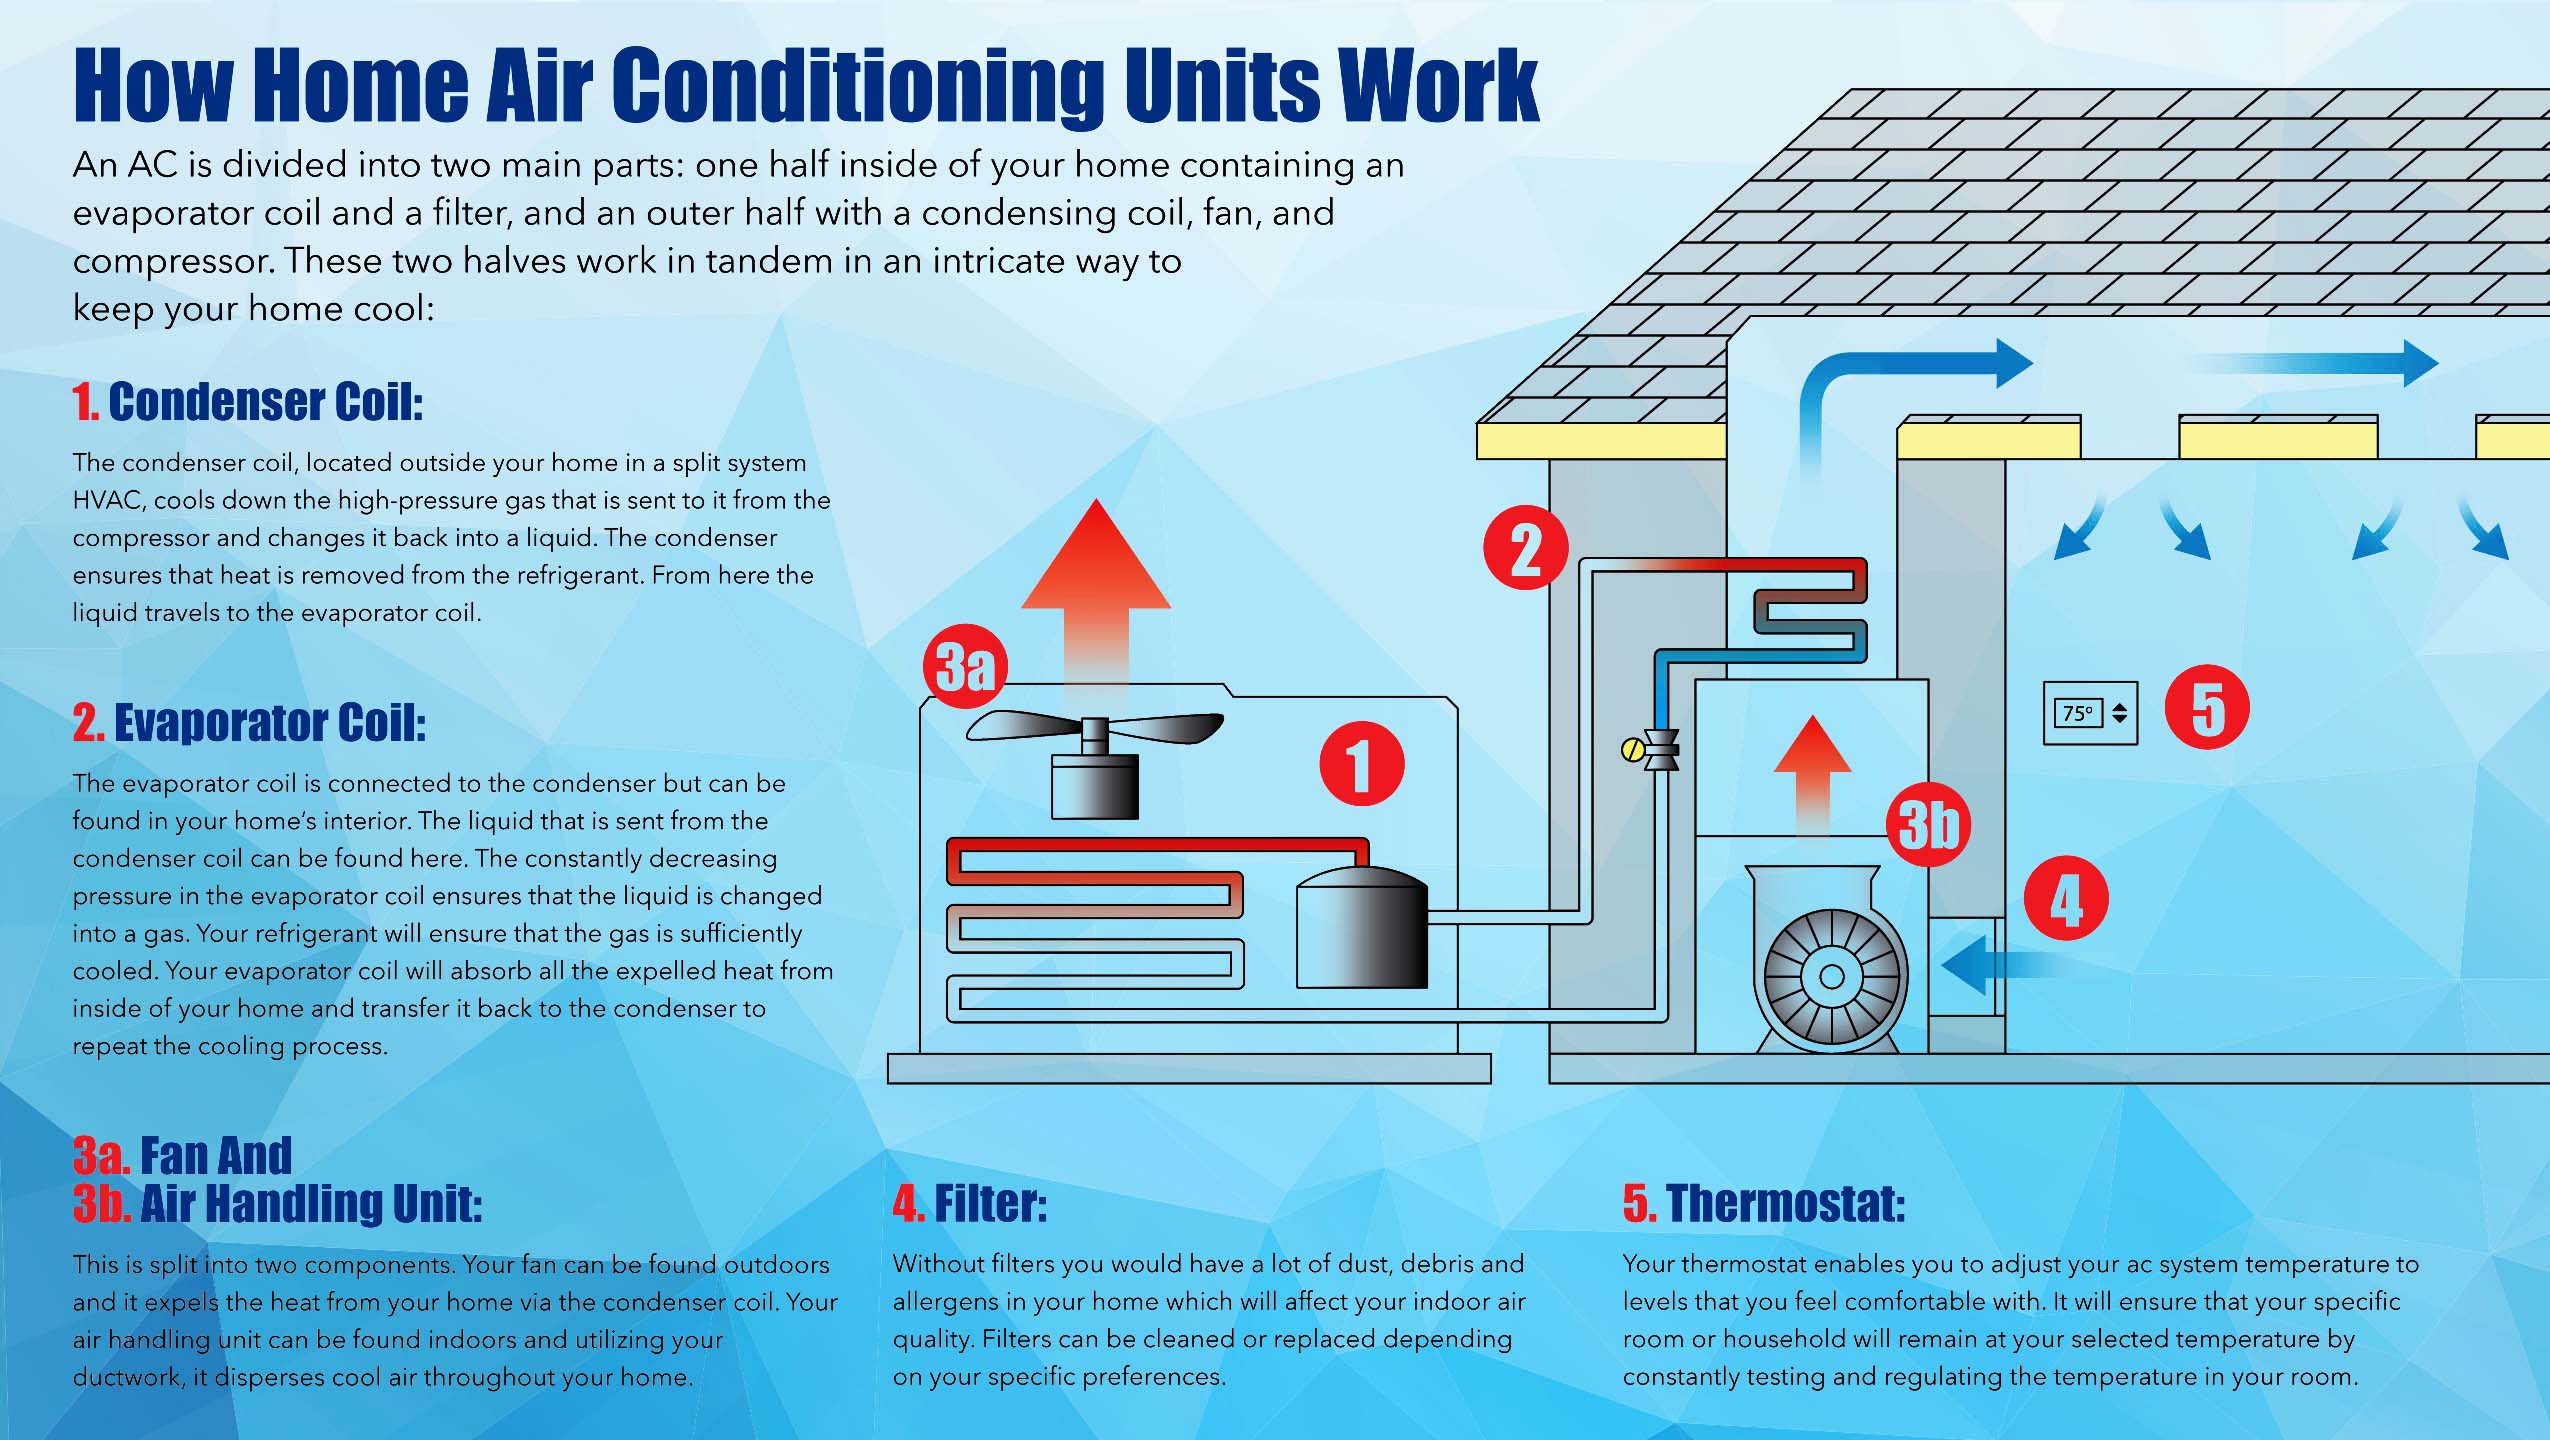
- Indoor Unit (Evaporator): This unit circulates air, cools it using refrigerant, and distributes the cooled air into the room.
- Outdoor Unit (Condenser): This unit releases the heat extracted from the indoor air. It houses the compressor, condenser coil, and fan.
- Refrigerant Lines: These copper lines connect the indoor and outdoor units, carrying refrigerant between them.
- Electrical Wiring: Provides power to both the indoor and outdoor units.
- Control Wiring: Allows communication between the indoor and outdoor units.
- Drain Line: Removes condensation from the indoor unit.
Tools and Materials You'll Need
Gather the following tools and materials before starting the installation:
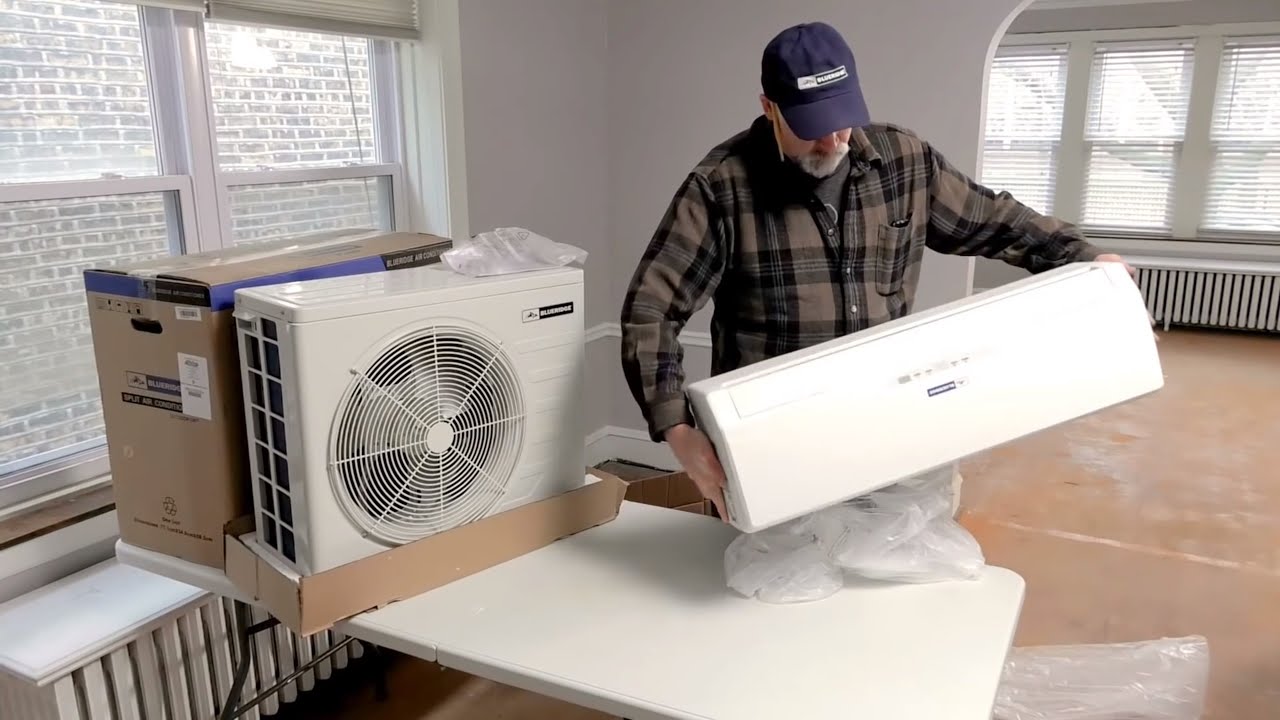
- Air Conditioner Split System Kit: Includes the indoor unit, outdoor unit, refrigerant lines, and mounting hardware.
- Refrigerant Line Set Insulation: To insulate the refrigerant lines and prevent condensation.
- Vacuum Pump: Essential for evacuating the refrigerant lines.
- Manifold Gauge Set: Used to monitor refrigerant pressure.
- Flaring Tool Kit: For creating secure connections on the refrigerant lines.
- Tube Cutter: For cutting refrigerant lines to the desired length.
- Adjustable Wrench: For tightening fittings.
- Level: To ensure proper unit alignment.
- Drill with Various Bits: For drilling mounting holes.
- Screwdrivers (Phillips and Flathead): For securing screws.
- Wire Strippers and Crimpers: For electrical connections.
- Voltage Tester: To verify power is off before working on electrical components.
- Safety Glasses and Gloves: For personal protection.
- Measuring Tape: For accurate measurements.
- Pencil or Marker: For marking locations.
- Wall Sleeve (if required): For passing refrigerant lines and electrical wiring through the wall.
- Duct Tape or Foil Tape: For sealing connections.
- Drain Line Tubing: For extending the drain line.
- Condensate Pump (if needed): To pump condensate water uphill.
- Nitrogen Tank and Regulator: For pressure testing the lines.
Step-by-Step Installation Guide
1. Planning and Preparation
Thorough planning is crucial for a successful installation.
- Select Locations: Choose suitable locations for both the indoor and outdoor units. The indoor unit should be mounted on an interior wall, away from direct sunlight and heat sources. The outdoor unit should be placed on a level surface with adequate ventilation.
- Check Electrical Capacity: Ensure your electrical system can handle the power requirements of the air conditioner. Consult a qualified electrician if necessary.
- Review Local Codes: Familiarize yourself with local building codes and regulations regarding HVAC installations.
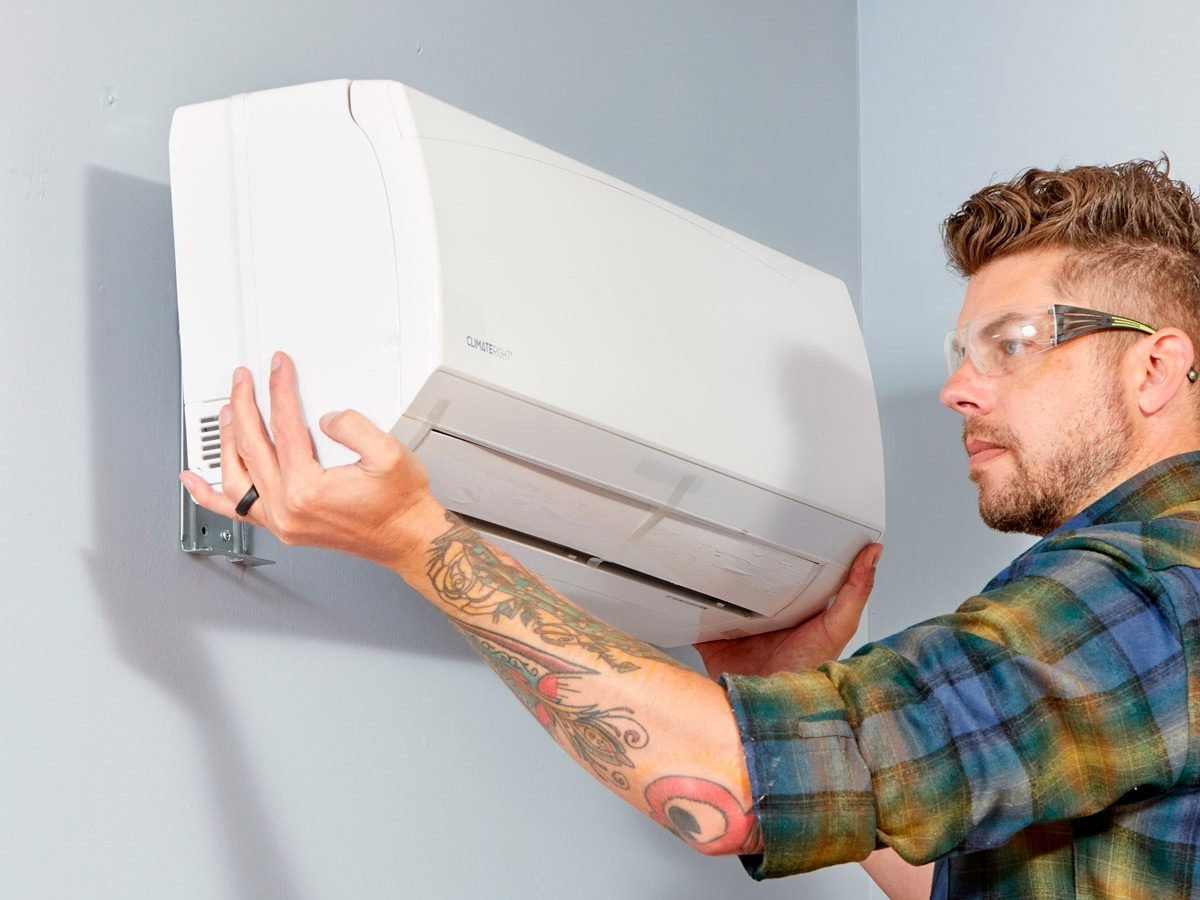
2. Installing the Indoor Unit
Carefully mount the indoor unit to the wall.
- Mounting Bracket: Attach the mounting bracket to the wall, ensuring it is level and securely fastened. Use appropriate anchors for your wall type.
- Drill Hole for Connections: Drill a hole through the wall for the refrigerant lines, electrical wiring, and drain line. Use a wall sleeve to protect the lines and wiring.
- Hang the Indoor Unit: Carefully hang the indoor unit on the mounting bracket.
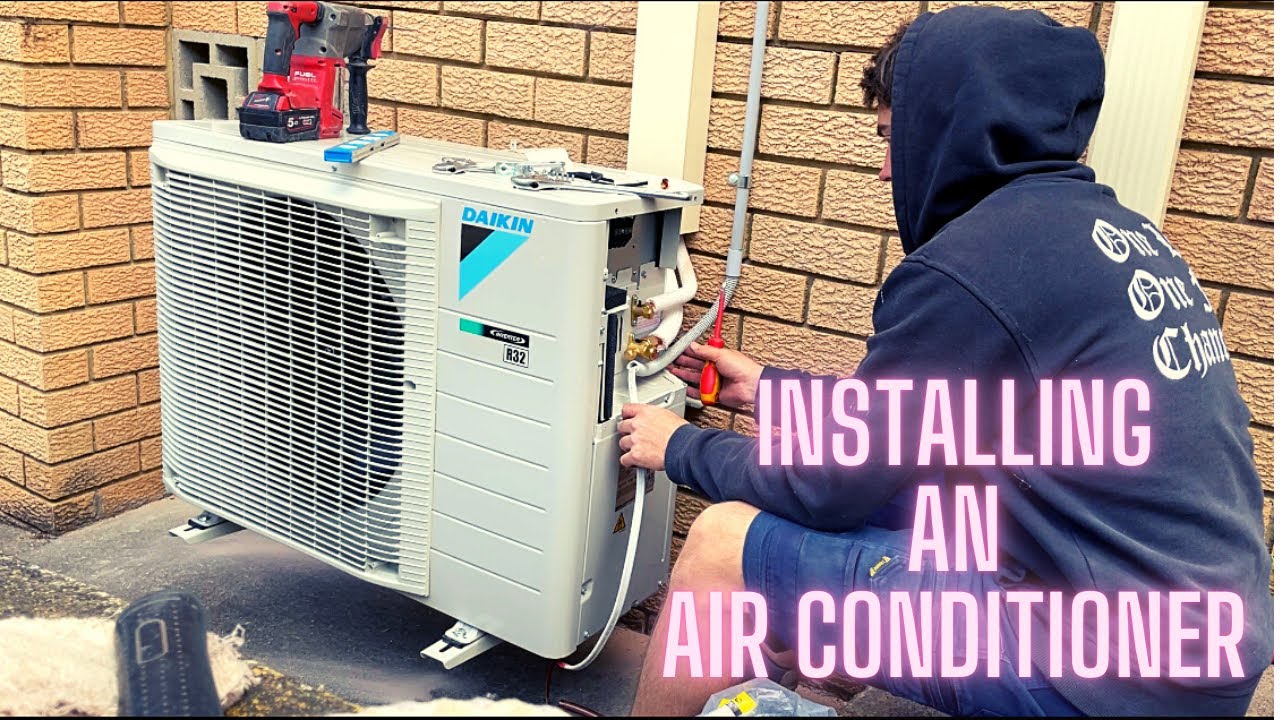
3. Installing the Outdoor Unit
Position and secure the outdoor unit properly.
- Prepare the Base: Place the outdoor unit on a level concrete pad or mounting bracket.
- Secure the Unit: Secure the outdoor unit to the base using appropriate hardware.
4. Connecting Refrigerant Lines
This step requires precision and specialized tools. Improper connections can lead to refrigerant leaks and system malfunction. Consider hiring a professional for this step.
- Cut the Lines: Cut the refrigerant lines to the required length using a tube cutter.
- Flare the Ends: Flare the ends of the refrigerant lines using a flaring tool kit. Ensure the flares are smooth and even.
- Connect to Units: Connect the refrigerant lines to the indoor and outdoor units, tightening the fittings securely with an adjustable wrench. Be careful not to overtighten.
- Insulate the Lines: Wrap the refrigerant lines with insulation to prevent condensation.
5. Electrical Wiring
Working with electricity can be dangerous. Disconnect power to the circuit before making any electrical connections. If you are not comfortable with electrical work, hire a qualified electrician.
- Connect Power: Connect the power wiring to both the indoor and outdoor units according to the manufacturer's instructions.
- Connect Control Wiring: Connect the control wiring between the indoor and outdoor units.
- Verify Connections: Double-check all electrical connections to ensure they are secure and properly insulated.
6. Connecting the Drain Line
Proper drainage is essential to prevent water damage.
- Attach Drain Line: Attach the drain line to the indoor unit.
- Route the Drain Line: Route the drain line to a suitable drainage location, such as a floor drain or condensate pump.
- Ensure Proper Slope: Ensure the drain line has a consistent downward slope to allow for proper drainage.
7. Evacuating and Charging the System
This step requires specialized equipment and knowledge of refrigerant handling. It is highly recommended to hire a qualified HVAC technician for this step.
- Connect Vacuum Pump: Connect a vacuum pump to the service ports on the outdoor unit.
- Evacuate the System: Evacuate the system to remove air and moisture from the refrigerant lines.
- Pressure Test with Nitrogen: Introduce nitrogen into the system and check for leaks using a leak detector.
- Charge with Refrigerant: Charge the system with the correct amount of refrigerant according to the manufacturer's specifications.
8. Testing and Final Checks
After completing the installation, thoroughly test the system.
- Power On: Turn on the power to the system.
- Test Cooling and Heating: Test both the cooling and heating functions of the air conditioner.
- Check Airflow: Check the airflow from the indoor unit to ensure it is adequate.
- Inspect for Leaks: Inspect all connections for leaks.
- Clean Up: Clean up the work area and dispose of any waste materials properly.
Common Issues and Troubleshooting
Here are some common issues you might encounter after installing a split system air conditioner:
- Unit Not Cooling: Check the power supply, air filter, and refrigerant levels.
- Leaking Water: Check the drain line for clogs or improper slope.
- Noisy Operation: Check for loose components or debris in the fan.
- Refrigerant Leaks: Refrigerant leaks require professional attention. Do not attempt to repair them yourself.
- System Not Turning On: Check the thermostat settings and electrical connections.
When to Call a Professional
While some aspects of split system air conditioner installation can be tackled by experienced DIYers, certain tasks require professional expertise. Consider hiring a qualified HVAC technician for the following:
- Refrigerant Line Connections: Ensuring proper connections to prevent leaks and system damage.
- Evacuation and Charging: Handling refrigerant and using specialized equipment.
- Electrical Wiring: Ensuring safe and code-compliant electrical connections.
- Complex Troubleshooting: Diagnosing and repairing complex system issues.
Cost Considerations
The cost of installing a split system air conditioner can vary depending on several factors, including:
- Size and Type of System: Larger systems and more efficient models typically cost more.
- Complexity of Installation: Difficult installations may require more labor and specialized equipment.
- Labor Costs: Professional installation costs can vary depending on location and contractor. Expect to pay between $500 and $2000 for professional installation.
- Permits and Inspections: Local building codes may require permits and inspections, adding to the overall cost.
DIY installation can save on labor costs, but it's essential to factor in the cost of tools, materials, and potential repairs if something goes wrong. A complete split system unit can range anywhere from $800 to upwards of $4000, depending on its BTU rating, SEER rating, and included features.
Safety Precautions
Safety is paramount when working with HVAC systems. Follow these precautions:
- Disconnect Power: Always disconnect power to the circuit before working on electrical components.
- Wear Safety Gear: Wear safety glasses and gloves to protect yourself from injury.
- Handle Refrigerant with Care: Refrigerant can cause frostbite and other health problems. Avoid direct contact with refrigerant.
- Follow Manufacturer's Instructions: Always follow the manufacturer's instructions for installation and operation.
- Consult a Professional: When in doubt, consult a qualified HVAC technician.
Installing an air conditioner split system can be a rewarding project, but it's essential to approach it with caution and proper preparation. By following this guide and prioritizing safety, you can increase your chances of a successful installation. Remember that professional help is often the best option, especially when dealing with refrigerant and electrical components.