How To Install Air Source Heat Pump
Air source heat pumps (ASHPs) represent a versatile and increasingly popular solution for both heating and cooling residential and commercial spaces. Unlike traditional furnaces that generate heat or air conditioners that only cool, heat pumps move heat, offering efficient temperature control year-round. This article provides a comprehensive guide to installing air source heat pumps, catering to homeowners, HVAC technicians, and facility managers. Understanding the installation process, system components, and best practices is crucial for optimizing performance, ensuring longevity, and maximizing energy savings.
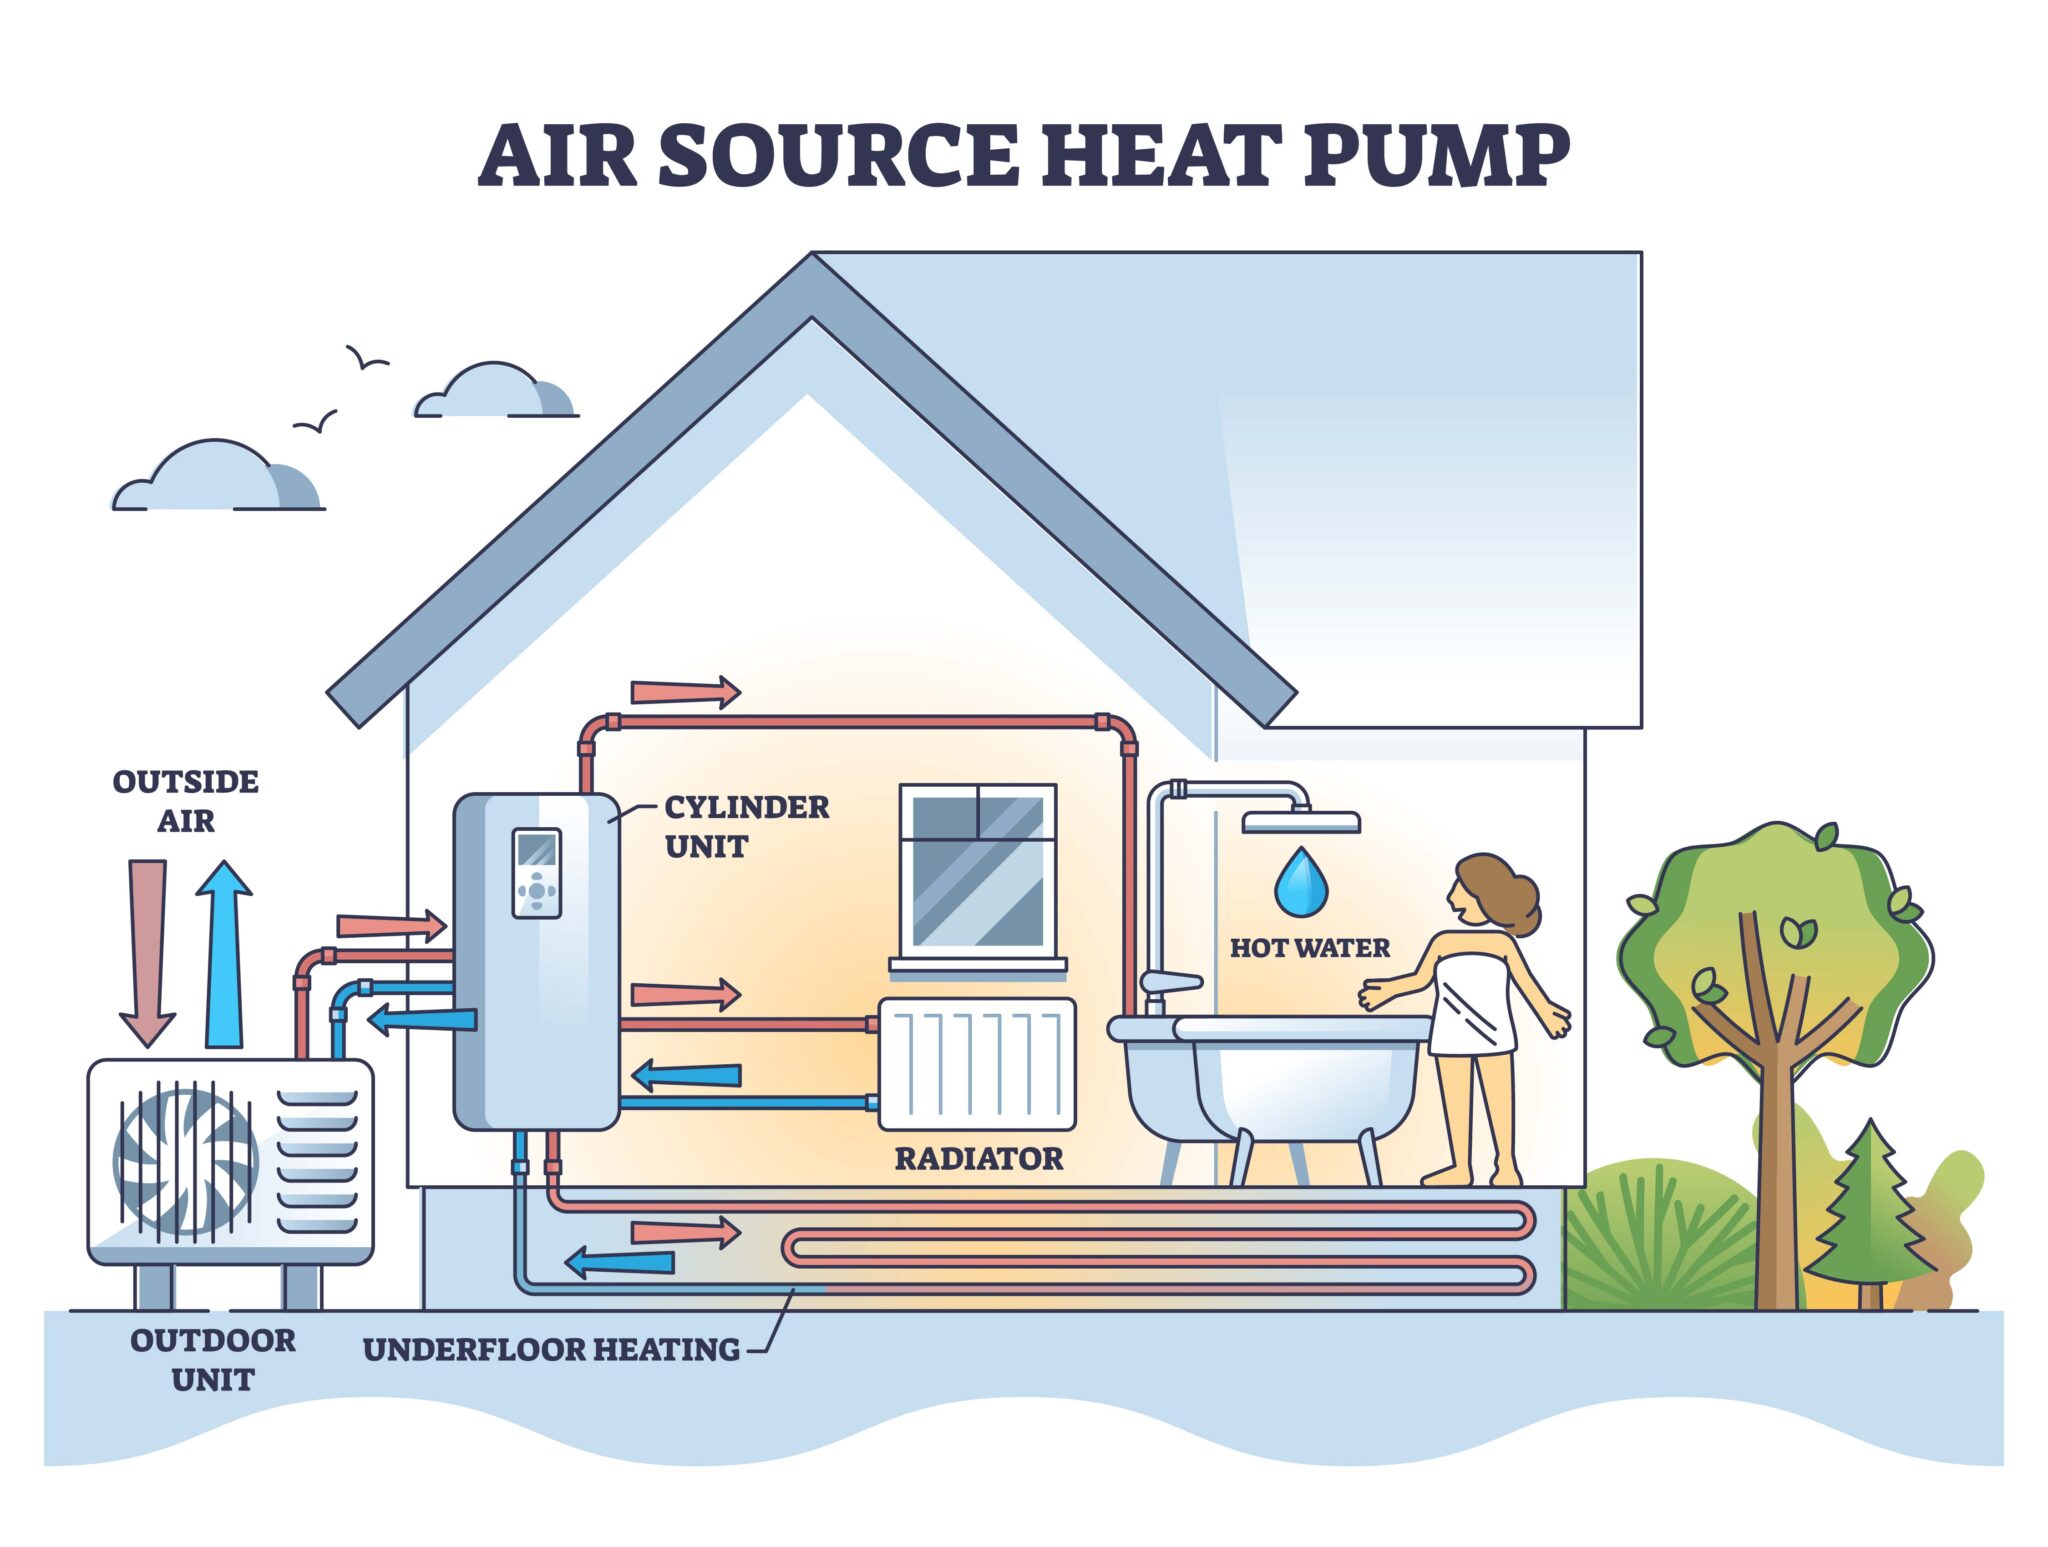
Understanding Air Source Heat Pumps
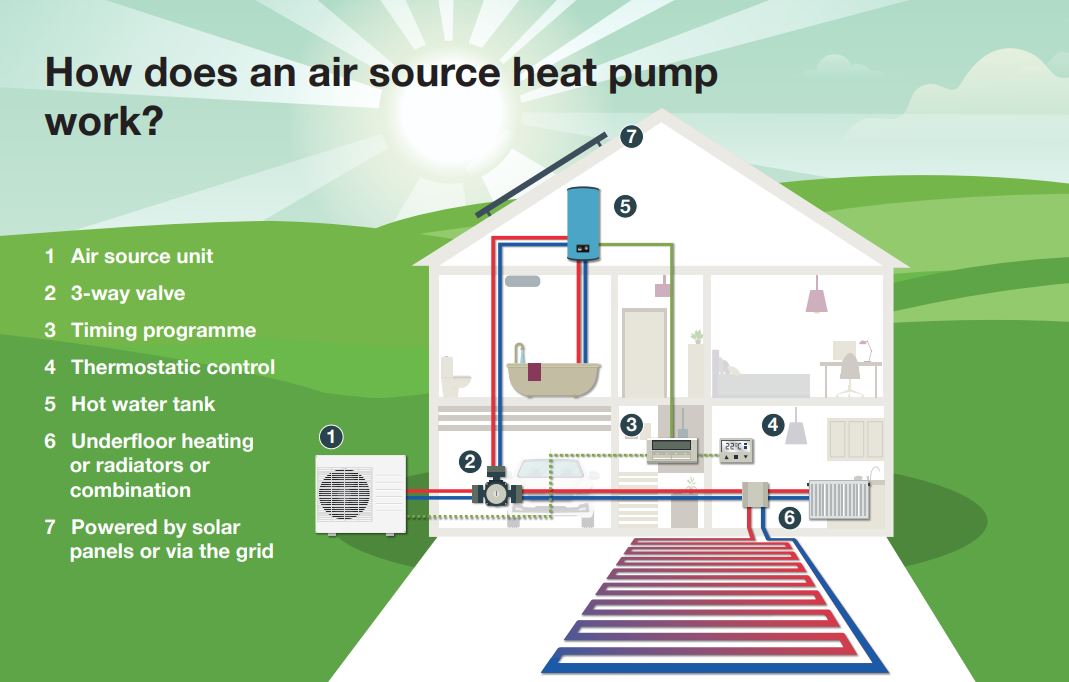
Before diving into the installation process, let's clarify the basics of how an air source heat pump operates. These systems utilize a refrigerant to transfer heat between the inside and outside of a building. In heating mode, the heat pump extracts heat from the outdoor air (even in cold temperatures) and transfers it indoors. In cooling mode, the process is reversed, extracting heat from the indoor air and releasing it outside. The efficiency of this process is measured by two key ratings: Heating Seasonal Performance Factor (HSPF) for heating and Seasonal Energy Efficiency Ratio (SEER) for cooling. Higher ratings indicate greater efficiency and lower operating costs.
Consider a home in a moderate climate, like Atlanta, Georgia. A homeowner replacing an old furnace with a high-efficiency ASHP might see their heating bills decrease by 30-40%, thanks to the heat pump's ability to extract heat even when outdoor temperatures dip to near freezing. This is in contrast to an electric resistance heater, which generates heat directly and consumes significantly more energy.
Planning and Preparation: The Key to a Successful Installation
Proper planning is paramount for a successful ASHP installation. This stage involves several critical steps:
1. Load Calculation
Determining the appropriate size of the heat pump for your space is crucial. An undersized unit will struggle to maintain desired temperatures, while an oversized unit will cycle on and off frequently, leading to reduced efficiency and premature wear and tear. A Manual J load calculation, performed by a qualified HVAC professional, considers factors such as the building's square footage, insulation levels, window efficiency, and climate to accurately determine the heating and cooling requirements. For example, a poorly insulated home in Minnesota will require a larger heat pump than a well-insulated home of the same size in Florida.
2. Site Assessment
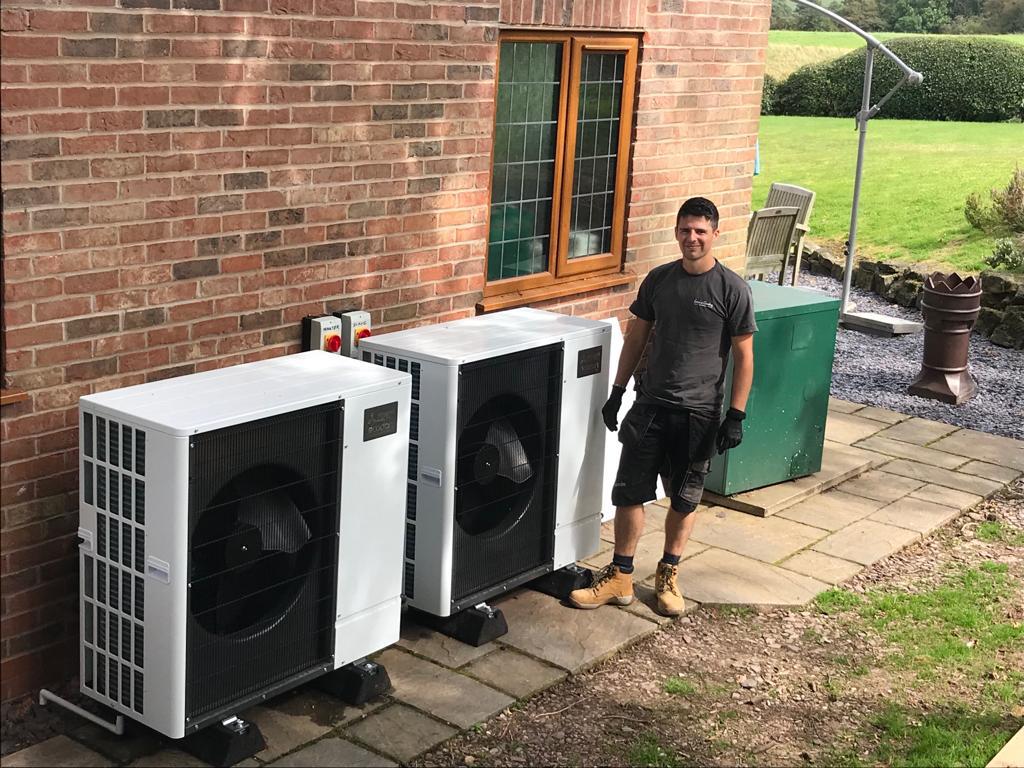
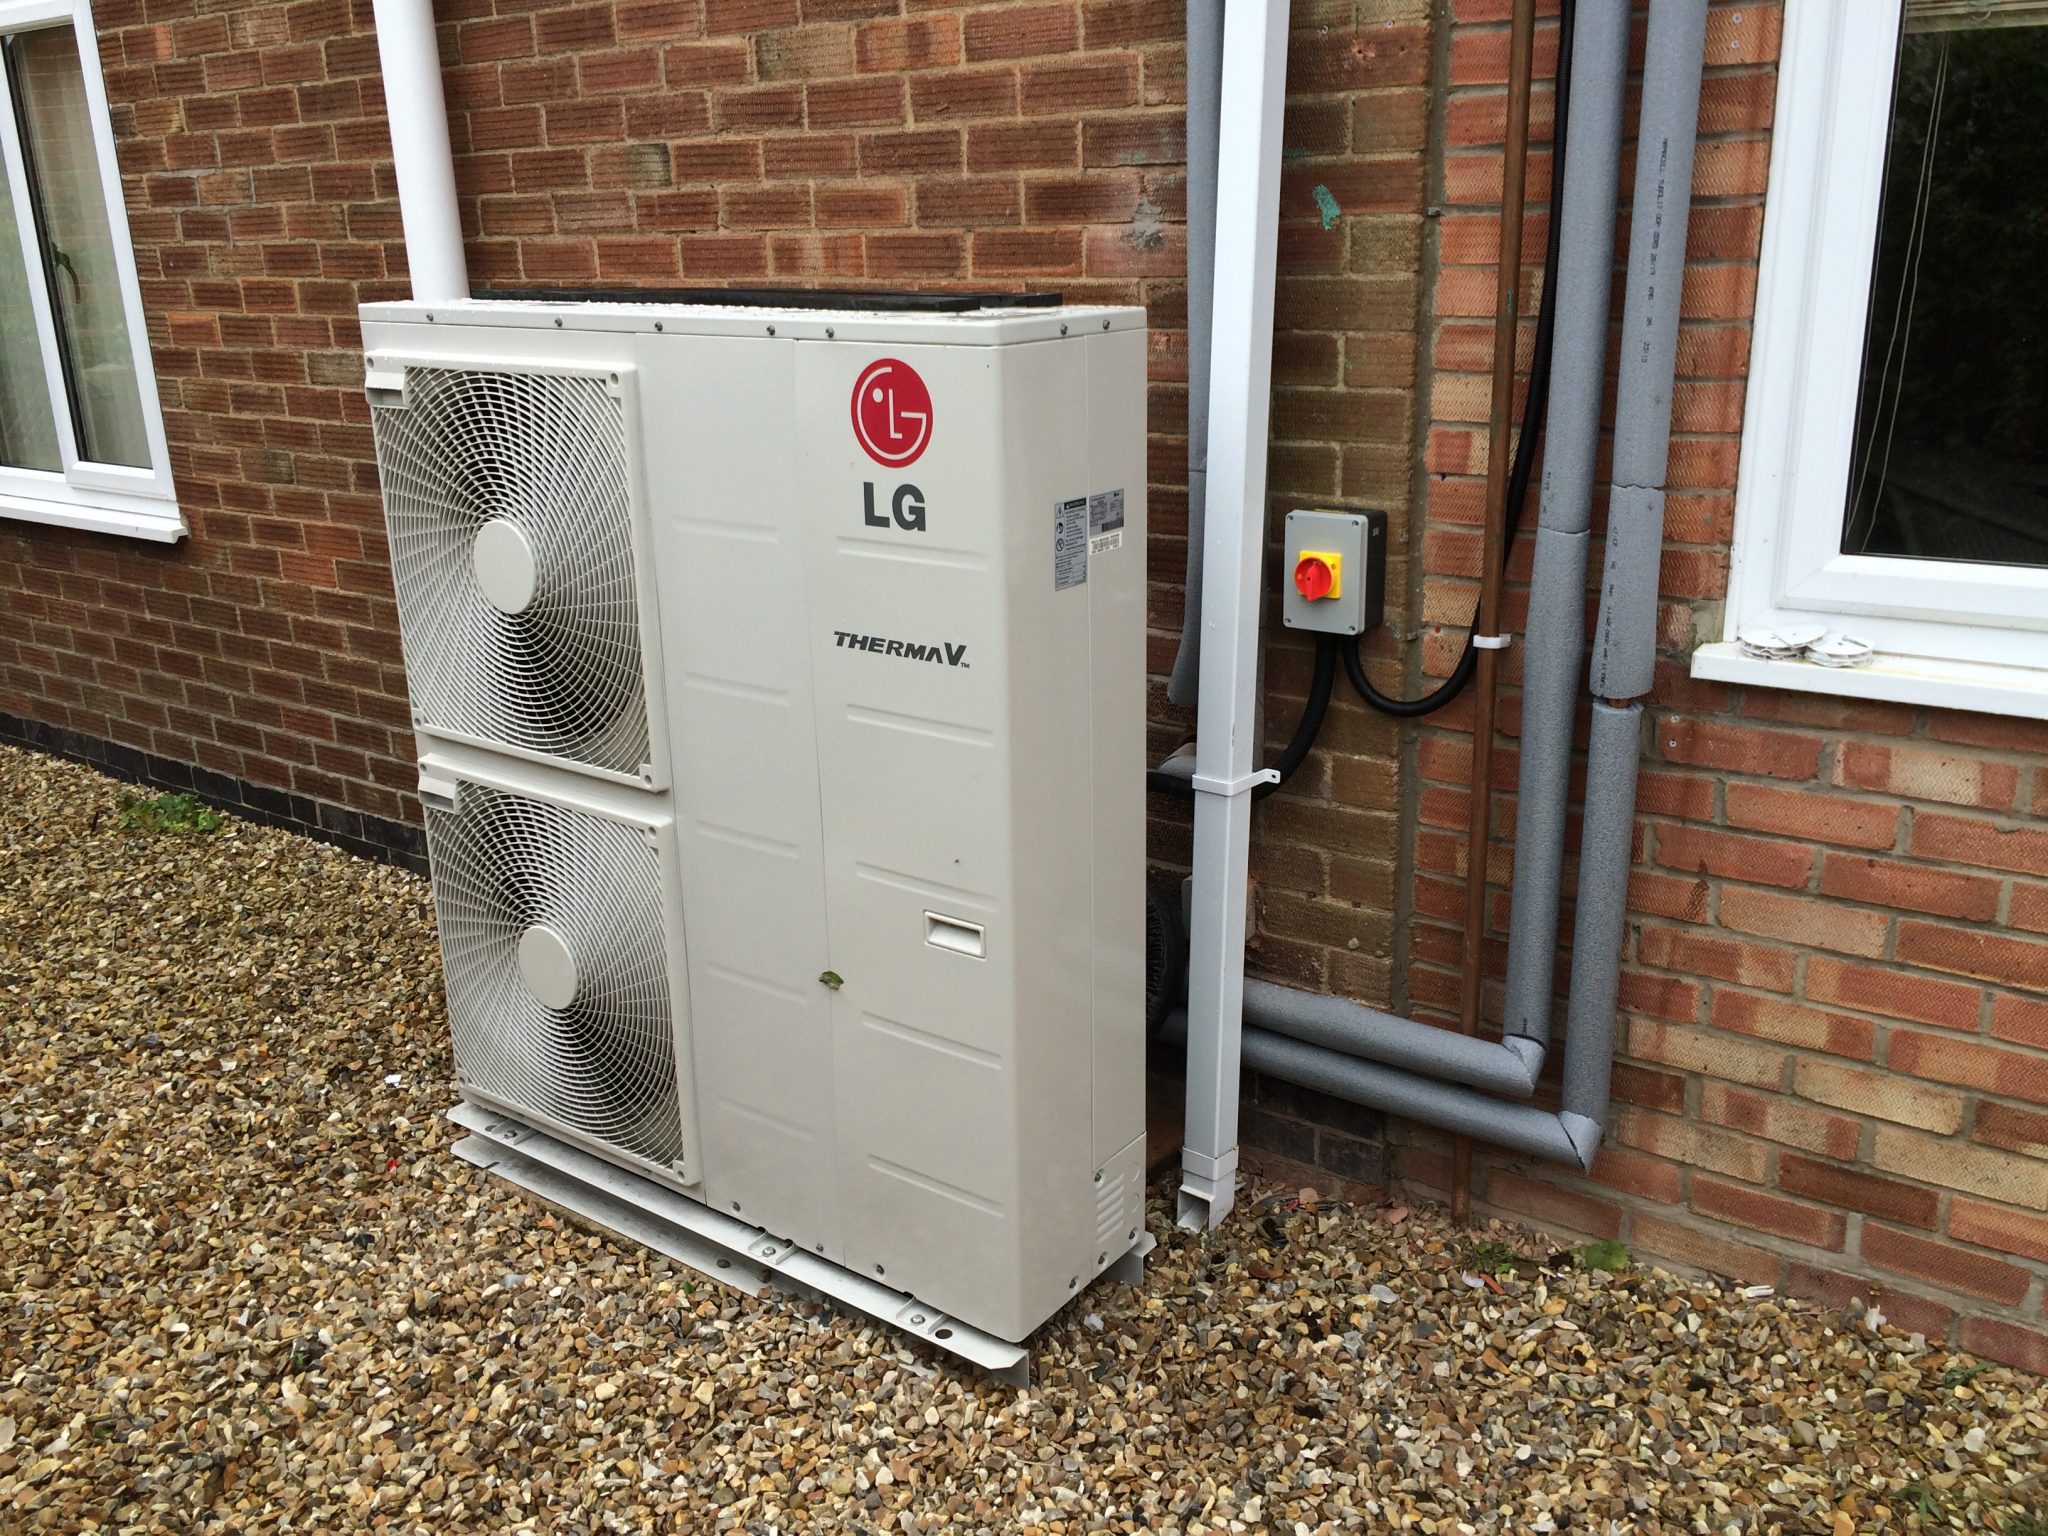
Evaluate the proposed locations for both the outdoor and indoor units. The outdoor unit requires adequate clearance for airflow and should be placed on a level, stable surface, away from obstructions like bushes or snowdrifts. The indoor unit, typically an air handler or a ductless mini-split unit, should be positioned to effectively distribute conditioned air throughout the space. Avoid placing the outdoor unit near bedrooms or living areas to minimize noise disturbance. Also, check for any local ordinances or HOA restrictions regarding outdoor unit placement.
3. Ductwork Inspection (for Ducted Systems)
If you are installing a ducted heat pump system, carefully inspect the existing ductwork for leaks, damage, or inadequate insulation. Leaky ducts can significantly reduce system efficiency and increase energy costs. Seal any leaks with mastic or foil tape and ensure that the ductwork is properly insulated. Consider having a professional perform a duct leakage test to quantify the extent of any leaks.
4. Electrical Requirements
Heat pumps require a dedicated electrical circuit with the appropriate voltage and amperage. Consult a qualified electrician to ensure that your electrical panel can handle the additional load and to install the necessary wiring and disconnect switch. Improper electrical wiring can pose a serious safety hazard and damage the equipment. NEC (National Electrical Code) guidelines must be followed meticulously.
5. Permits and Inspections
Check with your local building department to determine if a permit is required for the installation. Obtaining the necessary permits ensures that the installation meets local building codes and safety standards. Schedule inspections at various stages of the installation process to verify compliance and prevent potential problems.
Step-by-Step Installation Guide
The following steps provide a general overview of the ASHP installation process. Always refer to the manufacturer's instructions for specific guidance and safety precautions.
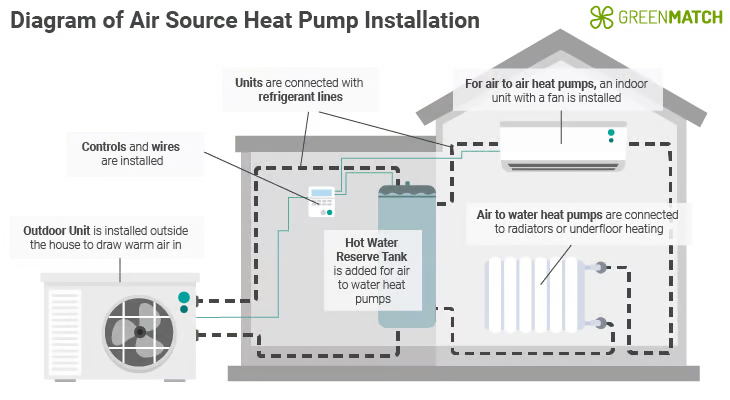
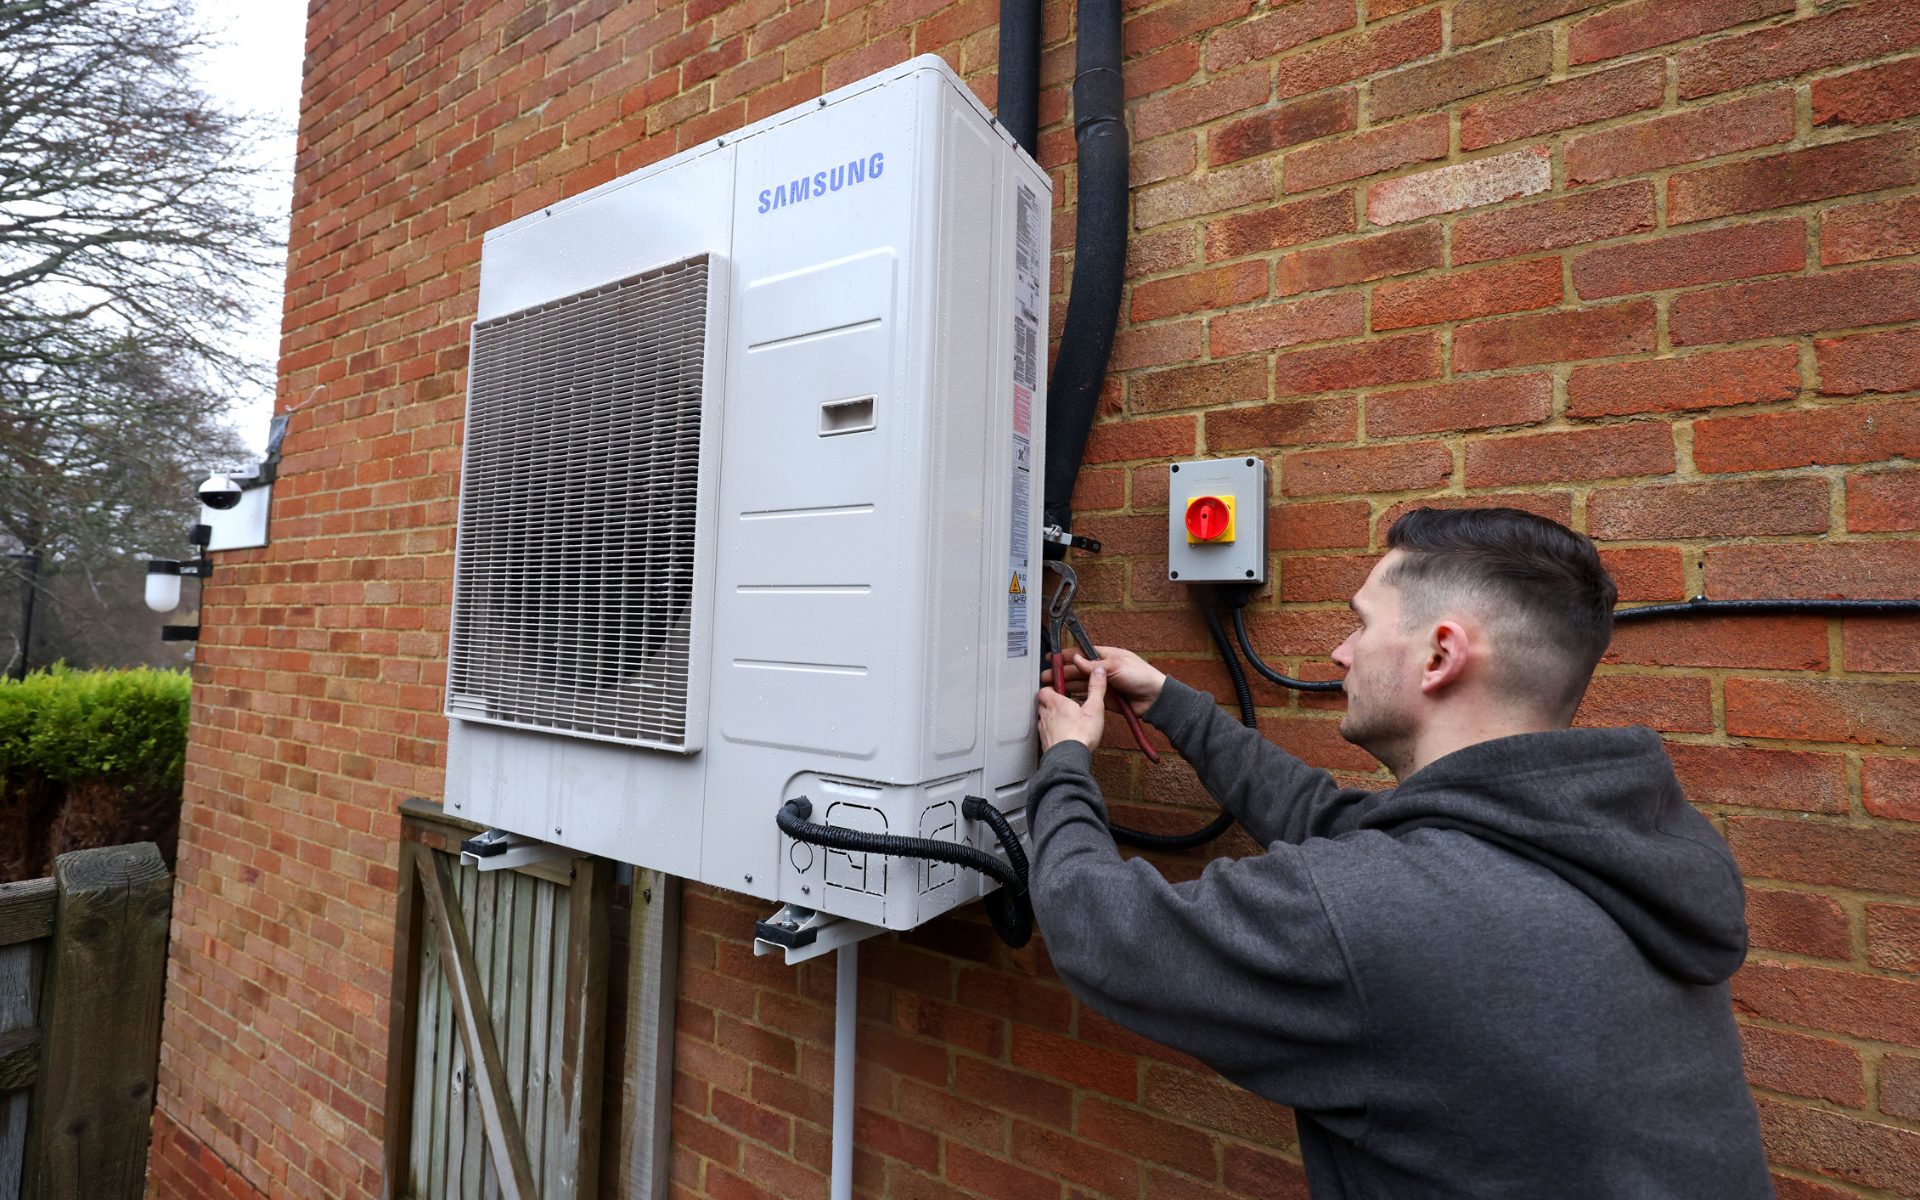
1. Mounting the Outdoor Unit
Position the outdoor unit on a level concrete pad or mounting brackets. Secure the unit to the pad or brackets using appropriate fasteners. Ensure that the unit is properly aligned and that there is adequate clearance around it for airflow. Connect the refrigerant lines and electrical wiring according to the manufacturer's instructions. Use a torque wrench to tighten the refrigerant line connections to the specified torque to prevent leaks.
2. Installing the Indoor Unit
For ducted systems, install the air handler in the attic, basement, or other designated location. Connect the ductwork to the air handler, ensuring that all connections are airtight. For ductless mini-split systems, mount the indoor unit on the wall or ceiling according to the manufacturer's instructions. Drill a hole through the wall to run the refrigerant lines and electrical wiring to the outdoor unit.
3. Connecting Refrigerant Lines
Carefully run the refrigerant lines between the outdoor and indoor units, following the shortest and straightest path possible. Insulate the refrigerant lines to prevent heat loss or gain. Connect the refrigerant lines to the outdoor and indoor units, using a flare tool to create leak-tight connections. Purge the refrigerant lines with nitrogen to remove any air or moisture before charging the system with refrigerant. This step is critical to prevent contamination and ensure proper system operation.
4. Wiring the System
Connect the electrical wiring between the outdoor and indoor units, following the wiring diagrams provided by the manufacturer. Ensure that all connections are secure and properly grounded. Install a thermostat and connect it to the indoor unit. Double-check all wiring connections before powering up the system.
5. Charging the System
Once the refrigerant lines are connected and the electrical wiring is complete, charge the system with the appropriate type and amount of refrigerant, as specified by the manufacturer. Use a refrigerant scale to accurately measure the refrigerant charge. Monitor the system pressures and temperatures to ensure that it is operating within the specified range. EPA Section 608 regulations must be followed when handling refrigerants.
6. Testing and Commissioning
After charging the system, thoroughly test its operation in both heating and cooling modes. Check the airflow, temperature, and pressure readings to verify that the system is performing as expected. Adjust the settings as needed to optimize performance. Train the homeowner or facility manager on how to operate and maintain the system. Provide them with the manufacturer's documentation and warranty information.
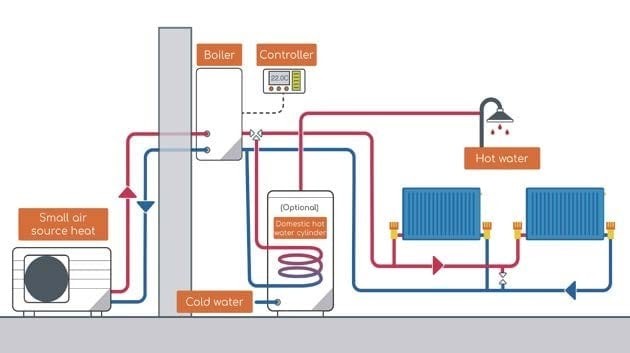
Ductless Mini-Split Systems: A Specialized Installation
Ductless mini-split heat pumps offer unique installation considerations. Since they don't rely on ductwork, they are ideal for retrofitting homes without existing duct systems or for zoning individual rooms. The installation process involves mounting the indoor unit on an exterior wall and connecting it to the outdoor unit via refrigerant lines and electrical wiring. Careful attention must be paid to properly sealing the wall penetration to prevent air leaks and moisture intrusion. Ductless systems often require specialized tools and training for proper installation and refrigerant charging.
Cost, Efficiency, and Lifespan
The cost of installing an air source heat pump varies depending on the size of the system, the complexity of the installation, and the location. Generally, expect to pay between $4,000 and $8,000 for a complete system installation. While the initial investment may be higher than a traditional furnace or air conditioner, the long-term energy savings can offset the upfront cost. High-efficiency ASHPs can achieve HSPF ratings of 10 or higher and SEER ratings of 20 or higher, resulting in significant energy savings. With proper maintenance, air source heat pumps can last for 15-20 years.
To maximize lifespan and efficiency, schedule regular maintenance with a qualified HVAC technician. This includes cleaning the coils, inspecting the refrigerant lines, and checking the electrical components. Changing air filters regularly is also crucial for maintaining airflow and preventing dust buildup.
Troubleshooting Common Issues
Even with proper installation, problems can sometimes arise. Common issues include:
- Insufficient heating or cooling: Check the refrigerant charge, airflow, and thermostat settings.
- Noisy operation: Inspect the fan blades, compressor, and refrigerant lines for damage or obstructions.
- Refrigerant leaks: Use a refrigerant leak detector to identify and repair any leaks.
- Electrical problems: Check the wiring, fuses, and circuit breakers.
For complex issues, always consult a qualified HVAC technician.
Conclusion
Installing an air source heat pump is a significant investment that can provide years of efficient and reliable heating and cooling. By carefully planning the installation, following proper procedures, and performing regular maintenance, you can maximize the performance, lifespan, and energy savings of your ASHP system. Whether you're a homeowner looking to upgrade your HVAC system, an HVAC technician expanding your skillset, or a facility manager responsible for maintaining large buildings, understanding the intricacies of ASHP installation is essential for achieving optimal results.