How To Install An Air Admittance Valve
:strip_icc()/How-to-install-air-admittance-valve_color-d37370f034c54b19bae09572f532f40d.jpg)
Ever noticed that unsettling gurgling sound coming from your sink drain after you flush the toilet or run the washing machine? Or perhaps a lingering sewer gas odor wafting through your bathroom? These are common signs of a ventilation problem in your plumbing system, and a potential culprit is a malfunctioning (or missing) air admittance valve, often called an AAV.
What is an Air Admittance Valve (AAV)?
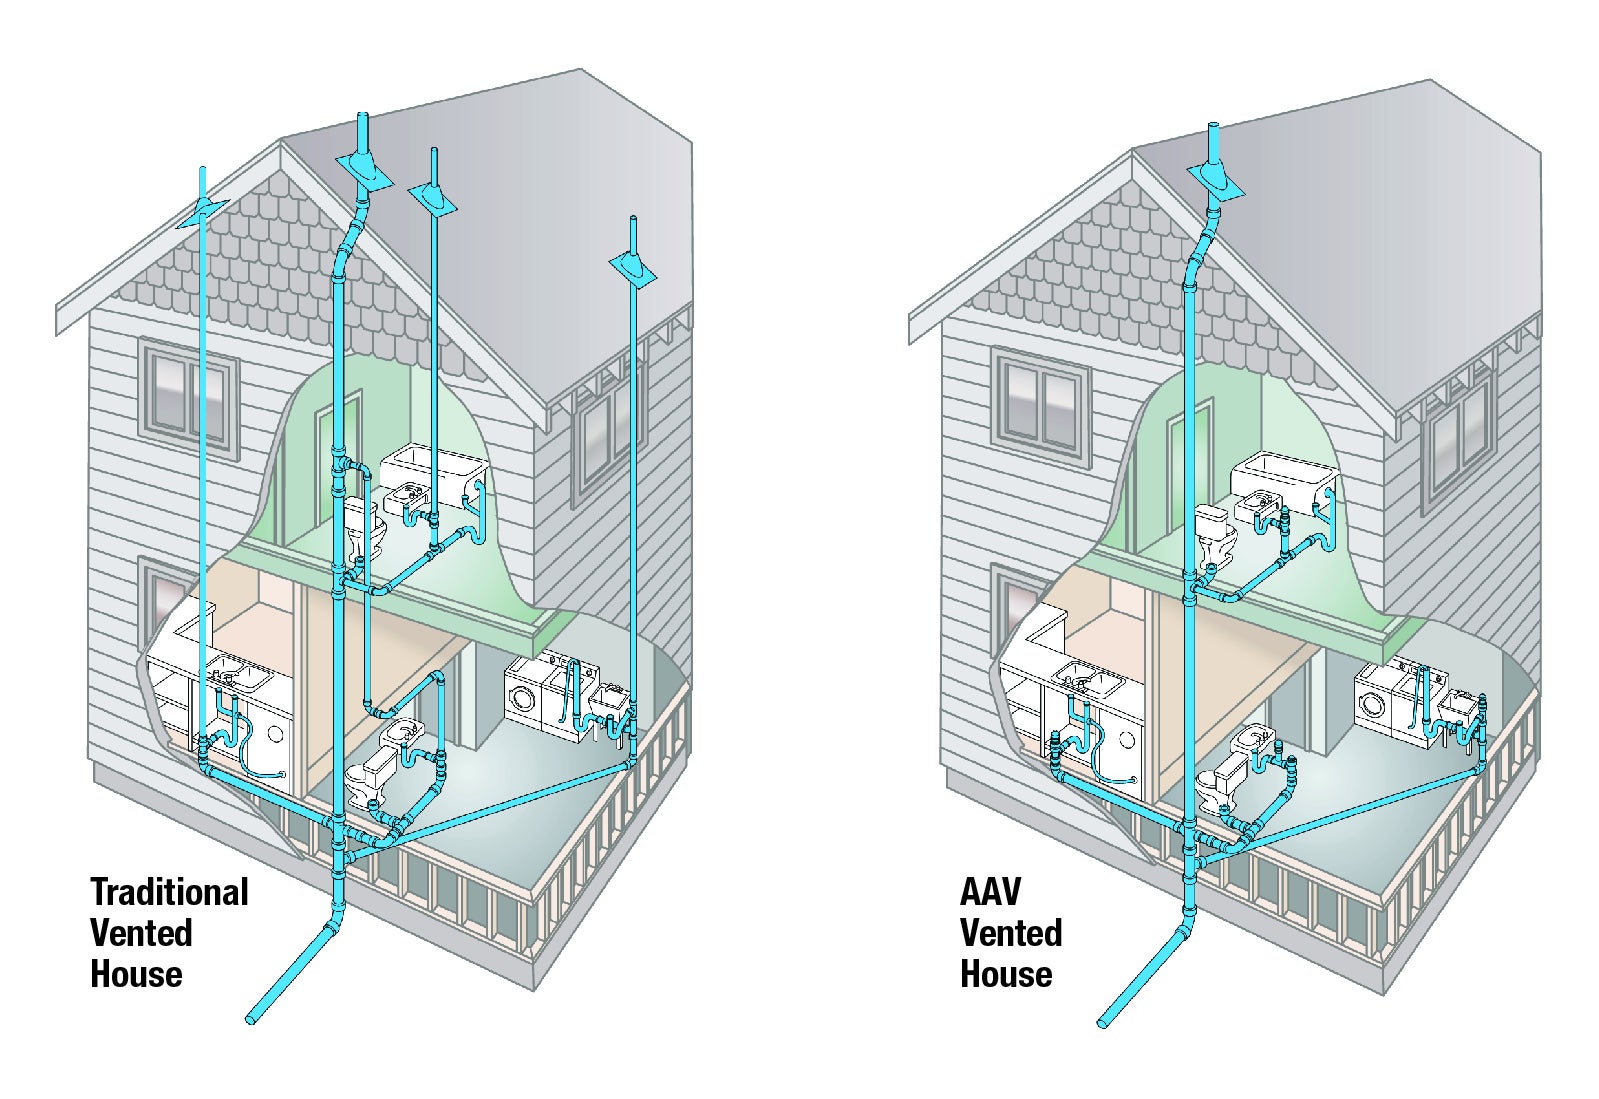
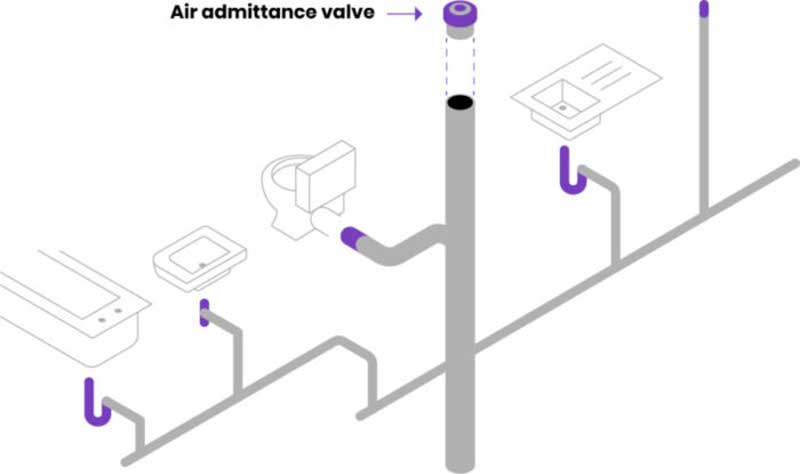
An AAV is a one-way valve that allows air into your plumbing drain system to prevent negative pressure from siphoning water out of your P-traps. P-traps are the curved pipes under your sinks and toilets that hold water, creating a seal that prevents sewer gases from entering your home. When a fixture drains, it creates a vacuum. Without proper venting, this vacuum can suck the water out of the P-trap, breaking the seal and allowing those unpleasant odors to escape. AAVs are a relatively simple and inexpensive way to solve this problem, especially in situations where traditional venting through the roof is difficult or costly.
When to Consider Installing or Replacing an AAV
You should consider installing or replacing an AAV if you experience any of the following:
- Gurgling sounds from drains after flushing or running water.
- Sewer gas odors coming from drains.
- Slow draining fixtures.
- If you are remodeling and adding a new fixture that is difficult to vent traditionally.
- If a previous AAV is visibly damaged or has stopped working.
Troubleshooting the Problem: Is it Really the AAV?
Before diving into AAV installation, it's crucial to rule out other potential causes of your plumbing woes. AAVs are relatively simple devices, but misdiagnosing the problem can lead to unnecessary work.
Step 1: Check for Obvious Blockages
A clogged drain is the most common cause of slow draining and gurgling sounds. Try these methods:
- Plunger: A good old-fashioned plunger can often dislodge minor blockages. Make sure there's enough water in the sink or tub to create a seal.
- Boiling Water: Pour a kettle of boiling water down the drain (avoid doing this with PVC pipes, as high temperatures can damage them – use hot tap water instead). This can melt grease and soap buildup.
- Baking Soda and Vinegar: Pour 1 cup of baking soda down the drain, followed by 1 cup of vinegar. Let it fizz for 30 minutes, then flush with hot water.
Step 2: Inspect Existing Venting
If you have traditional venting that goes through the roof, check the vent pipe on your roof for obstructions. Birds nests, leaves, or debris can block the vent and prevent proper airflow. This is a job for a professional if you're not comfortable working at heights.
Step 3: Identify the Location of the AAV (If Present)
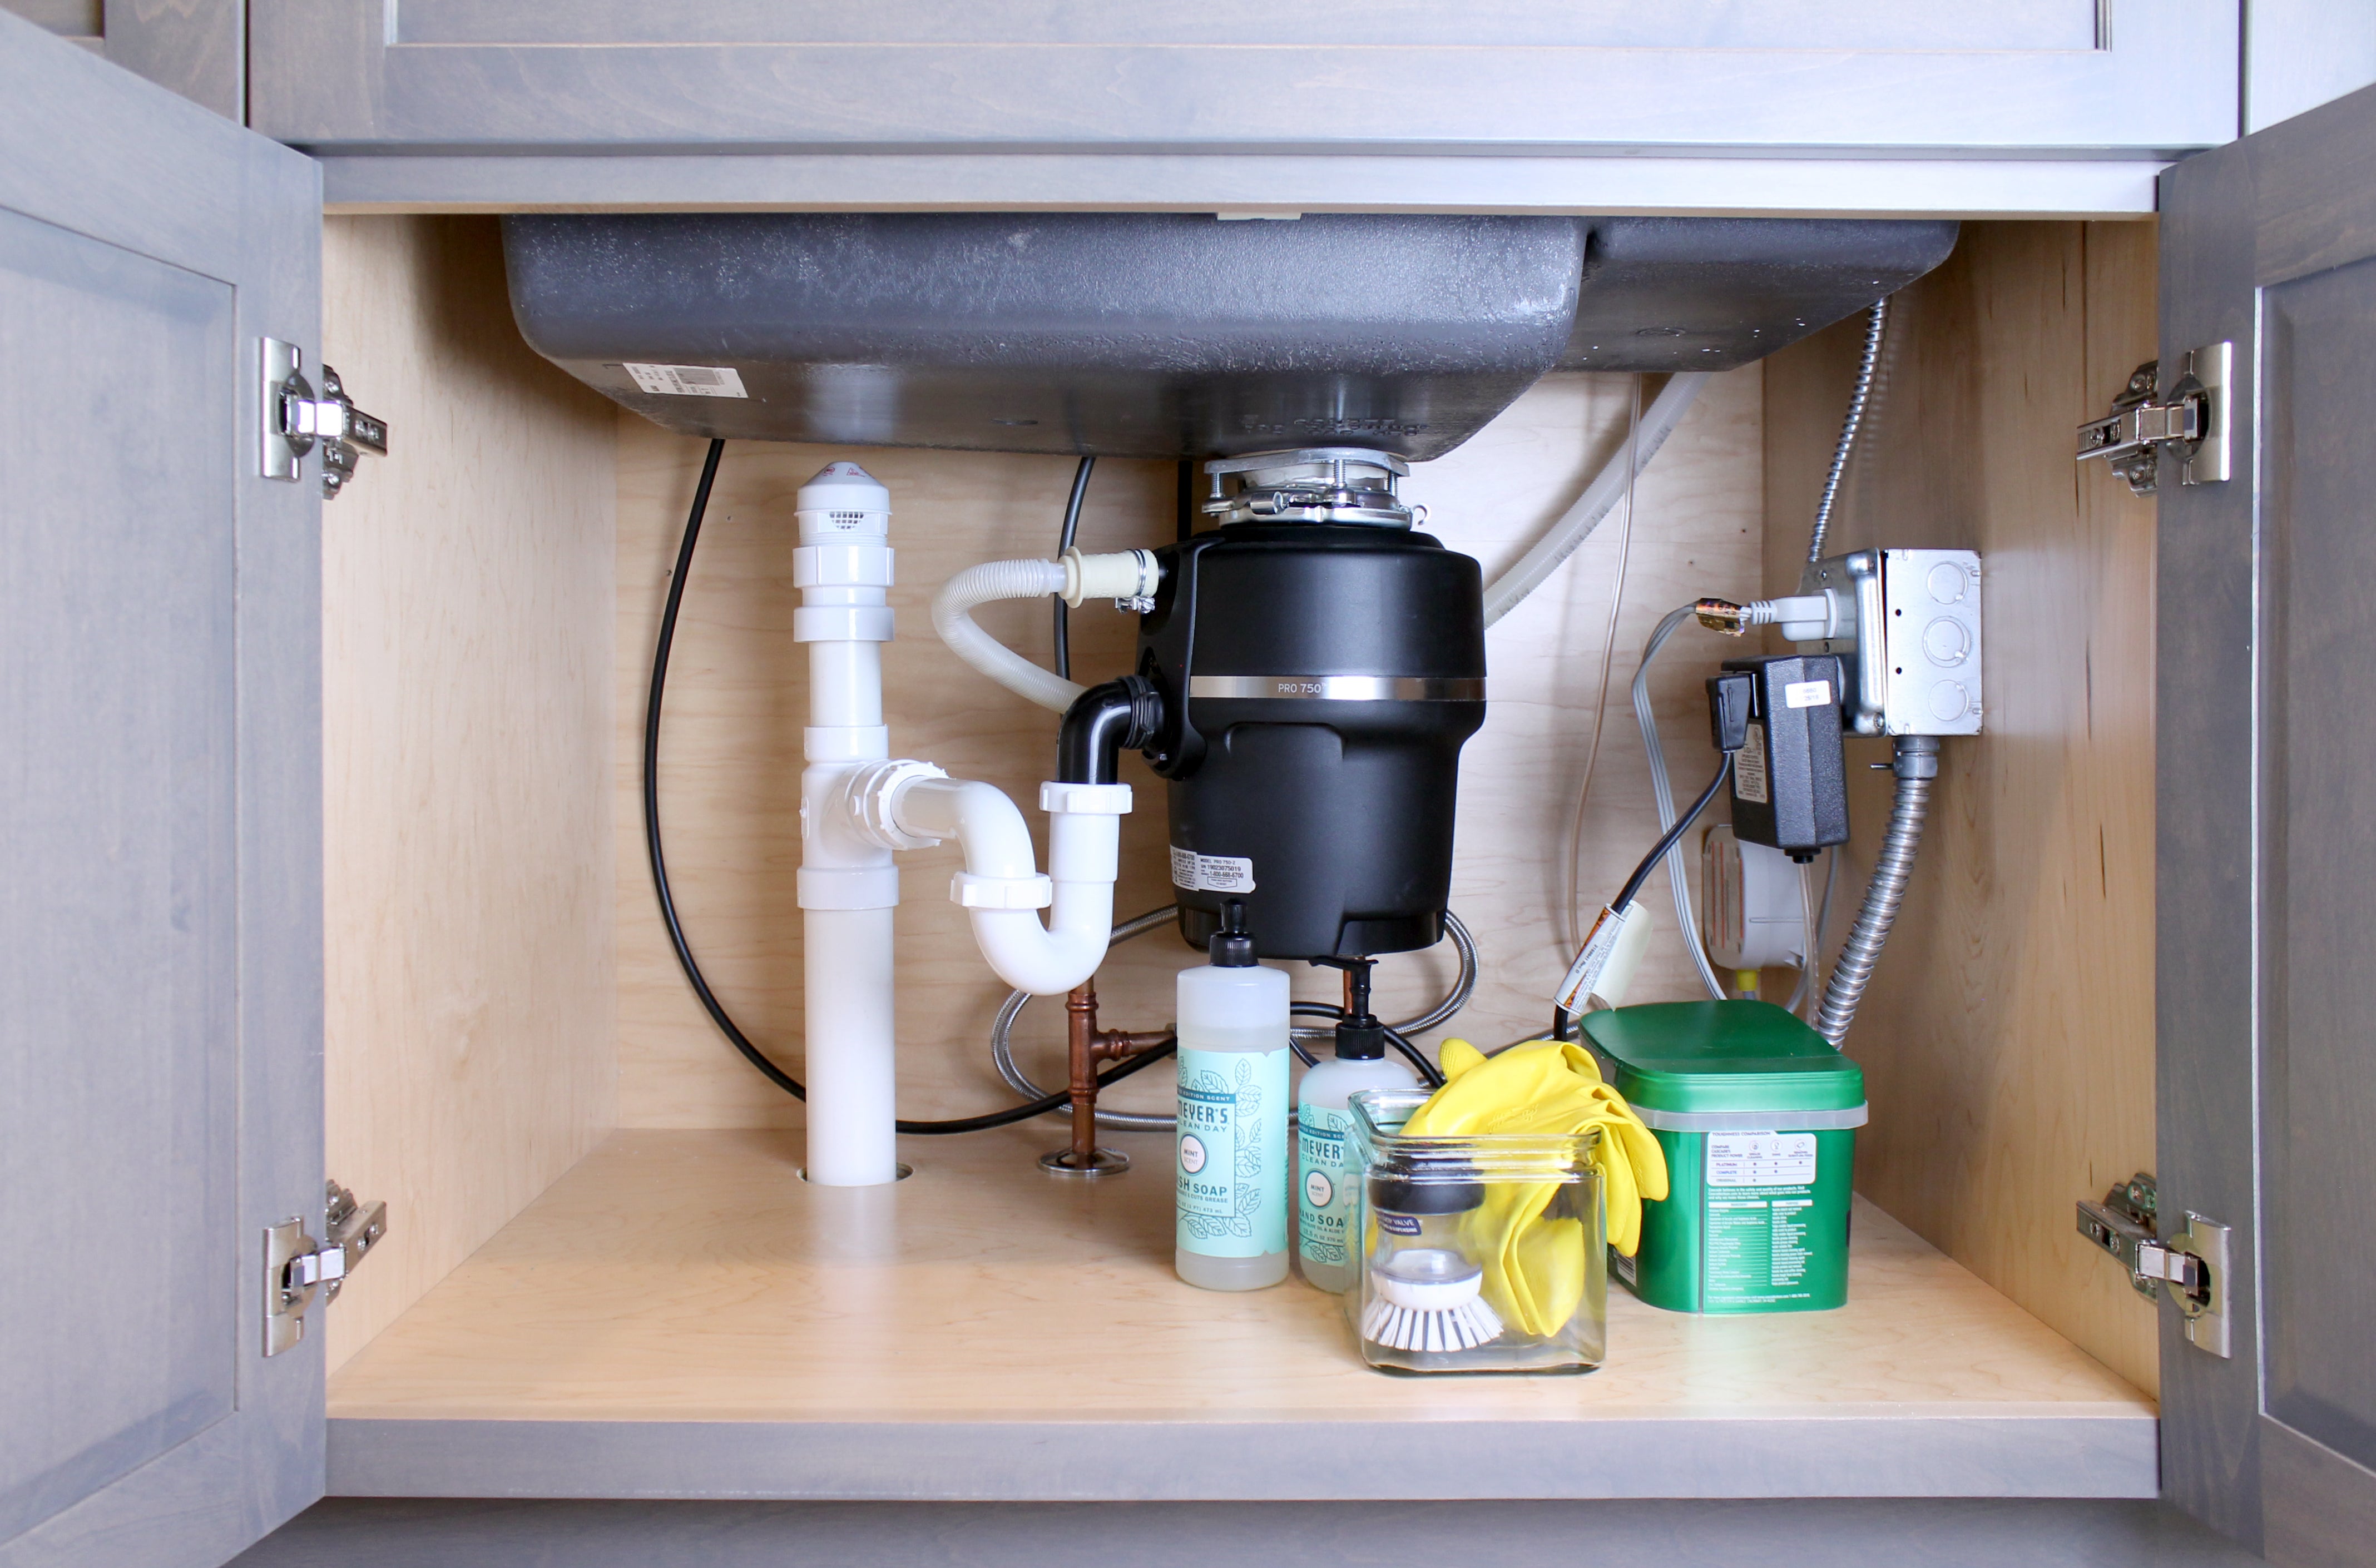
AAVs are typically located under sinks, behind toilets, or in other accessible areas near plumbing fixtures. Look for a cylindrical plastic device connected to the drain line. If you find one, proceed to Step 4.
Step 4: Inspect the Existing AAV for Damage
Visually inspect the AAV for cracks, leaks, or signs of damage. If the AAV is old or visibly damaged, it's likely the culprit and should be replaced.
Step 5: Test the AAV (Simple Test)
While wearing gloves, carefully remove the AAV. Listen for a slight hiss of air as you remove it. This indicates that the valve was at least partially sealed. If you don't hear anything, the valve may be stuck open. Examine the rubber gasket or seal inside the AAV for dirt, debris, or damage. Clean the seal with a damp cloth if necessary. Replace the AAV and observe if the problem persists.
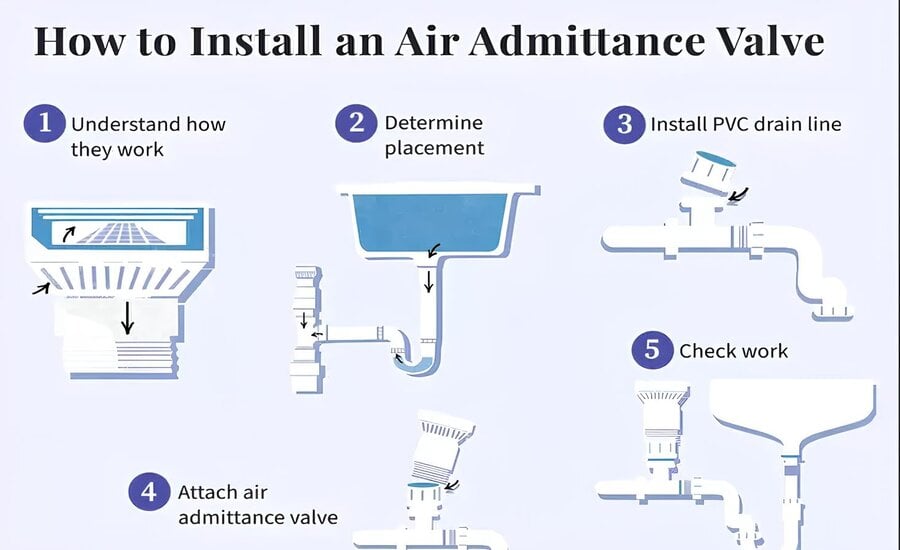
Installing an Air Admittance Valve: A Step-by-Step Guide
Important Safety Note: While installing an AAV is generally a straightforward task, it's crucial to exercise caution. If you're uncomfortable with plumbing tasks, or if you encounter any complex issues, call a licensed plumber. Incorrect installation can lead to leaks, sewer gas exposure, and potential health hazards.
Tools and Materials You'll Need:
- New Air Admittance Valve (AAV) - Make sure to select the correct size for your drain pipe.
- Pipe cutter or PVC saw (if you need to cut the drain pipe)
- PVC primer and cement (if you need to glue PVC fittings)
- Measuring tape
- Pencil or marker
- Wrench or pliers (if you need to tighten fittings)
- Safety glasses
- Gloves
- Clean cloths or rags
Step 1: Turn Off the Water Supply
Before you begin, turn off the water supply to the fixture you're working on. This will prevent water from flowing out when you disconnect the drainpipe. Typically, shut-off valves are located under the sink or behind the toilet.
Step 2: Disconnect the Drainpipe
Carefully disconnect the drainpipe from the fixture. Place a bucket or basin underneath to catch any remaining water in the P-trap. Use a wrench or pliers to loosen any fittings. Be prepared for some water spillage, even after turning off the water supply.
Step 3: Prepare the Drainpipe for the AAV
You'll need a vertical section of pipe to install the AAV. If there isn't one already, you'll need to create one using PVC pipe and fittings. *Determine the location where the AAV will be installed. The AAV should be installed at least 6 inches above the drain line it is venting. This is important to prevent splashing. *Measure and cut a length of PVC pipe to create the vertical section. Make sure the pipe is long enough to accommodate the AAV and any necessary fittings. *Use PVC primer and cement to glue the vertical section of pipe to the existing drainpipe. Follow the manufacturer's instructions for the primer and cement.
Step 4: Install the AAV
The AAV should have a threaded connection that allows it to be screwed onto the vertical section of pipe. *Apply Teflon tape to the threads of the AAV to create a watertight seal. *Screw the AAV onto the vertical section of pipe, tightening it securely by hand. Do not overtighten, as this could damage the AAV.
Step 5: Reconnect the Drainpipe
Reconnect the drainpipe to the fixture. Tighten all fittings securely to prevent leaks.
Step 6: Test for Leaks
Turn the water supply back on and check for leaks around the AAV and the drainpipe connections. If you find any leaks, tighten the fittings further or disassemble the connections and reapply Teflon tape or PVC cement.
Step 7: Observe the Drain
Run water into the fixture and observe the drain. Listen for any gurgling sounds or unusual noises. The drain should flow freely without any backups.
Important Considerations:
- AAV Placement: The AAV must be installed in an accessible location for future inspection and replacement. It should also be protected from freezing temperatures.
- AAV Height: As mentioned above, AAVs should be installed at least 6 inches above the drain line. Check local codes for the exact required height.
- AAV Limitations: AAVs are not a substitute for proper venting in all situations. They are typically used for individual fixtures or small groups of fixtures. In some jurisdictions, they may not be permitted as the primary venting method. Always check your local plumbing codes before installing an AAV.
- AAV Maintenance: Periodically inspect the AAV for damage and clean it if necessary. The AAV's filter cap is removable.
- Professional Consultation: If you're unsure about any aspect of the installation process, or if you encounter any complex plumbing issues, consult a licensed plumber.
Troubleshooting Common Problems After Installation
- Gurgling Still Present: If you still hear gurgling after installing the AAV, it could indicate a blockage further down the drain line. Try using a drain snake to clear any obstructions. Or, the AAV could be defective. Replace it with a new one to test if the first one was faulty.
- Sewer Gas Odor Persists: If you still smell sewer gas, check all drainpipe connections for leaks. Make sure the AAV is properly sealed and functioning correctly. Another option is to check the seal of the toilet around the base, as this is another way for sewer gas to enter your home.
- Slow Draining Continues: If the drain is still slow, it could be due to a partial blockage or an issue with the main vent stack in your home. Consult a plumber to inspect the venting system.
When to Call a Professional Plumber
While installing or replacing an AAV is a relatively simple DIY task, there are situations where it's best to call a professional plumber:
- Complex Plumbing Systems: If you have a complex plumbing system with multiple fixtures and vents, it's best to consult a plumber to ensure proper venting.
- Main Vent Stack Issues: If you suspect a problem with the main vent stack in your home, it's important to call a plumber to diagnose and repair the issue.
- Local Code Compliance: Plumbing codes vary from region to region. A plumber can ensure that your plumbing system meets all local code requirements.
- You're Uncomfortable: If you're uncomfortable with any aspect of the installation process, or if you encounter any complex plumbing issues, don't hesitate to call a plumber. It's better to be safe than sorry.
By following these steps and tips, you can confidently troubleshoot and potentially solve your plumbing ventilation problems. Remember to prioritize safety and consult a professional when needed. Good luck!
:max_bytes(150000):strip_icc()/air-admittance-valve-b5d78cbecf6e4b26bd8a37f76691a632.jpg)