How To Install Refrigerant In Car
Is your car blowing hot air when it should be ice cold, or struggling to defrost your windshield on a chilly morning? A common culprit behind these frustrating issues is low refrigerant. While a complex HVAC system might seem daunting, checking and potentially topping off your car's refrigerant can be a DIY task for the confident homeowner. However, safety and a clear understanding of the process are paramount. This guide will walk you through diagnosing the problem and taking appropriate action, while also emphasizing when it's time to call in the professionals.
Diagnosing the Cooling or Heating Problem
Before you start adding refrigerant, it's essential to pinpoint the root cause of your discomfort. Just topping off the system won't fix a leak, and you'll be back in the same situation soon enough. Start with these diagnostic steps:
Step 1: Preliminary Checks (No Tools Required)
These initial checks are simple and don't require any tools.
- Check the A/C Button: Sounds obvious, but make sure the A/C button is actually engaged! Some systems have an 'Eco' mode that might limit A/C performance.
- Listen to the Compressor: With the engine running and the A/C on max, listen closely near the engine. You should hear a distinct click when the A/C compressor engages. If you don't hear it, the compressor might not be running at all, which could indicate a more serious electrical or mechanical issue.
- Feel the Airflow: Are the vents blowing air at all? A weak airflow might suggest a clogged cabin air filter (more on that later) or a problem with the blower motor.
- Smell the Air: A musty or moldy smell coming from the vents often indicates a dirty cabin air filter. While not directly related to refrigerant levels, a clogged filter restricts airflow and reduces cooling efficiency.
Step 2: Inspect the Cabin Air Filter (Potentially No Tools Required)
The cabin air filter traps dust, pollen, and other debris, preventing them from entering the car's interior. A clogged filter restricts airflow, reducing the efficiency of both the heating and cooling systems.
- Locate the Filter: The cabin air filter is usually located behind the glove box, under the dashboard, or sometimes under the hood. Consult your car's owner's manual for the exact location.
- Inspect the Filter: Remove the filter and visually inspect it. If it's covered in dirt, leaves, or other debris, it's time for a replacement. Some vehicles might require a screwdriver to access the filter compartment.
- Replace if Necessary: Cabin air filters are relatively inexpensive and easy to replace. A new filter can significantly improve airflow and overall system performance.
Step 3: Check the A/C Compressor Clutch (Basic Equipment Needed)
The A/C compressor clutch engages and disengages the compressor, allowing it to cycle on and off as needed. If the clutch isn't engaging, the compressor won't pump refrigerant, and your A/C won't work.
- Locate the Compressor: The A/C compressor is typically located at the front of the engine, driven by a belt.
- Observe the Clutch: With the engine running and the A/C on max, watch the front of the compressor. You should see the center of the pulley (the clutch) engage and spin along with the outer pulley.
- Use a Multimeter (Optional): If you're comfortable using a multimeter, you can check if the compressor clutch is receiving power. Disconnect the electrical connector to the clutch and use the multimeter to check for voltage when the A/C is turned on. If there's no voltage, there's an electrical issue preventing the clutch from engaging.
If the clutch is not engaging and you suspect an electrical problem, it's best to consult a professional. Diagnosing electrical issues can be complex and requires specialized knowledge and tools.
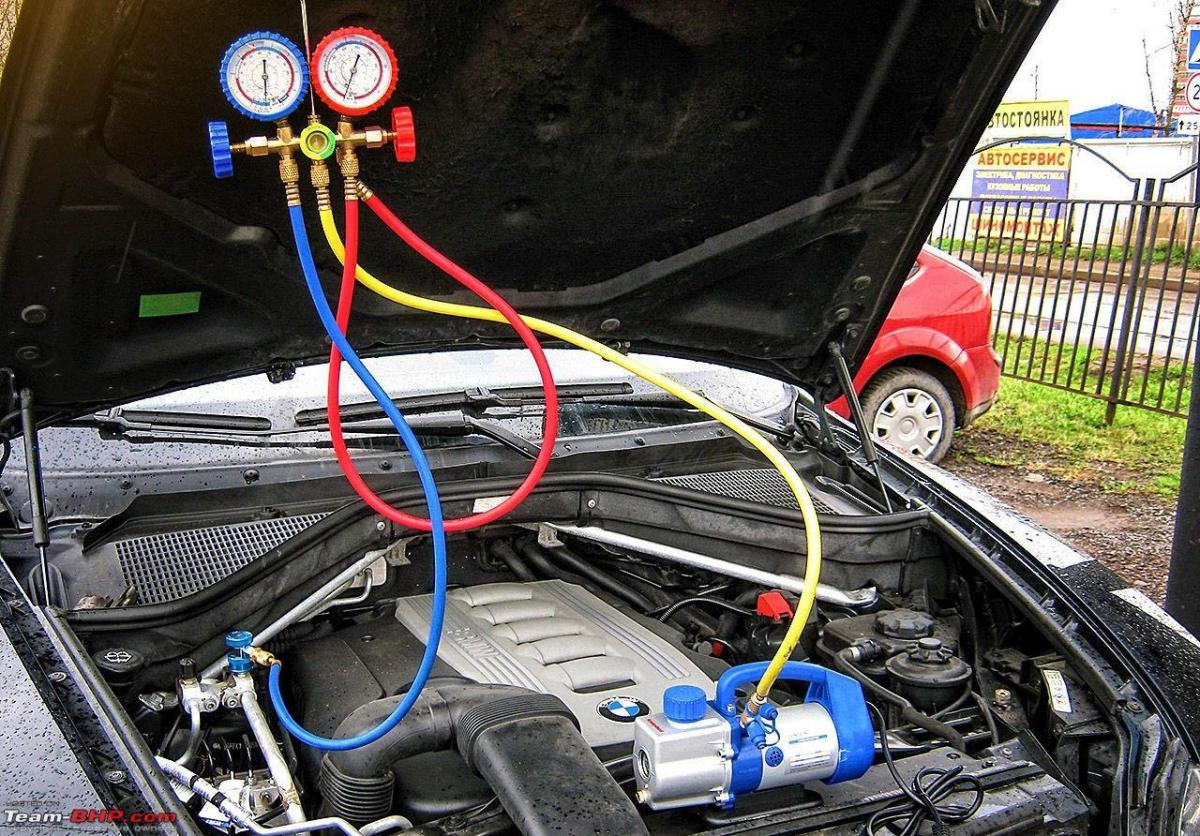
Step 4: Gauge Manifold Test (Requires Specialized Equipment)
This step involves using a gauge manifold set to measure the high and low-side pressures of your A/C system. This requires specialized equipment and some experience working with A/C systems. If you're not comfortable with this process, it's best to take your car to a professional.
- Connect the Gauges: Connect the gauge manifold hoses to the high and low-side service ports on your A/C system. These ports are typically located near the compressor or along the refrigerant lines. Make sure you connect the correct hose to the correct port to avoid damaging the system.
- Start the Engine and A/C: Start the engine and turn the A/C on max.
- Read the Gauges: Observe the high and low-side pressure readings on the gauges. Compare these readings to the specifications in your car's service manual or a refrigerant chart. Low pressure on both sides usually indicates a low refrigerant level. Abnormal readings can also indicate other problems, such as a blocked orifice tube or a faulty compressor.
Adding Refrigerant (DIY with Caution)
If your diagnosis points to low refrigerant, you can attempt to add refrigerant yourself. However, exercise extreme caution. Refrigerant can cause frostbite, and improper handling can damage your A/C system. Work in a well-ventilated area, wear gloves and eye protection, and follow the instructions on the refrigerant can carefully.
What You'll Need:
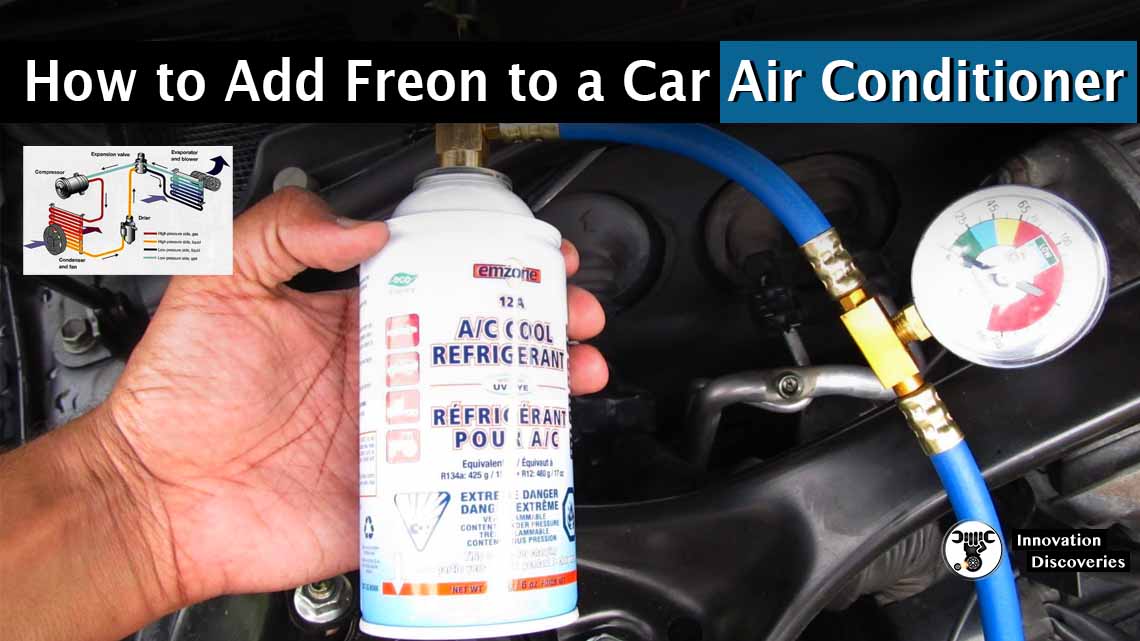
- Refrigerant with a Gauge and Dispenser: Purchase a can of refrigerant specifically designed for automotive A/C systems. These cans typically come with a gauge and dispenser hose for easy application. Make sure the refrigerant is compatible with your car's A/C system (R-134a or R-1234yf). Using the wrong type of refrigerant can damage your system.
- Gloves and Eye Protection: Protect your hands and eyes from potential refrigerant exposure.
- Rag: To wipe up any spills.
Step-by-Step Instructions:
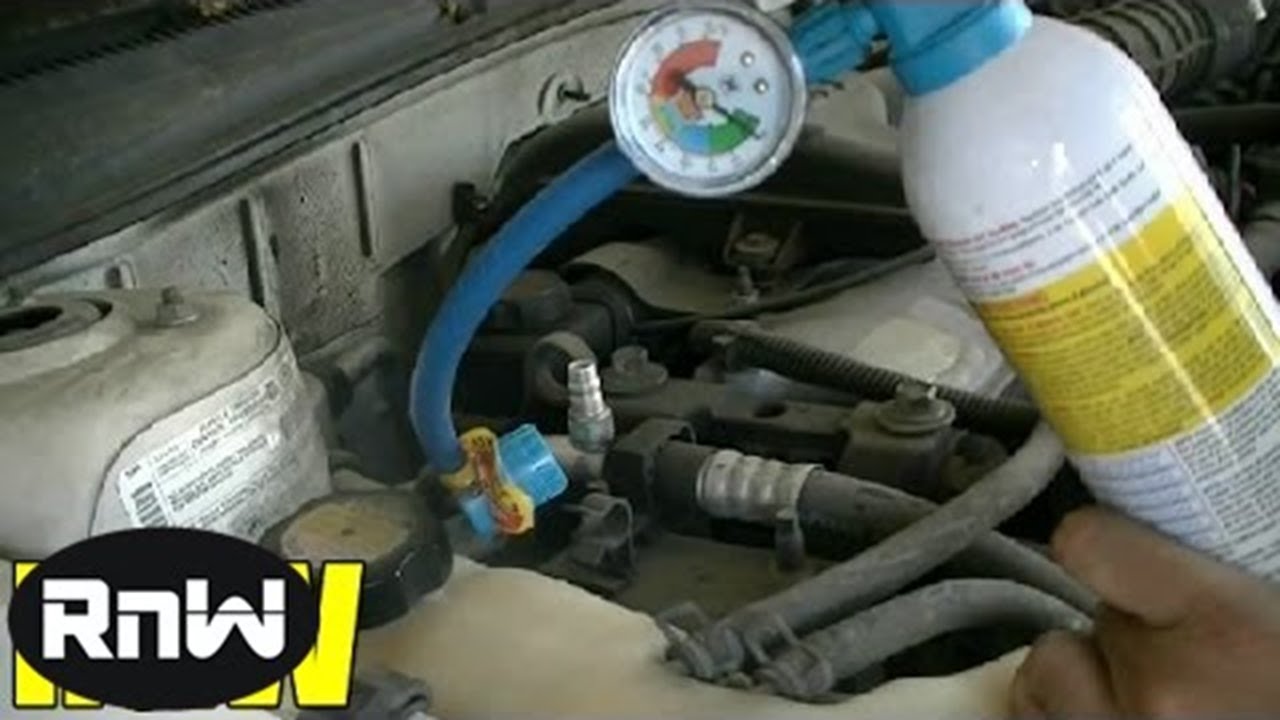
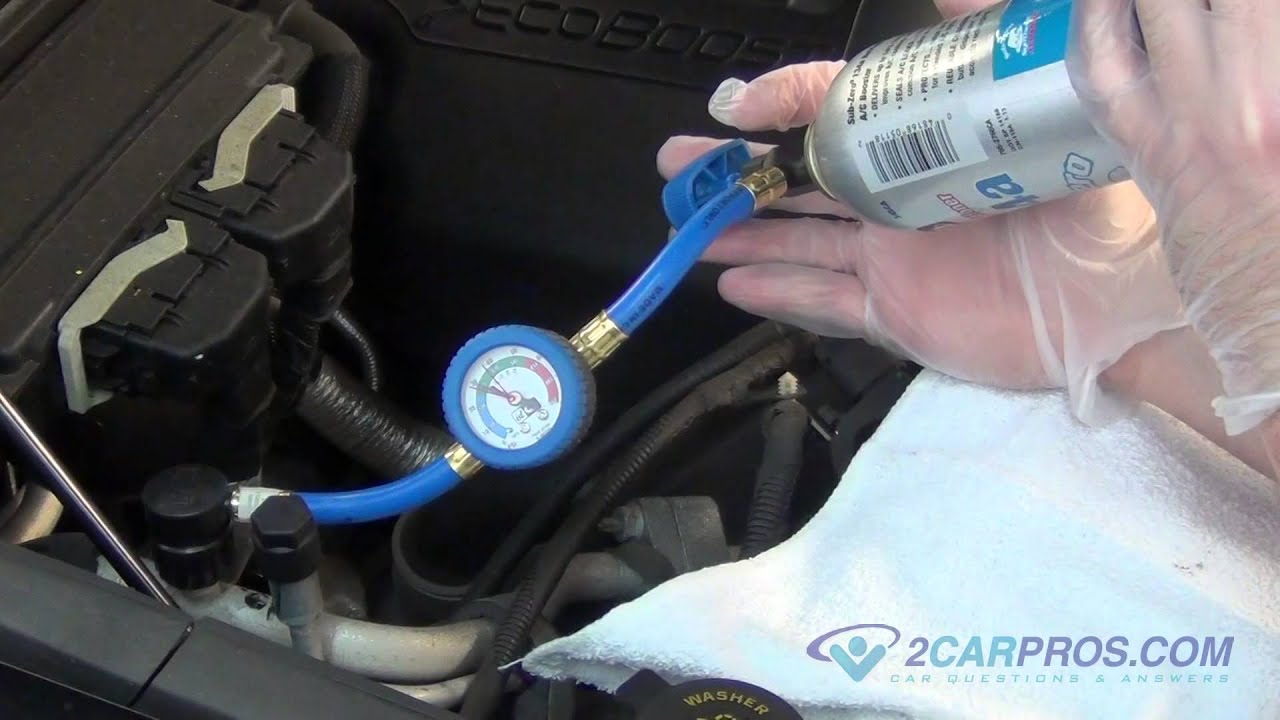
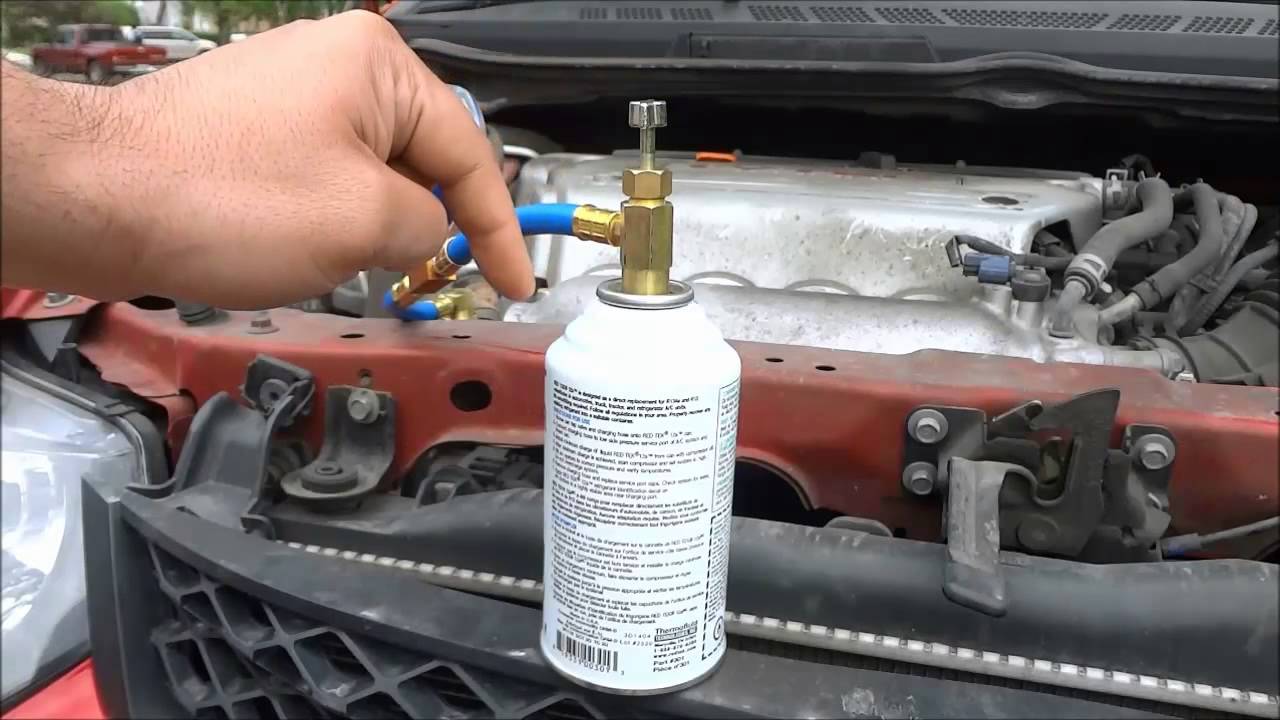
- Locate the Low-Side Service Port: This port is typically located on the low-pressure refrigerant line, usually near the evaporator core or the accumulator. It's usually labeled with an "L" or a blue cap. Do not connect the refrigerant can to the high-side port, as this can cause the can to explode.
- Attach the Dispenser: Connect the dispenser hose from the refrigerant can to the low-side service port. Make sure the connection is secure.
- Start the Engine and A/C: Start the engine and turn the A/C on max.
- Add Refrigerant Slowly: Slowly add refrigerant to the system, following the instructions on the can. Monitor the gauge on the dispenser to avoid overcharging the system. Overcharging can damage the compressor.
- Check the Vent Temperature: As you add refrigerant, monitor the temperature of the air coming from the vents. The air should gradually get colder.
- Stop When the System is Charged: Stop adding refrigerant when the gauge indicates the correct pressure range for your car's A/C system. Refer to the refrigerant chart on the can or your car's service manual for the correct pressure range.
- Disconnect the Dispenser: Once the system is charged, disconnect the dispenser hose from the low-side service port.
- Monitor Performance: Continue to monitor the performance of your A/C system. If the cooling performance deteriorates again quickly, you likely have a leak that needs to be addressed by a professional.
When to Call a Professional
While adding refrigerant can be a DIY task, certain situations warrant professional attention:
- You Suspect a Leak: If you're constantly adding refrigerant, you likely have a leak in the system. A professional can use specialized equipment to locate and repair the leak. Ignoring a leak can lead to further damage to your A/C system.
- The Compressor Isn't Engaging: If the A/C compressor clutch isn't engaging, it could be due to an electrical problem, a faulty compressor, or low refrigerant pressure. Diagnosing and repairing these issues requires specialized knowledge and tools.
- The System is Overcharged: Overcharging the A/C system can damage the compressor. If you accidentally overcharged the system, a professional can safely remove the excess refrigerant.
- You're Not Comfortable Working with Refrigerant: Working with refrigerant can be dangerous if you're not properly trained. If you're not comfortable with the process, it's best to leave it to a professional.
- You Suspect a More Complex Problem: If you've tried adding refrigerant and the A/C system still isn't working properly, there may be a more complex problem, such as a blocked orifice tube, a faulty expansion valve, or a contaminated system. These issues require professional diagnosis and repair.
- You Don't Have the Right Tools: Properly diagnosing and repairing A/C systems often requires specialized tools, such as a gauge manifold set, a vacuum pump, and a leak detector.
Don't hesitate to consult a certified HVAC technician. They have the knowledge, experience, and equipment to diagnose and repair A/C problems safely and effectively. Ignoring problems can lead to costly repairs down the road.
Safety Precautions
Working with refrigerant requires caution. Here are some essential safety precautions:
- Work in a Well-Ventilated Area: Refrigerant fumes can be harmful if inhaled. Work in a well-ventilated area to minimize exposure.
- Wear Gloves and Eye Protection: Refrigerant can cause frostbite on contact with skin and can damage your eyes. Always wear gloves and eye protection when working with refrigerant.
- Avoid Contact with Skin and Eyes: If refrigerant comes into contact with your skin or eyes, flush the affected area with plenty of water for at least 15 minutes and seek medical attention.
- Do Not Overcharge the System: Overcharging the A/C system can damage the compressor. Follow the instructions on the refrigerant can carefully and monitor the gauge to avoid overcharging.
- Do Not Mix Refrigerants: Using the wrong type of refrigerant can damage your A/C system. Make sure you're using the correct refrigerant for your car.
- Dispose of Refrigerant Properly: Do not release refrigerant into the atmosphere. It's harmful to the environment. Dispose of used refrigerant cans according to local regulations.
- Be Aware of High-Pressure Lines: The high-side refrigerant lines are under high pressure. Avoid disconnecting or tampering with these lines unless you have the proper training and equipment.
By following these steps and safety precautions, you can confidently diagnose and potentially address a low refrigerant issue in your car's A/C system. Remember to prioritize safety and seek professional help when needed.


:max_bytes(150000):strip_icc()/pierce-56a0556c3df78cafdaa1108e.jpg)