How To Measure A Hose Diameter

Ever tried connecting a new sprinkler or nozzle to your garden hose, only to find it's the wrong size? Or perhaps you’re replacing a leaky hose in your washing machine and aren’t sure what diameter to buy? This frustration is incredibly common. Getting the right hose diameter is crucial for a proper, leak-free connection. Luckily, measuring a hose diameter is a simple task you can usually handle yourself.
Understanding Hose Diameter: Inside vs. Outside
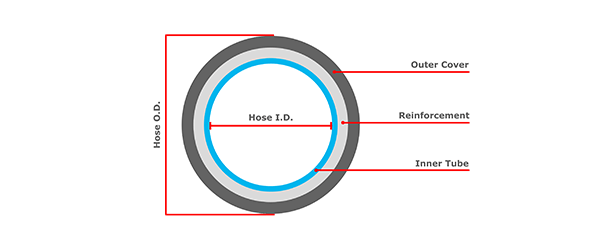
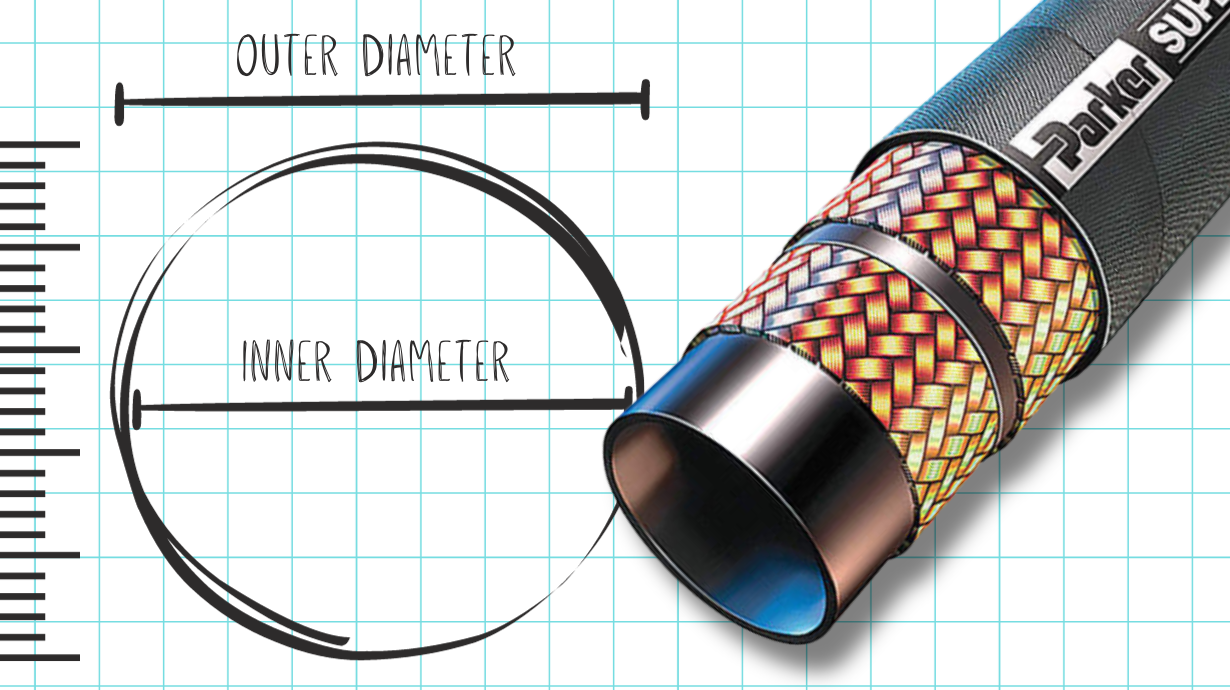
Before we dive into the how-to, it's important to understand the difference between inside diameter (ID) and outside diameter (OD). When we talk about hose size, we're almost always referring to the inside diameter. This is the diameter of the *hole* through which water (or any fluid) flows. The outside diameter includes the thickness of the hose wall.
Why is this important? Because fittings and connectors are designed to match the ID of the hose. Using the OD measurement will almost certainly lead to a mismatch and leaks.
Troubleshooting: Why Knowing the Diameter Matters
Mismatched hose and connector sizes lead to a range of problems:
- Leaks: The most common issue. A connector that's too large for the hose won't create a tight seal, resulting in water spraying everywhere.
- Reduced Water Pressure: A hose that's too narrow can restrict water flow, significantly reducing water pressure at the nozzle or sprinkler.
- Damaged Equipment: Forcing a connector onto a hose that's too small can damage both the hose and the connector.
- Inefficient Watering: If you're using a garden hose, leaks and reduced pressure waste water and make watering less effective.
Step-by-Step Guide: Measuring Hose Diameter
Here's a comprehensive guide to accurately measuring your hose diameter. You'll need a few simple tools:
- A Ruler or Measuring Tape: A ruler with millimeter markings is ideal for precision.
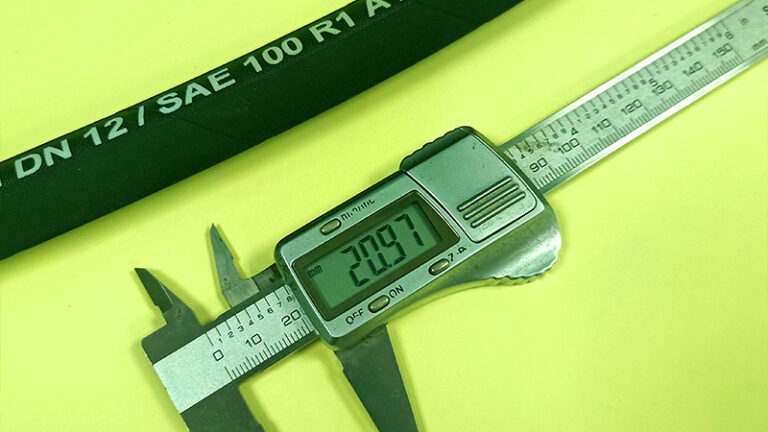
- Calipers (Optional, but Recommended): Calipers provide the most accurate measurement, especially for small diameters. You can find inexpensive digital calipers online or at most hardware stores.
- A Pen and Paper: To record your measurements.
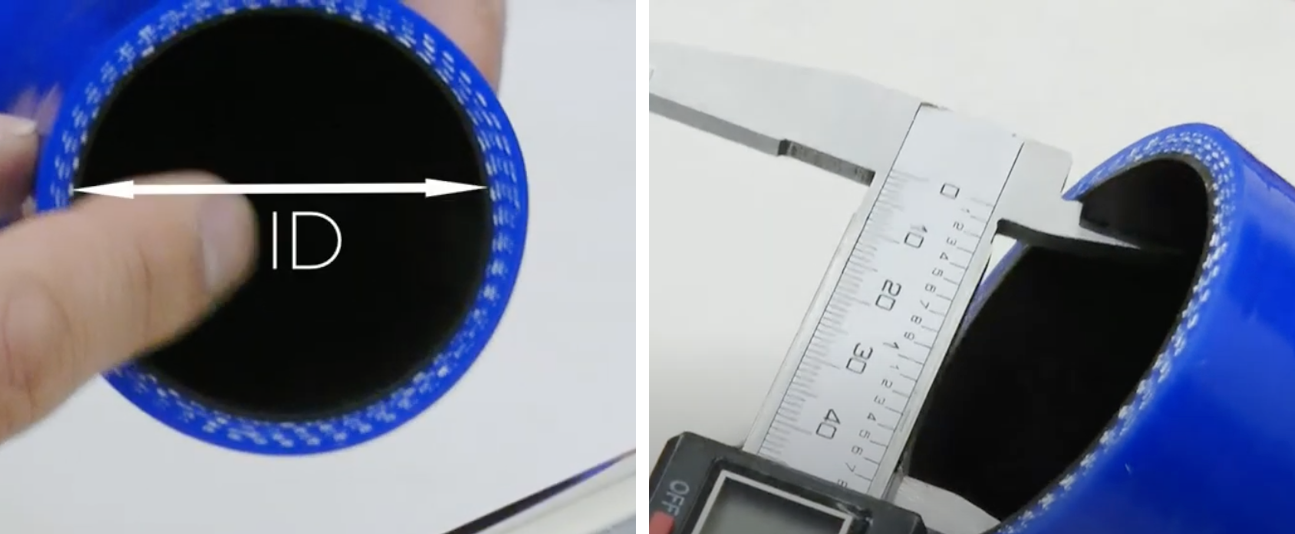
Method 1: Measuring the Inside Diameter (ID) Directly
This is the most accurate method, if possible. However, it only works if you have access to the inside of the hose – for example, if it's been cut or disconnected.
- Safety First: Ensure the hose is disconnected from any water source. If it was previously connected, allow any remaining water to drain out completely.
- Clean the End: If the end of the hose is dirty or frayed, clean it up slightly to ensure an accurate measurement. You can use a sharp knife or scissors to carefully trim any frayed edges.
- Measure Across the Opening: Using your ruler or calipers, carefully measure the distance across the inside opening of the hose. Make sure you're measuring the diameter, which is the widest point across the circle.
- Take Multiple Measurements: Rotate the ruler or calipers slightly and take a few measurements. This helps account for any slight irregularities in the hose shape.
- Record the Measurements: Write down all your measurements.
- Calculate the Average: If you took multiple measurements, calculate the average. This will give you the most accurate reading of the ID.
- Determine the Hose Size: Compare your measurement to standard hose sizes (see the chart below).
Method 2: Measuring the Outside Diameter (OD) and Calculating the ID
If you can't access the inside of the hose, you can measure the outside diameter (OD) and then *estimate* the ID. This method is less precise, but it's often the only option. It's particularly suitable for situations where the hose has a simple cylindrical shape, and not a more complicated, reinforced structure.
- Safety First: Disconnect the hose from any water source.
- Measure the Outside Diameter: Use your ruler or calipers to measure the distance across the outside of the hose. Again, make sure you're measuring the widest point, and take multiple measurements.
- Estimate the Wall Thickness: This is the tricky part. You'll need to estimate the thickness of the hose wall. This can be difficult, as it varies depending on the hose material and construction. A *typical* garden hose has a wall thickness of around 1/8 inch (3mm). A reinforced hose will have a thicker wall. Look closely at the hose end, if possible, to get a better idea of the wall thickness.
- Calculate the ID: To estimate the ID, subtract *twice* the estimated wall thickness from the OD. The formula is: ID = OD - (2 x Wall Thickness)
- Record and Determine Size: Record your calculations and compare the estimated ID to standard hose sizes.
Example: Let's say you measure an OD of 3/4 inch (19mm) and estimate a wall thickness of 1/8 inch (3mm). Then:
ID = 3/4 inch - (2 x 1/8 inch) = 3/4 inch - 1/4 inch = 1/2 inch.
Method 3: Using a Hose Size Gauge (Optional)
Hose size gauges are inexpensive tools designed specifically for identifying hose sizes. They typically consist of a series of holes or slots, each corresponding to a specific hose diameter. To use a gauge, simply try fitting the hose into the different openings until you find the one that fits snugly.
- Purchase a Hose Size Gauge: You can find these at most hardware stores or online retailers.
- Try Different Openings: Insert the end of your hose into the different openings on the gauge.
- Find the Snug Fit: The correct size is the opening that the hose fits into snugly, without being too tight or too loose.
- Note the Size: The gauge will typically be marked with the corresponding hose size.
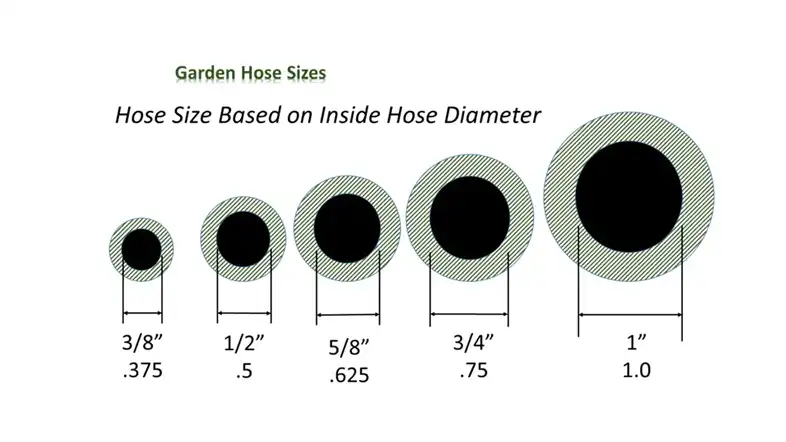
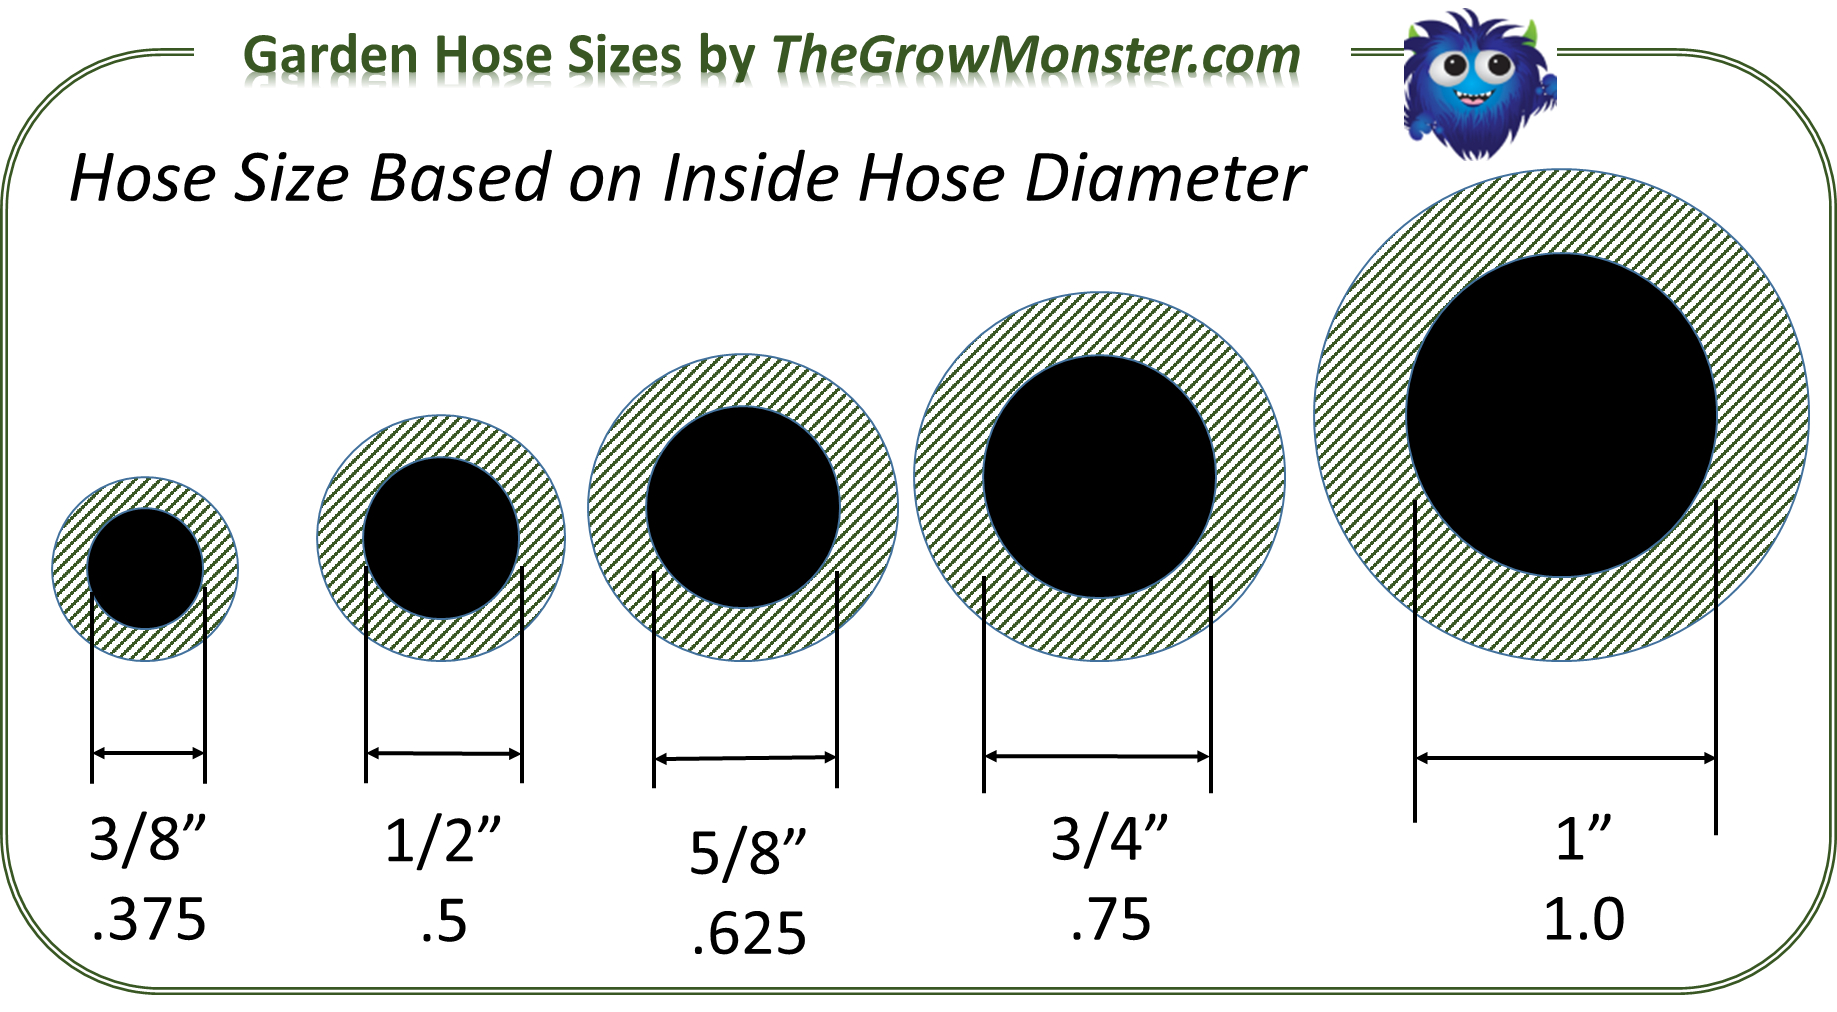
Standard Hose Sizes
Here are some common hose sizes and their approximate measurements:
- 1/4 inch (6mm): Used for small air hoses and some specialized applications.
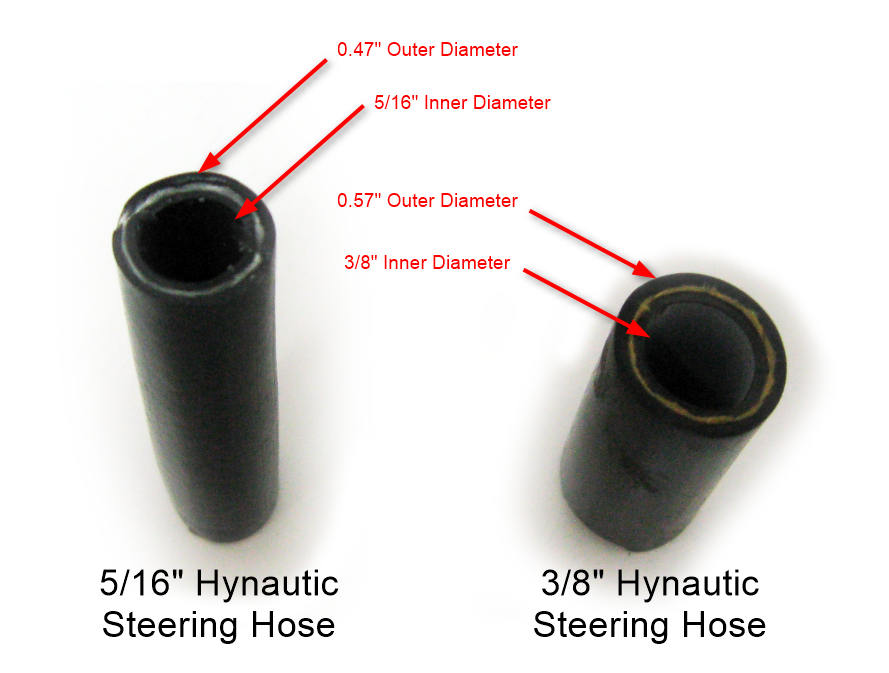
- 3/8 inch (10mm): Common for fuel lines and smaller water hoses.
- 1/2 inch (12.5mm): A very common size for garden hoses and some appliance hoses.
- 5/8 inch (16mm): Another very common garden hose size, offering a good balance between flow rate and flexibility.
- 3/4 inch (19mm): Often used for higher-volume garden hoses and commercial applications.
- 1 inch (25mm): Used for irrigation and larger water transfer applications.
- 1 1/4 inch (32mm) and larger: Typically used for industrial or specialized purposes.
Important Note: These are nominal sizes. The actual measured ID may vary slightly. Always err on the side of a slightly larger size if you're unsure, as you can often use clamps or fittings to create a tighter seal.
DIY Fixes for Common Problems
Once you've identified the hose diameter, you can address many common problems yourself:
- Leaky Connections: If you have a leaky connection between a hose and a faucet or sprinkler, try these fixes:
- Tighten the Connection: Make sure the connection is as tight as possible. Use pliers or a wrench if necessary, but be careful not to overtighten and damage the fitting.
- Replace the Washer: The rubber or plastic washer inside the connector may be worn or damaged. Replace it with a new washer of the correct size.
- Use Teflon Tape: Wrap Teflon tape (plumber's tape) around the threads of the connector to create a tighter seal.
- Replace the Connector: If the connector is damaged, replace it with a new one of the correct size.
- Kinks in the Hose: Kinks restrict water flow and can damage the hose over time.
- Straighten the Hose: Try to straighten the hose manually, removing any kinks.
- Use a Hose Reel: Storing the hose on a reel prevents kinks from forming.
- Replace the Hose: If the hose is severely kinked or damaged, it's best to replace it.
- Low Water Pressure: Low water pressure can be caused by several factors, including a kinked hose, a clogged nozzle, or a problem with the water supply.
- Check for Kinks: Make sure the hose is not kinked.
- Clean the Nozzle: Clean the nozzle or sprinkler head to remove any debris.
- Check the Water Supply: Make sure the water supply is adequate. Check the water pressure at other faucets in your home.
When to Call a Professional
While many hose-related issues can be resolved with DIY fixes, there are times when it's best to call a professional plumber or appliance repair technician:
- Major Leaks Inside Walls or Floors: If you have a leak that's inside a wall or under a floor, it's crucial to call a professional immediately. These leaks can cause significant water damage and mold growth.
- Complex Plumbing Repairs: If you're dealing with complex plumbing repairs, such as replacing a water pipe or repairing a sewer line, it's best to leave it to the professionals.
- Appliance Repairs Under Warranty: If you're repairing an appliance that's still under warranty, it's important to use an authorized repair technician. Otherwise, you may void the warranty.
- You're Uncomfortable or Unsure: If you're not comfortable performing a repair yourself, or if you're unsure about what to do, it's always best to err on the side of caution and call a professional.
Specifically regarding hoses, if you're dealing with a hose that's connected to a gas line, *never* attempt to repair it yourself. Gas leaks are extremely dangerous and require the expertise of a qualified professional.
Preventative Maintenance
A little preventative maintenance can go a long way in extending the life of your hoses and preventing problems:
- Store Hoses Properly: Store hoses on a reel or in a coil to prevent kinks and damage.
- Protect Hoses from Freezing: In cold weather, drain hoses completely and store them indoors to prevent them from freezing and cracking.
- Inspect Hoses Regularly: Inspect hoses regularly for signs of wear and tear, such as cracks, leaks, or bulges. Replace hoses that are damaged.
- Use Quality Hoses: Invest in high-quality hoses that are designed to withstand the elements and resist kinking.
- Avoid Over-Tightening Connections: Over-tightening connections can damage the fittings and lead to leaks.
By following these tips, you can accurately measure your hose diameter, troubleshoot common problems, and keep your hoses in good working order for years to come. Remember to prioritize safety and don't hesitate to call a professional when needed.