How To Measure Subcooling And Superheat
Frequently Asked Questions About Measuring Subcooling and Superheat
Understanding subcooling and superheat is crucial for ensuring your air conditioning or refrigeration system is running efficiently and effectively. These measurements help diagnose potential problems and optimize system performance. Here are some common questions answered in plain language:
1. What exactly are subcooling and superheat, and why are they important?
Think of it this way: refrigerant is the lifeblood of your cooling system. It cycles between liquid and gas to absorb and release heat. Subcooling and superheat tell us about the state of the refrigerant at different points in this cycle.
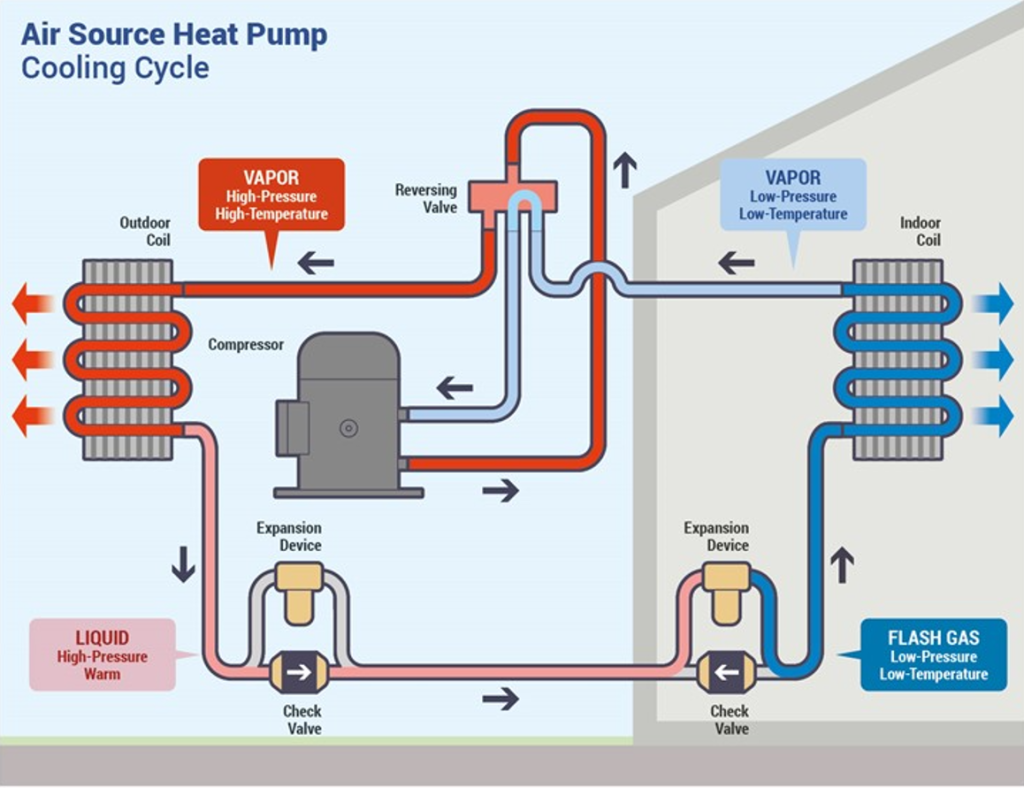
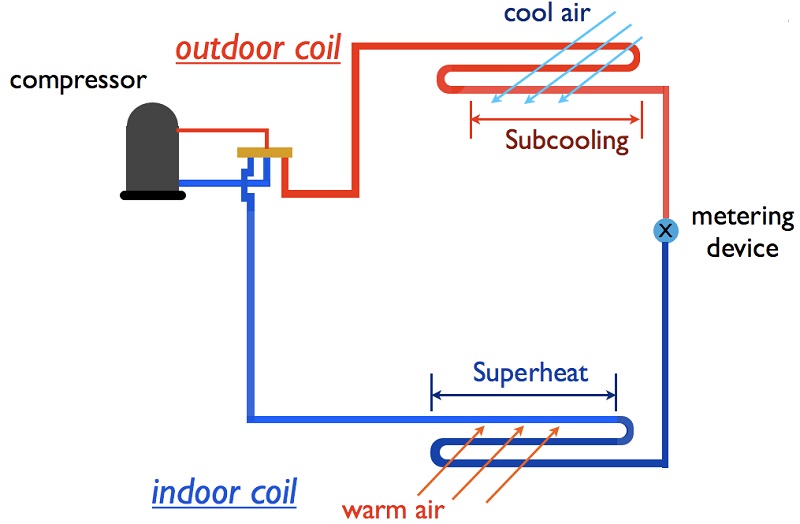
- Subcooling refers to the temperature difference between the refrigerant’s saturation temperature (the temperature at which it changes from a gas to a liquid at a given pressure) and its actual temperature after it has completely condensed into a liquid, usually measured at the outlet of the condenser. Ideally, you want the refrigerant to be a little bit cooler than it would be if it were right on the edge of boiling. The subcooling value is an indicator of the refrigerant charge in the system. Low subcooling likely indicates that the system is undercharged with refrigerant.
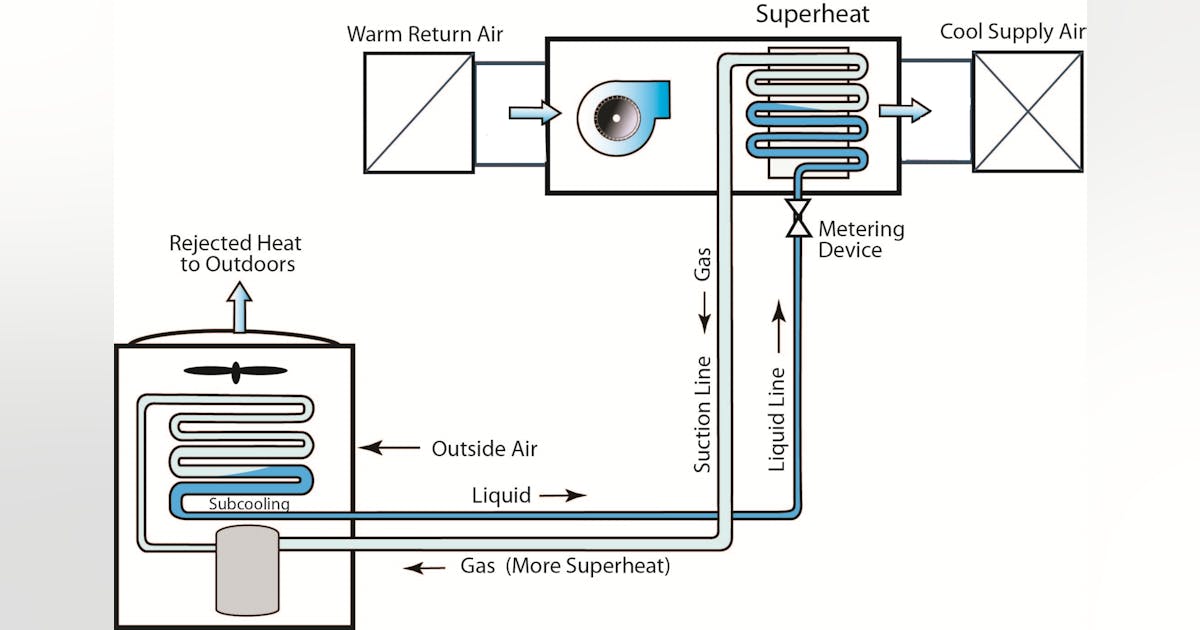
- Superheat is the temperature difference between the refrigerant’s saturation temperature and its actual temperature after it has completely evaporated into a gas, normally measured at the inlet of the compressor. Essentially, it ensures that only gas (not liquid) enters the compressor, which can damage it. Superheat value indicates how well the evaporator coil is removing heat from the air passing over it. High superheat usually indicates that the evaporator coil is not receiving enough refrigerant.
Essentially, correct subcooling and superheat mean:
- Optimal Cooling: The system cools efficiently and effectively.
- Energy Savings: The system consumes less energy, saving you money.
- Compressor Protection: The compressor, the heart of the system, is protected from damage.
- Extended Lifespan: The entire system lasts longer.
2. Do I need special tools to measure subcooling and superheat? What are they?
Yes, you'll need a few specific tools. While you *can* technically get pressure readings using basic gauges, accurate and reliable measurements require specialized equipment. Here's what you'll need:
- Manifold Gauge Set: This is the core tool. It consists of two gauges – one for high pressure and one for low pressure – connected to hoses and valves. These gauges are specifically designed to withstand the pressures found in refrigeration systems. Digital manifold gauge sets are highly recommended for their accuracy and ease of use.
- Thermometer or Temperature Clamps: Accurate temperature measurement is crucial. Digital thermometers with probe attachments are ideal. Alternatively, temperature clamps that attach directly to the refrigerant lines provide precise surface temperature readings.
- Pressure-Temperature (PT) Chart: This chart is essential for converting pressure readings into saturation temperatures. Many digital gauges have built-in PT charts for various refrigerants, making the process much simpler. However, knowing how to manually read and use one is still a valuable skill.
- Refrigerant Charging Scale (Optional but Recommended): While not directly used in the subcooling/superheat *measurement*, a charging scale helps ensure accurate refrigerant charging after you've diagnosed and corrected any issues.
Using the right tools, particularly a digital manifold gauge set, will significantly improve the accuracy and ease of measuring subcooling and superheat.
3. Where exactly do I attach the gauges and thermometer to measure subcooling and superheat?
Placement is key to getting accurate readings:
- Subcooling Measurement:
- High-Pressure Gauge: Connect to the liquid line, usually near the outlet of the condenser (where the refrigerant leaves the condenser as a liquid).
- Thermometer: Attach the thermometer or temperature clamp to the same liquid line, as close as possible to where the high-pressure gauge is connected. Insulate the temperature sensor if possible to avoid reading inaccurate air temperature.
- Superheat Measurement:
- Low-Pressure Gauge: Connect to the suction line, usually near the inlet of the compressor (where the refrigerant enters the compressor as a gas).
- Thermometer: Attach the thermometer or temperature clamp to the same suction line, as close as possible to where the low-pressure gauge is connected.Insulate the temperature sensor if possible to avoid reading inaccurate air temperature.
Important Note: Always refer to the manufacturer's service manual for your specific system for the exact location of the service ports and recommended measurement points. These locations can vary depending on the equipment.
4. What are the steps to calculate subcooling and superheat after I have my readings? Give me an example.
Here’s the process, broken down into simple steps:
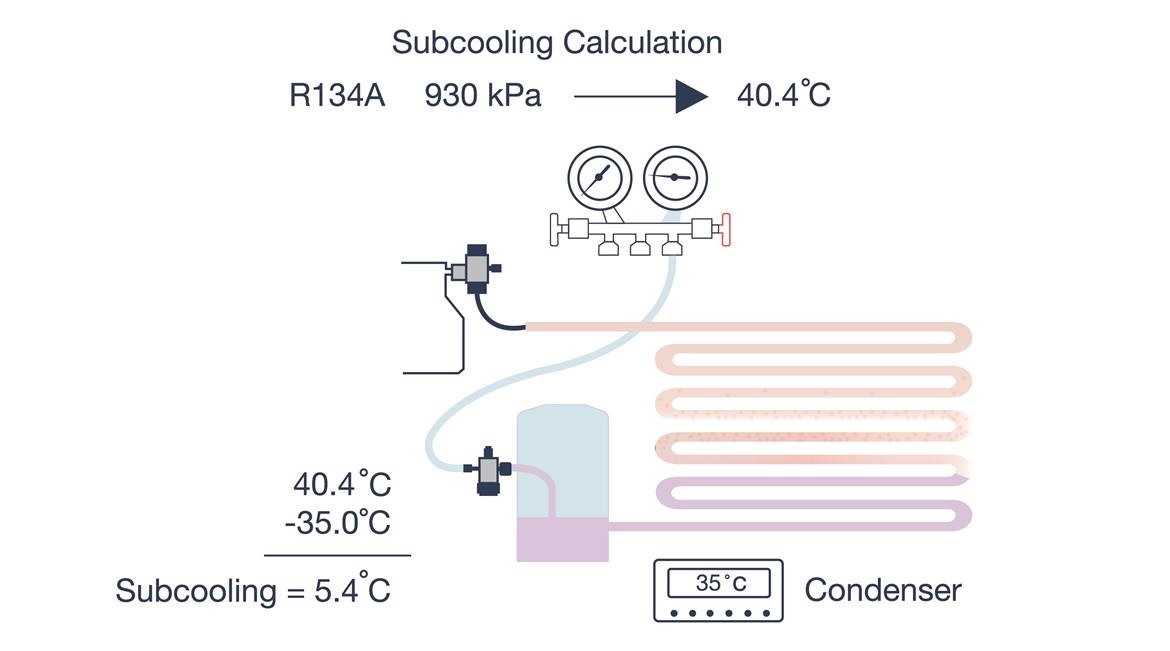
Calculating Subcooling:
- Measure the Liquid Line Pressure: Read the pressure from your high-pressure gauge at the liquid line.
- Convert Pressure to Saturation Temperature: Use a PT chart (or the built-in function on your digital gauge) to find the saturation temperature that corresponds to the measured liquid line pressure.
- Measure the Liquid Line Temperature: Read the actual temperature of the liquid line using your thermometer.
- Calculate Subcooling: Subtract the liquid line temperature from the saturation temperature.
Subcooling = Saturation Temperature - Liquid Line Temperature
Example:
- Liquid Line Pressure: 300 PSI
- Saturation Temperature (from PT chart for R-410A at 300 PSI): 95°F
- Liquid Line Temperature: 85°F
- Subcooling: 95°F - 85°F = 10°F
Calculating Superheat:
- Measure the Suction Line Pressure: Read the pressure from your low-pressure gauge at the suction line.
- Convert Pressure to Saturation Temperature: Use a PT chart (or the built-in function on your digital gauge) to find the saturation temperature that corresponds to the measured suction line pressure.
- Measure the Suction Line Temperature: Read the actual temperature of the suction line using your thermometer.
- Calculate Superheat: Subtract the saturation temperature from the suction line temperature.
Superheat = Suction Line Temperature - Saturation Temperature
Example:
- Suction Line Pressure: 130 PSI
- Saturation Temperature (from PT chart for R-410A at 130 PSI): 45°F
- Suction Line Temperature: 55°F
- Superheat: 55°F - 45°F = 10°F
5. What are typical or "ideal" subcooling and superheat values?
There's no single "ideal" value that applies to all systems. The optimal subcooling and superheat depend on several factors, including:
- Refrigerant Type: Different refrigerants have different properties, affecting optimal values.
- Metering Device: The type of metering device (e.g., TXV or fixed orifice) significantly influences superheat and subcooling requirements.
- System Design: Specific design characteristics of the system affect these values.
- Manufacturer's Specifications: The most important factor is the manufacturer's recommendations for your specific unit.
General Guidelines (but ALWAYS consult manufacturer’s data):
- Systems with TXV (Thermostatic Expansion Valve): These systems generally target a fixed superheat, often between 8-12°F, at the evaporator outlet. Subcooling can vary but is typically in the 5-15°F range. Subcooling is more useful on TXV systems for proper refrigerant charge.
- Systems with Fixed Orifice or Capillary Tube: These systems rely on a fixed amount of refrigerant charge, making subcooling a more critical indicator. Target subcooling is typically in the 10-20°F range. Superheat will vary significantly with load on fixed bore systems.
The best approach is to consult the equipment's service manual or the manufacturer's specifications for the recommended subcooling and superheat values for your specific model. These values are usually found on a sticker on the unit or in the accompanying documentation.
6. What do high or low subcooling/superheat readings indicate, and what should I do about them?
Deviations from the recommended values usually point to underlying problems:
Subcooling Issues:
- High Subcooling (Above Recommended):
- Possible Causes: Overcharged with refrigerant, restricted liquid line, non-condensables in the system (e.g., air).
- What to Do: If overcharged, carefully remove refrigerant to reach the target subcooling. Check for and address any restrictions in the liquid line. Purge non-condensables from the system (requires specialized tools and knowledge).
- Low Subcooling (Below Recommended):
- Possible Causes: Undercharged with refrigerant, restricted metering device, low airflow across the condenser coil.
- What to Do: Add refrigerant to reach the target subcooling. Check for and address any restrictions in the metering device. Ensure proper airflow across the condenser coil (clean coil, check fan operation).
Superheat Issues:
- High Superheat (Above Recommended):
- Possible Causes: Undercharged with refrigerant, restricted metering device, low airflow across the evaporator coil, leaky or stuck TXV.
- What to Do: Add refrigerant to reach the target superheat. Check for and address any restrictions in the metering device. Ensure proper airflow across the evaporator coil (clean coil, check fan operation). Inspect the TXV for proper operation (requires specialized knowledge).
- Low Superheat (Below Recommended):
- Possible Causes: Overcharged with refrigerant, restricted airflow across the evaporator coil, leaking TXV.
- What to Do: Remove refrigerant to reach the target superheat. Check for and address any restrictions in the evaporator coil. Inspect the TXV for proper operation (requires specialized knowledge).
Important Note: Modifying refrigerant charge requires specialized knowledge and equipment. If you're not comfortable working with refrigerant, always consult a qualified HVAC technician. Incorrect refrigerant handling can damage the system and harm the environment.
7. Is measuring subcooling and superheat something I can do myself, or should I always call a professional?
Measuring subcooling and superheat *can* be a DIY project for homeowners or facility managers with some technical aptitude, provided you understand the risks and take necessary precautions. However, it's crucial to assess your own comfort level and expertise.
When it's Potentially Okay to DIY:
- You have a solid understanding of HVAC systems and refrigerant cycles.
- You are comfortable using manifold gauges and thermometers.
- You can accurately read a PT chart or use a digital gauge with a built-in PT chart.
- You understand the safety precautions involved in working with refrigerant.
- You are ONLY measuring the values, and not attempting to add or remove refrigerant.
When You Should ALWAYS Call a Professional:
- You are uncomfortable working with tools or handling refrigerant.
- You don't fully understand the concepts of subcooling and superheat.
- You suspect a refrigerant leak (requires specialized leak detection equipment).
- You need to add or remove refrigerant (requires EPA certification and proper equipment).
- You are unsure about any step in the process.
- If the system uses a refrigerant that is not easily available or requires specialized equipment.
Working with refrigerant can be dangerous if not done correctly. Improper handling can lead to burns, frostbite, and environmental damage. Additionally, misdiagnosing and attempting to fix a problem yourself can potentially damage your system, leading to costly repairs. When in doubt, always consult a qualified HVAC technician. They have the expertise and equipment to accurately diagnose and repair any issues with your cooling system safely and effectively.