How To Measure Superheat And Subcooling

Imagine this: It’s a scorching summer day, and your air conditioner is blowing… warm air. Instead of a refreshing escape, you’re stuck with a house that feels like an oven. Before you panic and call for professional help, let's explore some basic troubleshooting steps. One of the most important things a technician will check is the superheat and subcooling, because these measurements are critical for diagnosing the overall health of your AC system.
Understanding Superheat and Subcooling: The Basics
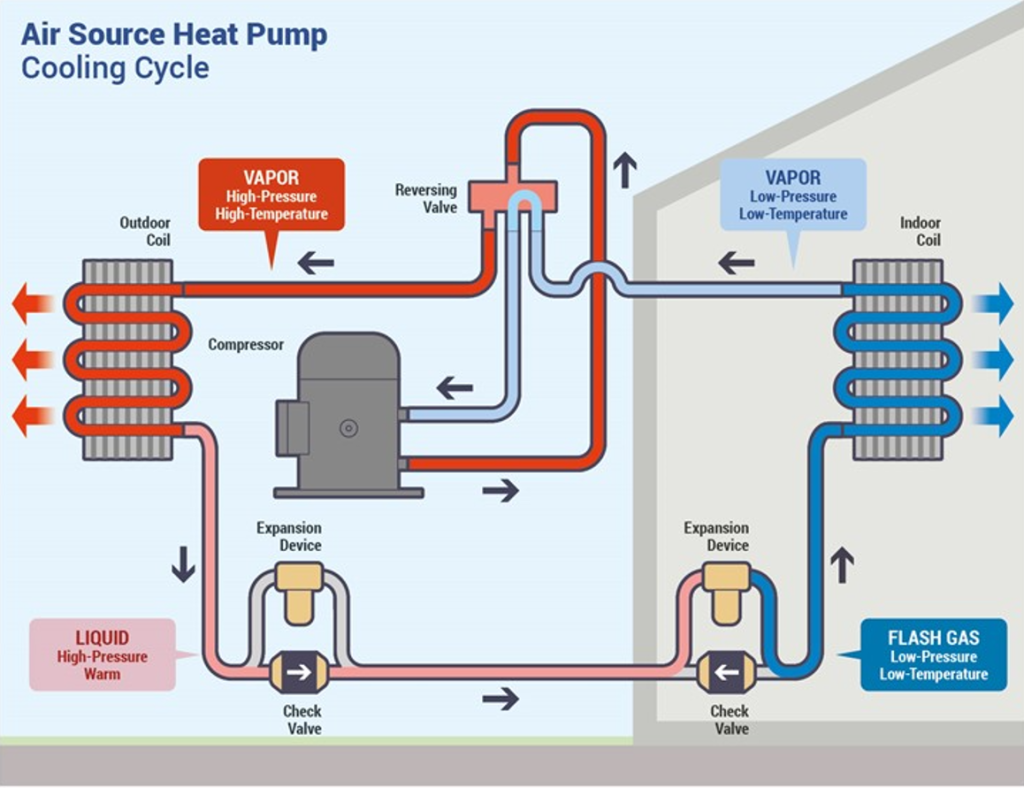
These terms might sound complicated, but they are simply ways of determining if your air conditioner has the correct amount of refrigerant. Refrigerant is the lifeblood of your AC, carrying heat from inside your house to the outside.
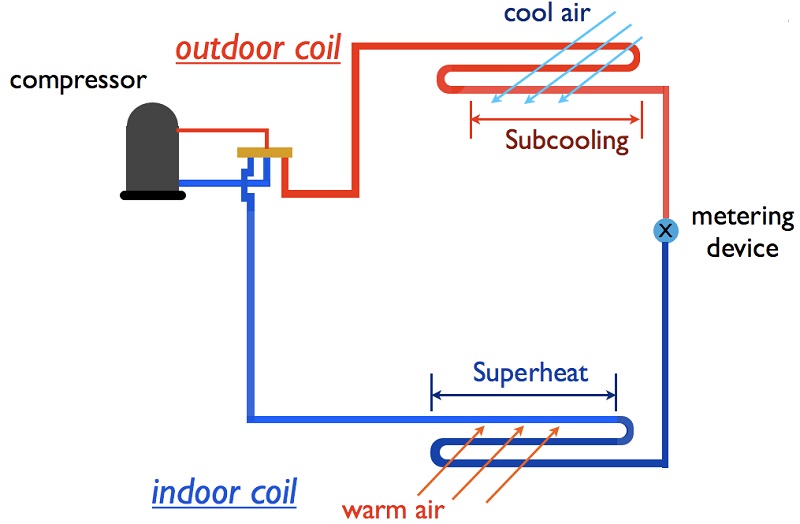
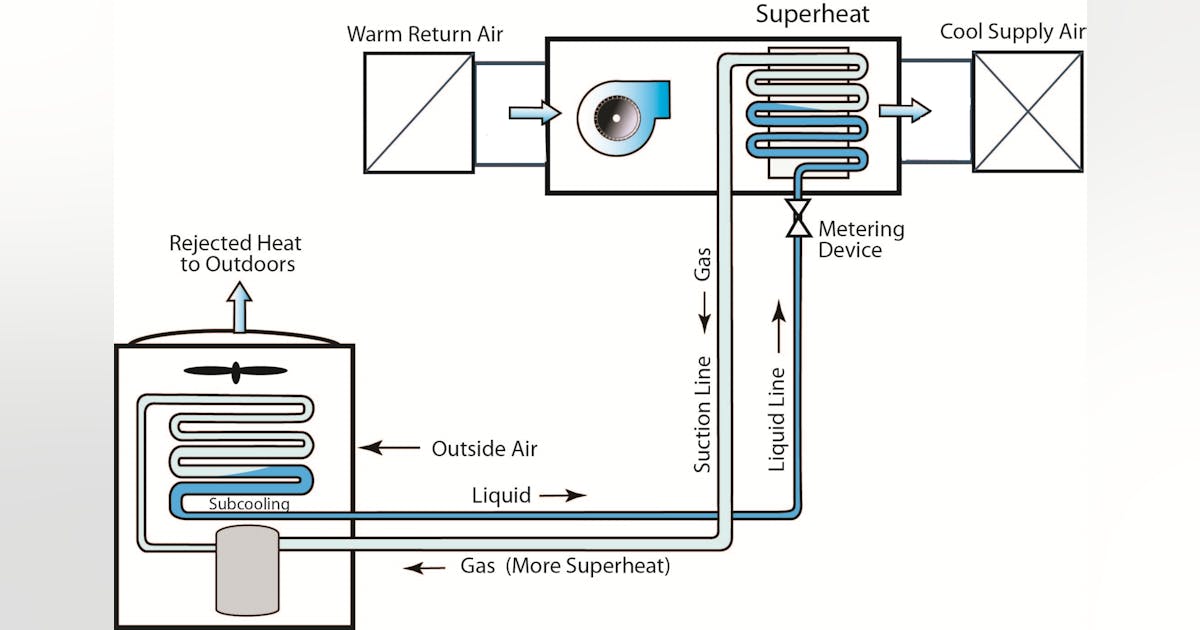
- Superheat: Measures the temperature of the refrigerant vapor *after* it has completely evaporated in the evaporator coil (the part inside your indoor unit). It tells us if there's enough refrigerant to ensure the compressor is getting cool vapor, preventing overheating.
- Subcooling: Measures the temperature of the refrigerant liquid *before* it enters the metering device (usually a TXV or orifice tube) in the condenser coil (the part outside your outdoor unit). It tells us if there's enough refrigerant in the system to ensure a solid column of liquid is reaching the metering device, optimizing cooling.
Why are they important? Incorrect superheat or subcooling can lead to:
- Reduced cooling efficiency.
- Increased energy bills.
- Compressor damage (the most expensive part of your AC to replace).
- System failure.
DIY Troubleshooting: What You Can Check Before Calling a Pro
Before diving into superheat and subcooling measurements, let's rule out some simpler issues you can address yourself.
1. Power Supply
Sounds obvious, but always start here!
- Check the breaker: Locate the breaker in your electrical panel that controls your AC unit. Make sure it's not tripped (flipped to the "off" position). If it is, flip it all the way to the "off" position and then back to "on".
- Check the disconnect switch: Near your outdoor unit, there's usually a disconnect switch (a small box with a handle). Ensure it's in the "on" position.
- Check for loose wires: This is for advanced users only and only when the power is OFF. If you're comfortable and know how to safely turn off the power at the breaker, you can visually inspect the wiring near the disconnect switch and at the outdoor unit's service panel (after removing it – again, power OFF!). Look for any loose or corroded connections. Tighten any you find, but do NOT attempt this if you're not confident in your electrical skills. ELECTRICAL WORK CAN BE DANGEROUS.
2. Thermostat Settings
Double-check your thermostat settings to avoid simple mistakes.
- Mode: Ensure your thermostat is set to "cool" or "AC".
- Temperature: Make sure the set temperature is lower than the current room temperature.
- Fan setting: Try setting the fan to "auto" instead of "on". "On" runs the fan continuously, even when the compressor isn't cooling, which can make it feel less effective.
- Battery: If your thermostat uses batteries, replace them. A low battery can cause erratic behavior.
3. Air Filter
A dirty air filter restricts airflow, making your AC work harder and less efficiently.
- Locate the filter: It's usually located in the indoor unit or in a wall or ceiling vent.
- Inspect the filter: If it's visibly dirty (covered in dust and debris), it's time to replace it.
- Replace the filter: Use a filter of the correct size and type (check your unit's manual for specifications).
4. Outdoor Unit Obstructions
Ensure the outdoor unit (condenser) is free from obstructions that can restrict airflow.
- Clear debris: Remove any leaves, grass clippings, branches, or other debris that may be blocking the unit.
- Trim vegetation: Keep bushes and plants trimmed back at least 2-3 feet from the unit.
Measuring Superheat and Subcooling: A Professional's Task (But Here's the Info)
Measuring superheat and subcooling requires specialized tools and knowledge. It involves working with refrigerant, which can be dangerous if handled improperly. This is generally a task for a qualified HVAC technician. However, understanding the process can help you better communicate with the technician and understand their diagnosis.
Disclaimer: Do NOT attempt to measure superheat and subcooling unless you are a trained and certified HVAC technician. Working with refrigerant can be dangerous and illegal without the proper licenses and equipment. This information is for educational purposes only.
Tools Required (For Informational Purposes Only):
- Refrigerant gauges (manifold gauge set): These measure the pressure on both the high and low sides of the system.
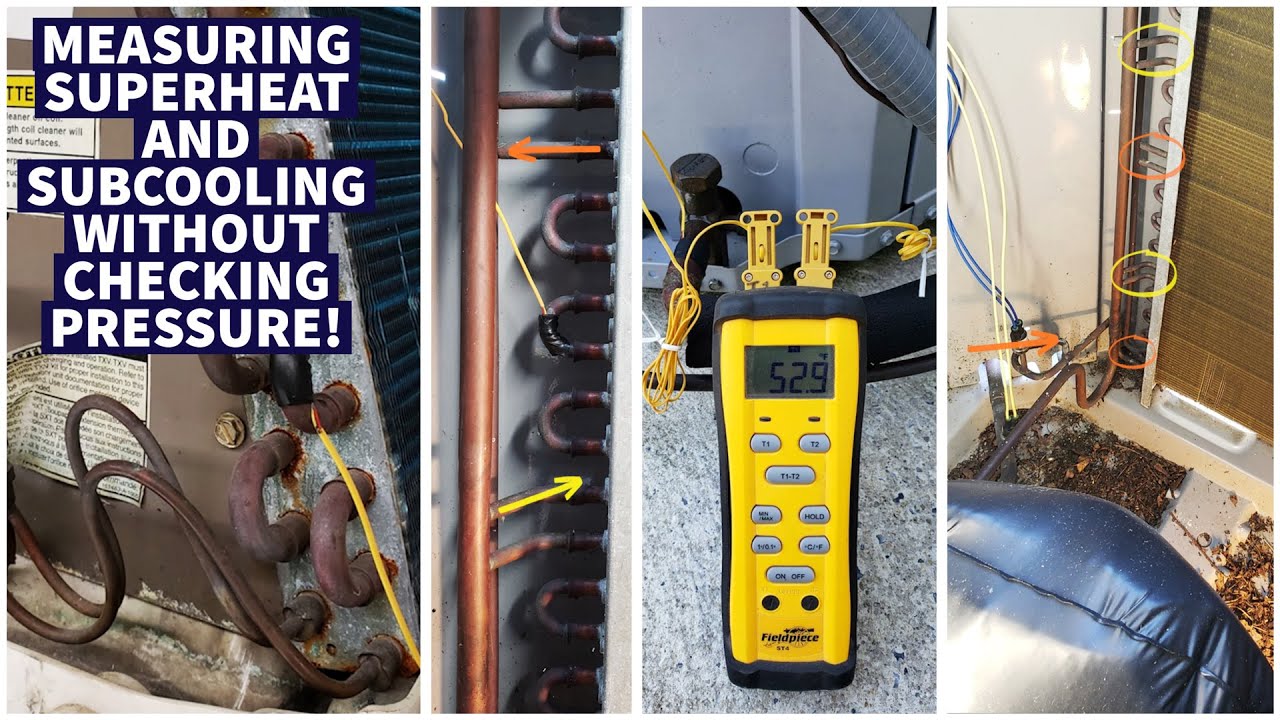
- Thermocouple or digital thermometer: To accurately measure refrigerant line temperatures.
- Pressure-temperature (PT) chart: A chart that correlates refrigerant pressure with its saturation temperature (boiling point). This chart is specific to the refrigerant being used in the system (e.g., R-22, R-410A).
The Process (Overview):
The following is a *simplified* overview of the process. An HVAC technician will take into account other factors such as ambient temperature, humidity, and the manufacturer's specifications for the unit.
Measuring Superheat
- Connect the gauges: The low-side (blue) gauge is connected to the suction line service port (the larger copper pipe coming from the indoor unit to the compressor). The high-side (red) gauge is connected to the liquid line service port (the smaller copper pipe leaving the condenser).
- Measure the suction line pressure: Read the pressure on the low-side gauge.
- Determine the saturation temperature: Using the PT chart for the refrigerant in use, find the saturation temperature that corresponds to the measured suction line pressure.
- Measure the suction line temperature: Using a thermocouple or digital thermometer, measure the temperature of the suction line a few inches from the service port, ideally insulated from ambient air.
- Calculate superheat: Subtract the saturation temperature (from step 3) from the measured suction line temperature (from step 4).
Superheat = Suction Line Temperature - Saturation Temperature - Compare to target superheat: The ideal superheat range varies depending on the type of metering device (TXV vs. fixed orifice) and the system design. A technician will consult the unit's service manual or use their experience to determine the target superheat.
Measuring Subcooling
- Connect the gauges: The gauges are connected as described above.
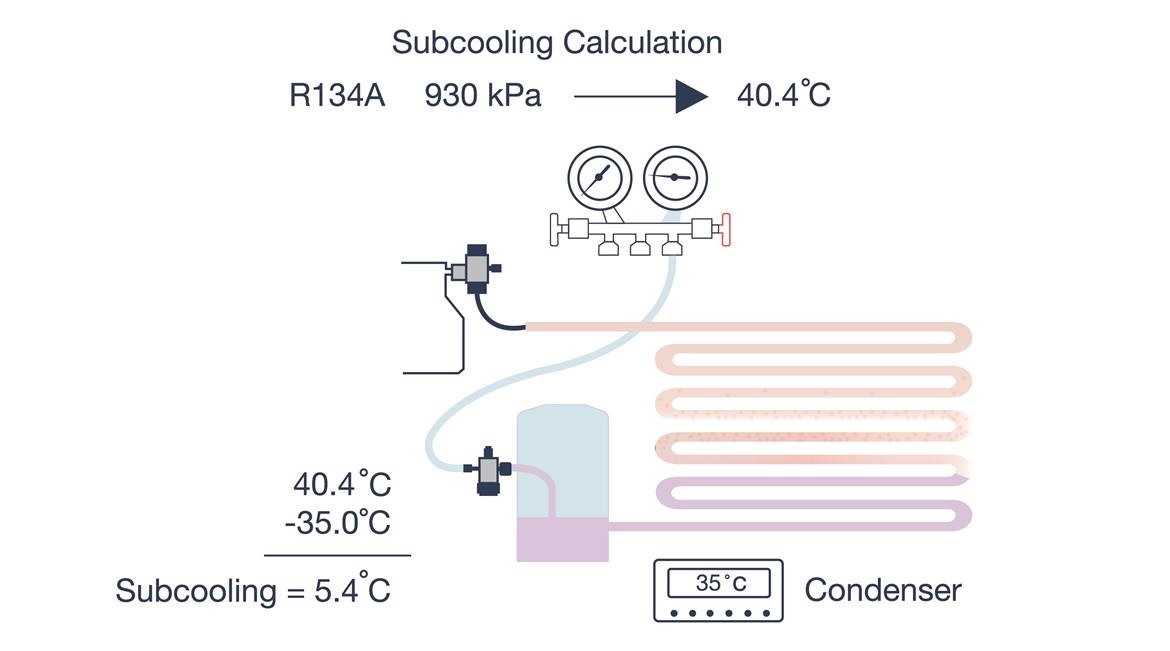
- Measure the liquid line pressure: Read the pressure on the high-side gauge.
- Determine the saturation temperature: Using the PT chart for the refrigerant in use, find the saturation temperature that corresponds to the measured liquid line pressure.
- Measure the liquid line temperature: Using a thermocouple or digital thermometer, measure the temperature of the liquid line a few inches from the service port, ideally insulated from ambient air.
- Calculate subcooling: Subtract the measured liquid line temperature (from step 4) from the saturation temperature (from step 3).
Subcooling = Saturation Temperature - Liquid Line Temperature - Compare to target subcooling: The ideal subcooling range also varies depending on the system design and refrigerant type. A technician will consult the unit's service manual or use their experience to determine the target subcooling.
Interpreting the Results (Technician's Domain)
Once the superheat and subcooling are measured, a technician can diagnose potential issues:
- Low Superheat: Could indicate overcharging of refrigerant, a restricted metering device, or a flooded evaporator coil.
- High Superheat: Could indicate undercharging of refrigerant, a refrigerant leak, or a faulty metering device.
- Low Subcooling: Could indicate undercharging of refrigerant or a restriction in the liquid line.
- High Subcooling: Could indicate overcharging of refrigerant or a restricted condenser coil.
Refrigerant Leaks
If the system is undercharged, the technician will need to locate and repair any refrigerant leaks before adding more refrigerant. Refrigerant leaks should always be repaired by a qualified technician. Releasing refrigerant into the atmosphere is illegal and harmful to the environment.
When to Call a Professional
If you've checked the power supply, thermostat settings, air filter, and outdoor unit obstructions, and your AC is still not cooling properly, it's time to call a qualified HVAC technician. Specifically, you should ALWAYS call a professional if:
- You suspect a refrigerant leak.
- You need to add or remove refrigerant.
- You suspect a problem with the compressor or other major components.
- You are uncomfortable working with electricity or gas.
Trying to fix complex AC problems yourself can be dangerous and may void your warranty. An experienced technician has the tools, knowledge, and training to diagnose and repair your AC system safely and effectively.
Preventative Maintenance: The Key to a Healthy AC
The best way to avoid AC problems is to perform regular preventative maintenance.
- Schedule annual maintenance: Have a qualified technician inspect and service your AC system at least once a year, preferably in the spring before the cooling season begins.
- Clean or replace air filters regularly: Check your air filter monthly and replace it when it's dirty.
- Keep the outdoor unit clean and free of obstructions: Regularly clear away any debris that may be blocking the unit.
By taking these simple steps, you can help keep your AC system running efficiently and reliably for years to come, saving you money on energy bills and repair costs.
While measuring superheat and subcooling requires specialized knowledge and equipment best left to professionals, understanding the process and the importance of these measurements can help you be a more informed homeowner and better communicate with your HVAC technician. Remember, a little preventative maintenance goes a long way in keeping your home cool and comfortable all summer long!