How To Prime A Well Jet Pump
Imagine this: you turn on the faucet, expecting a refreshing stream of water, but instead, you're met with nothing but a sputtering cough and then silence. A dry well is a major household inconvenience, disrupting everything from showering and laundry to cooking and flushing toilets. In many cases, the culprit behind this disruption is a loss of prime in your well jet pump. This article will guide you through troubleshooting and priming your well jet pump, helping you restore water pressure and get your household back on track.
Understanding Well Jet Pump Priming
Before diving into the troubleshooting process, it's essential to understand what priming means and why it's necessary. A well jet pump relies on suction to draw water from the well. Priming essentially means filling the pump housing and suction line with water. This creates a vacuum, allowing the pump to effectively draw water from the well. When the pump loses its prime (the water in the housing drains out), it can't create that vacuum, and therefore, it can't pump water.
Why does a jet pump lose its prime? Several factors can contribute, including:
- Air leaks in the suction line: Even a small air leak can disrupt the vacuum and allow water to drain back into the well.
- A check valve failure: The check valve prevents water from flowing back down the well pipe. If it fails, the water can drain out of the pump.
- A low water level in the well: If the water level in the well drops below the foot valve (at the bottom of the well), the pump will suck air and lose its prime.
- A faulty pump seal: Worn or damaged seals can allow air to enter the pump housing.
Troubleshooting a Well Jet Pump: A Step-by-Step Guide
Follow these steps to diagnose and address the issue:
Step 1: Safety First!
Before you begin any work on your well jet pump, always disconnect the power at the circuit breaker! This is crucial to prevent electrical shock. Also, be mindful of any standing water near the pump, as this can create a shock hazard. Wear appropriate safety gear, such as gloves and eye protection.
Step 2: Check the Power Supply
It might seem obvious, but it's always good to start with the simplest things. Verify that the circuit breaker for the pump hasn't tripped. If it has, reset it. If it trips again immediately, this could indicate a more serious electrical problem within the pump itself, requiring professional attention.
If the breaker continues to trip, do not repeatedly reset it. Contact a qualified electrician to diagnose and repair the electrical fault.
Step 3: Inspect the Pump and Piping for Leaks
Carefully examine the pump housing, pipes, and fittings for any signs of leaks. Look for:
- Visible water drips or puddles.
- Corrosion or rust around fittings.
- Loose connections.
If you find any leaks, tighten the connections with a wrench. If the fittings are corroded or damaged, they may need to be replaced. Small leaks in pipes can sometimes be temporarily patched with waterproof tape, but a permanent repair is always recommended.
Step 4: Check the Pressure Tank
The pressure tank stores water under pressure and helps regulate the pump's on/off cycles. A faulty pressure tank can sometimes mimic the symptoms of a lost prime. To check the pressure tank:
- Locate the pressure gauge on the tank.
- Turn off the pump at the breaker.
- Open a nearby faucet to relieve any pressure in the system.
- Use a tire pressure gauge to check the air pressure in the tank. The pressure should typically be 2 PSI below the pump's cut-in pressure (e.g., if the pump turns on at 30 PSI, the tank pressure should be around 28 PSI).
If the tank is waterlogged (full of water instead of air), or if the air pressure is significantly off, the tank may need to be recharged or replaced. This might require professional assistance, especially if you're unfamiliar with pressure tank maintenance.
Step 5: Priming the Well Jet Pump
If you've ruled out electrical issues, leaks, and pressure tank problems, it's time to prime the pump. Here's how:
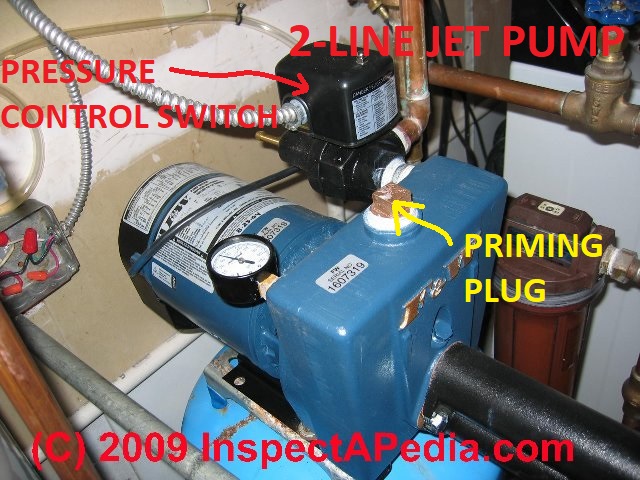
- Locate the Priming Plug: Most jet pumps have a priming plug or port located on the pump housing. This is usually a threaded plug that can be unscrewed.
- Open the Priming Plug: Carefully unscrew the priming plug. Some water may still be in the pump housing, so be prepared for a small spill.
- Pour Water into the Pump Housing: Using a funnel, slowly pour clean water into the priming port until the pump housing is completely full. You may need to wait a few moments for the water to settle.
- Replace the Priming Plug: Once the pump housing is full, replace the priming plug and tighten it securely. Make sure it's airtight!
- Turn on the Pump: Go back to the circuit breaker and turn the power back on to the pump.
- Listen and Observe: The pump should start running. Listen for any unusual noises, such as grinding or screeching. Watch the pressure gauge on the pressure tank. The pressure should gradually increase.
- Repeat if Necessary: If the pump doesn't start pumping water immediately, or if the pressure doesn't increase, turn off the pump (at the breaker), open the priming plug, and repeat steps 3-6. It may take several attempts to fully prime the pump, especially if there's a significant air leak in the system.
Step 6: Checking the Foot Valve (Advanced – May Require Professional Help)
The foot valve is located at the bottom of the well pipe, inside the well. It's a one-way valve that prevents water from flowing back into the well when the pump is not running. If the foot valve is faulty, it can cause the pump to lose its prime quickly.
Checking the foot valve is more challenging and often requires specialized equipment. Attempting to access the foot valve yourself can be dangerous and may damage your well.
Here's a general overview of how a professional might check the foot valve:
- Using a Well Camera: A well camera can be lowered into the well to visually inspect the foot valve for damage or blockage.
- Pressure Testing: A plumber can use specialized equipment to pressure test the well line to check for leaks, which could indicate a faulty foot valve.
If you suspect a problem with the foot valve, it's best to contact a qualified well service professional.
When to Call a Professional
While many priming issues can be resolved with the steps outlined above, some situations require professional expertise. Do not attempt repairs beyond your skill level, especially when dealing with electricity, gas, or complex plumbing systems.
Call a qualified professional in the following situations:
- Repeated Priming Issues: If you find yourself needing to prime the pump frequently, it indicates an underlying problem that needs to be addressed.
- Electrical Problems: If the circuit breaker continues to trip, or if you suspect an electrical fault in the pump, contact a qualified electrician.
- Well Depth Issues: If you suspect the water level in the well is too low, a well service professional can assess the situation and recommend solutions, such as deepening the well or lowering the pump.
- Foot Valve Problems: As mentioned earlier, checking and repairing the foot valve is best left to professionals.
- Complex Plumbing Issues: If you encounter significant leaks or damage to the pump or piping, contact a licensed plumber.
- Unusual Noises: Grinding, screeching, or other unusual noises coming from the pump can indicate internal damage and should be investigated by a professional.
Preventative Maintenance Tips
Preventing problems is always better than reacting to them. Here are some preventative maintenance tips to help keep your well jet pump running smoothly:
- Regular Inspections: Periodically inspect the pump, piping, and pressure tank for leaks, corrosion, and other signs of damage.
- Maintain Proper Well Water Levels: Be mindful of your water usage, especially during dry periods. Conserving water can help prevent the well from running dry.
- Protect the Pump from the Elements: Ensure the pump is properly protected from rain, snow, and extreme temperatures.
- Schedule Professional Maintenance: Consider scheduling annual maintenance with a qualified well service professional to inspect and service the pump and well system.
Conclusion
Losing prime in your well jet pump can be frustrating, but by following this troubleshooting guide, you can often identify and resolve the issue yourself. Remember to prioritize safety, start with the simplest solutions, and don't hesitate to call a professional when needed. With a little knowledge and effort, you can keep your well jet pump running efficiently and enjoy a reliable supply of water for your household. By understanding the basic components and troubleshooting steps, you're empowered to take control of your water system and address common issues effectively. Good luck!