How To Read American Standard Model Numbers

A common frustration for homeowners, especially during scorching summers or freezing winters, is inconsistent heating or cooling. You might notice some rooms are significantly warmer or cooler than others, or that your system seems to be running constantly without effectively reaching the set temperature. Before calling for expensive HVAC repairs, a systematic approach to diagnosing the problem can save you time and money. This guide will walk you through practical troubleshooting steps, focusing on understanding your American Standard model number to access specific information about your system.
Step 1: Identify Your American Standard Model Number
Your model number is your key to unlocking specific information about your American Standard heating or cooling system. It's essentially the system's DNA, telling you its type, capacity, features, and manufacturing details. Knowing how to decipher it will help you find the correct documentation, replacement parts, and even understand its intended performance.
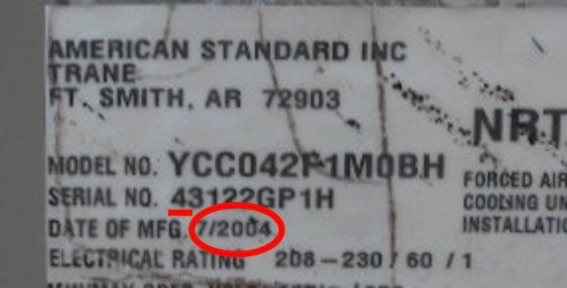
Where to find it: Look for a rating plate or sticker on the unit itself. For furnaces and air handlers, this is typically located inside the unit, often on the inside of the access panel. Air conditioners and heat pumps usually have the rating plate on the exterior of the unit.
Typical locations:
- Furnaces: Inside the blower compartment.
- Air Conditioners: On the side of the outdoor unit.
- Heat Pumps: On the side of the outdoor unit.
- Air Handlers: Inside the unit, often near the blower.
Once you've located the rating plate, carefully note down the complete model number. Don't just write down part of it, as subtle differences can indicate different features or specifications. An American Standard model number often looks something like this: AUD2B080A936AA, or 4A7A7036H1000AA.
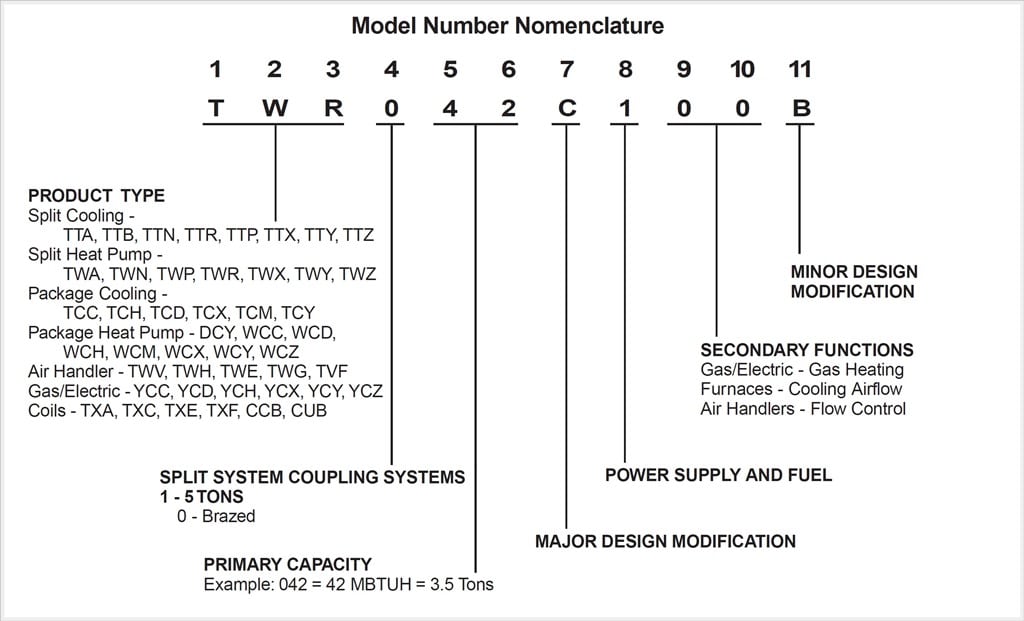
Step 2: Decoding the Model Number (Example)
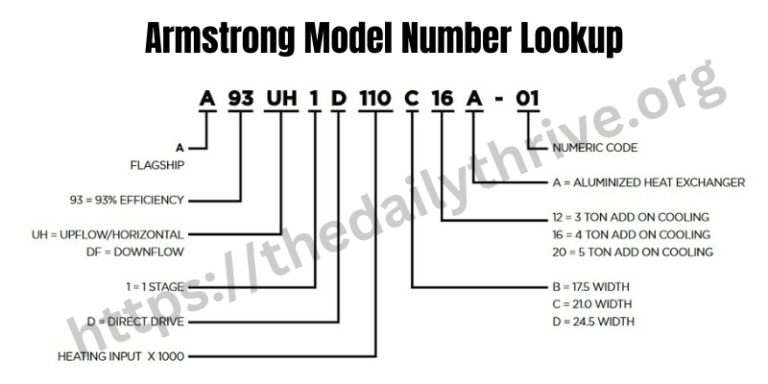
While the exact format can vary slightly depending on the age and type of your system, American Standard model numbers generally follow a pattern. Let's break down a hypothetical example: AUD2B080A936AA.
- AUD: Indicates the type of unit. In this case, "AUD" typically refers to an American Standard Upflow Furnace. Other common prefixes include:
- AUC: American Standard Upflow Condensing Furnace.
- AUE: American Standard Upflow Economizer Furnace.
- 4A7A: American Standard Air Conditioner
- 4A6H: American Standard Heat Pump
- TAM: American Standard Air Handler
- 2: Indicates the series or efficiency level. A higher number often denotes a more efficient model. This varies based on the specific product line and age of the system. Consult American Standard documentation for specifics.
- B: Denotes the cabinet size. This impacts physical dimensions and sometimes blower capacity. Refer to the product specifications for exact measurements.
- 080: Represents the BTU (British Thermal Units) input or output capacity. In this case, "080" likely means 80,000 BTU. For furnaces, this is usually the input BTU. For air conditioners, this number (often divided by 12,000) gives you the nominal tonnage (e.g., 36 = 3 tons).
- A: A letter indicating design series. With design changes, this letter is subject to change, signifying upgraded components and features.
- 9: Specifies the blower motor type and speed. This requires looking up the specific product information.
- 36: Indicates the voltage and phase of the electrical system. Common values include 36 (208/230V, single phase).
- AA: Denotes specific features or regional variations. These codes often require looking up the model number in a database or consulting American Standard documentation.
Important Note: This is a simplified explanation. The precise meaning of each character can vary widely depending on the specific model and year of manufacture. Always consult the official American Standard documentation or a qualified HVAC technician for accurate interpretation.
Step 3: Basic Troubleshooting Steps (No Tools Required)
Before you grab any tools, start with these simple checks. These are safe and easy to perform.
- Thermostat Settings: The most common culprit is a simple thermostat error. Ensure the thermostat is set to "Heat" or "Cool" (depending on the season) and that the temperature setting is appropriate. Check the batteries in your thermostat, replacing them if needed. A low battery can cause erratic behavior.
- Air Filter: A dirty air filter restricts airflow, making your system work harder and less efficiently. Locate your air filter (typically in the furnace or air handler) and check its condition. If it's visibly dirty, replace it with a new filter of the correct size and type. A clean filter improves efficiency and protects your equipment.
- Vents and Registers: Make sure that all supply and return vents are open and unobstructed. Blocked vents can disrupt airflow and cause uneven temperatures. Ensure furniture, rugs, or curtains aren't blocking vents.
- Outdoor Unit (Air Conditioner or Heat Pump): Check the outdoor unit for any obvious obstructions, such as leaves, branches, or snow. Clear away any debris that could be blocking airflow. Also, ensure the fins aren't bent or damaged.
Step 4: Troubleshooting with Basic Tools
If the initial checks don't resolve the issue, you can proceed with some slightly more involved troubleshooting steps using basic tools. Always turn off the power to the unit at the breaker box before performing any electrical checks.
- Multimeter: A multimeter is a valuable tool for testing electrical components, but only use it if you are comfortable and knowledgeable about electrical safety. Always turn off the power before testing.
- Check the Contactor (Air Conditioner or Heat Pump): The contactor is a switch that controls power to the compressor. Using a multimeter, you can check if the contactor is receiving power and sending it to the compressor when the thermostat calls for cooling. A faulty contactor is a common problem.
- Check the Capacitor (Air Conditioner or Heat Pump): Capacitors store and release electrical energy to start and run the compressor and fan motors. A faulty capacitor can prevent the unit from starting or running efficiently. Capacitors can store a dangerous electrical charge even after the power is turned off, so discharge them properly before handling. If you are not comfortable with this, call a professional.
- Screwdrivers: A set of screwdrivers (both Phillips and flathead) will be useful for accessing components and tightening connections.
- Check for Loose Wiring Connections: Carefully inspect the wiring connections inside the unit for any loose or corroded connections. Tighten any loose screws or replace corroded connectors.
- Inspect the Flame Sensor (Furnace): The flame sensor detects the presence of a flame in the furnace. If it's dirty or faulty, it can cause the furnace to shut down. Carefully remove the flame sensor and clean it with fine steel wool.
- Voltage Tester: A non-contact voltage tester can be used to safely check for the presence of voltage without directly contacting wires. This is useful for verifying that power is off before working on electrical components.
Step 5: Common Problems and DIY Solutions
Here are some common problems and potential DIY solutions:
- Problem: System won't turn on at all.
- Possible Cause: Power issue.
- DIY Check: Verify the breaker is not tripped. Check the disconnect switch near the unit. Test the voltage at the unit (if you are comfortable with electrical work).
- Problem: Uneven heating or cooling.
- Possible Cause: Airflow restrictions.
- DIY Check: Ensure vents are open and unobstructed. Check and replace the air filter. Inspect ductwork for leaks (seal any leaks with duct tape).
- Problem: System runs constantly but doesn't reach set temperature.
- Possible Cause: Dirty air filter, refrigerant leak (air conditioner or heat pump).
- DIY Check: Replace the air filter. Refrigerant leaks require professional diagnosis and repair.
- Problem: Furnace blowing cold air.
- Possible Cause: Overheating, flame sensor issue.
- DIY Check: Check the air filter. Inspect the flame sensor (clean if necessary). If the furnace is overheating, it may shut down to protect itself.
- Problem: Air conditioner/Heat pump not cooling/heating.
- Possible Cause: Dirty condenser coils, refrigerant leak.
- DIY Check: Check the condenser coils outside for any blockages. Clear it with a water hose. Refrigerant leaks require professional diagnosis and repair.
Step 6: When to Call a Professional
While DIY troubleshooting can be helpful, some issues require the expertise of a qualified HVAC technician. Never attempt repairs that you are not comfortable with or that involve handling refrigerant, gas lines, or high-voltage electrical components.
Call a professional if:
- You suspect a refrigerant leak. Handling refrigerant requires specialized equipment and training.
- You smell gas near the furnace. This is a serious safety hazard. Evacuate the area and call the gas company immediately.
- You are not comfortable working with electrical components.
- The system is making unusual noises, such as grinding, squealing, or banging.
- You have tried the basic troubleshooting steps and the problem persists.
- The model number decoding indicates an issue beyond your expertise.
- Work requires you to remove panels from inside the unit and/or you are unsure about safety concerns.
Finding a Qualified Technician: Look for HVAC technicians who are licensed, insured, and certified. Check online reviews and ask for recommendations from friends or family. Explain the symptoms you've observed and the troubleshooting steps you've already taken. Providing the technician with your American Standard model number will help them diagnose the problem more efficiently.
Conclusion
Troubleshooting your American Standard heating or cooling system can seem daunting, but by understanding your model number and following these practical steps, you can identify and resolve many common issues yourself. Remember to prioritize safety and call a professional when necessary. Regular maintenance, such as changing the air filter and cleaning the outdoor unit, can prevent many problems from occurring in the first place. With a little knowledge and effort, you can keep your system running smoothly and efficiently, ensuring comfort and saving money on energy bills.