How To Read Pressure Temperature Chart
Imagine this: It's a sweltering summer day, and your air conditioner decides to quit. Instead of enjoying cool comfort, you're sweating and wondering what went wrong. Before calling a professional, understanding the basics of your AC system, particularly using a Pressure Temperature (PT) chart, can help you diagnose the problem and potentially save you time and money. This guide provides a step-by-step approach to troubleshooting your AC, with a focus on how to use a PT chart effectively.
Understanding the Basics: Your Air Conditioner's Cooling Cycle
Your AC works by circulating refrigerant, a special fluid that absorbs and releases heat. This cycle involves several key components:
- Compressor: The heart of the system, pumping refrigerant and increasing its pressure and temperature.
- Condenser: Located outside, it rejects heat from the refrigerant, turning it into a high-pressure liquid.
- Expansion Valve (or Metering Device): This regulates the flow of refrigerant into the evaporator, causing a pressure drop.
- Evaporator: Located inside, it absorbs heat from the air, turning the refrigerant into a low-pressure gas.
The refrigerant must be at the correct pressure and temperature at each stage for the system to function efficiently. This is where the PT chart becomes invaluable.
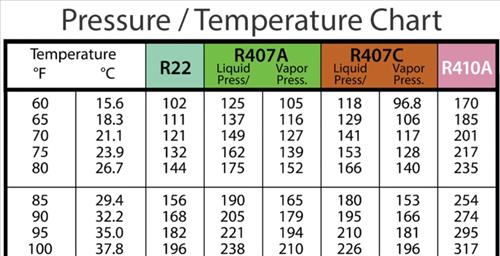
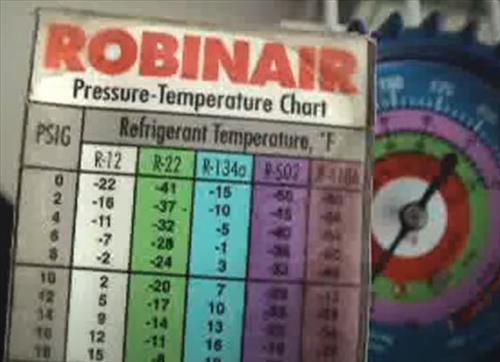
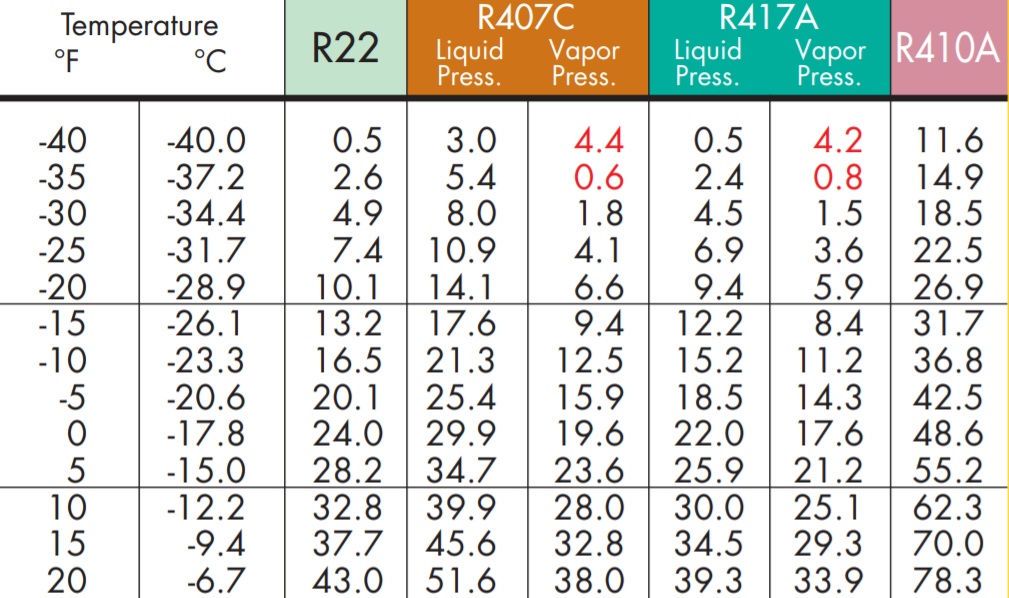
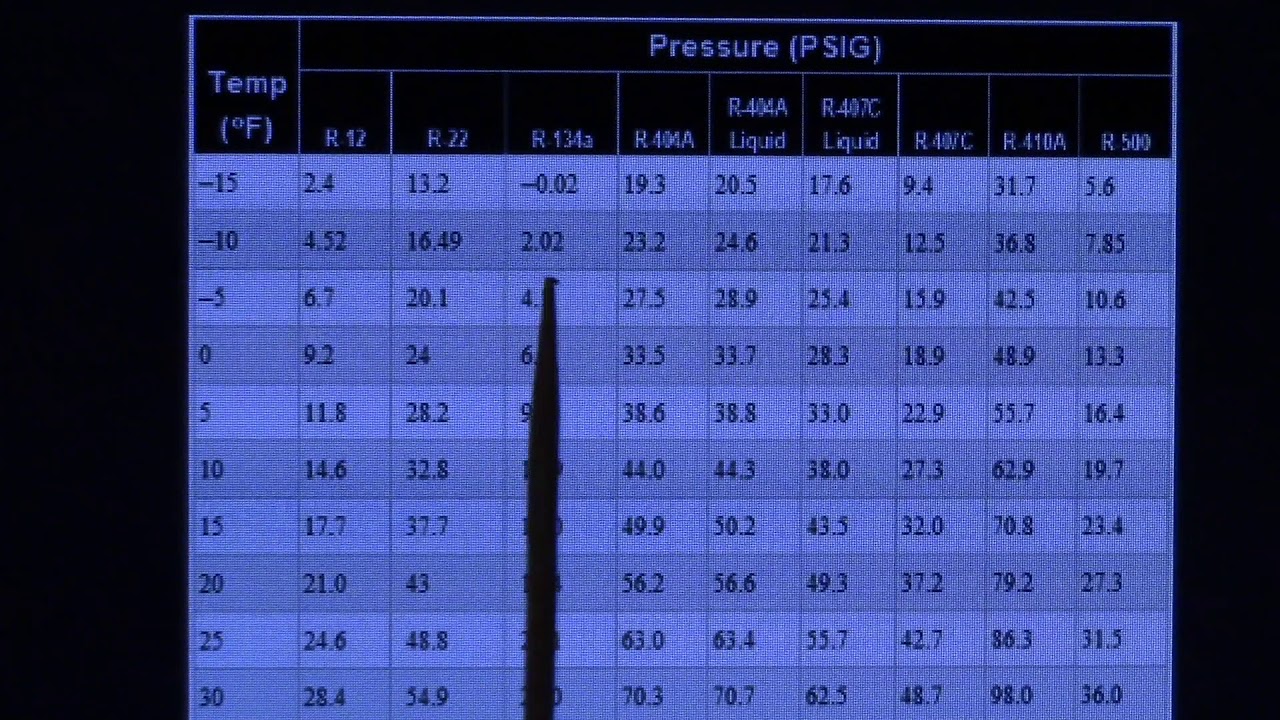
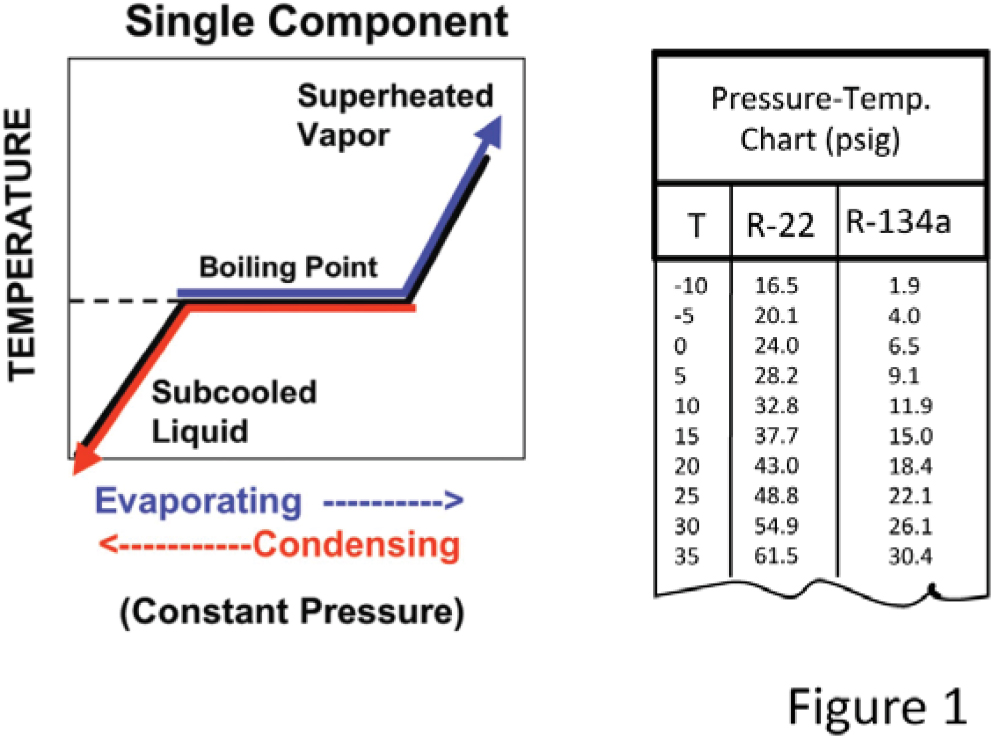
What is a Pressure Temperature (PT) Chart?
A PT chart is a table that shows the relationship between the pressure and boiling point (saturation temperature) of a specific refrigerant. Each refrigerant (R-22, R-410A, R-32, etc.) has its own unique PT chart. This means that at a given pressure, the refrigerant will boil (or condense) at a specific temperature. Technicians use these charts to diagnose refrigerant-related issues by comparing measured pressures with expected temperatures.
You can easily find PT charts online by searching for "[Refrigerant Type] PT Chart" (e.g., "R-410A PT Chart"). Make sure you use a reliable source!
Understanding Saturation Temperatures
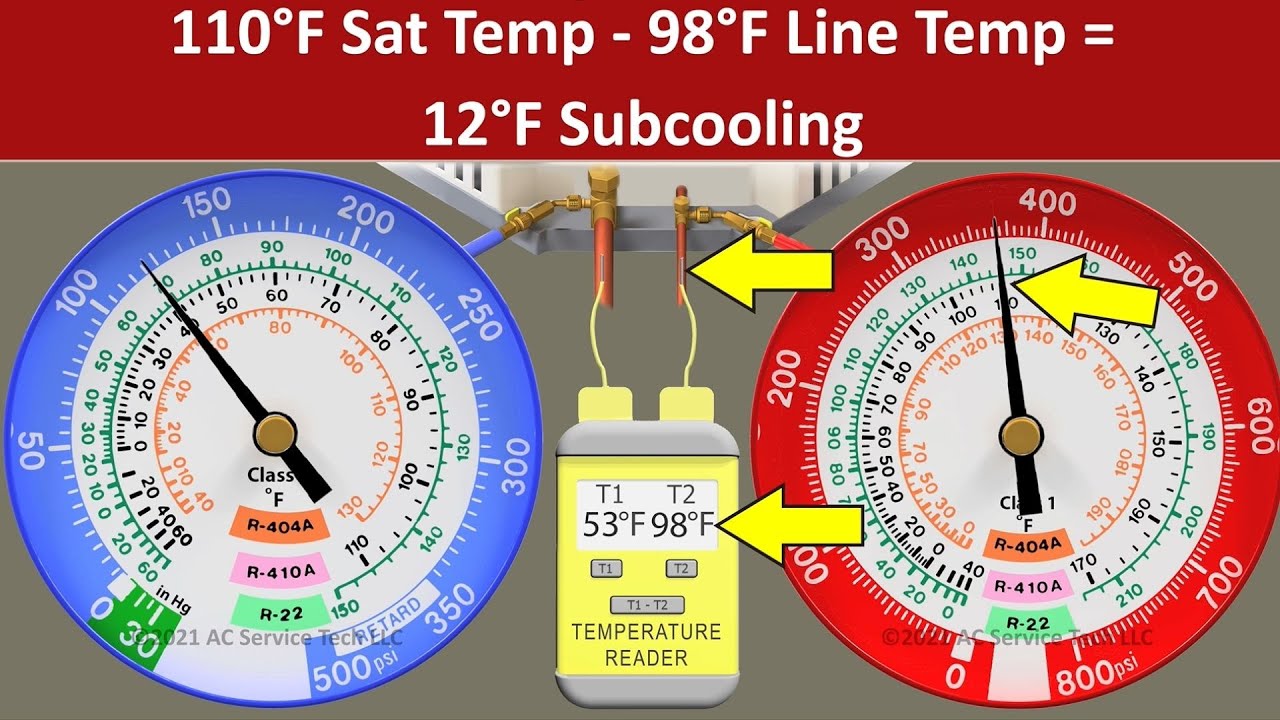
The PT chart displays saturation temperatures. Saturation temperature refers to the temperature at which a refrigerant will change state (boil or condense) at a specific pressure. Understanding this is crucial for diagnosing AC problems. The goal is to compare the saturation temperature on the chart with the actual temperature of the refrigerant line to see if the system is working within normal parameters.
Step-by-Step Troubleshooting Guide
Important Safety Note: Before attempting any repairs, always turn off the power to your air conditioner at the breaker box. Working with electricity can be dangerous. If you suspect a refrigerant leak, do not attempt to repair it yourself. Contact a licensed HVAC technician. Refrigerant handling requires specialized equipment and certifications.
Step 1: Initial Checks and Power
- Thermostat Settings: Ensure your thermostat is set to "Cool" and the temperature is lower than the current room temperature. A common mistake is simply having the thermostat set incorrectly.
- Air Filter: A clogged air filter is a frequent cause of AC problems. Replace it with a new, clean filter. A dirty filter restricts airflow, making the system work harder and potentially causing it to freeze up.
- Breaker Box: Check the breaker for the AC unit. If it's tripped, reset it. If it trips again immediately, there's likely a more serious electrical issue that requires a professional.
- Outdoor Unit Power: Make sure the outdoor unit is receiving power. Some units have a separate disconnect switch near the unit; ensure it is turned on.
Step 2: Inspect the Outdoor Unit (Condenser)
- Clean the Condenser Coils: Over time, the outdoor condenser coils can become dirty with leaves, grass clippings, and debris. Use a garden hose (with a gentle spray nozzle) to clean the coils from the inside out. Be careful not to damage the fins. Dirty coils restrict airflow and reduce the system's efficiency.
- Fan Operation: Observe the condenser fan while the AC is running. It should be spinning freely and drawing air through the coils. If the fan isn't working, the compressor can overheat. This could indicate a faulty capacitor or motor, which should be replaced by a professional.
- Ice Buildup: Check for ice buildup on the refrigerant lines or the outdoor unit. Ice indicates a problem with airflow, refrigerant charge, or another system malfunction. Turn off the AC and allow the ice to melt completely before proceeding. Address the underlying cause (dirty filter, low refrigerant, etc.).
Step 3: Accessing and Interpreting Pressure Readings (For Experienced DIYers Only - Safety First!)
Warning: This step requires knowledge of HVAC systems and the use of specialized tools like manifold gauges. If you are not comfortable working with refrigerant lines, do not attempt this step. Improper handling of refrigerant can be dangerous and illegal.
- Gather Your Tools: You will need a manifold gauge set, refrigerant hoses, and potentially a thermometer. Ensure your gauges are compatible with the type of refrigerant your system uses (e.g., R-410A or R-32). Using incompatible gauges can damage your system and gauges.
- Connect the Gauges: Carefully connect the manifold gauge hoses to the service ports on the suction (low pressure) and liquid (high pressure) lines of the AC unit. Follow the manufacturer's instructions for your gauge set.
- Take Pressure Readings: With the AC running, observe the pressure readings on the gauges. Record both the low-side (suction) and high-side (liquid) pressures.
- Measure Temperatures: Use a thermometer to measure the temperature of the suction line near the service port and the temperature of the liquid line near the service port.
Step 4: Using the PT Chart for Diagnosis
Now comes the critical part: using the PT chart to interpret your pressure and temperature readings.
- Identify Your Refrigerant: Crucially, know which refrigerant your system uses. This information is typically found on a sticker on the outdoor unit.
- Find the Saturation Temperature: Using your PT chart for the specific refrigerant, locate the saturation temperature that corresponds to your low-side (suction) pressure. This is your target evaporating temperature.
- Compare Measured and Chart Temperatures (Suction Line): Compare the saturation temperature you found on the PT chart (based on the low-side pressure) with the actual temperature you measured on the suction line. A typical difference (superheat) is between 8-12 degrees Fahrenheit. If the actual suction line temperature is significantly higher, it could indicate a low refrigerant charge. If it is significantly lower, it could mean an overcharged system, or a problem with the metering device.
- Find the Saturation Temperature: Using your PT chart for the specific refrigerant, locate the saturation temperature that corresponds to your high-side (liquid) pressure. This is your target condensing temperature.
- Compare Measured and Chart Temperatures (Liquid Line): Compare the saturation temperature you found on the PT chart (based on the high-side pressure) with the actual temperature you measured on the liquid line. A typical difference (subcooling) is between 10-15 degrees Fahrenheit. If the actual liquid line temperature is significantly lower, it could indicate an overcharged system. If it is significantly higher, it could mean a low refrigerant charge, or a problem with the condenser fan motor/ dirty condenser coils.
Example: Let's say your system uses R-410A refrigerant. You measure a low-side pressure of 120 PSI. Looking at an R-410A PT chart, you find that 120 PSI corresponds to a saturation temperature of approximately 40°F. You then measure the temperature of the suction line and find it to be 55°F. In this case, your superheat would be 15°F, possibly indicating a slightly low refrigerant charge.
Important Considerations:
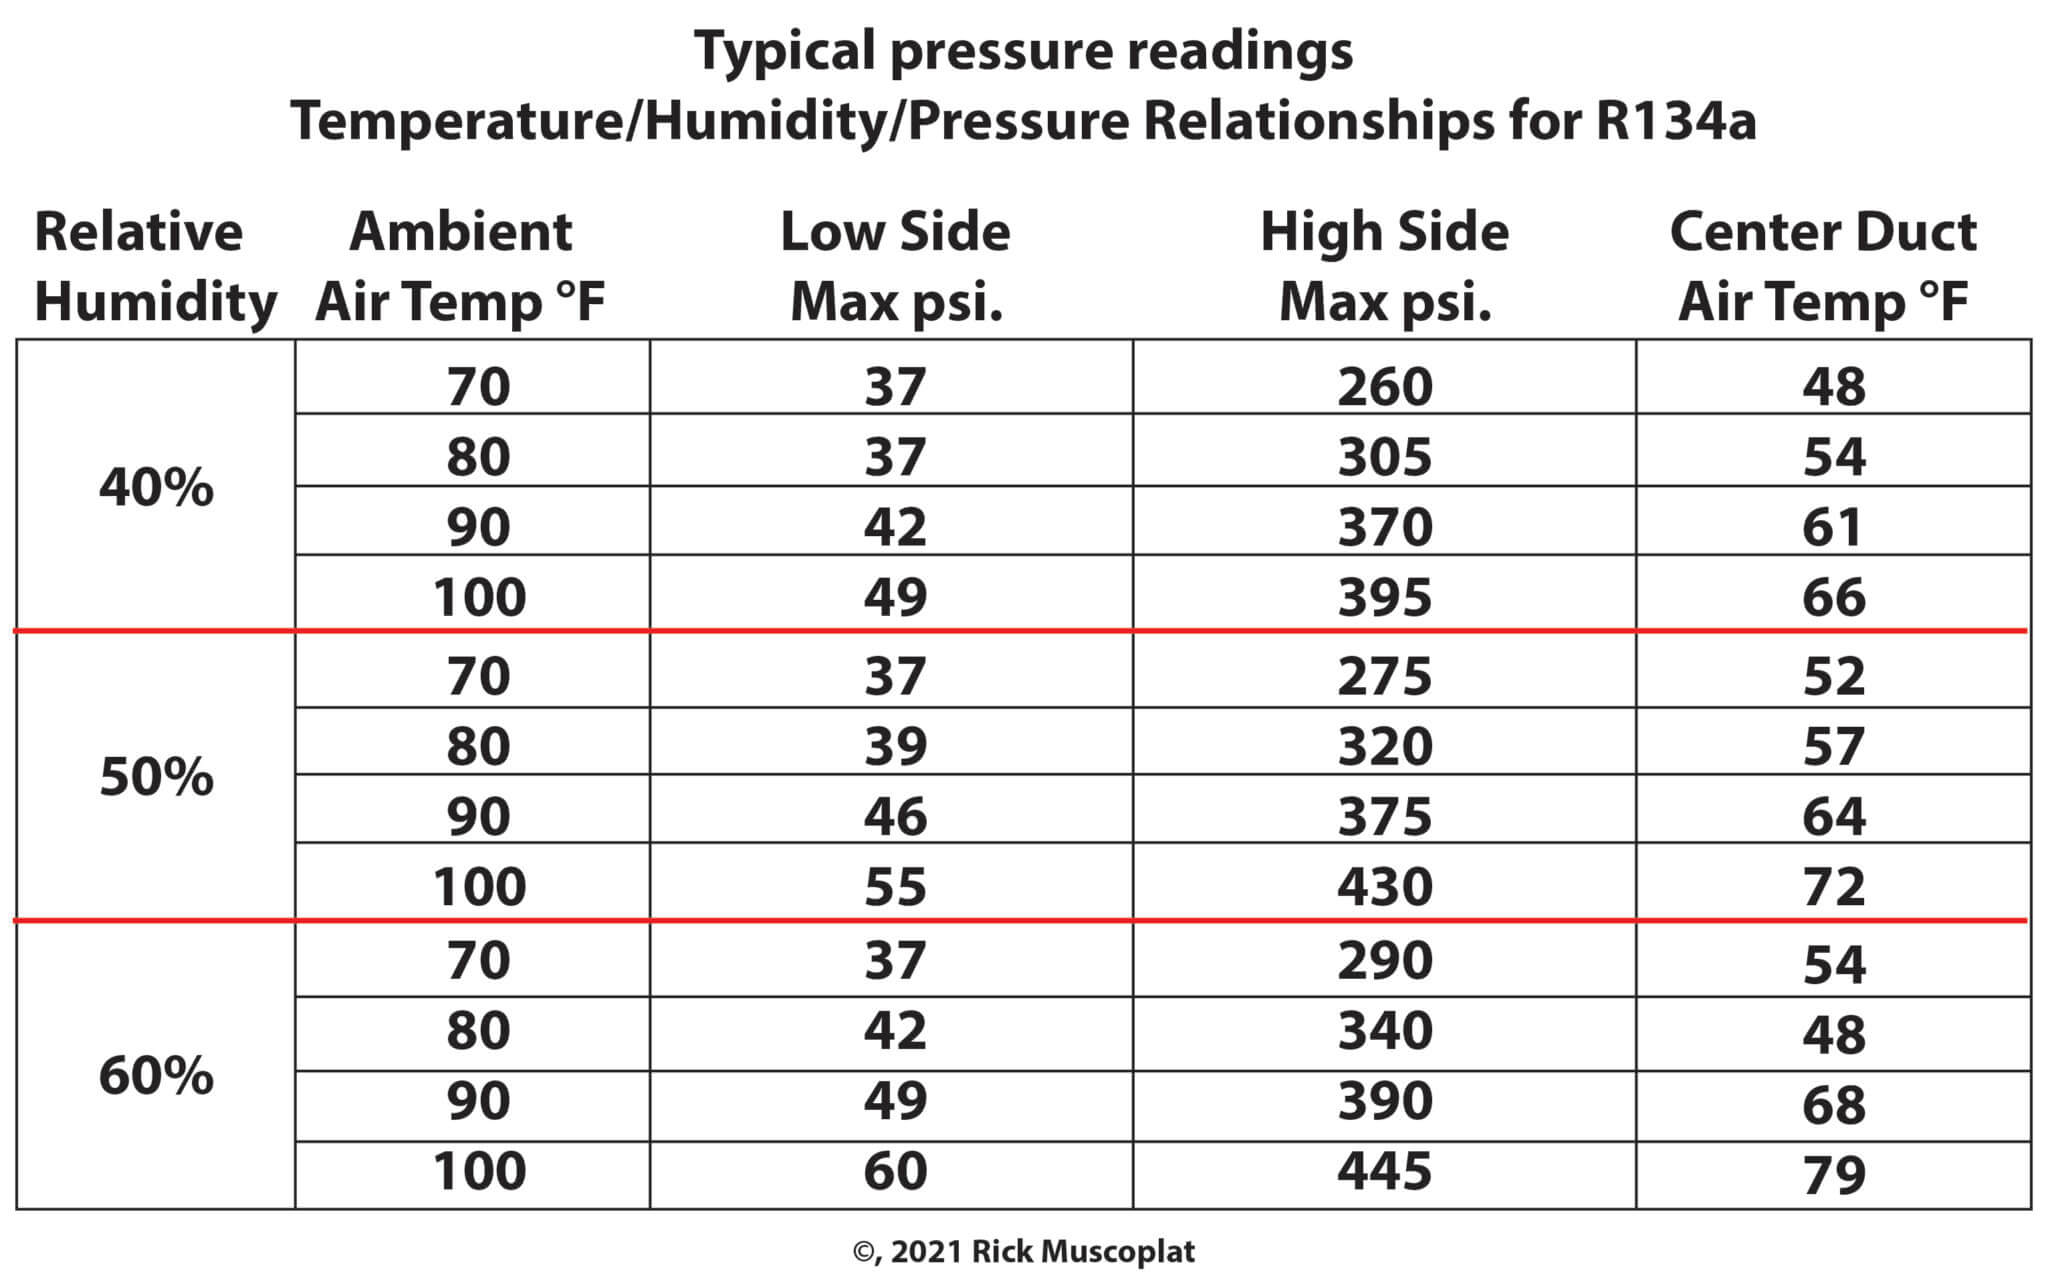
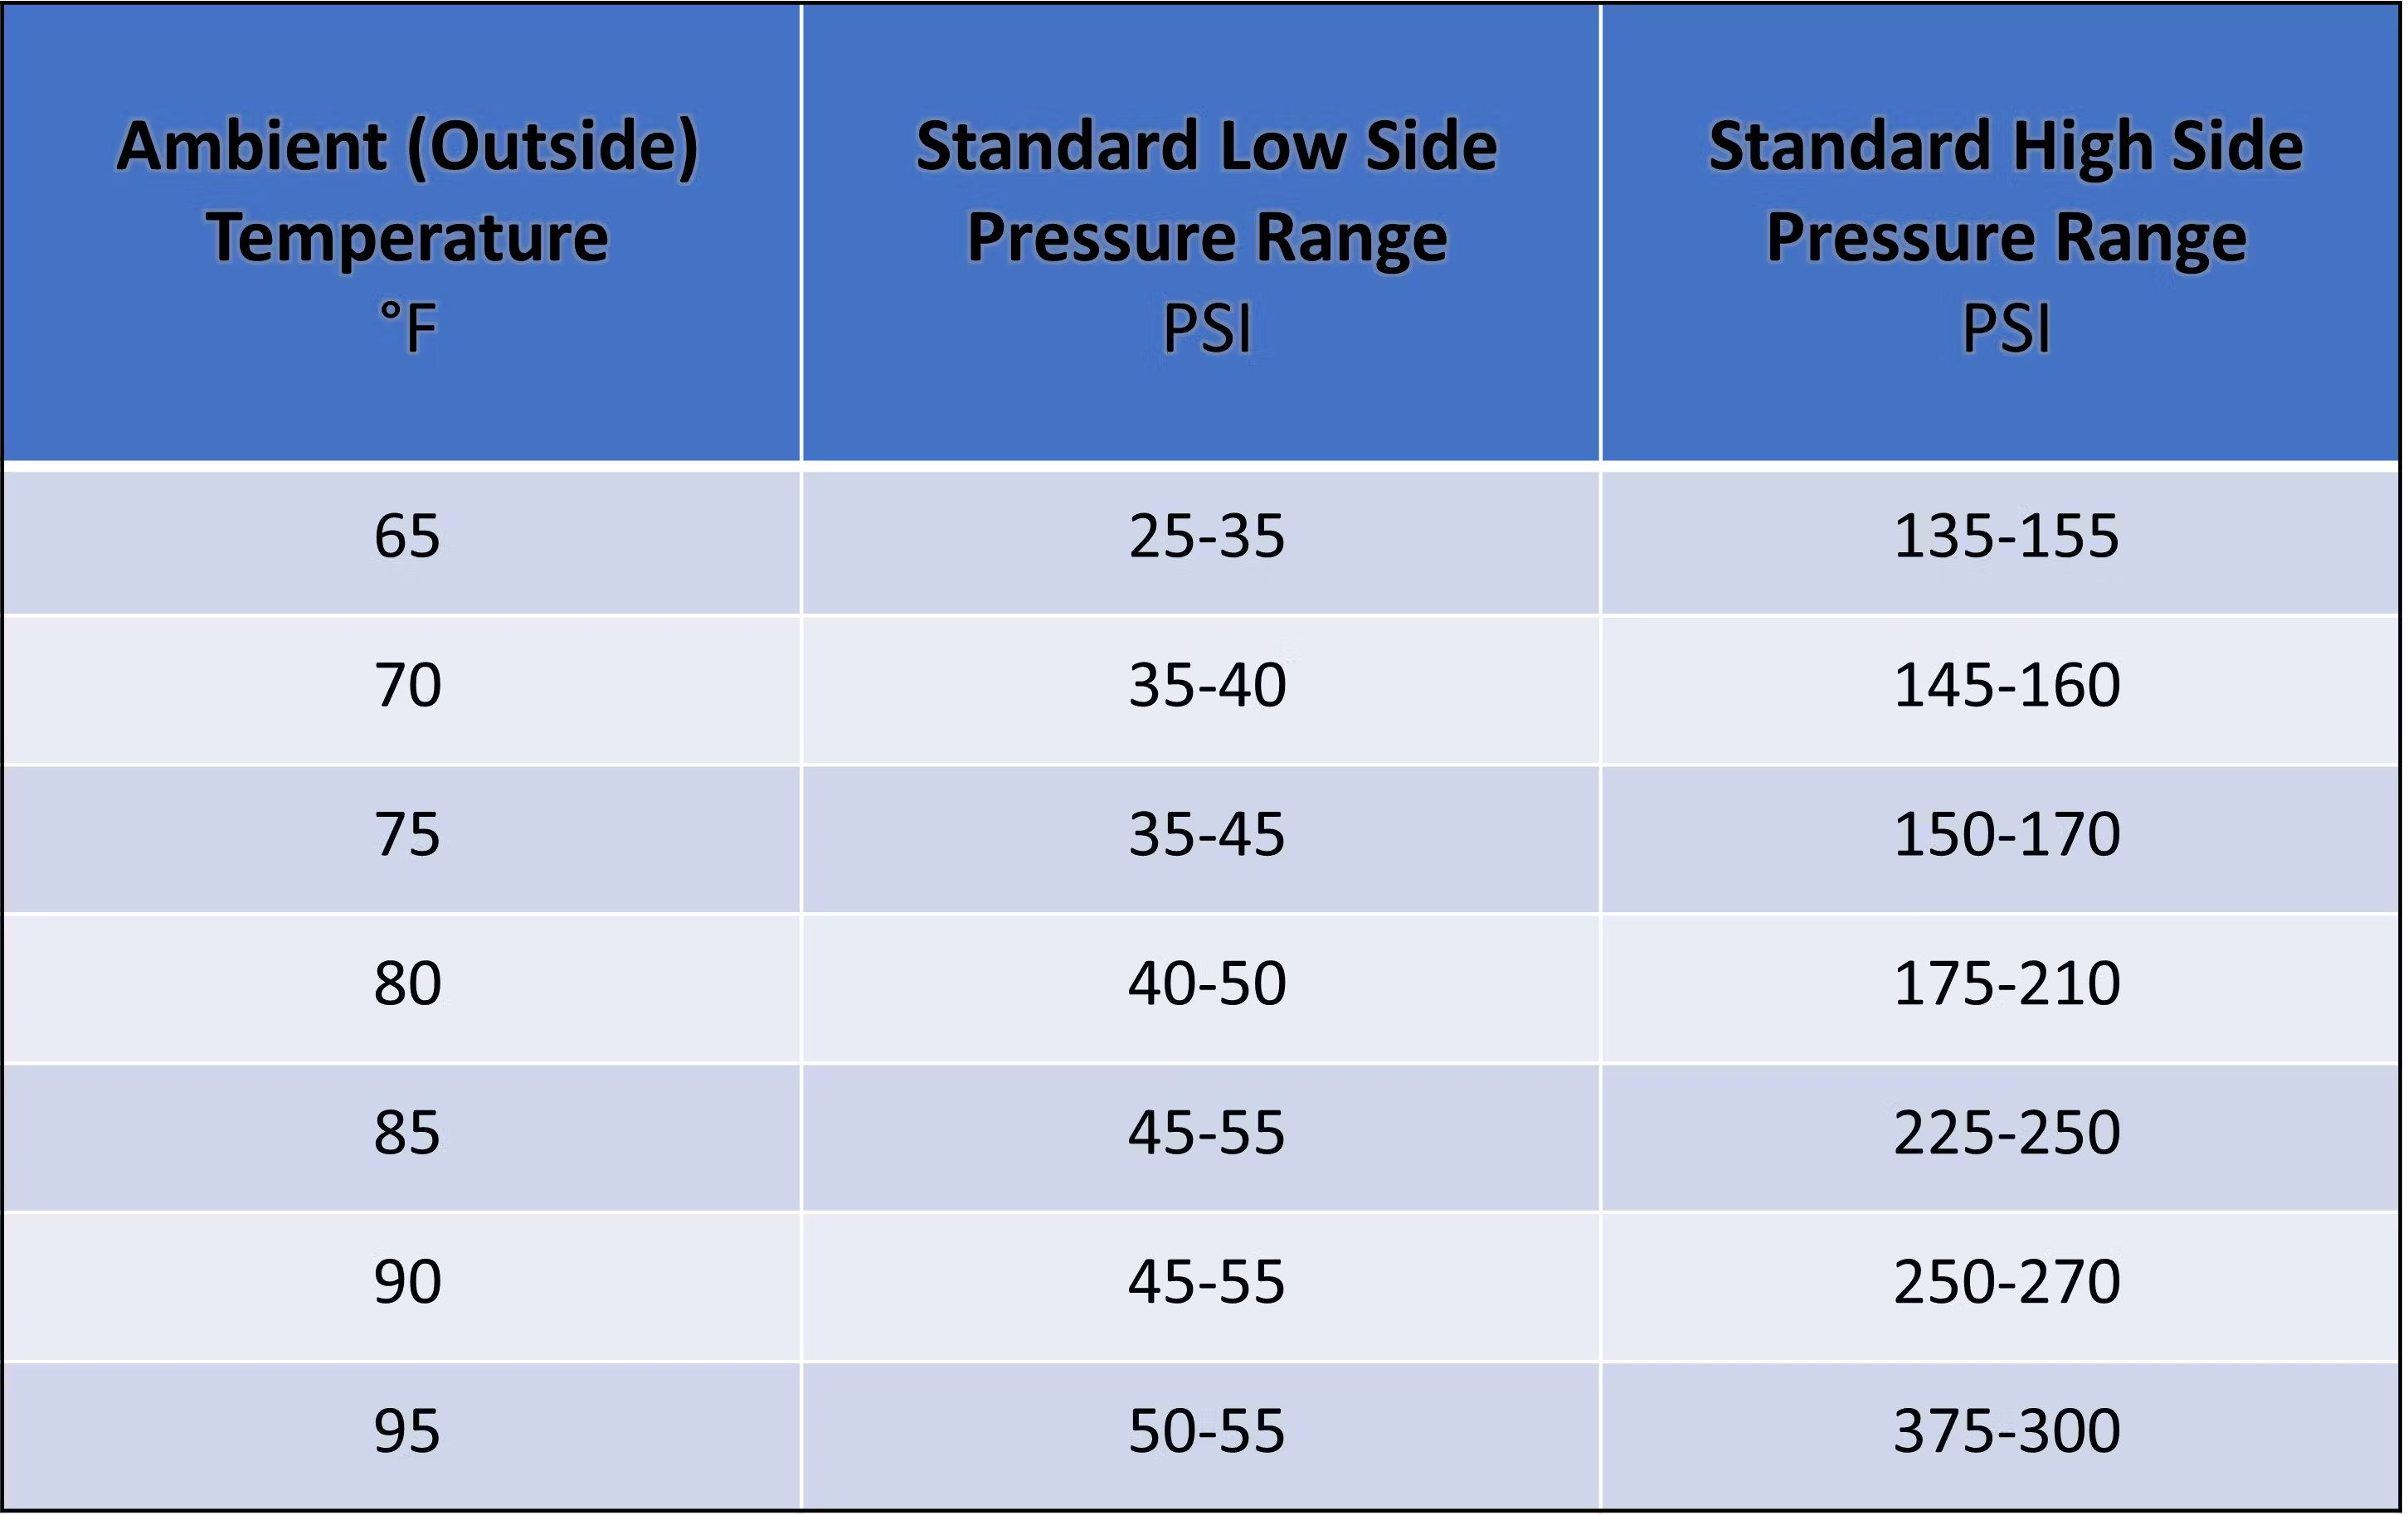
- Ambient Temperature: The ambient (outdoor) temperature significantly impacts the pressures and temperatures within the AC system. Consult HVAC resources for pressure guidelines based on ambient temperature.
- Load on the System: The cooling load (how much heat the AC is removing from the house) also affects pressures. A system running on a very hot day will have different pressures than one running on a mild day.
- Experience is Key: Interpreting PT chart readings accurately requires experience and understanding of HVAC systems. If you are unsure, consult a professional.
Possible Diagnoses and Actions Based on PT Chart Readings (Professional Assistance Recommended)
Note: The following are general guidelines and may not apply to all situations. Consult a qualified HVAC technician for accurate diagnosis and repair.
- Low Suction Pressure, Low High-Side Pressure: Possible Low Refrigerant Charge. Requires leak detection and refrigerant recharge by a professional.
- High Suction Pressure, High High-Side Pressure: Possible Overcharged System or Restricted Airflow (Dirty Coils). Overcharging requires refrigerant removal by a professional. Clean coils as described earlier.
- Normal Suction Pressure, High High-Side Pressure: Possible Condenser Fan Issue or Dirty Condenser Coils. Check fan operation and clean coils.
- Low Suction Pressure, Normal High-Side Pressure: Possible Restriction in the Refrigerant Line or Metering Device Issue. Requires professional diagnosis and repair.
Step 5: Simple DIY Repairs (When Appropriate)
- Replacing the Contactor: The contactor is an electrical switch that controls power to the compressor. If it's faulty, the compressor won't run. This repair requires electrical knowledge. Turn off the power and discharge any capacitors before attempting. Visually inspect the contactor for burned or damaged contacts. If it's damaged, replace it with a new one of the same voltage and amperage rating.
- Replacing the Capacitor: Capacitors store and release electrical energy to help start the compressor and fan motors. A failing capacitor can prevent the AC from starting. This repair also requires electrical knowledge and proper discharge techniques. Locate the capacitor (typically a cylindrical component near the compressor or fan motor). Discharge it using a screwdriver with an insulated handle. Replace it with a new capacitor of the same microfarad (µF) and voltage rating.
When to Call a Professional
While some basic troubleshooting steps can be performed by homeowners, certain repairs should always be left to licensed HVAC technicians. These include:
- Refrigerant Leaks and Recharging: Handling refrigerant requires specialized equipment and certifications. Leaks can be harmful to the environment and require proper repair techniques.
- Compressor Repairs or Replacement: The compressor is a complex and expensive component. Repairing or replacing it requires specialized knowledge and tools.
- Evaporator Coil Repairs: Accessing and repairing the evaporator coil often involves disassembling the indoor unit and handling refrigerant lines.
- Any Electrical Repairs Beyond Simple Component Replacement: If you are not comfortable working with electricity, do not attempt any electrical repairs beyond replacing a contactor or capacitor.
- Suspected Gas Leaks: If your HVAC system uses gas, a suspected gas leak is a serious safety hazard. Evacuate the area and call your gas company immediately.
Conclusion
By understanding the basics of your AC system and how to use a Pressure Temperature (PT) chart, you can become a more informed homeowner and potentially save money on repair costs. Remember to prioritize safety and never attempt repairs beyond your skill level. When in doubt, call a qualified HVAC technician. Understanding the PT chart will allow you to better communicate with your technician and understand their diagnosis.