How To Read R410a Pressure Chart
Imagine this: It's a sweltering summer day, and your air conditioner decides to quit. The house is getting hotter by the minute, and you're starting to feel the panic set in. Before you call a professional (and potentially face a hefty bill), there are a few simple troubleshooting steps you can take. Understanding how to read an R410a pressure chart can be a key part of diagnosing the problem, but let's start with the basics.
Air Conditioner Troubleshooting: A Step-by-Step Guide
This guide provides a safe and logical approach to troubleshooting a malfunctioning air conditioner. Remember, safety is paramount. If at any point you feel uncomfortable or unsure, stop and call a qualified HVAC technician.
Step 1: Check the Basics – Power and Settings
Often, the simplest solutions are the ones we overlook. Before diving into complex diagnostics, ensure the following:
- Power Supply: Is the unit receiving power? Check the circuit breaker in your electrical panel. A tripped breaker is a common culprit. Reset the breaker by flipping it all the way off and then back on.
- Thermostat: Is the thermostat set correctly? Ensure it's in "cool" mode, the temperature is set below the current room temperature, and the fan is set to "auto" or "on" (depending on your preference). Double-check the batteries in the thermostat if it's battery-powered.
- Air Filter: A clogged air filter restricts airflow, causing the unit to work harder and potentially freeze up. Replace the air filter with a clean one. This is a simple maintenance task that can significantly improve your AC's performance.
Step 2: Inspect the Outdoor Unit (Condenser)
The outdoor unit plays a crucial role in the cooling process. Here's what to look for:
- Obstructions: Are there any obstructions around the unit, such as bushes, weeds, or debris? Clear any obstructions to ensure proper airflow. The unit needs adequate space to breathe.
- Fan Operation: Is the fan running? If the fan isn't running, the unit will overheat. If it's not running, and the unit is getting power, this could indicate a faulty fan motor, which requires professional repair.
- Coil Condition: The condenser coils (the metal fins) should be clean and free of debris. You can gently clean them with a garden hose (use a low-pressure spray) or a fin comb, available at most hardware stores. Be careful not to bend the fins.
Step 3: Inspect the Indoor Unit (Evaporator)
The indoor unit is responsible for absorbing heat from your home. Check these items:
- Frozen Coils: Look for ice buildup on the evaporator coils. This is a common issue caused by restricted airflow (due to a dirty filter) or low refrigerant. If you see ice, turn off the AC and allow the ice to thaw completely. Once thawed, replace the air filter and try running the AC again. If the coils freeze up again, it likely indicates a refrigerant leak or another underlying issue requiring professional attention.
- Drainage: The evaporator coil produces condensation, which needs to drain properly. Check the drain line for clogs. You can often clear a clog by using a wet/dry vacuum to suck out any debris. Locate the drain line (usually a PVC pipe) and attach the vacuum hose to the end of the line. This can dislodge any blockages. Be prepared for water to come out!
Step 4: Understanding R410a Pressure Readings (When to Call a Pro)
This is where things get a bit more technical. Working with refrigerant requires specialized tools and knowledge. Improper handling of refrigerant can be dangerous and illegal. This section is for informational purposes only. If you suspect a refrigerant issue, contact a qualified HVAC technician.
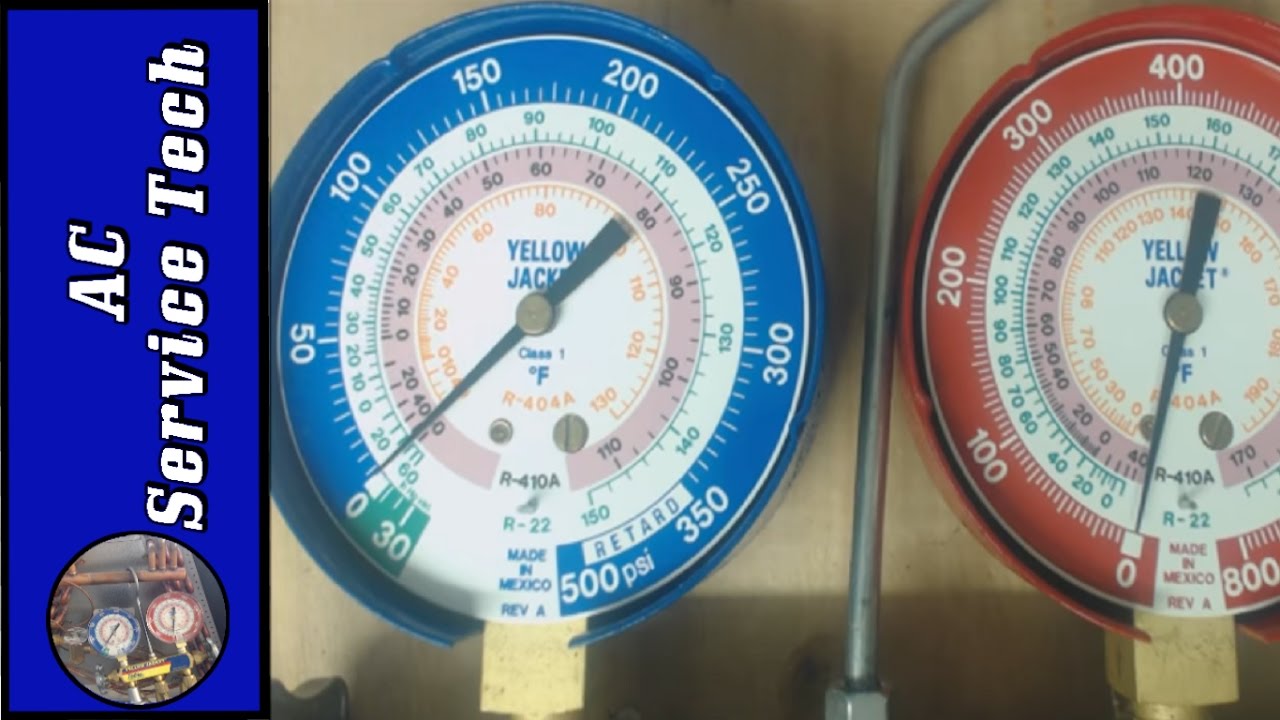
Refrigerant, in this case R410a, is the lifeblood of your AC system. It absorbs heat from your home and releases it outside. If the refrigerant level is too low, the AC won't cool effectively. Reading the pressure of the refrigerant in your system can give a technician valuable clues about the system's health. This is done using a manifold gauge set.
What is an R410a Pressure Chart?
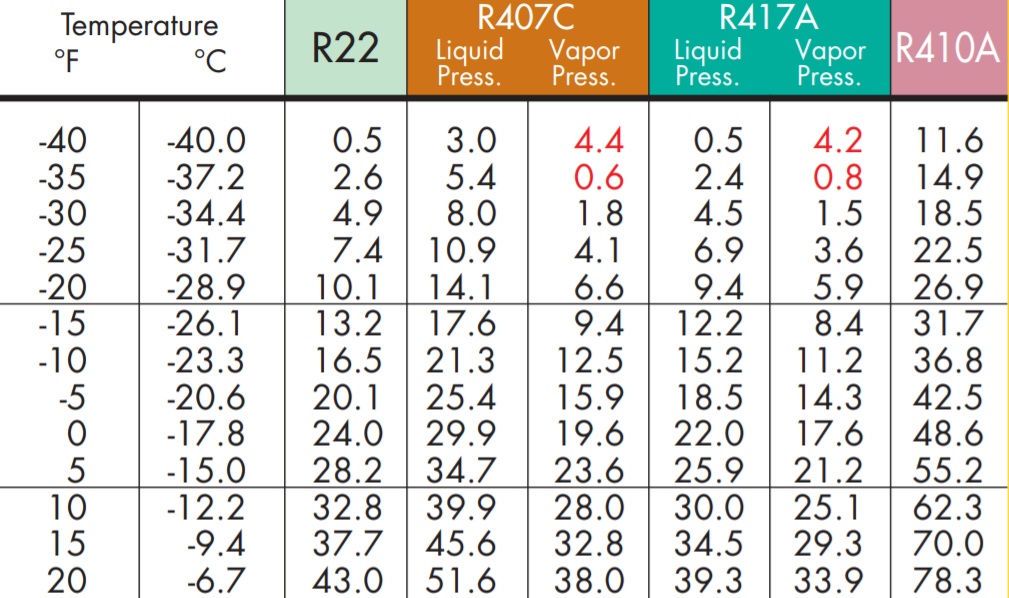
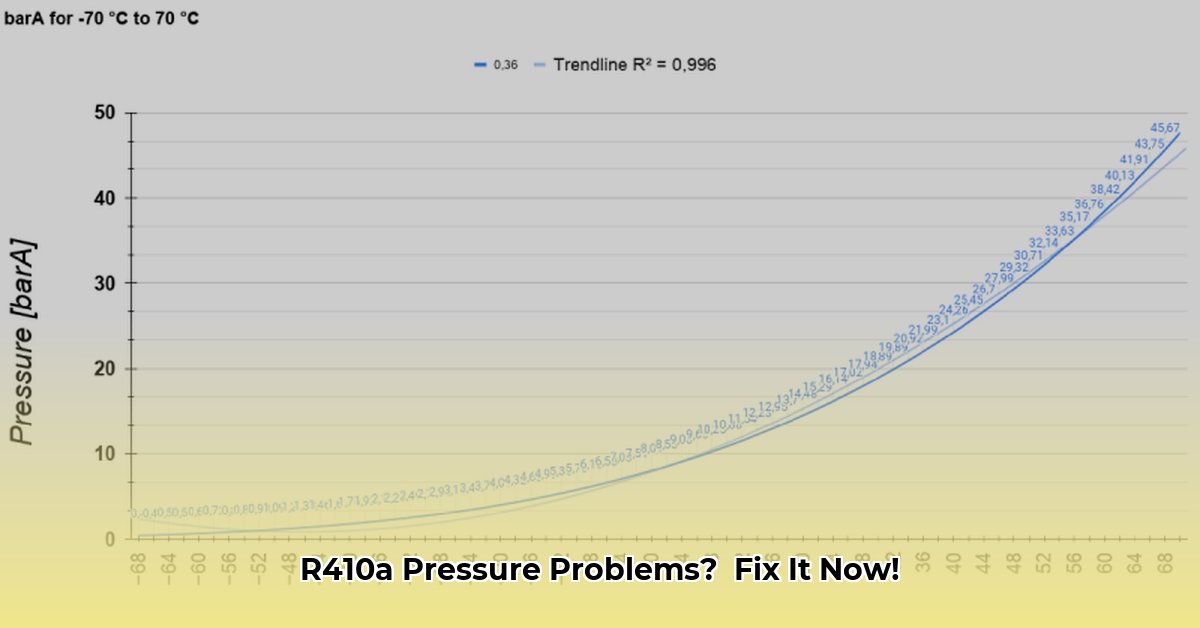
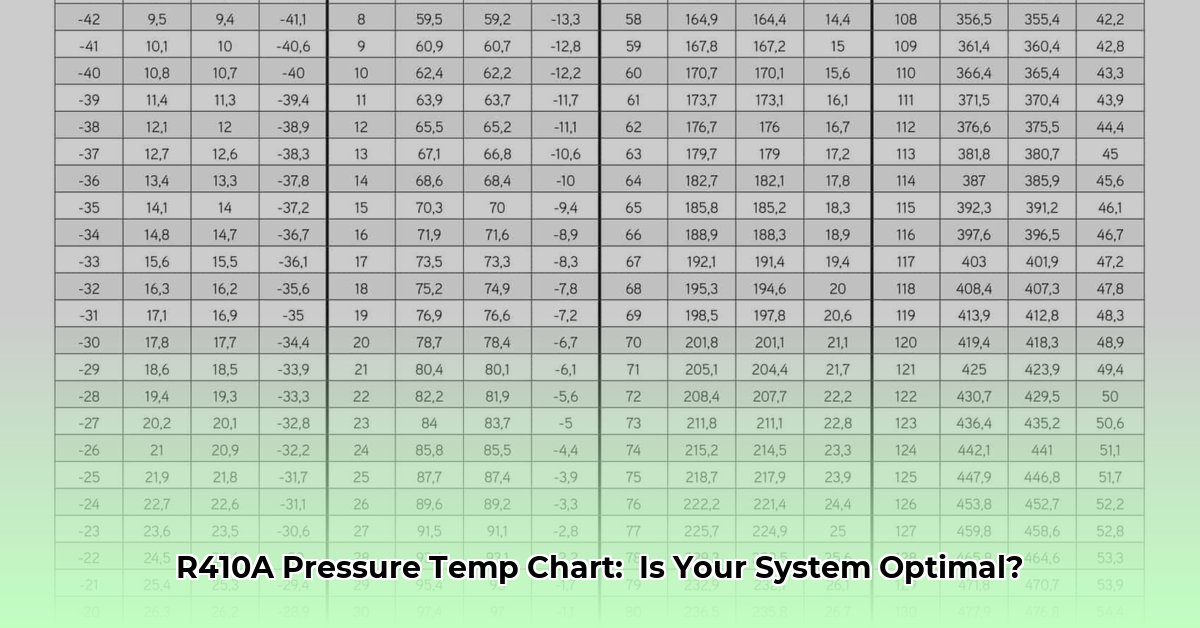
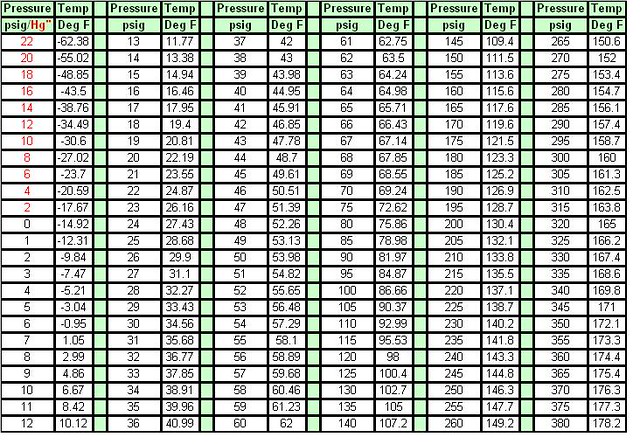
An R410a pressure chart (also known as a PT chart - Pressure/Temperature chart) is a table that correlates the temperature of the refrigerant with its pressure. Because the pressure of R410a is temperature-dependent at saturation, reading the pressure at a given temperature can help determine if the system is properly charged.
How to Use an R410a Pressure Chart (For Informational Purposes Only):
- Safety First: Do not attempt this without proper training and certification. Refrigerant can cause frostbite and other injuries. Wear appropriate safety gear, including gloves and eye protection.
- Access the Service Ports: The technician will connect the manifold gauge set to the service ports on the AC unit (usually located on the outdoor unit). These ports provide access to the refrigerant lines.
- Measure the Temperature: Use a thermometer to measure the temperature of the refrigerant line. This is usually done on the suction line (the larger of the two refrigerant lines). The technician may use a clamp-on thermometer for accurate readings.
- Read the Pressure: The manifold gauge set will display the pressure of the refrigerant in the system. Note the pressure reading.
- Consult the R410a Pressure Chart: Find the temperature you measured in the chart and compare the corresponding pressure to the pressure reading you obtained from the gauge set.
- Interpret the Results:
- Correct Pressure: If the pressure is within the range specified by the chart for the measured temperature, the refrigerant charge is likely correct.
- Low Pressure: If the pressure is lower than expected, it could indicate a refrigerant leak.
- High Pressure: If the pressure is higher than expected, it could indicate overcharging or other system issues.
Example: Let's say you are trained and certified, and using an appropriate gauge, you measure the temperature of the suction line and find it to be 75°F (approximately 24°C). Looking at an R410a pressure chart, you find that the corresponding pressure should be around 125-135 PSI. If your gauge reads significantly lower (e.g., 90 PSI), it strongly suggests a refrigerant leak.
Important Considerations:
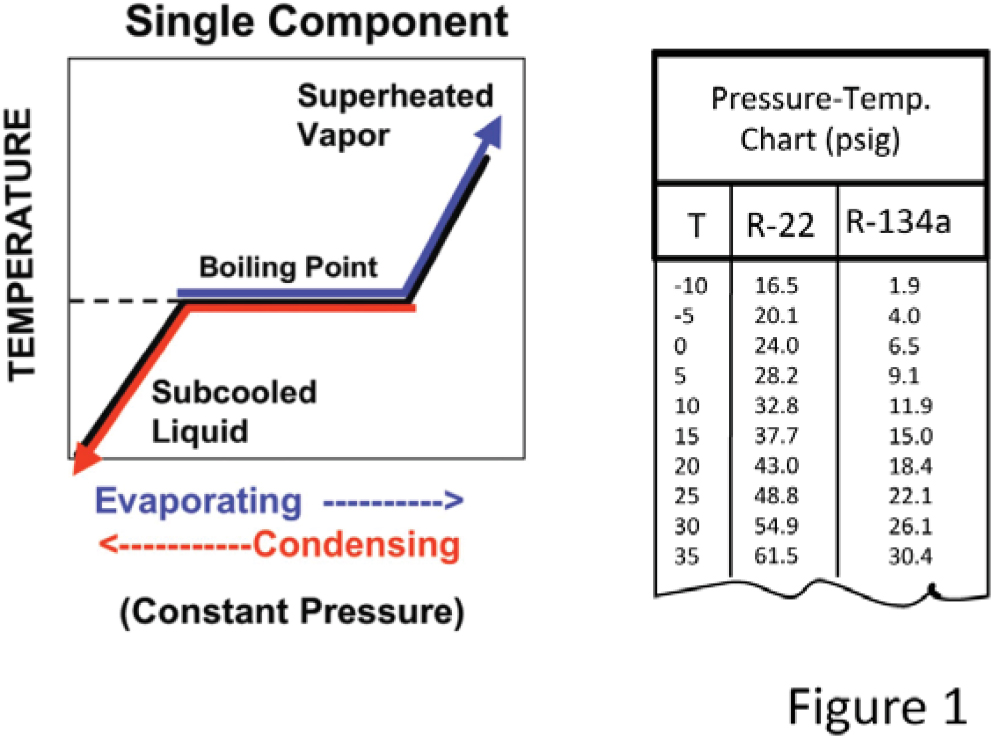
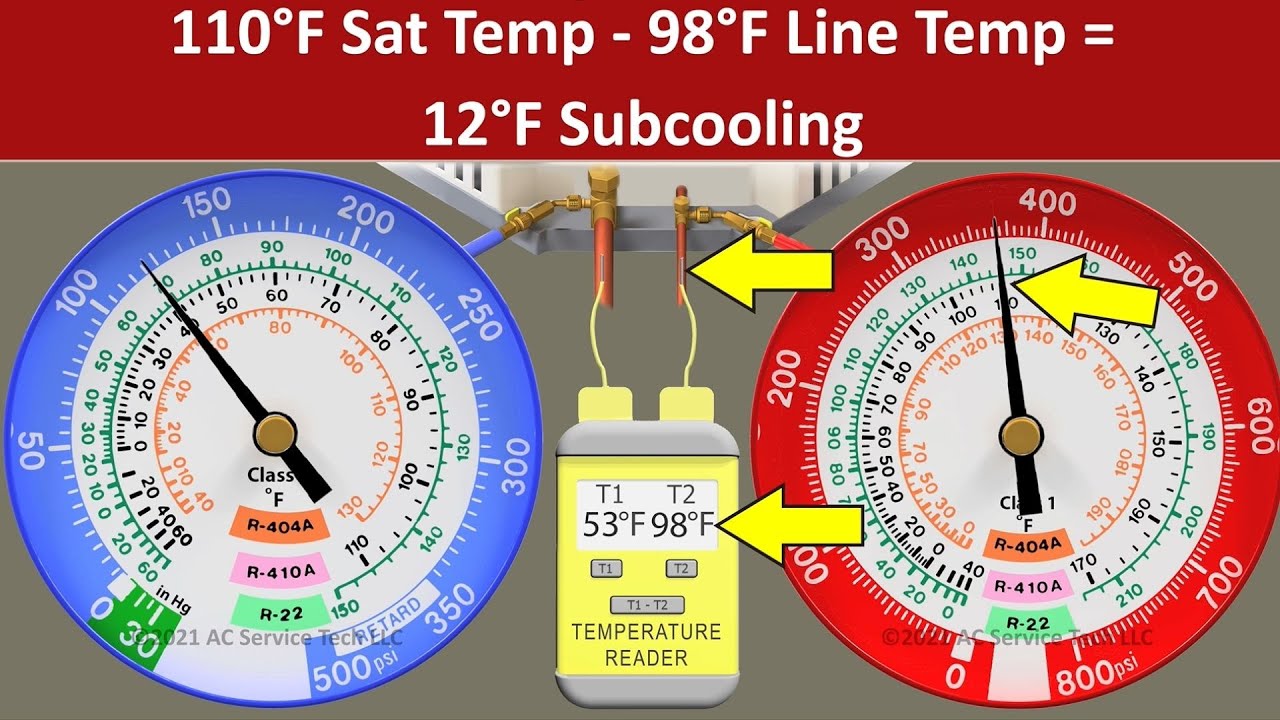
- Superheat and Subcooling: A technician will often use superheat and subcooling calculations in conjunction with the pressure chart to diagnose refrigerant issues more accurately. These calculations take into account the state of the refrigerant (liquid or gas) and provide a more comprehensive picture of the system's performance.
- Ambient Temperature: The ambient temperature (the temperature of the air surrounding the AC unit) affects refrigerant pressures. Technicians will consider the ambient temperature when interpreting pressure readings.
- System Load: The load on the AC system (how hard it's working to cool the house) also affects refrigerant pressures.
- Manufacturer Specifications: Always refer to the manufacturer's specifications for your specific AC unit. These specifications may provide more precise pressure ranges.
When to Call a Professional
While the initial steps above are generally safe for homeowners, certain repairs require the expertise of a qualified HVAC technician. Here are some situations where you should always call a professional:
- Refrigerant Leaks: Handling refrigerant is dangerous and requires specialized equipment. If you suspect a refrigerant leak, do not attempt to fix it yourself.
- Electrical Issues: Working with electricity can be hazardous. If you suspect an electrical problem, such as a faulty capacitor or wiring issue, do not attempt to repair it yourself.
- Compressor Problems: The compressor is the heart of the AC system. If you suspect a compressor problem, contact a professional. Compressor repairs are complex and expensive.
- Complex Component Replacement: Replacing parts like the fan motor, compressor, or expansion valve requires specialized knowledge and tools. Leave these repairs to the professionals.
- If you're uncomfortable or unsure about any step in the troubleshooting process, it's always best to err on the side of caution and call a qualified HVAC technician.
Basic DIY Fixes: A Recap
Here are some simple DIY fixes you can attempt before calling a professional:
- Check the circuit breaker.
- Adjust the thermostat settings.
- Replace the air filter.
- Clear obstructions around the outdoor unit.
- Clean the condenser coils (gently).
- Clear the condensate drain line.
By following these steps, you can often diagnose and resolve minor AC problems yourself. Remember to prioritize safety and call a professional when needed. Keeping your system well-maintained with simple tasks such as filter replacement will often prevent larger, more costly problems.
Disclaimer: This article provides general information for troubleshooting purposes only. It is not a substitute for professional HVAC service. The author and publisher assume no responsibility for any damages or injuries resulting from the use of this information.