How To Replace A Txv Valve

The Thermostatic Expansion Valve (TXV) is a critical component in air conditioning and refrigeration systems, regulating refrigerant flow to the evaporator coil. Its proper functioning is essential for optimal system efficiency and performance. For HVAC professionals, mastering TXV replacement is a fundamental skill. This article provides a comprehensive guide, addressing practical steps, troubleshooting, career implications, and industry outlook.
Understanding the TXV and Its Importance
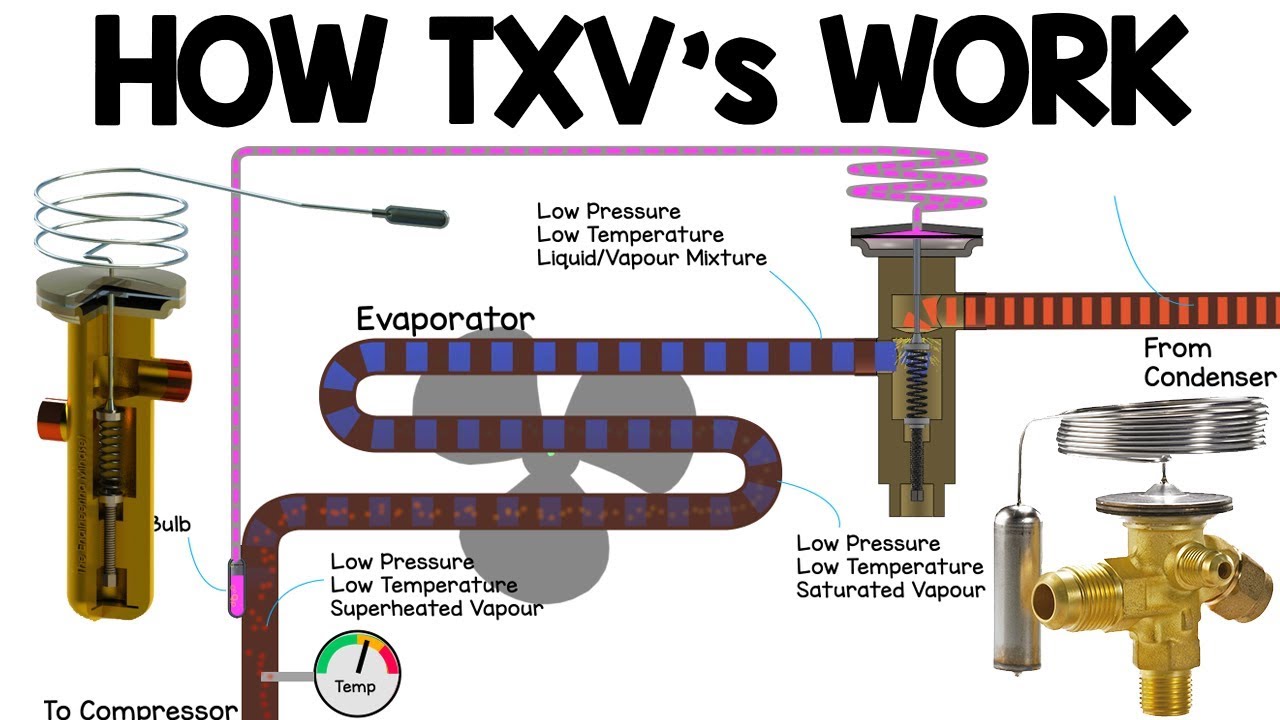
Before diving into the replacement process, it’s crucial to understand the TXV's role. The TXV maintains a consistent superheat at the evaporator outlet, ensuring efficient heat transfer and preventing liquid refrigerant from returning to the compressor, which can cause catastrophic damage. A malfunctioning TXV can lead to a range of issues, including:
- Reduced cooling capacity
- Icing on the evaporator coil
- High energy consumption
- Compressor damage
Recognizing these symptoms and accurately diagnosing a faulty TXV are essential steps before considering replacement.
Step-by-Step Guide to TXV Replacement
Replacing a TXV requires precision and adherence to safety protocols. Here's a detailed guide:
1. Safety First: Preparation and Precautions
Prioritize safety by taking the following steps:
- Disconnect power: Turn off and lock out the electrical disconnect to the unit. This prevents accidental electrocution.
- Wear appropriate PPE: Safety glasses, gloves, and appropriate work attire are essential.
- Work in a well-ventilated area: Refrigerant leaks can displace oxygen and pose a health hazard.
2. Refrigerant Recovery
Federal regulations mandate proper refrigerant handling. EPA Section 608 certification is required to handle refrigerants. Failure to comply can result in substantial fines. Use a refrigerant recovery machine to remove all refrigerant from the system according to EPA guidelines. Accurately document the amount of refrigerant recovered.
3. Accessing the TXV
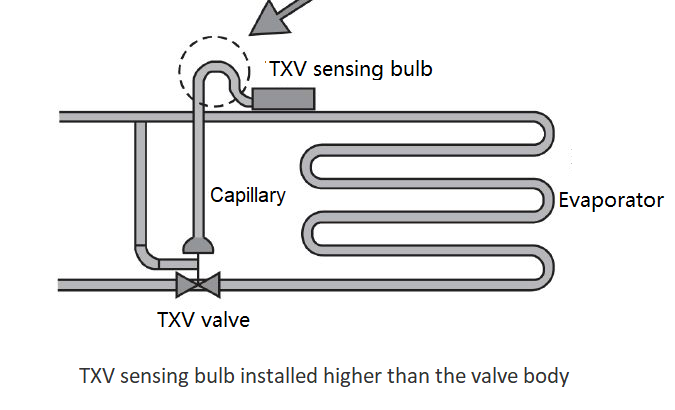
The TXV is typically located near the evaporator coil. Remove the access panels and any components obstructing access. Note the location and orientation of the existing TXV and its connections for easy reinstallation. Photographing the setup can be helpful.
4. Brazing and Debrazing
TXVs are usually connected to the refrigerant lines via brazed joints. This is where meticulous technique is paramount. Here's the process:
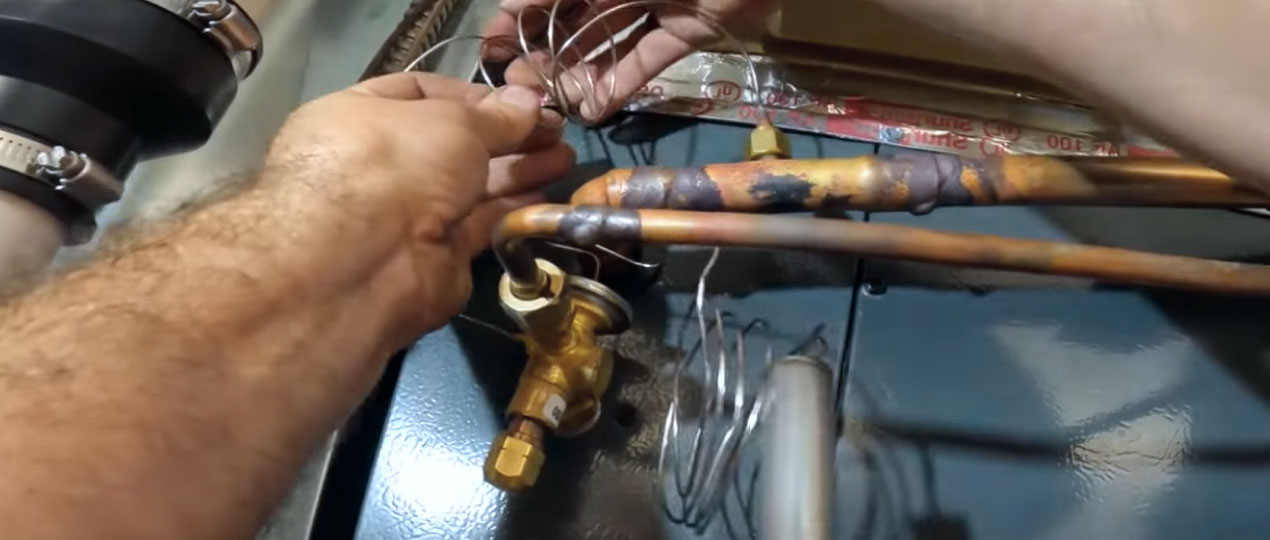
- Debrazing: Carefully heat the brazed joints with a torch until the brazing alloy melts. Use a wet rag to protect nearby components from excessive heat. Remove the old TXV.
- Cleaning: Thoroughly clean the connecting tubes with emery cloth or a wire brush to remove any oxidation or debris. This ensures a proper braze.
- Brazing: Apply flux to the cleaned tube ends and the TXV connections. Assemble the new TXV, ensuring it is properly oriented. Heat the joint evenly until the flux liquefies and the brazing alloy flows smoothly into the joint. Avoid overheating, which can damage the TXV.
- Nitrogen Purge: While brazing, maintain a steady flow of dry nitrogen through the system. This prevents oxidation inside the tubing, which can lead to future problems.
Proper brazing is a critical skill. Consider taking a brazing certification course to enhance your skills and demonstrate competency.
5. Leak Testing
After brazing, it’s crucial to pressure test the system to ensure there are no leaks. Pressurize the system with dry nitrogen to the manufacturer's recommended pressure. Use a leak detector or soapy water solution to check all brazed joints and connections for leaks. Repair any leaks immediately by debrazing, cleaning, and rebrazing the joint.
6. Evacuation
Once the system is leak-free, it needs to be evacuated to remove any air and moisture. Connect a vacuum pump to the system and evacuate it to the manufacturer's recommended micron level (typically below 500 microns). This process can take several hours, depending on the size of the system. A deep vacuum is essential for proper system operation and longevity.
7. Refrigerant Charging
After evacuation, charge the system with the correct type and amount of refrigerant according to the manufacturer's specifications. Use a calibrated scale to accurately measure the refrigerant charge. Monitor the system's operating pressures and temperatures to ensure proper performance. Superheat and subcooling measurements are critical for verifying proper refrigerant charge and TXV operation.
8. System Startup and Verification
Turn on the system and monitor its performance. Check the supply and return air temperatures, compressor amperage, and operating pressures. Verify that the TXV is maintaining the correct superheat at the evaporator outlet. Make any necessary adjustments to the refrigerant charge or TXV settings.
9. Documentation
Document all work performed, including the refrigerant type and amount used, the micron level achieved during evacuation, and the system's operating parameters. This documentation is essential for future troubleshooting and warranty claims.
Troubleshooting Common TXV Issues
Even with careful replacement, issues can arise. Here are some common troubleshooting scenarios:
- TXV Stuck Open: This can lead to low superheat, liquid refrigerant returning to the compressor, and potential compressor damage. Symptoms include low suction pressure and high discharge pressure.
- TXV Stuck Closed: This can lead to high superheat, reduced cooling capacity, and potential compressor overheating. Symptoms include high suction pressure and low discharge pressure.
- TXV Hunting: This is characterized by fluctuating suction pressure and unstable superheat. It can be caused by a dirty TXV, incorrect refrigerant charge, or system imbalances.
Career Paths and Certifications
Mastering TXV replacement, along with other HVAC skills, opens doors to diverse career paths. Here are a few examples:
- HVAC Technician: Entry-level positions typically involve assisting experienced technicians and performing basic maintenance tasks. As skills develop, technicians can progress to diagnosing and repairing complex systems, including TXV replacement. The median annual salary for HVAC technicians is around $51,390 (Bureau of Labor Statistics, May 2022), but can vary significantly based on experience, location, and certifications.
- HVAC Installer: Installers focus on installing new HVAC systems, including ductwork, piping, and equipment. They need a strong understanding of system design and installation procedures.
- HVAC Service Manager: Service managers oversee the day-to-day operations of an HVAC service department, including scheduling technicians, managing inventory, and ensuring customer satisfaction.
- HVAC Design Engineer: Design engineers are responsible for designing HVAC systems for buildings, ensuring they meet energy efficiency and performance requirements. This often requires a bachelor's degree in mechanical engineering.
Certifications play a crucial role in career advancement and earning potential:
- NATE (North American Technician Excellence): NATE certification is widely recognized and demonstrates a technician's knowledge and skills. NATE offers certifications in various HVAC specialties, including installation, service, and efficiency.
- EPA Section 608: As mentioned earlier, this certification is legally required to handle refrigerants. There are different levels of certification based on the type of equipment being serviced.
- HVAC Excellence: HVAC Excellence is another reputable certification organization that offers certifications in various HVAC areas.
Earning these certifications not only validates your skills but also increases your marketability and earning potential. Employers often prioritize candidates with certifications.
Industry Trends and the Future of HVAC
The HVAC industry is constantly evolving, driven by factors such as increasing energy efficiency standards, technological advancements, and growing demand for skilled technicians. Here are some key trends:
- Energy Efficiency: There's a growing emphasis on energy-efficient HVAC systems, driven by government regulations and consumer demand. Technicians need to be knowledgeable about high-efficiency equipment and proper installation and maintenance practices.
- Smart Technology: Smart thermostats, building automation systems, and remote monitoring are becoming increasingly common. Technicians need to be proficient in installing, configuring, and troubleshooting these technologies.
- Refrigerant Regulations: Regulations regarding refrigerants are becoming stricter due to environmental concerns. Technicians need to stay up-to-date on the latest refrigerant regulations and proper handling procedures.
The job outlook for HVAC technicians is projected to grow 6 percent from 2022 to 2032, about as fast as the average for all occupations (Bureau of Labor Statistics). This growth is driven by the increasing demand for HVAC systems in new buildings and the need to replace older, less efficient systems. Furthermore, a significant portion of the existing workforce is nearing retirement age, creating further job opportunities.
To succeed in the HVAC industry, continuous learning and professional development are essential. Stay informed about the latest technologies, regulations, and best practices. Attend industry conferences, workshops, and training courses to enhance your skills and knowledge.
Conclusion
Replacing a TXV valve is a fundamental skill for HVAC professionals. By following the steps outlined in this guide, prioritizing safety, and continuously developing your skills, you can excel in this critical area of the HVAC industry. The industry offers excellent career opportunities, competitive salaries, and the satisfaction of providing essential services to homes and businesses. Embracing certifications and staying abreast of industry trends will position you for long-term success in this dynamic and rewarding field. The future of HVAC is bright, and skilled technicians are in high demand.