How To Replace Ac Capacitor

Is Your AC Giving You the Cold Shoulder? Learn How to Replace an AC Capacitor
A malfunctioning AC unit during the peak of summer is no fun. Often, the culprit behind a failing AC is a faulty capacitor. Before you call an HVAC technician, consider this: replacing an AC capacitor is a task many homeowners can tackle themselves, saving time and money. However, safety is paramount. This guide will walk you through the process, step by step, so you can determine if this is a DIY project for you, and if so, how to do it safely. We'll also cover when it's best to call a professional.
Is This a DIY Project for You? Assessing Your Skills and Comfort Level
Replacing an AC capacitor involves working with electricity. If you are not comfortable working with electricity, stop now and call a qualified HVAC technician. Your safety is more important than saving a few dollars. If you are comfortable and experienced with basic electrical repairs, proceed with caution and follow all safety guidelines.
Safety First: The Most Important Step
Electricity can be deadly. Before you even think about touching your AC unit, follow these crucial safety steps:
- Turn off the power: Locate the disconnect switch for your AC unit. This is usually a gray metal box near the outdoor unit. Open the box and either flip the breaker to the "off" position or remove the disconnect.
- Verify the power is off: Use a non-contact voltage tester to confirm that no electricity is flowing to the AC unit. Test multiple points, including the terminals where the capacitor will be removed.
- Wait: Even after turning off the power, capacitors can store a charge. Wait at least 5 minutes to allow the capacitor to discharge.
- Short the capacitor (Optional, but recommended): Using an insulated screwdriver with a well-insulated handle, carefully short the capacitor terminals. This is an extra precaution to ensure any residual charge is discharged. Touch the screwdriver shaft to both terminals simultaneously. Do not touch the metal shaft of the screwdriver while doing this.
Gather Your Tools and Parts
Before you start, make sure you have everything you need:
Tools:
- Screwdrivers (Phillips and flathead)
- Pliers or nut drivers
- Non-contact voltage tester
- Insulated screwdriver (for discharging the capacitor)
- Camera or smartphone (to take pictures before disconnecting wires)
- Work gloves
- Safety Glasses
Parts:
- Replacement capacitor (Important: must match the original capacitor's specifications)
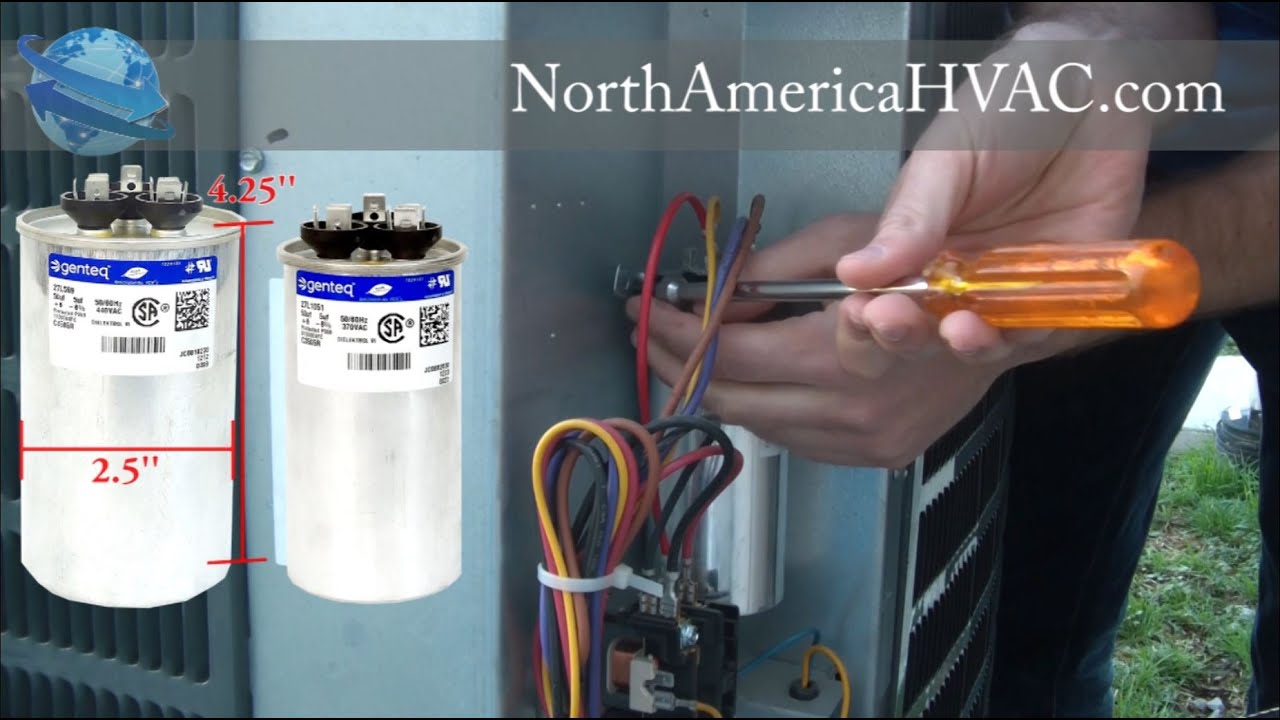
Finding the Right Replacement Capacitor: The capacitor's specifications are printed on its label. You'll need to match the microfarad (µF) rating and the voltage. It's okay to use a capacitor with a higher voltage rating than the original, but never use one with a lower rating. Using the wrong capacitor can damage your AC unit.
Step-by-Step Guide to Replacing Your AC Capacitor
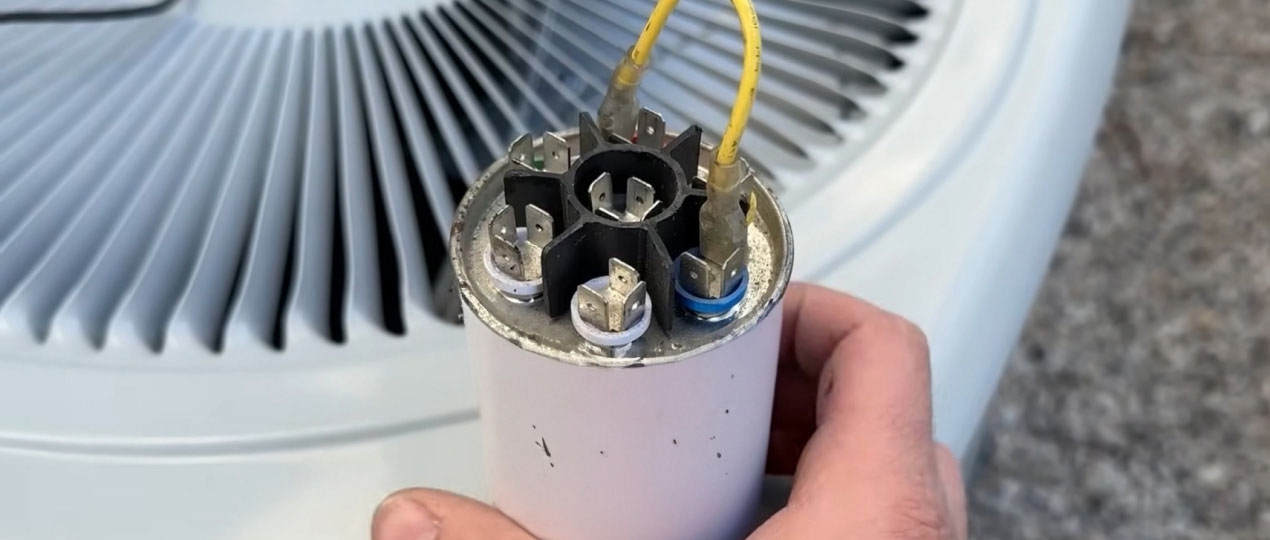
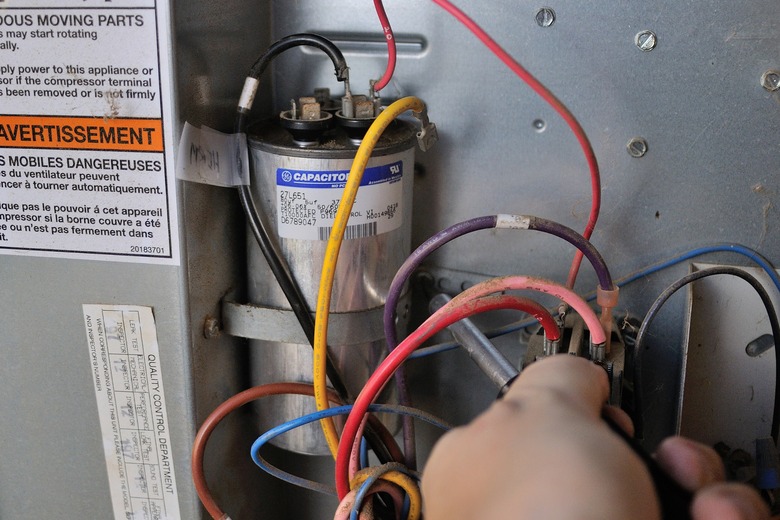
- Locate the Capacitor: Open the access panel on your AC unit. The capacitor is usually a cylindrical component housed in an electrical control box. It might be a single capacitor (a "run" capacitor) or a dual capacitor, which looks like a single cylinder with three terminals.
- Take Pictures: Before disconnecting any wires, take clear pictures of the capacitor and its wiring. This is crucial for reconnecting the wires correctly. Pay close attention to which wire goes to which terminal.
- Disconnect the Wires: Carefully disconnect the wires from the capacitor terminals. Use pliers or nut drivers if the wires are difficult to remove. Be gentle to avoid damaging the terminals.
- Remove the Old Capacitor: Loosen any mounting brackets or straps holding the capacitor in place. Carefully remove the old capacitor.
- Install the New Capacitor: Place the new capacitor in the same location as the old one and secure it with the mounting brackets or straps.
- Reconnect the Wires: Using your pictures as a guide, reconnect the wires to the corresponding terminals on the new capacitor. Make sure the connections are secure.
- Double-Check Your Work: Before closing everything up, double-check that all the wires are connected correctly and that the capacitor is securely mounted.
- Replace the Access Panel: Carefully replace the access panel on your AC unit.
- Restore Power: Go back to the disconnect switch and restore power to the AC unit.
- Test Your AC: Turn on your AC and monitor its performance. It should now be running smoothly.
Troubleshooting Common Issues After Replacing the Capacitor
Sometimes, even after replacing the capacitor, your AC might not work perfectly. Here are some common issues and potential solutions:
- AC doesn't turn on: Double-check the disconnect switch to make sure the power is on. Also, check the breaker in your main electrical panel to see if it has tripped. If the AC still doesn't turn on, there may be another issue, such as a faulty compressor or contactor.
- AC runs but doesn't cool: This could be a sign of a refrigerant leak or a problem with the compressor. Call a professional HVAC technician.
- AC makes unusual noises: Unusual noises could indicate a problem with the fan motor or other components. It's best to have a professional diagnose the issue.
- The new capacitor fails quickly: This could be a sign of an underlying problem, such as voltage fluctuations or a failing compressor. Have a professional check your AC system.
When to Call a Professional HVAC Technician
While replacing an AC capacitor is a relatively simple task, there are times when it's best to call a professional:
- If you are not comfortable working with electricity.
- If you are unsure about any step of the process.
- If your AC unit is still under warranty. Replacing the capacitor yourself might void the warranty.
- If you suspect a more complex problem with your AC unit. The capacitor might not be the only issue.
- If you have replaced the capacitor and the AC is still not working correctly.
- If you are dealing with refrigerant lines. Only licensed professionals can handle refrigerant.
Cost Considerations: DIY vs. Professional Repair
One of the main reasons homeowners choose to replace their AC capacitor themselves is to save money. Here's a breakdown of the potential costs:
DIY:
- Replacement capacitor: $15 - $50 (depending on the size and type)
- Tools (if you don't already have them): $20 - $50
Professional Repair:
- Service call fee: $75 - $150
- Labor: $75 - $150 per hour
- Replacement capacitor: $50 - $150 (markup included)
In total, a professional repair can cost anywhere from $200 to $500 or more. By replacing the capacitor yourself, you can potentially save a significant amount of money. However, remember that your time and the potential for mistakes also have value. It's also worth noting that some HVAC companies offer flat-rate pricing for capacitor replacement, which can be more predictable than hourly rates.
Preventative Maintenance: Keeping Your AC Running Smoothly
Regular maintenance can help prevent capacitor failure and other AC problems. Here are some tips:
- Clean the outdoor unit: Remove any debris, such as leaves, grass clippings, and dirt, from the fins of the outdoor unit. This will improve airflow and prevent overheating.
- Change the air filter regularly: A dirty air filter restricts airflow and can cause the AC unit to work harder, which can lead to premature failure of components like the capacitor.
- Schedule regular maintenance: Have a professional HVAC technician inspect your AC unit annually to identify and address potential problems before they become major issues.
Final Thoughts
Replacing an AC capacitor can be a straightforward DIY project for homeowners with some electrical experience. By following these steps and prioritizing safety, you can potentially save money and get your AC unit back up and running quickly. However, remember to assess your skills and comfort level honestly, and don't hesitate to call a professional if you are unsure about anything. A little preventative maintenance can go a long way in keeping your AC running efficiently for years to come. Always prioritize safety when working with electricity. Good luck!