How To Replace Ac Schrader Valve

Air conditioning systems are essential for maintaining a comfortable indoor environment, especially during hot weather. However, like any mechanical device, they can experience problems. One common issue is a leaky Schrader valve. This article provides a step-by-step guide on how to replace an AC Schrader valve, along with crucial safety information and when to call in a professional.
Understanding the AC Schrader Valve
The Schrader valve is a small, spring-loaded valve found on your AC unit's refrigerant lines. Its primary function is to allow technicians to charge and discharge refrigerant. Think of it like the valve on your car tire. Over time, these valves can corrode, become damaged, or simply leak, leading to a loss of refrigerant and decreased cooling efficiency. Identifying and addressing a faulty Schrader valve promptly can prevent more significant and costly problems.
Recognizing a Faulty Schrader Valve
Several symptoms may indicate a faulty Schrader valve:
- Hissing sound: A noticeable hissing sound near the valve indicates escaping refrigerant.
- Bubbles when soapy water is applied: Applying a soapy water solution to the valve and observing bubbles forming confirms a leak.
- Low refrigerant levels: Your AC unit struggles to cool your home effectively.
- Ice buildup on refrigerant lines: Due to low refrigerant, ice may form on the lines connected to the unit.
- AC unit not turning on: In some cases, the system might completely fail if refrigerant levels are too low.
Safety Precautions: Before You Begin
Working with AC systems involves refrigerant, which can be harmful if not handled correctly. It's crucial to prioritize safety throughout the entire process. If you feel uncomfortable or unsure at any point, it's always best to consult a qualified HVAC technician.
- Turn off the power: Completely disconnect power to the outdoor AC unit at the breaker box. This prevents electrical shock.
- Wear safety glasses: Protect your eyes from refrigerant or debris.
- Wear gloves: Protect your hands from cold refrigerant and sharp edges.
- Work in a well-ventilated area: If any refrigerant escapes, ensure adequate ventilation.
- Avoid direct contact with refrigerant: Refrigerant can cause frostbite and other injuries.
- Know your limits: If you're not comfortable with any step, call a professional.
Tools and Materials Required
Before starting, gather the necessary tools and materials:
- New Schrader valve(s): Purchase the correct type and size Schrader valve for your AC unit. Take the old one with you for comparison, or consult your AC unit's manual.
- Schrader valve core removal tool: This tool is designed to safely remove and install Schrader valve cores without releasing refrigerant (ideally, a non-refrigerant releasing tool).
- Wrench (appropriate size): For loosening and tightening the Schrader valve access port cap.
- Adjustable wrench: This can be used if the sizes for your unit are non-standard.
- Soapy water solution: For leak testing.
- Clean rag: For wiping surfaces.
- Refrigerant gauge set (optional, but recommended): For monitoring refrigerant pressure (use only if you are experienced with using these tools).
- Vacuum pump (optional, but recommended): For evacuating the system after replacing the valve (use only if you are experienced with using these tools).
- Refrigerant (optional, and REQUIRES LICENSING): Only if refrigerant was lost and needs to be added (this should ONLY be done by a licensed professional).
Step-by-Step Guide: Replacing the Schrader Valve
This procedure assumes you are using a Schrader valve core removal tool designed to minimize refrigerant loss. If you're using a tool that releases refrigerant, this task should be performed by a licensed HVAC technician.
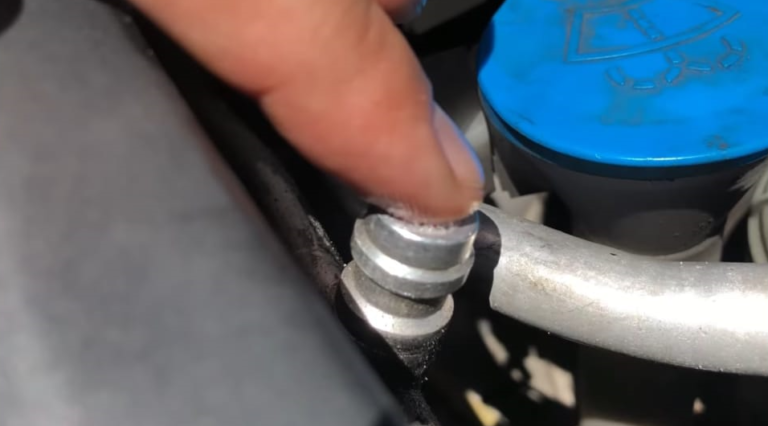
Step 1: Locate the Schrader Valve
The Schrader valves are typically located on the refrigerant lines (copper pipes) near the outdoor unit. They are usually protected by a small cap. There are commonly two Schrader valves, one on the suction line (larger diameter) and one on the liquid line (smaller diameter). Identify the leaking valve.
Step 2: Prepare the Valve Area
Use the wrench to carefully remove the cap from the Schrader valve access port. Wipe the area around the valve with a clean rag to remove any dirt or debris.
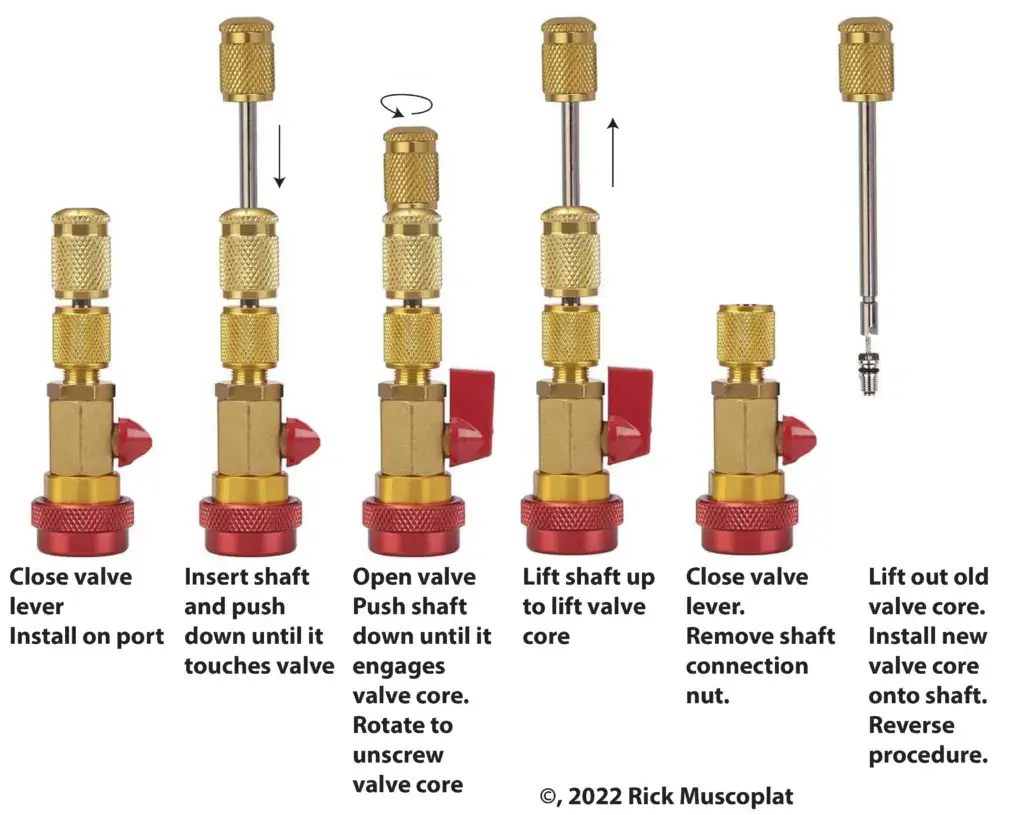
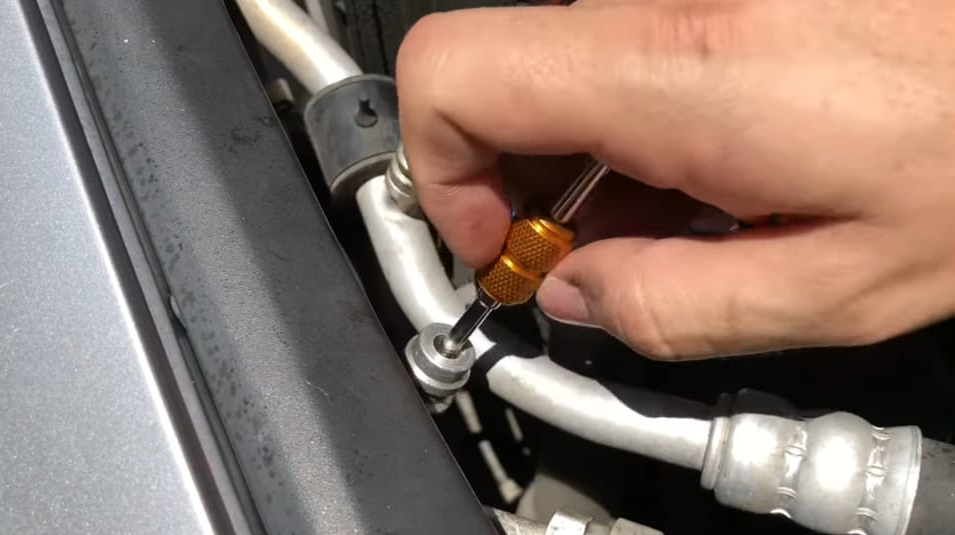
Step 3: Use the Schrader Valve Core Removal Tool
This is the MOST CRITICAL STEP. Insert the Schrader valve core removal tool into the valve. Follow the tool's instructions carefully to engage the tool with the valve core. Slowly and carefully remove the valve core using the tool. The key here is to minimize refrigerant loss! If your tool allows, close off the valve to contain any remaining refrigerant in the tool itself.
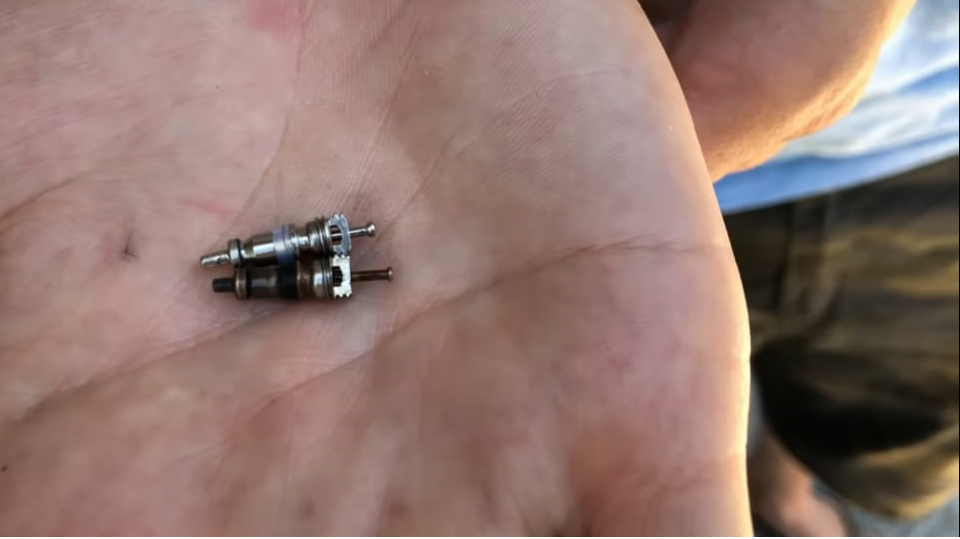
Step 4: Inspect the Valve Seat
Carefully inspect the valve seat inside the port for any damage or corrosion. If the valve seat is damaged, replacing just the core might not solve the problem. A professional might need to braze in a new access port.
Step 5: Install the New Schrader Valve Core
Carefully insert the new Schrader valve core into the tool. Following the tool's instructions, slowly and carefully install the new core into the access port. Ensure it is properly seated and tightened. Do not overtighten, as this can damage the new valve.
Step 6: Leak Test
Apply a soapy water solution to the valve area. If bubbles form, there is still a leak. Double-check the valve core is properly seated and tightened. If the leak persists, there may be damage to the valve seat, and you should consult a professional.
Step 7: Replace the Cap
Once you are satisfied there are no leaks, replace the cap on the Schrader valve access port. Tighten the cap securely.
Step 8: Repeat for Other Valves (If Necessary)
If you suspect other Schrader valves are leaking, repeat the process for those valves as well.
Step 9: Re-establish Power
Return to your breaker box and switch the breaker back on to restore power to the unit.
Step 10: Monitor Performance
Observe the AC unit's performance. It should start cooling effectively. Continue to monitor for any signs of refrigerant leaks or reduced cooling capacity over the next few days.
When to Call a Professional
While replacing a Schrader valve core can be a straightforward DIY task, certain situations require the expertise of a qualified HVAC technician:
- You are not comfortable working with refrigerant: Refrigerant can be dangerous, and improper handling can lead to injury.
- You don't have the proper tools: Using the wrong tools can damage the AC unit or cause refrigerant leaks.
- The valve seat is damaged: Replacing a damaged valve seat requires brazing, which requires specialized equipment and skills.
- The system has lost a significant amount of refrigerant: Adding refrigerant requires a license and specialized equipment.
- You suspect other problems with the AC unit: A faulty Schrader valve may be a symptom of a larger issue.
- If you are unsure about any of the steps: It's always best to err on the side of caution and consult a professional.
Refrigerant Handling and Environmental Considerations
Refrigerants are regulated substances due to their potential impact on the environment. It is illegal and harmful to intentionally release refrigerant into the atmosphere. Only licensed technicians are authorized to handle and dispose of refrigerant properly.
If you suspect a significant refrigerant leak, contact a professional immediately. They can recover the remaining refrigerant, repair the leak, and recharge the system safely and responsibly.
Preventative Maintenance
Regular maintenance can help prevent Schrader valve leaks and other AC problems. Consider these tips:
- Annual AC tune-up: Schedule an annual tune-up with a qualified HVAC technician. They can inspect the Schrader valves and other components for wear and tear.
- Clean the outdoor unit: Keep the outdoor unit free of debris, such as leaves, grass clippings, and dirt. This will improve airflow and reduce stress on the system.
- Change air filters regularly: Clogged air filters can restrict airflow and cause the AC unit to work harder, potentially leading to leaks and other problems.
Additional Tips for Success
- Take your time: Rushing the process can lead to mistakes.
- Follow instructions carefully: Read and understand the instructions for your Schrader valve core removal tool before you begin.
- Double-check your work: After completing the repair, double-check for leaks.
- Keep records: Keep a record of the repairs you have made to your AC unit, including the date, the parts replaced, and any other relevant information.
Final Thoughts
Replacing an AC Schrader valve core can be a relatively simple repair that homeowners can often tackle themselves, especially if using a non-refrigerant-releasing tool. By following these steps and taking the necessary safety precautions, you can potentially save money and restore your AC unit's cooling efficiency. However, it's crucial to recognize when a repair is beyond your capabilities and to consult a qualified HVAC technician. Remember, safety and environmental responsibility are paramount when working with air conditioning systems. If significant refrigerant loss is suspected, or you are not comfortable completing any of the steps, consult a professional immediately.