
How To Replace Pressure Regulator Valve

A pressure regulator valve (PRV) is a vital component in your plumbing system, ensuring consistent water pressure and protecting your pipes and appliances from damage caused by excessive pressure. Over time, PRVs can fail, leading to fluctuating water pressure, leaks, and potentially higher water bills. Replacing a faulty PRV is a manageable DIY project that can save you money on plumbing repairs and contribute to overall water conservation. This comprehensive guide provides step-by-step instructions and helpful tips for replacing a PRV, keeping your plumbing system healthy and efficient.
Understanding Pressure Regulator Valves
Before diving into the replacement process, it's crucial to understand the purpose and function of a PRV. Your municipal water supply often operates at high pressure, which can be damaging to household plumbing fixtures and appliances like dishwashers, washing machines, and water heaters. A PRV reduces this incoming pressure to a safe and consistent level, typically around 50-60 psi. Maintaining proper water pressure not only extends the lifespan of your plumbing system but also prevents water waste from leaky faucets and running toilets. Ignoring a failing PRV can lead to costly repairs and increased water bills.
Identifying a Failing Pressure Regulator Valve
Several telltale signs indicate that your PRV may need replacement. These include:
- Fluctuating Water Pressure: Inconsistent water pressure, varying from too high to too low, is a primary indicator.
- Water Hammer: Loud banging noises in your pipes when you turn off faucets can be a sign of excessive pressure.
- Leaks: Visible leaks around the PRV body or connections are a clear sign of valve failure.
- High Water Pressure Readings: Using a water pressure gauge attached to an outdoor faucet, check your water pressure. If it consistently exceeds 80 psi, your PRV may be malfunctioning.
- Increased Water Bills: Unexplained spikes in your water bill can be a result of leaks caused by excessive pressure.
If you observe any of these symptoms, it's essential to address the issue promptly to prevent further damage and conserve water. Regularly inspecting your PRV as part of a routine home maintenance schedule can help catch problems early on.
Tools and Materials Required
Before you begin the replacement process, gather the necessary tools and materials. Having everything on hand will ensure a smooth and efficient job.
- New Pressure Regulator Valve: Purchase a replacement PRV that matches the size and type of your existing valve. Check your local building codes for approved models.
- Pipe Wrench: Two pipe wrenches will be needed for removing and installing the PRV.
- Adjustable Wrench: An adjustable wrench can be used for tightening fittings.
- Pipe Cutter or Hacksaw: For cutting the water pipe if needed.
- Thread Sealant (Pipe Dope or Teflon Tape): To create a watertight seal on threaded connections.
- Sandpaper or Wire Brush: To clean pipe threads.
- Bucket and Towels: To catch any water spills.
- Screwdriver (Flathead and Phillips): Depending on the type of PRV and fittings.
- Water Pressure Gauge: To test the water pressure after installation.
Step-by-Step Replacement Guide
Follow these steps carefully to replace your pressure regulator valve safely and effectively.
Step 1: Shut Off the Water Supply
Locate the main water shut-off valve for your house and turn it off completely. This will prevent water from flowing into your plumbing system during the replacement process. Open a faucet at the lowest point in your house to relieve any remaining pressure in the pipes.
Step 2: Locate the Existing PRV
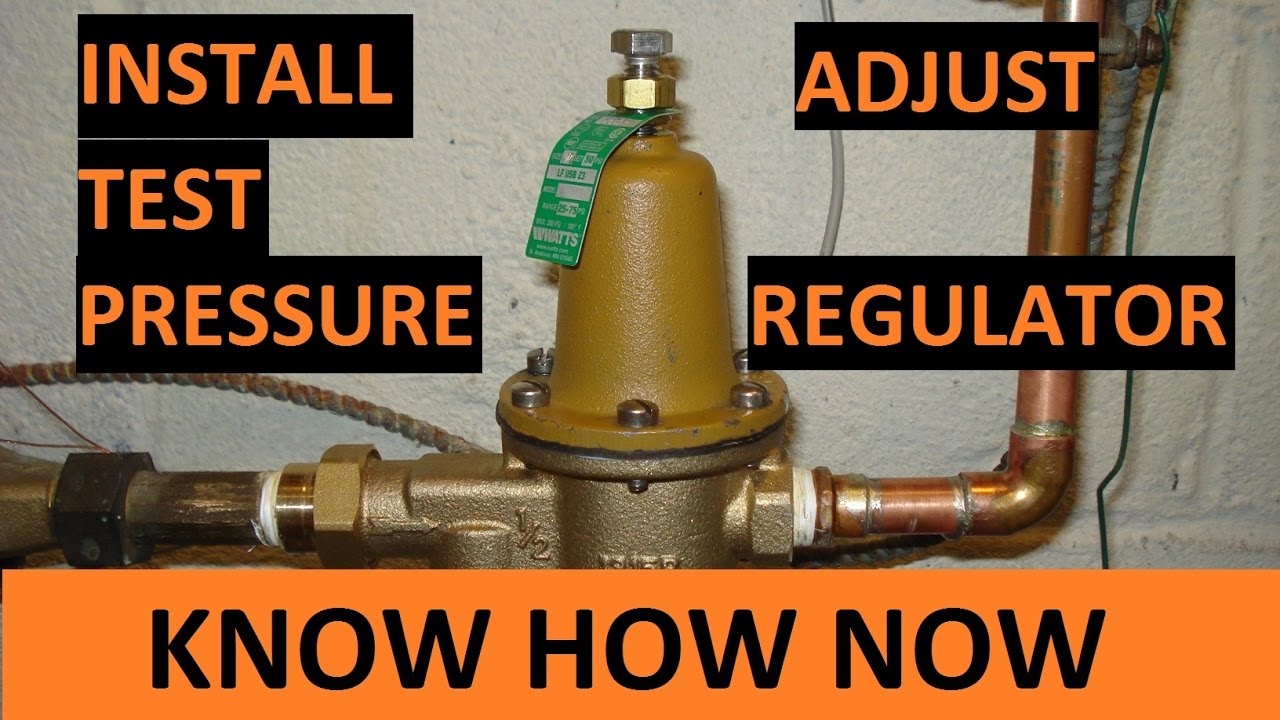
The PRV is typically located near the main water meter or where the water supply enters your house. It is often a bell-shaped valve with an adjustment screw on top.
Step 3: Disconnect the Old PRV
Using two pipe wrenches, grip the PRV and the adjacent pipe. Apply counter-pressure to prevent damage to the surrounding pipes. Slowly loosen and unscrew the connections on both sides of the PRV. Have a bucket and towels ready to catch any remaining water in the pipes.
Step 4: Clean the Pipe Threads
Use sandpaper or a wire brush to thoroughly clean the threads on the pipes where the new PRV will be connected. This will ensure a tight and leak-free seal.
Step 5: Apply Thread Sealant
Apply thread sealant (pipe dope or Teflon tape) to the male threads of the pipes. If using Teflon tape, wrap it clockwise around the threads several times. If using pipe dope, apply a liberal amount to the threads.
Step 6: Install the New PRV
Carefully align the new PRV with the pipes and hand-tighten the connections. Then, using two pipe wrenches, tighten the connections securely. Ensure that the PRV is installed in the correct direction, following the flow direction indicated on the valve body (usually an arrow).
Step 7: Slowly Turn on the Water Supply
Gradually turn on the main water shut-off valve, allowing water to slowly fill the pipes. This will help prevent water hammer and potential damage to the system.
Step 8: Check for Leaks
Inspect all connections for leaks. If you find any leaks, tighten the connections slightly. If the leaks persist, turn off the water supply, remove the PRV, reapply thread sealant, and reinstall the valve.
Step 9: Adjust the Water Pressure
Using a water pressure gauge attached to an outdoor faucet, check the water pressure. Adjust the PRV using the adjustment screw on top of the valve until the pressure reaches the desired level (typically 50-60 psi). Consult your local plumbing codes for recommended water pressure levels.
Step 10: Monitor the System
Monitor the system for a few days to ensure that there are no leaks and that the water pressure remains stable. Listen for any unusual noises, such as water hammer, which could indicate an issue.
Choosing the Right Pressure Regulator Valve
Selecting the correct PRV is crucial for optimal performance and longevity. Consider the following factors when choosing a replacement valve:
- Size: Match the size of the new PRV to the existing pipe size. Common sizes are 3/4 inch and 1 inch.
- Type: Choose a PRV made from durable materials such as brass or stainless steel. Lead-free brass is recommended for potable water systems.
- Pressure Range: Select a PRV with an adjustable pressure range that suits your needs.
- Brand Reputation: Opt for reputable brands known for quality and reliability, like Watts, Honeywell, or Zurn.
Integrating with Smart Home Systems
Consider integrating your plumbing system with smart home technology for enhanced monitoring and control. Smart water leak detectors can be installed near the PRV and other critical plumbing points to detect leaks early on and prevent water damage. Some advanced systems even allow you to remotely shut off the water supply in case of a leak. Integrating these technologies can lead to significant water savings and reduced energy bills.
Furthermore, connecting your water monitoring system to a smart thermostat can optimize your water heating efficiency. The thermostat can adjust the water heater temperature based on usage patterns, reducing standby heat loss and saving energy. Companies like Nest and Ecobee offer smart thermostats that integrate with various water monitoring systems.
ROI and Energy Savings
Replacing a faulty PRV offers several financial and environmental benefits:
- Reduced Water Bills: Preventing leaks and maintaining optimal water pressure can significantly lower your water consumption and reduce your monthly bills.
- Extended Appliance Lifespan: Consistent water pressure protects your appliances from damage, extending their lifespan and saving you on replacement costs.
- Energy Savings: By preventing leaks and optimizing water pressure, you can reduce the energy required to heat water, resulting in lower energy bills.
- Property Value: A well-maintained plumbing system enhances the value of your home and makes it more attractive to potential buyers.
While the initial cost of a PRV replacement may seem daunting, the long-term savings and benefits far outweigh the expense. The payback period for a PRV replacement is typically less than a year, depending on the extent of the water wastage and the cost of water in your area. Many utility companies offer rebates for water-saving devices, including PRVs, further reducing the upfront cost.
Professional Installation vs. DIY
While replacing a PRV is a manageable DIY project for many homeowners, it's essential to assess your skills and comfort level before attempting the job. If you're not comfortable working with plumbing or have limited experience, it's best to hire a licensed plumber. A professional plumber can ensure that the PRV is installed correctly and in compliance with local building codes. They can also identify and address any underlying plumbing issues that may be contributing to the problem.
However, if you're confident in your abilities, replacing the PRV yourself can save you money on labor costs. Just be sure to follow the steps carefully and take all necessary safety precautions. Remember to consult your local building codes before starting the project.
Maintenance Tips for a Long-Lasting PRV
To ensure the longevity and optimal performance of your PRV, follow these maintenance tips:
- Regular Inspections: Inspect the PRV regularly for leaks or signs of corrosion.
- Pressure Testing: Periodically test the water pressure to ensure that the PRV is maintaining the desired level.
- Sediment Flushing: If your water supply is prone to sediment buildup, consider installing a sediment filter upstream of the PRV.
- Professional Servicing: Schedule a professional plumbing inspection every few years to identify and address any potential issues before they become major problems.
By following these maintenance tips, you can extend the lifespan of your PRV and ensure that your plumbing system operates efficiently and reliably. Regular maintenance not only saves you money on repairs but also contributes to water conservation and environmental sustainability. Furthermore, consider looking into Energy Star guidelines for water heaters and plumbing fixtures to ensure you're using the most efficient options available.


:max_bytes(150000):strip_icc()/Water-pressure-regulator-2718696_color-8cb88034226e4c43aae61588c648e23f.jpg)
