How To Size A Capacitor For A Compressor

Is your air conditioner struggling to start, humming loudly, or simply not cooling your home effectively? One common culprit behind these frustrating heating and cooling issues is a faulty or incorrectly sized capacitor. A capacitor is an essential electrical component that gives your compressor the jolt it needs to start and run efficiently. When it fails or isn’t the right size, your system will struggle, leading to poor performance and potentially expensive repairs.
This guide provides a step-by-step approach to troubleshooting capacitor issues in your AC compressor. We’ll cover how to diagnose the problem and, if appropriate, how to determine the correct capacitor size for your system. Remember, working with electricity can be dangerous. Safety is paramount. If you're uncomfortable with any of these steps, or if you encounter any complications, always call a qualified HVAC technician.
Troubleshooting: Is Your Capacitor the Problem?
Before diving into sizing a new capacitor, let's confirm that the capacitor is indeed the source of your AC woes. Here’s a systematic way to diagnose the issue:
Step 1: Initial Observations (No Tools Required)
Start with a visual inspection and listen carefully to your AC unit's behavior.
- Is the fan running outside? If the fan isn't running while the compressor is trying to start, it might indicate a capacitor issue or a problem with the fan motor itself.
- Is the compressor humming loudly but failing to start? A persistent hum often suggests the compressor is trying to start but lacking the necessary power boost from the capacitor.
- Is the AC unit cycling on and off rapidly (short cycling)? Short cycling can damage your compressor and indicates an underlying issue, possibly related to the capacitor.
- Is the air coming from the vents warm instead of cold? While many things can cause warm air, a failing capacitor preventing the compressor from starting is a likely candidate.
- Listen for a clicking sound. Some failing capacitors make a distinct clicking sound as they repeatedly attempt to energize the compressor.
These observations, though simple, can provide valuable clues about the potential cause of your AC problems.
Step 2: Visual Inspection of the Capacitor (Power Off!)
Important Safety Note: Before proceeding, TURN OFF the power to your AC unit at the breaker box. Double-check that the power is off by attempting to turn on the AC unit at the thermostat. Wait a few minutes to ensure all capacitors are fully discharged.
Now, carefully open the access panel to the outdoor unit. Inside, you'll find the capacitor(s). Look for these signs of capacitor failure:
- Bulging or rounded top/bottom: A healthy capacitor has a flat top and bottom. A bulging or rounded shape is a clear indication of failure.
- Leaks: Look for signs of oil or other fluid leaking from the capacitor. This is a telltale sign that it has failed.
- Rust or corrosion: Corrosion around the terminals or on the capacitor body can indicate damage.
- Physical damage: Any cracks, dents, or other physical damage to the capacitor's casing is a cause for concern.
If you see any of these signs, the capacitor is likely the problem and needs to be replaced. Do not touch any internal components, even with the power off, as capacitors can store a dangerous electrical charge.
Step 3: Testing the Capacitor with a Multimeter (Requires Equipment and Knowledge)
This step requires a multimeter capable of measuring capacitance and basic knowledge of electrical safety. If you're not comfortable using a multimeter, please consult an HVAC professional.
A multimeter can provide a more definitive diagnosis. Here’s how to test the capacitor:
- Safely Discharge the Capacitor: Even with the power off, capacitors can retain a charge. Use a screwdriver with an insulated handle to carefully short the terminals of the capacitor. Touch both terminals simultaneously. This discharges any remaining energy. Exercise extreme caution.
- Disconnect the Wires: Carefully disconnect the wires connected to the capacitor terminals. Take a picture or draw a diagram of the wiring configuration before disconnecting anything. This is crucial for proper reassembly.
- Set Your Multimeter: Set your multimeter to the capacitance (Farad - μF or mfd) setting. The symbol usually looks like this: "F" or "μF."
- Connect the Probes: Connect the multimeter probes to the capacitor terminals. It doesn't matter which probe goes to which terminal.
- Read the Measurement: Observe the capacitance reading on the multimeter.
- Compare to Rating: Compare the measured capacitance to the capacitor's rated capacitance, which is printed on the capacitor label. A healthy capacitor will typically be within +/- 5-10% of its rated value. If the reading is significantly lower (e.g., more than 10% below the rated value) or zero, the capacitor is likely faulty.
If the capacitor fails this test, it needs to be replaced.
When to Call a Professional
While some capacitor issues can be resolved with DIY solutions, certain situations require the expertise of a qualified HVAC technician:
- If you're uncomfortable working with electricity.
- If you suspect a more complex problem beyond a simple capacitor failure (e.g., compressor failure, refrigerant leak).
- If you're unsure about the correct capacitor replacement procedure.
- If you've replaced the capacitor and the problem persists.
- If you find any signs of burnt wires or components.
Attempting repairs beyond your skill level can be dangerous and can potentially damage your equipment further. Err on the side of caution and seek professional assistance when needed.
Sizing a Capacitor for a Compressor
If you've determined that your capacitor needs replacing, it's crucial to select the correct size. Using the wrong capacitor can damage your compressor and void your warranty.
Step 1: Locate the Existing Capacitor's Specifications
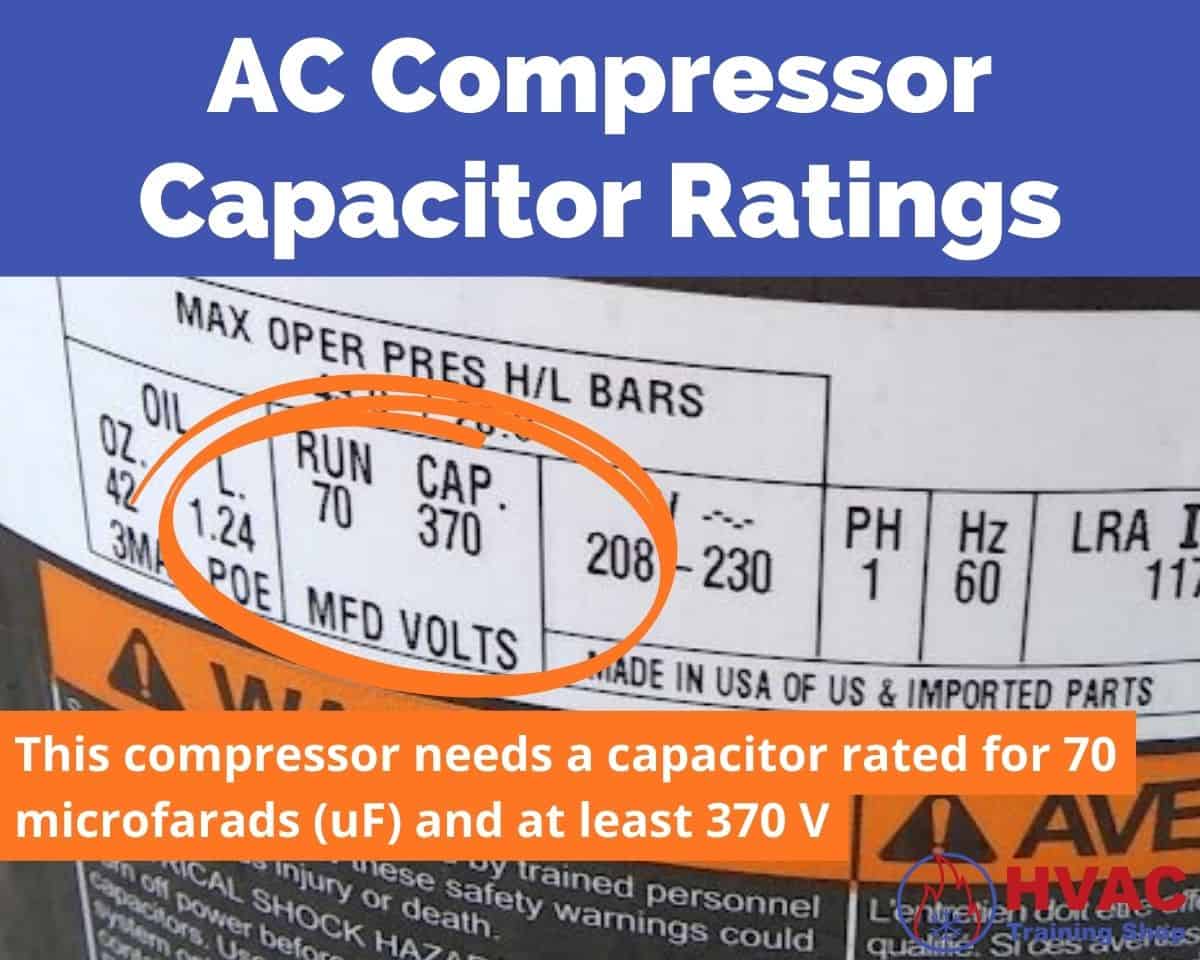
The easiest and most reliable way to determine the correct capacitor size is to simply read the information printed on the existing capacitor. Look for these key specifications:
- Capacitance (μF or mfd): This is the most critical value, measured in microfarads (μF) or sometimes abbreviated as mfd. For example, "45 + 5 μF" indicates a dual capacitor with a 45 μF rating for the compressor and a 5 μF rating for the fan motor.
- Voltage (VAC): This indicates the capacitor's voltage rating. It's crucial to use a capacitor with a voltage rating equal to or higher than the original. Using a capacitor with a lower voltage rating can result in premature failure and potential hazards.
Write down these specifications. You'll need them when purchasing a replacement capacitor.
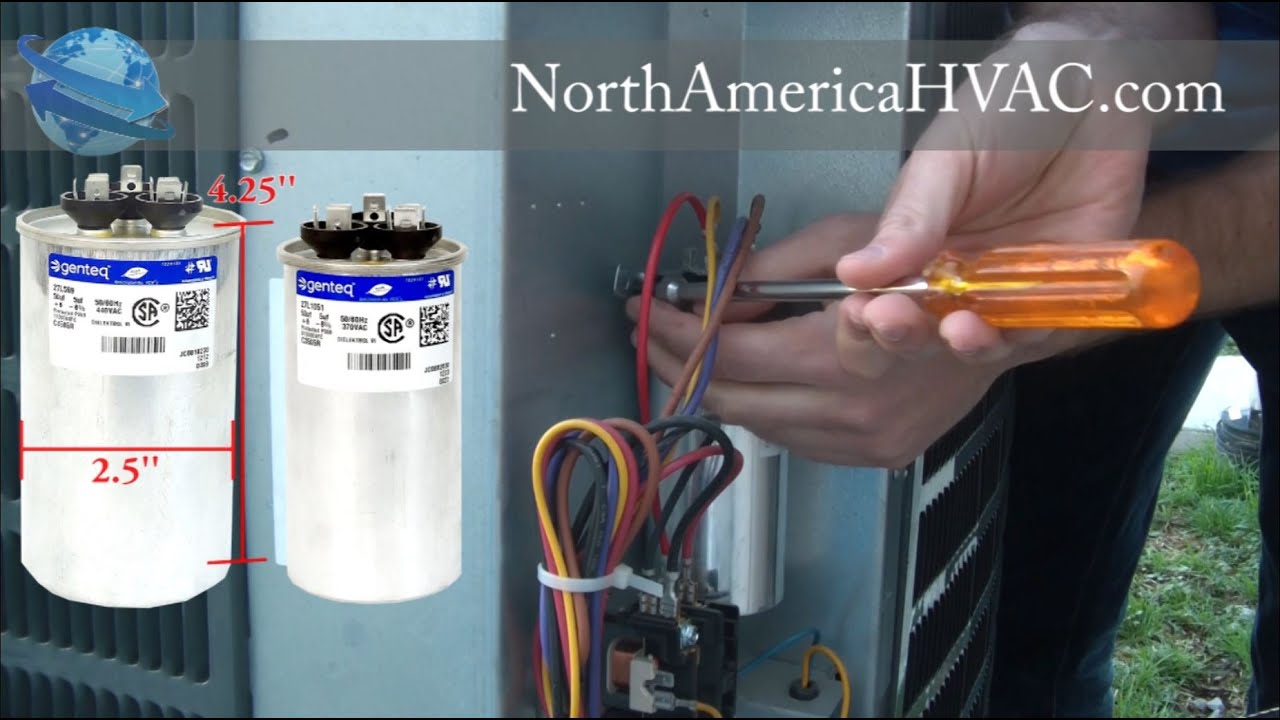
Step 2: Understanding Dual and Single Capacitors
AC units often use two types of capacitors:
- Single Capacitors: These have two terminals and are used solely for the compressor or the fan motor.
- Dual Capacitors: These have three terminals labeled "C" (Common), "H" (Hermetic, for the compressor), and "F" (Fan). Dual capacitors are used to simultaneously start and run both the compressor and the fan motor, saving space and cost.
Identify whether you need a single or dual capacitor based on the existing capacitor type.
Step 3: Cross-Referencing with the Compressor's Data Plate (If the Original Capacitor is Unreadable)
If the label on the existing capacitor is damaged or unreadable, you may be able to find the required capacitance on the compressor's data plate. The data plate is usually a small metal tag attached to the compressor itself. Look for information like “Running Amps” and “Locked Rotor Amps”. This method is more involved, and it's best to consult with an HVAC technician if you're not comfortable interpreting the data plate information.
The data plate might not explicitly state the capacitor size, but it will often list the compressor's Running Load Amps (RLA) and Locked Rotor Amps (LRA). You can use these values to estimate the required capacitance using the following (simplified) rule of thumb, but always verify with a professional before making a purchase!
Important Disclaimer: This is an approximation and should be confirmed by a qualified technician!
Approximate Formula: Capacitance (μF) ≈ (LRA / VAC) * a constant (typically 2650).
For example, if the LRA is 80 Amps and the Voltage is 240 VAC, then:
Capacitance ≈ (80 / 240) * 2650 ≈ 883 μF
Again, this is just a rough estimate and should NOT be used as the sole basis for selecting a capacitor. Always consult with an HVAC professional to ensure proper sizing.
Step 4: Choosing a Replacement Capacitor
When purchasing a replacement capacitor, keep the following in mind:
- Match the Capacitance: The most important factor is matching the capacitance (μF) of the original capacitor. Using a capacitor with a significantly different capacitance can damage your compressor.
- Voltage Rating: Choose a capacitor with a voltage rating equal to or higher than the original. Never use a capacitor with a lower voltage rating.
- Type (Single or Dual): Select the correct type of capacitor (single or dual) based on your system's requirements.
- Quality: Opt for a reputable brand known for producing high-quality capacitors. Avoid cheap, generic capacitors, as they may fail prematurely.
Where to Buy: You can purchase replacement capacitors from HVAC supply stores, electrical supply stores, and online retailers. Make sure to purchase from a reputable source to ensure you're getting a quality product.
Replacing the Capacitor (Proceed with Caution!)
Before proceeding, ensure that you have turned off the power to your AC unit at the breaker box and that the capacitor is fully discharged.
- Take a Picture: Before disconnecting any wires, take a clear picture or draw a detailed diagram of the wiring configuration. This will be invaluable when reconnecting the wires.
- Disconnect the Wires: Carefully disconnect the wires from the capacitor terminals. Use needle-nose pliers to grip the terminals firmly.
- Remove the Old Capacitor: Loosen any mounting brackets or straps holding the old capacitor in place and remove it.
- Install the New Capacitor: Secure the new capacitor in the same location and using the same mounting hardware as the old capacitor.
- Reconnect the Wires: Carefully reconnect the wires to the corresponding terminals on the new capacitor, following your picture or diagram. Ensure that the wires are securely connected and that there are no loose connections.
- Double-Check: Double-check your wiring to ensure that everything is connected correctly.
- Restore Power: Replace the access panel and turn the power back on at the breaker box.
- Test the System: Turn on your AC unit and observe its operation. Listen for any unusual noises and monitor the air temperature to ensure that it's cooling properly.
If the AC unit still fails to start or if you notice any problems, turn off the power immediately and consult an HVAC professional.
Conclusion
Troubleshooting and sizing a capacitor for your AC compressor can be a manageable DIY project, provided you follow safety precautions and have a basic understanding of electrical components. By carefully diagnosing the problem, identifying the correct capacitor size, and following the replacement procedure, you can potentially save money and restore your AC unit to optimal performance. However, remember that safety is paramount. If you're uncomfortable with any of these steps, or if you encounter any complications, always consult a qualified HVAC technician. Ignoring electrical safety can lead to serious injury or even death.