How To Size A Mini Split System
Switching to a mini-split system, also known as a ductless mini-split, can significantly lower your energy bills while providing targeted heating and cooling. But selecting the right size unit is crucial for optimal performance and efficiency. An oversized unit cycles on and off too frequently, wasting energy and reducing dehumidification. An undersized unit struggles to maintain temperature, leading to discomfort and increased energy consumption. This comprehensive guide will walk you through the process of accurately sizing a mini-split system for your home or business, ensuring maximum energy savings and comfort.
Understanding Mini-Split Systems
Mini-splits consist of two main components: an outdoor compressor/condenser and one or more indoor air-handling units. These units are connected by refrigerant lines and electrical wiring, eliminating the need for ductwork. This ductless design offers several advantages, including:
- Improved Energy Efficiency: Ductwork can leak up to 30% of conditioned air. Mini-splits eliminate these losses, leading to significant energy savings.
- Zoned Cooling and Heating: Each indoor unit can be controlled independently, allowing you to heat or cool specific zones of your home or office. This feature is particularly beneficial for rooms that are rarely used or have varying temperature needs.
- Easy Installation: Installing a mini-split is generally simpler and less disruptive than installing a traditional ducted system, making it a good choice for retrofits and additions.
- Quiet Operation: Mini-split systems are known for their quiet operation, both indoors and outdoors.
The Importance of Proper Sizing
Properly sizing a mini-split system is paramount for achieving its potential energy savings and comfort benefits. As mentioned, an incorrectly sized unit can lead to several problems:
- Oversized Units: Short cycling (frequent on/off cycles) reduces efficiency, wastes energy, and can lead to uneven temperature distribution and poor dehumidification. It also puts unnecessary wear and tear on the compressor, shortening its lifespan.
- Undersized Units: Inability to maintain desired temperature, especially during extreme weather conditions. This results in increased energy consumption as the system works overtime. It can also lead to premature failure due to constant strain.
Step-by-Step Guide to Sizing a Mini-Split System
Here's a detailed guide to accurately sizing your mini-split system:
Step 1: Calculate the Cooling Load (BTUs)
The first and most critical step is to determine the cooling load, measured in British Thermal Units (BTUs). This represents the amount of heat that needs to be removed from a space to maintain a comfortable temperature. There are several methods for calculating the cooling load:
- Manual J Calculation: This is the most accurate method and is recommended by HVAC professionals. It takes into account various factors, including:
- Square footage of the area: Measure the length and width of each room or zone you want to cool or heat.
- Climate zone: Your location's climate significantly impacts the cooling load. Consult a climate zone map or your local weather data.
- Insulation levels: The better the insulation, the lower the cooling load. Consider wall, ceiling, and floor insulation.
- Window size and type: Large windows and single-pane windows increase heat gain. Note the dimensions and type of glazing.
- Number of occupants: Each person generates heat. Estimate the average number of people occupying the space.
- Lighting and appliances: Heat generated by lighting (especially incandescent bulbs) and appliances contributes to the cooling load.
- Orientation of the building: South-facing walls receive more direct sunlight and generate more heat.
- Air Leakage: Air leaks increase the cooling load by allowing outside air in and conditioned air out.
While a professional HVAC contractor typically performs a Manual J calculation, there are online calculators available to give you a rough estimate. However, for accurate sizing, a professional assessment is highly recommended.
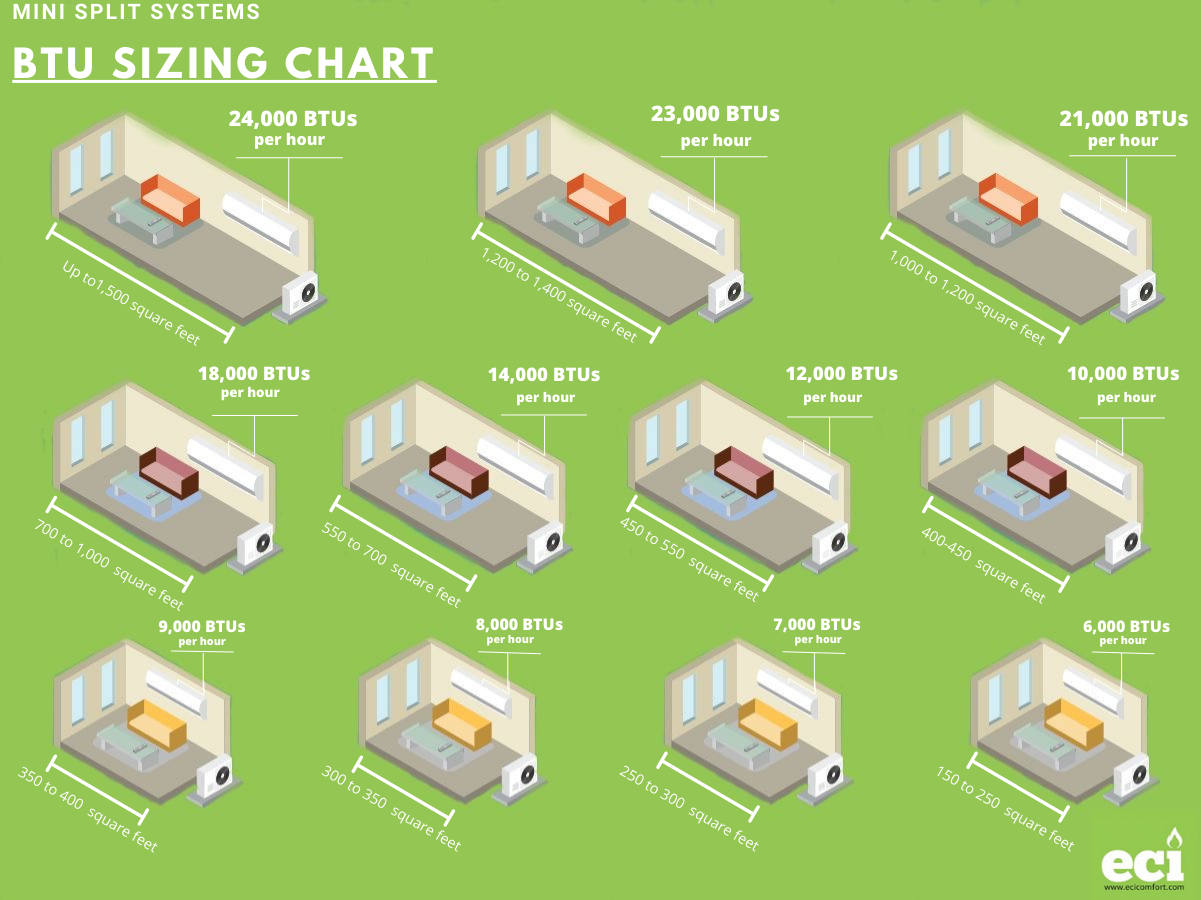
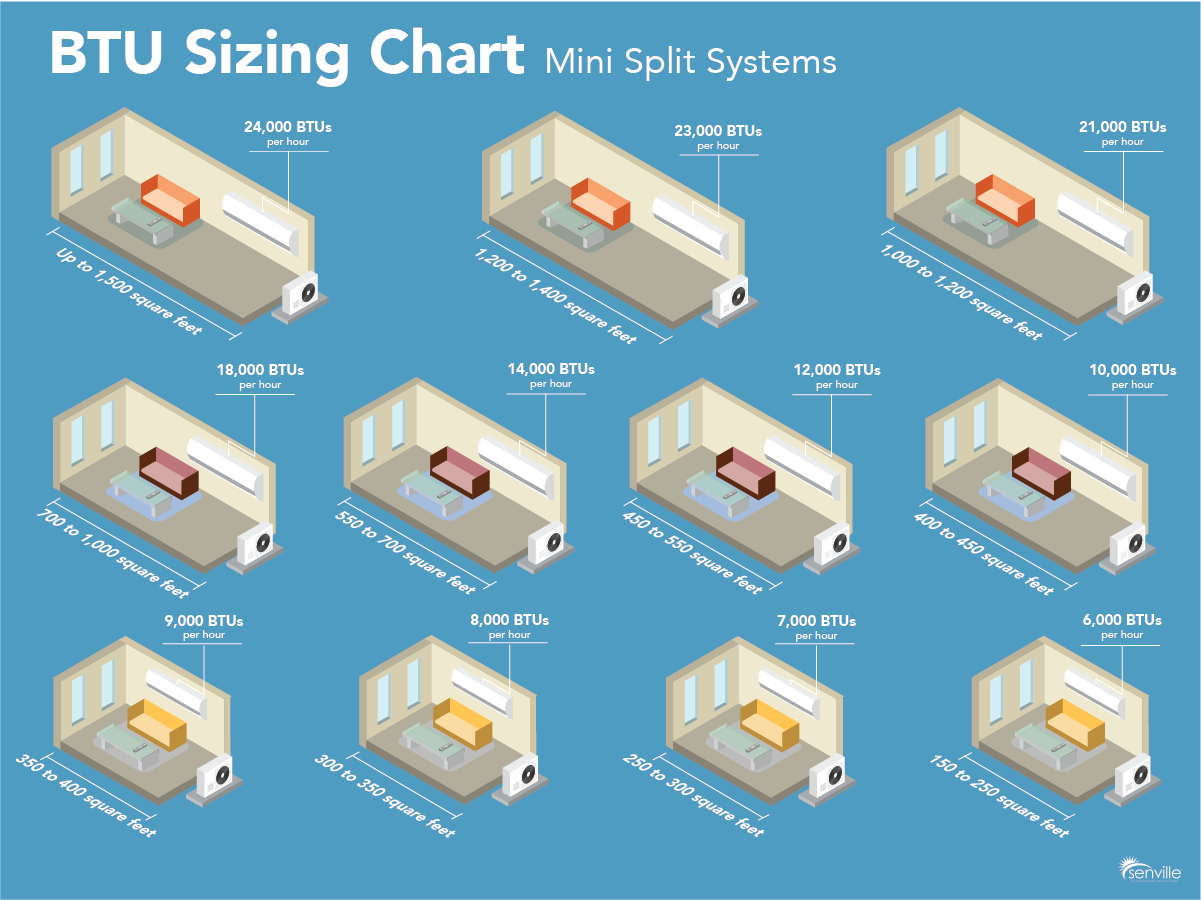
- Square Footage Method (Rule of Thumb): This is a simplified method, but it can provide a starting point. Generally, you need approximately 20 BTUs per square foot. For example, a 200-square-foot room would require a 4,000 BTU mini-split unit (200 sq ft x 20 BTU/sq ft = 4,000 BTU).
Important Considerations: Adjust the BTU requirement based on the following factors:
- Sunny Room: Add 10% to the BTU requirement.
- Shady Room: Subtract 10% from the BTU requirement.
- Poor Insulation: Add 10% to 20% to the BTU requirement.
- High Ceilings (over 8 feet): Add 10% to 15% to the BTU requirement.
- Kitchen: Add 4,000 BTUs.
Step 2: Determine the Heating Load (BTUs)
In addition to cooling, many mini-split systems also provide heating. The heating load represents the amount of heat needed to maintain a comfortable temperature during the colder months. The Manual J calculation also considers heating load factors.
For a rough estimate, you can use the same square footage method, but be mindful of factors like:
- Climate: Colder climates require higher BTU output for heating.
- Insulation: Adequate insulation minimizes heat loss and reduces the heating load.
- Window Efficiency: Energy-efficient windows reduce heat loss.
Step 3: Select the Right Mini-Split Unit(s)
Once you've determined the cooling and heating loads, you can select the appropriate mini-split unit(s). Here are some key considerations:
- BTU Capacity: Choose a unit with a BTU rating that closely matches your calculated cooling and heating loads. It's generally better to slightly undersize than to significantly oversize.
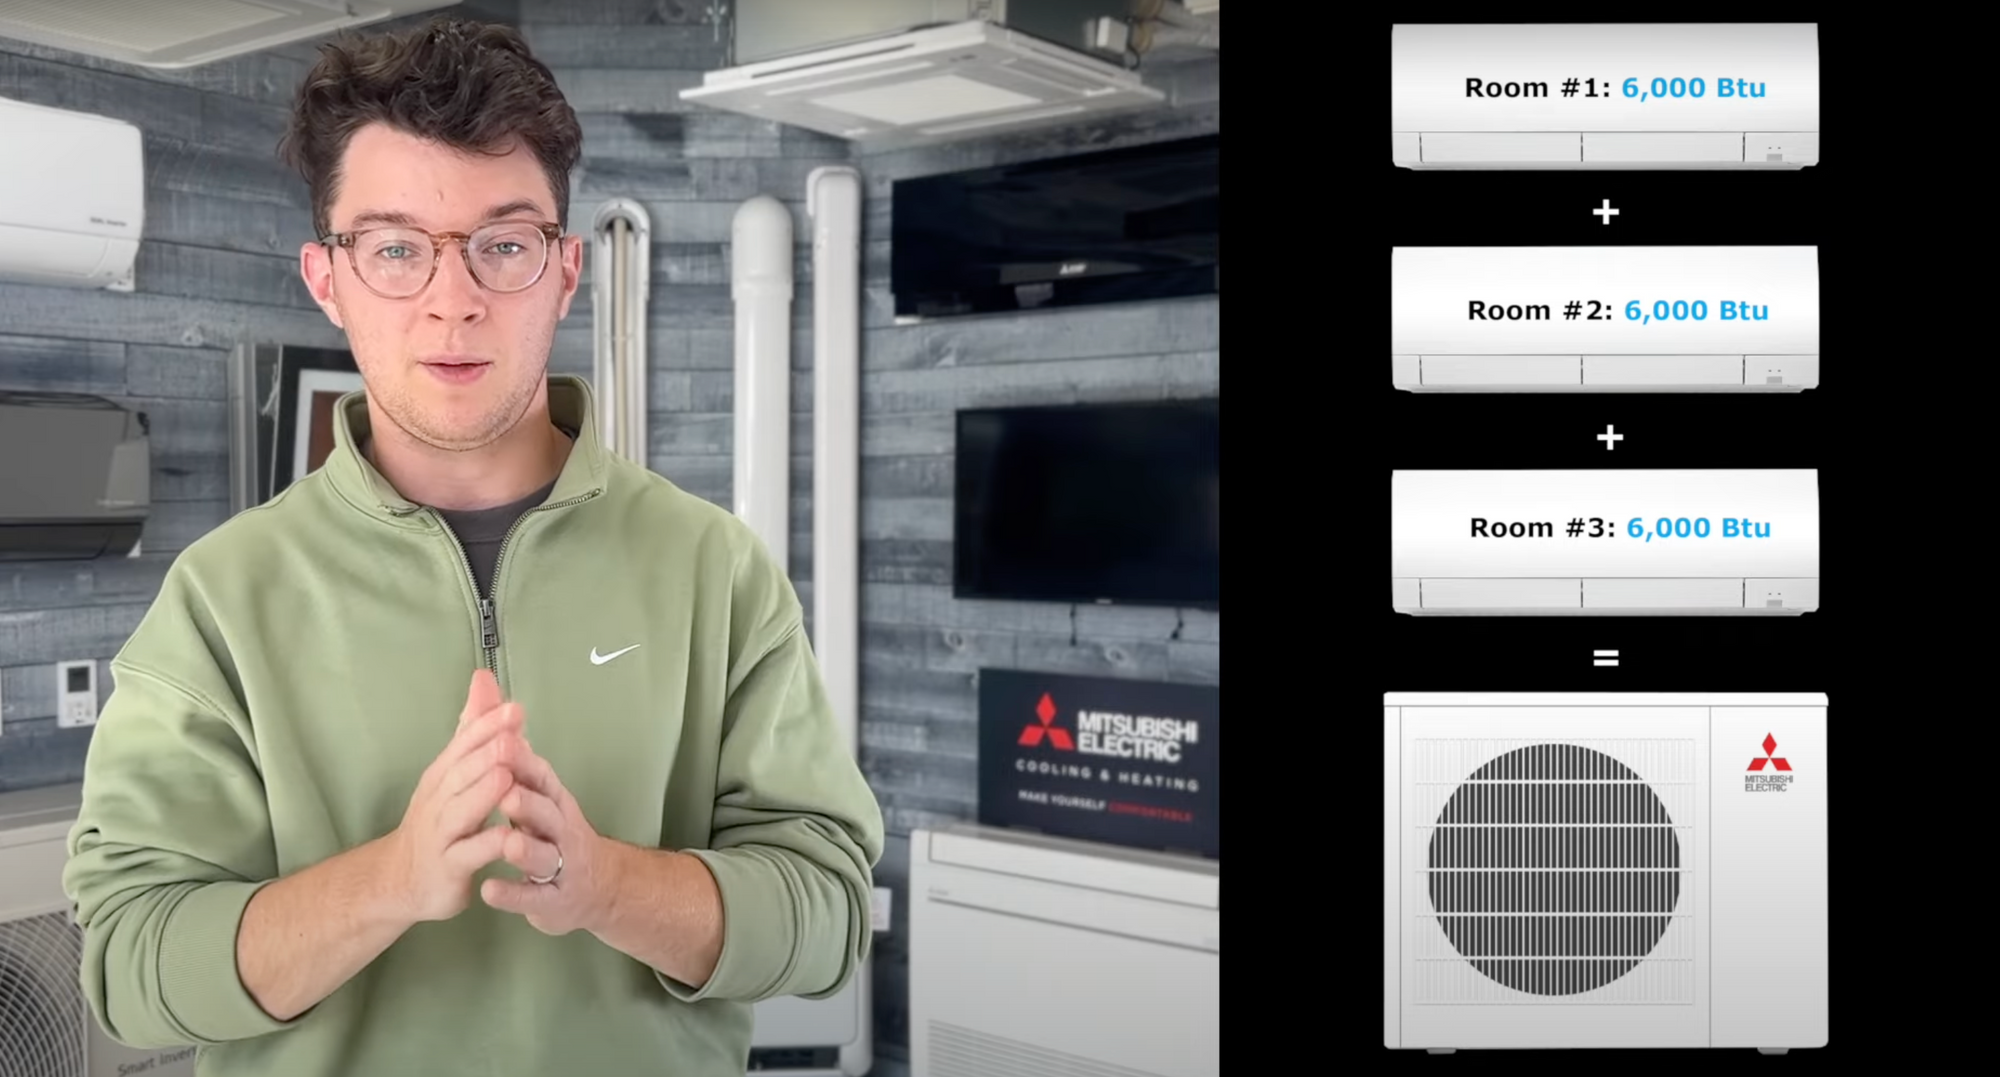
- Single-Zone vs. Multi-Zone Systems:
- Single-Zone: One outdoor unit connected to one indoor unit. Suitable for cooling or heating a single room or zone.
- Multi-Zone: One outdoor unit connected to multiple indoor units. Ideal for cooling or heating multiple rooms or zones.
- Energy Efficiency (SEER and HSPF): Look for units with high Seasonal Energy Efficiency Ratio (SEER) for cooling and Heating Season Performance Factor (HSPF) for heating. These ratings indicate the unit's energy efficiency. Energy Star certified models offer the best efficiency.
- Smart Features: Consider units with smart features like Wi-Fi connectivity, smart thermostat compatibility, and occupancy sensors. These features allow for remote control, automated scheduling, and energy optimization. Smart thermostats can learn your preferences and adjust the temperature accordingly, further reducing energy consumption.
- Rebates and Incentives: Check for local, state, and federal rebates and incentives for installing energy-efficient mini-split systems. These rebates can significantly reduce the upfront cost. Many utility companies offer rebates for Energy Star certified appliances.
Step 4: Professional Installation
Proper installation is crucial for the performance and longevity of your mini-split system. Hiring a qualified HVAC contractor ensures that the unit is installed correctly, the refrigerant lines are properly sealed, and the system is operating at peak efficiency.
Finding a Qualified Contractor:
- Check for licenses and certifications: Ensure the contractor is licensed and certified to install mini-split systems in your area.
- Read online reviews: Check online reviews and testimonials to gauge the contractor's reputation and quality of work.
- Get multiple quotes: Obtain quotes from several contractors to compare prices and services.
- Ask for references: Request references from previous customers to assess the contractor's reliability and workmanship.
ROI and Energy Savings
Investing in a properly sized and installed mini-split system can provide significant returns in the form of energy savings and increased comfort. While the initial cost may be higher than traditional window units, the long-term energy savings can quickly offset the investment.
Factors Affecting ROI:
- Climate: The more extreme the climate, the greater the energy savings.
- Energy Rates: Higher energy rates translate to faster ROI.
- Usage Patterns: Frequent use of the mini-split system maximizes energy savings.
- Rebates and Incentives: Rebates reduce the upfront cost and shorten the payback period.
Example: A homeowner in a moderate climate replaces inefficient window AC units with a properly sized mini-split system. The mini-split consumes 40% less energy than the window units. Over five years, the homeowner saves $500 annually on energy bills, resulting in a total savings of $2,500. After accounting for the initial investment and potential rebates, the homeowner achieves a positive ROI within a few years.
Smart Home Integration
Integrating your mini-split system with a smart home ecosystem can further enhance its efficiency and convenience. Smart thermostats, occupancy sensors, and voice control can automate temperature adjustments and optimize energy consumption.
Benefits of Smart Home Integration:
- Remote Control: Control your mini-split from anywhere using your smartphone or tablet.
- Automated Scheduling: Create custom schedules to automatically adjust the temperature based on your needs.
- Occupancy Sensing: Detect when a room is occupied and adjust the temperature accordingly, saving energy when the room is empty.
- Voice Control: Control your mini-split using voice commands through virtual assistants like Amazon Alexa or Google Assistant.
- Energy Monitoring: Track your energy consumption and identify opportunities for further optimization.
Conclusion
Properly sizing a mini-split system is an essential step in maximizing its energy efficiency and comfort benefits. By following the steps outlined in this guide, you can ensure that you select the right size unit for your specific needs and climate. Remember to consult with a qualified HVAC contractor for accurate load calculations and professional installation. With a properly sized and installed mini-split system, you can enjoy significant energy savings, improved comfort, and a positive return on investment.