How To Snap Stove Pipe Together

Snapping Stove Pipe Together: A Comprehensive Guide
Installing or replacing a stove pipe, whether for a wood stove, pellet stove, or other heating appliance, requires careful attention to detail. A properly installed stove pipe ensures safe and efficient venting of combustion byproducts. One of the key steps in this process is correctly connecting the sections of stove pipe. This guide will walk you through the process of snapping stove pipe together, covering essential techniques, safety precautions, and troubleshooting tips.
Understanding Stove Pipe Connections
Stove pipes are designed with a crimped end and a non-crimped end. The crimped end is slightly narrower, allowing it to slide *inside* the non-crimped end of the adjacent pipe section. This overlapping design ensures that creosote and other combustion byproducts flow downwards, preventing leaks and potential hazards.
Key Concept: The crimped end always points *downwards* towards the appliance (stove) and away from the chimney. This arrangement allows condensation and creosote to flow back into the stove for burning, rather than leaking onto the floor or accumulating in the pipe.
Tools and Materials You'll Need
Before you begin, gather the necessary tools and materials:
- Stove pipe sections (ensure they are the correct diameter and material for your appliance)
- Gloves (heat-resistant work gloves)
- Measuring tape
- Pencil or marker
- Crimper tool (if you need to adjust the crimp)
- Stove pipe thermometer (optional, but recommended for monitoring flue temperatures)
- Silicone sealant or high-temperature tape (check your local codes and appliance manufacturer's recommendations)
- Screws or rivets (if required by the pipe type or local codes)
- Drill and screwdriver/rivet gun (if using screws or rivets)
- Safety glasses
Step-by-Step Guide to Snapping Stove Pipe Together
- Preparation: Begin by laying out the stove pipe sections in the order they will be installed. This helps visualize the process and ensures you have all the necessary components. Ensure that the crimped end is always pointing down.
- Test Fit: Before applying sealant or fasteners, test fit each section to ensure a proper and snug connection. Slide the crimped end of one pipe section into the non-crimped end of the next. You should feel a secure fit, but not an excessively tight one.
- Adjusting the Crimp (If Necessary): If the crimped end is too wide or damaged, it may not slide easily into the non-crimped end. Use a crimper tool to gently re-crimp the end. Be careful not to over-crimp, as this can make the connection too tight.
- Applying Sealant or Tape: Depending on the type of stove pipe and local building codes, you may need to apply a high-temperature silicone sealant or tape to the joints. If using sealant, apply a thin, even bead around the inside of the non-crimped end. If using tape, wrap it securely around the joint after the pipes are connected. Always refer to the manufacturer's recommendations.
- Connecting the Sections: Carefully slide the crimped end of one pipe section into the non-crimped end of the next, ensuring a tight and secure fit. If using sealant, wipe away any excess immediately.
- Securing the Joints (If Required): Some stove pipes require mechanical fasteners, such as screws or rivets, to secure the joints. If this is the case, drill pilot holes (if necessary) and install the screws or rivets according to the manufacturer's instructions. Make sure the fasteners are properly tightened to prevent leaks.
- Connecting to the Appliance: The first section of stove pipe connects to the flue outlet on the stove. Ensure this connection is secure and sealed according to the stove manufacturer's instructions. Often, this involves a stove adapter.
- Connecting to the Chimney: The final section of stove pipe connects to the chimney. This connection is critical and must be done properly to prevent backdrafts and ensure safe venting. Use a proper chimney connector, and follow all local building codes.
- Inspection: Once all the sections are connected, carefully inspect the entire stove pipe system for any gaps, leaks, or loose connections. Make any necessary adjustments to ensure a tight and secure installation.
Safety Precautions
- Wear Safety Glasses: Protect your eyes from debris and sharp edges.
- Wear Heat-Resistant Gloves: Stove pipes can become hot quickly, even when the appliance is not in use.
- Work in a Well-Ventilated Area: When using sealants or solvents, work in a well-ventilated area to avoid inhaling harmful fumes.
- Follow Manufacturer's Instructions: Always refer to the manufacturer's instructions for your specific stove pipe and appliance.
- Consult Local Building Codes: Ensure your installation complies with all local building codes and regulations.
- Annual Inspection: Have your stove pipe and chimney inspected annually by a qualified professional.
Troubleshooting Common Issues
Tight Connections: If the crimped end is difficult to insert, ensure it is properly crimped and that there are no burrs or imperfections. You can also try lightly lubricating the crimped end with a small amount of graphite or stove polish. However, avoid using flammable lubricants.
Loose Connections: If the connection is too loose, double-check that the crimped end is properly sized and that there are no gaps or distortions. If necessary, use a crimper tool to slightly tighten the crimp. If gaps persist, use high-temperature sealant or tape to ensure a tight seal.
Leaks: If you suspect a leak, carefully inspect all the joints and connections. Use a smoke test (with a professional present) to pinpoint the location of the leak. Address any leaks immediately to prevent carbon monoxide poisoning and fire hazards.
Choosing the Right Type of Stove Pipe
Stove pipes are available in various materials and thicknesses. Common materials include:
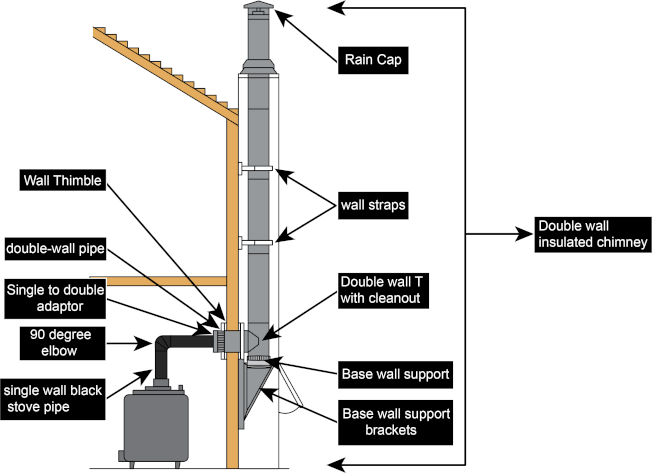
- Single-Wall Stove Pipe: Typically used for connecting the stove to the chimney. It's more affordable but radiates more heat and requires greater clearances from combustible materials.
- Double-Wall Stove Pipe: Offers better insulation and reduces clearances to combustible materials. It's generally safer and more efficient but more expensive than single-wall pipe. *Selkirk* is a popular brand for double-wall options.
- Black Stove Pipe: Common and affordable, made of steel.
- Stainless Steel Stove Pipe: More durable and corrosion-resistant, ideal for high-temperature applications.
Consider the following factors when choosing stove pipe:
- Appliance Type: Different appliances (wood stoves, pellet stoves, etc.) require different types of stove pipe. Refer to your appliance manufacturer's specifications.
- Local Building Codes: Building codes often specify the type and thickness of stove pipe required.
- Clearance to Combustibles: Choose a stove pipe with appropriate clearances to combustible materials to prevent fire hazards.
- Durability: Select a stove pipe that is durable and resistant to corrosion, especially if you live in a humid or coastal environment.
Maintenance and Inspection
Regular maintenance and inspection are crucial for ensuring the safe and efficient operation of your stove pipe system:
- Annual Inspection: Have your stove pipe and chimney inspected annually by a qualified professional.
- Cleaning: Clean the stove pipe regularly to remove creosote buildup. The frequency of cleaning depends on the type of fuel you burn and the usage of your appliance.
- Check for Corrosion: Inspect the stove pipe for signs of corrosion, rust, or damage. Replace any damaged sections immediately.
- Monitor Flue Temperatures: Use a stove pipe thermometer to monitor flue temperatures and ensure they are within the safe operating range.
Cost Considerations
The cost of stove pipe varies depending on the material, thickness, and length. Single-wall stove pipe is generally less expensive than double-wall stove pipe. Expect to pay anywhere from $20 to $100 per section, depending on the type and size. Installation costs can range from $100 to $500, depending on the complexity of the project.
Brands to Consider
Several reputable brands offer high-quality stove pipe, including:
- Selkirk: Known for their durable and reliable stove pipe systems, particularly their double-wall options.
- Duravent: Offers a wide range of stove pipe products, including single-wall, double-wall, and triple-wall options.
- Simpson Dura-Vent: Another well-respected brand known for their quality and performance.
When selecting a brand, consider factors such as warranty, customer reviews, and availability of replacement parts.
Conclusion
Snapping stove pipe together is a crucial step in ensuring the safe and efficient operation of your heating appliance. By following these guidelines, taking necessary safety precautions, and performing regular maintenance, you can enjoy a warm and worry-free heating season. Remember to always consult with a qualified professional if you have any questions or concerns about your stove pipe installation.